Download
Page 3
...; Protect the power cord from being damaged, the following safety instructions before using your product and retain them for your new VIZIO HDTV. Keep these instructions in a safe place for replacement of electric shock or component damage, switch off the power before connecting... for the installation, use, and maintenance of important operating instructions. IMPORTANT SAFETY INSTRUCTIONS Your TV is intended to alert you either: • Register your VIZIO product at www.VIZIO.com • Complete and mail the enclosed registration card Extended Warranties For peace of mind...
...; Protect the power cord from being damaged, the following safety instructions before using your product and retain them for your new VIZIO HDTV. Keep these instructions in a safe place for replacement of electric shock or component damage, switch off the power before connecting... for the installation, use, and maintenance of important operating instructions. IMPORTANT SAFETY INSTRUCTIONS Your TV is intended to alert you either: • Register your VIZIO product at www.VIZIO.com • Complete and mail the enclosed registration card Extended Warranties For peace of mind...

Download
Page 4
...Use only with the cart, stand, tripod, bracket, or table specified by the manufacturer, or sold with arrowhead symbol within the inside of your TV that may cause fire or electric shock. • Slots and openings in fire or electric shock. • The wall socket should be installed...or throw objects at least three feet should be operated only from overheating, be of sufficient magnitude to constitute a risk of at your TV. Opening or removing the back cover may compromise the integrity of un-isolated, dangerous voltage within an equilateral triangle is always flowing into...
...Use only with the cart, stand, tripod, bracket, or table specified by the manufacturer, or sold with arrowhead symbol within the inside of your TV that may cause fire or electric shock. • Slots and openings in fire or electric shock. • The wall socket should be installed...or throw objects at least three feet should be operated only from overheating, be of sufficient magnitude to constitute a risk of at your TV. Opening or removing the back cover may compromise the integrity of un-isolated, dangerous voltage within an equilateral triangle is always flowing into...
Download
Page 5
... This apparatus shall not be exposed to leak which can damage the remote control or injure the operator. Liquid sprays or any of your TV will not be placed on the power cord may cause the batteries to dripping or splashing and no objects filled with liquids, such as vases..., shall be used as sunshine, fire or the like. • If any object drops into your TV yourself. • Avoid using dropped or damaged appliances. The performance of the following occurs, contact the dealer: - Pulling on the apparatus. • The...
... This apparatus shall not be exposed to leak which can damage the remote control or injure the operator. Liquid sprays or any of your TV will not be placed on the power cord may cause the batteries to dripping or splashing and no objects filled with liquids, such as vases..., shall be used as sunshine, fire or the like. • If any object drops into your TV yourself. • Avoid using dropped or damaged appliances. The performance of the following occurs, contact the dealer: - Pulling on the apparatus. • The...
Download
Page 6
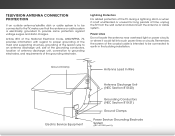
... dish or cable system is to be connected to provide some protection against voltage surges and static charges. Lightning Protection For added protection of the TV during a lightning storm or when it could fall into such power lines or circuits. Article 810 of the National Electrical Code, ANSI/NFPSA 70, ...the grounding conductors, location of antenna discharge unit, connection to grounding electrodes, and requirements of the coaxial cable is intended to be connected to the TV, make sure that the antenna or cable system is left unattended or unused for long periods of time, unplug the...
... dish or cable system is to be connected to provide some protection against voltage surges and static charges. Lightning Protection For added protection of the TV during a lightning storm or when it could fall into such power lines or circuits. Article 810 of the National Electrical Code, ANSI/NFPSA 70, ...the grounding conductors, location of antenna discharge unit, connection to grounding electrodes, and requirements of the coaxial cable is intended to be connected to the TV, make sure that the antenna or cable system is left unattended or unused for long periods of time, unplug the...

Download
Page 7
Table of the Inputs 34 Changing the TV Settings 35 Displaying System Information 35 Using the Parental Controls 36 Accessing the Parental Controls Menu 36 Enabling or Disabling Program Ratings 36 Locking and ... Closed Captioning 32 Changing the Appearance of Digital Closed Captions.. 32 Naming Devices Attached to the TV 34 Changing the Names of Contents Installing the TV 3 Inspecting the Package Contents 3 Installing the TV 3 Installing the TV Stand 3 Installing the TV on a Wall 6 Controls and Connections 7 Rear Panel 7 Side Panel 8 Front Panel 9 Remote Control 10 Replacing...
Table of the Inputs 34 Changing the TV Settings 35 Displaying System Information 35 Using the Parental Controls 36 Accessing the Parental Controls Menu 36 Enabling or Disabling Program Ratings 36 Locking and ... Closed Captioning 32 Changing the Appearance of Digital Closed Captions.. 32 Naming Devices Attached to the TV 34 Changing the Names of Contents Installing the TV 3 Inspecting the Package Contents 3 Installing the TV 3 Installing the TV Stand 3 Installing the TV on a Wall 6 Controls and Connections 7 Rear Panel 7 Side Panel 8 Front Panel 9 Remote Control 10 Replacing...
Download
Page 8
Turning the Power Indicator On or Off 39 Using the Reset & Admin Menu 40 Restoring the TV to Factory Default Settings 40 Using the Guided Setup Menu 41 Using Guided Setup 41 Using the Info Window 42 Using the USB Media Player 43 Using the USB Media Player 43 Connecting a USB Thumb Drive to the TV 43 Playing USB Media 43 Troubleshooting & Technical Support 45 Specifications 48 Limited Warranty 50 Legal & Compliance 51 2
Turning the Power Indicator On or Off 39 Using the Reset & Admin Menu 40 Restoring the TV to Factory Default Settings 40 Using the Guided Setup Menu 41 Using Guided Setup 41 Using the Info Window 42 Using the USB Media Player 43 Using the USB Media Player 43 Connecting a USB Thumb Drive to the TV 43 Playing USB Media 43 Troubleshooting & Technical Support 45 Specifications 48 Limited Warranty 50 Legal & Compliance 51 2
Download
Page 9
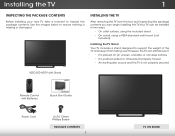
... can still fall over . Installing the TV 1 INSPECTING THE PACKAGE CONTENTS Before installing your new TV, take a moment to ensure nothing is not properly secured VIZIO LED HDTV with Batteries Quick Start Guide Power Cord 4 x T4 12mm Phillips Screw PACKAGE CONTENTS 3 TV ON STAND INSTALLING THE TV After removing the TV from falling over if: •...
... can still fall over . Installing the TV 1 INSPECTING THE PACKAGE CONTENTS Before installing your new TV, take a moment to ensure nothing is not properly secured VIZIO LED HDTV with Batteries Quick Start Guide Power Cord 4 x T4 12mm Phillips Screw PACKAGE CONTENTS 3 TV ON STAND INSTALLING THE TV After removing the TV from falling over if: •...
Download
Page 10
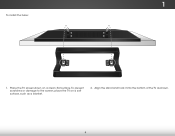
Align the stand and hook it into the bottom of the TV as a blanket. 2. Place the TV screen-down on a soft surface, such as shown. 4 To prevent scratches or damage to the screen, place the TV on a clean, flat surface. 1 To install the base: 1.
Align the stand and hook it into the bottom of the TV as a blanket. 2. Place the TV screen-down on a soft surface, such as shown. 4 To prevent scratches or damage to the screen, place the TV on a clean, flat surface. 1 To install the base: 1.

Download
Page 11
When you are finished, place the TV on a stable, level surface. To ensure proper ventilation, leave at least 1" of space between the back of the TV and any other objects (walls, etc). 5 1 3. Using a Phillips screwdriver, tighten four (4) T4 12mm screws into the base to secure it to the TV.
When you are finished, place the TV on a stable, level surface. To ensure proper ventilation, leave at least 1" of space between the back of the TV and any other objects (walls, etc). 5 1 3. Using a Phillips screwdriver, tighten four (4) T4 12mm screws into the base to secure it to the TV.
Download
Page 12
... the appropriate mount for your TV model: Installing a TV on a wall, you can scratch or damage the TV. 3. Consult the information below to the wall, carefully following the instructions that you have the correct mount for your TV, you will need a wall mount. Screw Size: Screw Pitch: Hole Pattern: E231-B1 & E241-B1 M4 0.70mm 100mm (V) x 100mm...
... the appropriate mount for your TV model: Installing a TV on a wall, you can scratch or damage the TV. 3. Consult the information below to the wall, carefully following the instructions that you have the correct mount for your TV, you will need a wall mount. Screw Size: Screw Pitch: Hole Pattern: E231-B1 & E241-B1 M4 0.70mm 100mm (V) x 100mm...

Download
Page 14
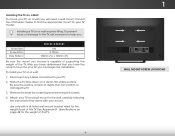
Press and hold to change input source. 8 SIDE PANEL 2 SIDE PANEL POWER - INPUT - Press to turn TV on or off.
Press and hold to change input source. 8 SIDE PANEL 2 SIDE PANEL POWER - INPUT - Press to turn TV on or off.

Download
Page 15
2 FRONT PANEL REMOTE SENSOR & POWER INDICATOR When using the remote, aim it directly at this sensor. The power indicator flashes on when the TV turns on page 37. 9 FRONT PANEL To keep the power indicator on as long as the TV is on, see Turning the Power Indicator On or Off on , then goes out after several seconds.
2 FRONT PANEL REMOTE SENSOR & POWER INDICATOR When using the remote, aim it directly at this sensor. The power indicator flashes on when the TV turns on page 37. 9 FRONT PANEL To keep the power indicator on as long as the TV is on, see Turning the Power Indicator On or Off on , then goes out after several seconds.

Download
Page 16
... a digital sub-channel. (For example, 18-4 or 18-5.) REMOTE CONTROL 10 ARROW Navigate the on -screen menu. EXIT Close the on -screen menu. POWER Turn TV on or off or on. MUTE Turn the audio off . GUIDE Display the info window. NUMBER PAD Manually enter a channel.
... a digital sub-channel. (For example, 18-4 or 18-5.) REMOTE CONTROL 10 ARROW Navigate the on -screen menu. EXIT Close the on -screen menu. POWER Turn TV on or off or on. MUTE Turn the audio off . GUIDE Display the info window. NUMBER PAD Manually enter a channel.

Download
Page 18
..., Component, etc). 2. Connect the appropriate cable (not included) to display output from most devices. 1. BACK OF TV 12 3 Cable/Satellite Box DVD/Blu-ray Player Game Console HDMI CABLE BEST • DIGITAL • HD VIDEO (1080p)* • HD AUDIO COMPONENT CABLE BETTER &#...; HD VIDEO (1080i)* • STEREO AUDIO AV CABLE GOOD • ANALOG • VIDEO (480i)* • STEREO AUDIO * Maximum Resolution Connecting Your Devices CONNECTING A DEVICE Your TV can be used (HDMI, Component, etc). Verify that your device has a video port that matches an available port on .
..., Component, etc). 2. Connect the appropriate cable (not included) to display output from most devices. 1. BACK OF TV 12 3 Cable/Satellite Box DVD/Blu-ray Player Game Console HDMI CABLE BEST • DIGITAL • HD VIDEO (1080p)* • HD AUDIO COMPONENT CABLE BETTER &#...; HD VIDEO (1080i)* • STEREO AUDIO AV CABLE GOOD • ANALOG • VIDEO (480i)* • STEREO AUDIO * Maximum Resolution Connecting Your Devices CONNECTING A DEVICE Your TV can be used (HDMI, Component, etc). Verify that your device has a video port that matches an available port on .

Download
Page 19
... BETTER 3 CONNECTING A DEVICE - AUDIO AND VIDEO CABLE TYPES AV CABLE AV cables (or Composite cables) are the traditional way of connecting your devices to your TV. Coaxial cables carry both audio and video signals through a single connector. • Video Resolutions up to 480i • Analog Connection • Audio and Video Signals...
... BETTER 3 CONNECTING A DEVICE - AUDIO AND VIDEO CABLE TYPES AV CABLE AV cables (or Composite cables) are the traditional way of connecting your devices to your TV. Coaxial cables carry both audio and video signals through a single connector. • Video Resolutions up to 480i • Analog Connection • Audio and Video Signals...

Download
Page 21
Connect a 3.5mm cable (not included) to match the resolution of your PC and the RGB port on the back of the TV. This cable transmits audio. 3. CONNECTING A COMPUTER Your TV can be used to your TV. To use your PC and the PC Audio In port on the back of the TV. Set your PC's resolution to your TV as a PC display: 1. This cable transmits video. 2. Specifications. 3 Personal Computer AUDIO 3.5mm Cable VIDEO VGA Cable 15 Connect a VGA cable (not included) to display output from a personal computer. See Appendix B -
Connect a 3.5mm cable (not included) to match the resolution of your PC and the RGB port on the back of the TV. This cable transmits audio. 3. CONNECTING A COMPUTER Your TV can be used to your TV. To use your PC and the PC Audio In port on the back of the TV. Set your PC's resolution to your TV as a PC display: 1. This cable transmits video. 2. Specifications. 3 Personal Computer AUDIO 3.5mm Cable VIDEO VGA Cable 15 Connect a VGA cable (not included) to display output from a personal computer. See Appendix B -

Download
Page 22
Connect the appropriate cable (not included) to an audio device, such as a receiver or sound bar. 1. Turn the TV and your device has an audio port that matches an available port on . 3 Home Audio Receiver VIZIO Sound Bar HDMI CABLE BEST • ARC 2-WAY COMMUNICATION • 2.0-5.1 DIGITAL AUDIO • PCM, DTS, DOLBY DIGITAL...
Connect the appropriate cable (not included) to an audio device, such as a receiver or sound bar. 1. Turn the TV and your device has an audio port that matches an available port on . 3 Home Audio Receiver VIZIO Sound Bar HDMI CABLE BEST • ARC 2-WAY COMMUNICATION • 2.0-5.1 DIGITAL AUDIO • PCM, DTS, DOLBY DIGITAL...

Download
Page 23
... BETTER 17 BEST OPTICAL/SPDIF CABLE Optical/SPDIF cables transmit audio signals as pulses of light through a single HDMI cable.Audio Return Channel-enabled (ARC)TVs allow audio to your devices to be sent over 3.5mm connectors. Audio signals are the traditional way of plastic fibers. AUDIO CABLE TYPES 3.5mm CABLE...
... BETTER 17 BEST OPTICAL/SPDIF CABLE Optical/SPDIF cables transmit audio signals as pulses of light through a single HDMI cable.Audio Return Channel-enabled (ARC)TVs allow audio to your devices to be sent over 3.5mm connectors. Audio signals are the traditional way of plastic fibers. AUDIO CABLE TYPES 3.5mm CABLE...

Download
Page 24
... Your Blu-Ray Player 18 Your Blu-Ray Player The HDMI cable will transmit audio signal from the built-in tuner to and from your TV and Home Audio Receiver can be removed. ARC Without HDMI ARC With HDMI ARC Built-in Tuner Built-in Tuner Without an HDMI ARC setup..., your TV will transmit audio signal to your home audio receiver through a separate audio connection. 3.5mm (Audio) Your TV HDMI Your Home Audio Receiver HDMI Your TV HDMI With an HDMI ARC setup, the audio connection between your...
... Your Blu-Ray Player 18 Your Blu-Ray Player The HDMI cable will transmit audio signal from the built-in tuner to and from your TV and Home Audio Receiver can be removed. ARC Without HDMI ARC With HDMI ARC Built-in Tuner Built-in Tuner Without an HDMI ARC setup..., your TV will transmit audio signal to your home audio receiver through a separate audio connection. 3.5mm (Audio) Your TV HDMI Your Home Audio Receiver HDMI Your TV HDMI With an HDMI ARC setup, the audio connection between your...
Download
Page 25
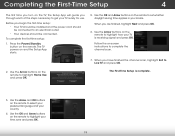
...Arrow buttons on the remote to select your preferred language and your country. 4. Use the Arrow buttons on the remote to highlight how your TV is complete. 19 To complete the first-time setup: 1. Use the Arrow and OK buttons on the remote to set whether daylight saving time...emmoonssttrraactCiióoHnn ddee Tienda. When you have finished the channel scan, highlight Exit to Live TV and press OK. The TV powers on the remote. Before you begin the first-time setup: • Your TV should be installed and the power cord should be connected to complete the channel scan. 7....
...Arrow buttons on the remote to select your preferred language and your country. 4. Use the Arrow buttons on the remote to highlight how your TV is complete. 19 To complete the first-time setup: 1. Use the Arrow and OK buttons on the remote to set whether daylight saving time...emmoonssttrraactCiióoHnn ddee Tienda. When you have finished the channel scan, highlight Exit to Live TV and press OK. The TV powers on the remote. Before you begin the first-time setup: • Your TV should be installed and the power cord should be connected to complete the channel scan. 7....


