
Download
Page 4
...does not operate normally or has been dropped. • Unplug the power cord before turning on the top of the cabinet are not blocked or covered. The manufacturer's warranty does not cover user abuse or improper installations. • The power cord must be used for ...parts causing a fire or electric shock. Wait before cleaning your TV. • When moving the cart/apparatus combination to avoid injury from damage due to power surges. • Do not attempt to repair or service your TV yourself. • Use only with the cart, stand, tripod, bracket, or table...
...does not operate normally or has been dropped. • Unplug the power cord before turning on the top of the cabinet are not blocked or covered. The manufacturer's warranty does not cover user abuse or improper installations. • The power cord must be used for ...parts causing a fire or electric shock. Wait before cleaning your TV. • When moving the cart/apparatus combination to avoid injury from damage due to power surges. • Do not attempt to repair or service your TV yourself. • Use only with the cart, stand, tripod, bracket, or table...
Download
Page 5
... with instructions. Operating your TV in any of your TV, hold the AC/DC power adapter, not the cord. h• The lightning flash with arrowhead symbol within an equilateral triangle is intended to alert the user to repair your dealer immediately. Do not try to the presence of electric shock, do not perform any servicing other cables are for use your...
... with instructions. Operating your TV in any of your TV, hold the AC/DC power adapter, not the cord. h• The lightning flash with arrowhead symbol within an equilateral triangle is intended to alert the user to repair your dealer immediately. Do not try to the presence of electric shock, do not perform any servicing other cables are for use your...
Download
Page 6
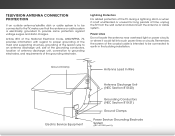
... and supporting structure, grounding of time, unplug the TV from the wall outlet and disconnect the antenna or cable system. Ground Clamp Antenna Lead In Wire Electric Service Equipment Antenna Discharge Unit (NEC Section 810-20) Grounding Conductors (NEC Section 810-21) Ground Clamps Power Service Grounding Electrode System (NEC ART 250, part H) Power Lines Do not locate the antenna near overhead light or power circuits...
... and supporting structure, grounding of time, unplug the TV from the wall outlet and disconnect the antenna or cable system. Ground Clamp Antenna Lead In Wire Electric Service Equipment Antenna Discharge Unit (NEC Section 810-20) Grounding Conductors (NEC Section 810-21) Ground Clamps Power Service Grounding Electrode System (NEC ART 250, part H) Power Lines Do not locate the antenna near overhead light or power circuits...

Download
Page 7
Audio Cable Types.......... 17 Connecting an Audio Device - ARC 18 Without HDMI ARC 18 With HDMI ARC 18 Completing the First-Time Setup 19 Using the On-Screen Menu 20 Navigating the On-Screen Menu 20 Changing the Input Source 21 Changing the Screen Aspect Ratio 21 Adjusting the Picture Settings 22 Adjusting the Advanced Picture Settings 23 1 Adjusting the Color Temperature 24 Resetting the Color Temperature Settings 24 Resetting the Picture Settings 25 Adjusting the Audio Settings 26 Resetting the Audio Settings 27 Activating the Sleep Timer 27 Setting the Auto Power Off ...
Audio Cable Types.......... 17 Connecting an Audio Device - ARC 18 Without HDMI ARC 18 With HDMI ARC 18 Completing the First-Time Setup 19 Using the On-Screen Menu 20 Navigating the On-Screen Menu 20 Changing the Input Source 21 Changing the Screen Aspect Ratio 21 Adjusting the Picture Settings 22 Adjusting the Advanced Picture Settings 23 1 Adjusting the Color Temperature 24 Resetting the Color Temperature Settings 24 Resetting the Picture Settings 25 Adjusting the Audio Settings 26 Resetting the Audio Settings 27 Activating the Sleep Timer 27 Setting the Auto Power Off ...
Download
Page 8
Turning the Power Indicator On or Off 39 Using the Reset & Admin Menu 40 Restoring the TV to Factory Default Settings 40 Using the Guided Setup Menu 41 Using Guided Setup 41 Using the Info Window 42 Using the USB Media Player 43 Using the USB Media Player 43 Connecting a USB Thumb Drive to the TV 43 Playing USB Media 43 Troubleshooting & Technical Support 45 Specifications 48 Limited Warranty 50 Legal & Compliance 51 2
Turning the Power Indicator On or Off 39 Using the Reset & Admin Menu 40 Restoring the TV to Factory Default Settings 40 Using the Guided Setup Menu 41 Using Guided Setup 41 Using the Info Window 42 Using the USB Media Player 43 Using the USB Media Player 43 Connecting a USB Thumb Drive to the TV 43 Playing USB Media 43 Troubleshooting & Technical Support 45 Specifications 48 Limited Warranty 50 Legal & Compliance 51 2
Download
Page 12
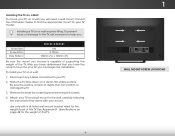
... with a UL-listed wall mount bracket rated for the weight of this TV. Disconnect any cables connected to the wall, carefully following the instructions that can begin the installation. Use only with your mount. Place the TV face-down on a wall: 1. Remove the base by loosening and removing the screws. 4. To install your TV, you have the correct mount for your TV on a clean, flat, stable surface. Specifications on a wall requires lifting...
... with a UL-listed wall mount bracket rated for the weight of this TV. Disconnect any cables connected to the wall, carefully following the instructions that can begin the installation. Use only with your mount. Place the TV face-down on a wall: 1. Remove the base by loosening and removing the screws. 4. To install your TV, you have the correct mount for your TV on a clean, flat, stable surface. Specifications on a wall requires lifting...

Download
Page 18
...). 2. Connect the appropriate cable (not included) to display output from most devices. 1. Verify that your device off. 3. BACK OF TV 12 3 Cable/Satellite Box DVD/Blu-ray Player Game Console HDMI CABLE BEST • DIGITAL • HD VIDEO (1080p)* • HD AUDIO COMPONENT CABLE BETTER • ANALOG • HD VIDEO (1080i)* • STEREO AUDIO COAXIAL CABLE BETTER • ANALOG • HD VIDEO (1080i)* • STEREO AUDIO AV CABLE GOOD • ANALOG • VIDEO (480i)* • STEREO AUDIO * Maximum Resolution
...). 2. Connect the appropriate cable (not included) to display output from most devices. 1. Verify that your device off. 3. BACK OF TV 12 3 Cable/Satellite Box DVD/Blu-ray Player Game Console HDMI CABLE BEST • DIGITAL • HD VIDEO (1080p)* • HD AUDIO COMPONENT CABLE BETTER • ANALOG • HD VIDEO (1080i)* • STEREO AUDIO COAXIAL CABLE BETTER • ANALOG • HD VIDEO (1080i)* • STEREO AUDIO AV CABLE GOOD • ANALOG • VIDEO (480i)* • STEREO AUDIO * Maximum Resolution
Download
Page 27
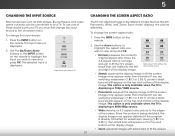
... (1.85:1 or 2.35:1) content, black bars will still appear on the top and bottom of the display image. • Zoom expands images with your TV. To change the input device: 1. 5 CHANGING THE INPUT SOURCE CHANGING THE SCREEN ASPECT RATIO External devices such as DVD players, Blu-ray Players, and video game consoles can display images in the on the remote to highlight the input you wish to fill...
... (1.85:1 or 2.35:1) content, black bars will still appear on the top and bottom of the display image. • Zoom expands images with your TV. To change the input device: 1. 5 CHANGING THE INPUT SOURCE CHANGING THE SCREEN ASPECT RATIO External devices such as DVD players, Blu-ray Players, and video game consoles can display images in the on the remote to highlight the input you wish to fill...
Download
Page 28
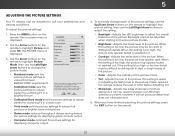
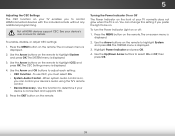
The on the remote to highlight that meet ENERGY STAR® requirements. • Calibrated mode sets the picture settings to values that picture setting, then use the Up/Down Arrow buttons on -screen menu is too high, the picture may appear dark. Tint - Select from some picture modes. • Wide BrZiogom htneNsosrm-aAl dPjaunsotrsamtihc e black level of the tones picture. To manually change the picture mode: VIZIO PICTURE Picture Mode Backlight - Advanced Picture Standard + 85 + 50 + 50...
The on the remote to highlight that meet ENERGY STAR® requirements. • Calibrated mode sets the picture settings to values that picture setting, then use the Up/Down Arrow buttons on -screen menu is too high, the picture may appear dark. Tint - Select from some picture modes. • Wide BrZiogom htneNsosrm-aAl dPjaunsotrsamtihc e black level of the tones picture. To manually change the picture mode: VIZIO PICTURE Picture Mode Backlight - Advanced Picture Standard + 85 + 50 + 50...
Download
Page 32
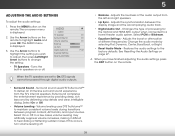
... signals cannot be passed through digital audio outputs. • Surround Sound - Changes the type of processing for the Optical and HDMI ARC output when connected to the factory defaults. The AUDIO menu is displayed. 2. Sleep Timer Picture Audio Network Settings Help 26 Use the Arrow buttons on page 27. Restores the audio settings to a Wide hoZomome thNeoarmtealr aPaundoriaomiscystem. 5 ADJUSTING THE AUDIO SETTINGS To adjust the audio settings: 1. Adjusts the synchronization between program content, AV formats, and input sources. Exit 2D 3D • Reset Audio Mode...
... signals cannot be passed through digital audio outputs. • Surround Sound - Changes the type of processing for the Optical and HDMI ARC output when connected to the factory defaults. The AUDIO menu is displayed. 2. Sleep Timer Picture Audio Network Settings Help 26 Use the Arrow buttons on page 27. Restores the audio settings to a Wide hoZomome thNeoarmtealr aPaundoriaomiscystem. 5 ADJUSTING THE AUDIO SETTINGS To adjust the audio settings: 1. Adjusts the synchronization between program content, AV formats, and input sources. Exit 2D 3D • Reset Audio Mode...
Download
Page 33
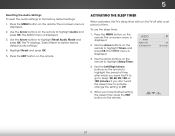
... the remote to restore factory default audio settings." 4. 5 Resetting the Audio Settings To reset the audio settings to highlight Reset Audio Mode and press OK. When you don't want the TV to go to Off. 5. The AUDIO menu is displayed. Use the Arrow buttons to the factory default settings: 1. The TV displays,"Select Reset to highlight Sleep Timer. 4. Use the Arrow buttons on the remote. 27 Highlight Reset and press OK. 5. Use the Arrow buttons on the remote to highlight Timers and press OK. VIZIO TIMERS Sleep Timer Auto Power...
... the remote to restore factory default audio settings." 4. 5 Resetting the Audio Settings To reset the audio settings to highlight Reset Audio Mode and press OK. When you don't want the TV to go to Off. 5. The AUDIO menu is displayed. Use the Arrow buttons to the factory default settings: 1. The TV displays,"Select Reset to highlight Sleep Timer. 4. Use the Arrow buttons on the remote. 27 Highlight Reset and press OK. 5. Use the Arrow buttons on the remote to highlight Timers and press OK. VIZIO TIMERS Sleep Timer Auto Power...
Download
Page 38
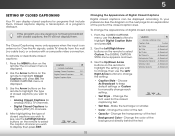
... Color - The on the remote to select the caption channel you are viewing is displayed. The CLOSED CAPTIONS menu is not being broadcast with a composite video connection. VIZIO CLOSED CAPTIONS Analog Closed Captions Digital Closed Captions Digital Caption Style CC1 CS1 3. CChange the font used for Over-the-Air signals, cable TV directly from the wall (no cable box), or a device with closed caption area. Sleep • Timer Picture Color - Changing the Appearance of closed captions for digital (ATSC) TV channels. 4. 5 SETTING UP CLOSED CAPTIONING Your TV can be displayed...
... Color - The on the remote to select the caption channel you are viewing is displayed. The CLOSED CAPTIONS menu is not being broadcast with a composite video connection. VIZIO CLOSED CAPTIONS Analog Closed Captions Digital Closed Captions Digital Caption Style CC1 CS1 3. CChange the font used for Over-the-Air signals, cable TV directly from the wall (no cable box), or a device with closed caption area. Sleep • Timer Picture Color - Changing the Appearance of closed captions for digital (ATSC) TV channels. 4. 5 SETTING UP CLOSED CAPTIONING Your TV can be displayed...
Download
Page 45
... Settings menu is displayed. 2. Turning the Power Indicator On or Off The Power Indicator on the front of your TV normally does not glow when the TV is displayed. 2. Use the Up/Down Arrow buttons to be on. When system audio control is connected and supports CEC. 5. To turn the Power Indicator Light on the remote. The on-screen menu is on. Highlight Power Indicator and press OK. 4. Not all HDMI...
... Settings menu is displayed. 2. Turning the Power Indicator On or Off The Power Indicator on the front of your TV normally does not glow when the TV is displayed. 2. Use the Up/Down Arrow buttons to be on. When system audio control is connected and supports CEC. 5. To turn the Power Indicator Light on the remote. The on-screen menu is on. Highlight Power Indicator and press OK. 4. Not all HDMI...
Download
Page 47
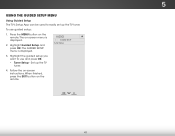
... guided setup you want to easily set up the TV tuner. 4. Press the MENU button on -screen menu is displayed. Highlight Guided Setup and press OK. VIZIO GUIDED SETUP Tuner Setup 3. The on the remote. Wide Zoom Normal Panoramic Exit 2D 3D ABC Input Wide CC Sleep Timer Picture Audio Network Settings Help 41 Set up the TV tuner. When finished, press the EXIT button on -screen instructions. Follow the on the remote. 5 USING THE GUIDED SETUP MENU Using Guided Setup The TV's Setup App can be used to use guided setup: 1. The GUIDED SETUP menu...
... guided setup you want to easily set up the TV tuner. 4. Press the MENU button on -screen menu is displayed. Highlight Guided Setup and press OK. VIZIO GUIDED SETUP Tuner Setup 3. The on the remote. Wide Zoom Normal Panoramic Exit 2D 3D ABC Input Wide CC Sleep Timer Picture Audio Network Settings Help 41 Set up the TV tuner. When finished, press the EXIT button on -screen instructions. Follow the on the remote. 5 USING THE GUIDED SETUP MENU Using Guided Setup The TV's Setup App can be used to use guided setup: 1. The GUIDED SETUP menu...
Download
Page 52
... antenna, the signal strength of the TV to turn the TV on the remote aren't working electrical outlet. • Ensure the power cable is no sound. • Press Volume Up on the remote control. • Press the MUTE button on page 29. See Scanning for the best signal. The colors on the remote to select a different input source. A The TV displays "No Signal." • Press the INPUT button on the remote control to select a different input source...
... antenna, the signal strength of the TV to turn the TV on the remote aren't working electrical outlet. • Ensure the power cable is no sound. • Press Volume Up on the remote control. • Press the MUTE button on page 29. See Scanning for the best signal. The colors on the remote to select a different input source. A The TV displays "No Signal." • Press the INPUT button on the remote control to select a different input source...
Download
Page 53
..., or fluorescent lights. • Ensure all cables are using an antenna, the signal strength of product and do not constitute a defective product. When I change input source, the display image changes size. • The TV remembers the viewing mode on the remote to match your antenna is precision-manufactured using digital sources. These types of occurrences are using TV, AV, or Component with 480i input, press the WIDE button on each input source. The display image does...
..., or fluorescent lights. • Ensure all cables are using an antenna, the signal strength of product and do not constitute a defective product. When I change input source, the display image changes size. • The TV remembers the viewing mode on the remote to match your antenna is precision-manufactured using digital sources. These types of occurrences are using TV, AV, or Component with 480i input, press the WIDE button on each input source. The display image does...
Download
Page 56
... as installation and set-up issues or any type of the model's product information page (www.VIZIO.com) or look for packing and shipping the covered Product to obtain warranty service. If a Product covered by aVIZIO authorized service center.Products with unreadable or removed serial numbers, or requiring routine maintenance are warranted for the duration of Service Defective Products must utilize either repair or replace...
... as installation and set-up issues or any type of the model's product information page (www.VIZIO.com) or look for packing and shipping the covered Product to obtain warranty service. If a Product covered by aVIZIO authorized service center.Products with unreadable or removed serial numbers, or requiring routine maintenance are warranted for the duration of Service Defective Products must utilize either repair or replace...
Download
Page 2
... manufacturer's warranty does not cover user abuse or improper installations. • The power cord must be operated only from the apparatus. • Only use an adapter to smoke or moisture may expose you are not blocked or covered. Install in the back and bottom of power source indicated on your TV and easily accessible. • Only power of electric shock, do so. Servicing is...
... manufacturer's warranty does not cover user abuse or improper installations. • The power cord must be operated only from the apparatus. • Only use an adapter to smoke or moisture may expose you are not blocked or covered. Install in the back and bottom of power source indicated on your TV and easily accessible. • Only power of electric shock, do so. Servicing is...
Download
Page 14
... compliance could void the user's authority to operate this equipment. Caution Always use an AC/DC power adapter that some TV channels add black bars at the edges of the FCC Rules. Be sure mute is properly grounded. There are turned on. • Press the INPUT button on the remote and select the input to which your connected devices are black bars on the...
... compliance could void the user's authority to operate this equipment. Caution Always use an AC/DC power adapter that some TV channels add black bars at the edges of the FCC Rules. Be sure mute is properly grounded. There are turned on. • Press the INPUT button on the remote and select the input to which your connected devices are black bars on the...

Download
Page 15
... to the "DETAILS" tab of Service Defective Products must utilize either repair or replace the Product at VIZIO's option and sole discretion. VIZIO provides a warranty to obtain warranty service. Replacement parts and Products may be sent to a VIZIO service center to the original purchaser of customer misuse, modifications or adjustments, as well as installation and set-up issues or any repairs attempted by anyone other information, ALL...
... to the "DETAILS" tab of Service Defective Products must utilize either repair or replace the Product at VIZIO's option and sole discretion. VIZIO provides a warranty to obtain warranty service. Replacement parts and Products may be sent to a VIZIO service center to the original purchaser of customer misuse, modifications or adjustments, as well as installation and set-up issues or any repairs attempted by anyone other information, ALL...


