
E240AR User Manual
Page 2
... enabling other features will increase power consumption that could exceed the limits necessary to qualify for ENERGY STAR in the "factory default" setting and this is the setting in which power savings will be achieved. Dolby and the double-D symbol are incorporated under license from SRS Labs, Inc. SRS StudioSound HD and...
... enabling other features will increase power consumption that could exceed the limits necessary to qualify for ENERGY STAR in the "factory default" setting and this is the setting in which power savings will be achieved. Dolby and the double-D symbol are incorporated under license from SRS Labs, Inc. SRS StudioSound HD and...
E240AR User Manual
Page 6
... your local stations to find out when they will turn off their analog signal and switch to receive over-the-air TV. Analog-only television sets that receive TV programming through an antenna now need a converter box to continue to digital-only broadcasting.
... your local stations to find out when they will turn off their analog signal and switch to receive over-the-air TV. Analog-only television sets that receive TV programming through an antenna now need a converter box to continue to digital-only broadcasting.
E240AR User Manual
Page 8
...14 Connecting an audio device (E240AR 15 Connecting an audio device (E320AR 16 Completing the First-Time Setup 17 Using the On-Screen Menu 18 Navigating the On-Screen Menu 18 Changing the Input Source 19 Changing the Screen Aspect Ratio 19 Setting Up Closed Captioning 20 Changing... Adjusting the Picture Size and Position 24 Resetting the Picture Settings 24 Adjusting the Audio Settings 24 Adjusting the Advanced Audio Settings 25 Resetting the Audio Settings 26 Changing the TV Settings 27 Changing the Input Source 27 Setting the Tuner Mode 27 Scanning for Channels 27 Adding New ...
...14 Connecting an audio device (E240AR 15 Connecting an audio device (E320AR 16 Completing the First-Time Setup 17 Using the On-Screen Menu 18 Navigating the On-Screen Menu 18 Changing the Input Source 19 Changing the Screen Aspect Ratio 19 Setting Up Closed Captioning 20 Changing... Adjusting the Picture Size and Position 24 Resetting the Picture Settings 24 Adjusting the Audio Settings 24 Adjusting the Advanced Audio Settings 25 Resetting the Audio Settings 26 Changing the TV Settings 27 Changing the Input Source 27 Setting the Tuner Mode 27 Scanning for Channels 27 Adding New ...
E240AR User Manual
Page 9
Resetting the TV Settings 34 Restoring the TV to Factory Default Settings 35 Using Setup Wizard 35 Using the Info Window 36 Using the USB Media Player 37 Using the USB Photo slideshow 37 Connecting a USB Thumb Drive to the TV 37 Playing USB Media 37 Troubleshooting & Technical Support 40 Specifications 43 Limited Warranty 45 Legal & Compliance 46 2
Resetting the TV Settings 34 Restoring the TV to Factory Default Settings 35 Using Setup Wizard 35 Using the Info Window 36 Using the USB Media Player 37 Using the USB Photo slideshow 37 Connecting a USB Thumb Drive to the TV 37 Playing USB Media 37 Troubleshooting & Technical Support 40 Specifications 43 Limited Warranty 45 Legal & Compliance 46 2
E240AR User Manual
Page 18
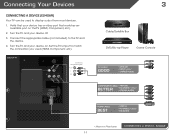
... the TV (HDMI, Component, etc). 2. Turn the TV and your device off. 3. Verify that your device has a video port that matches an available port on . E240AR Set the TV's input to component inputs: Y/V L R 3 Cable/Satellite Box DVD/Blu-ray Player Game Console AV CABLE GOOD • ANALOG • VIDEO (480i)* • STEREO...
... the TV (HDMI, Component, etc). 2. Turn the TV and your device off. 3. Verify that your device has a video port that matches an available port on . E240AR Set the TV's input to component inputs: Y/V L R 3 Cable/Satellite Box DVD/Blu-ray Player Game Console AV CABLE GOOD • ANALOG • VIDEO (480i)* • STEREO...
E240AR User Manual
Page 19
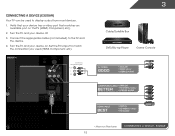
... the TV and the device. 4. Turn the TV and your device off. 3. Verify that your device has a video port that matches an available port on . Set the TV's input to match the connection you used to display output from most devices. 1. Connecting A Device (E320AR) Your TV can be used (HDMI, Component...
... the TV and the device. 4. Turn the TV and your device off. 3. Verify that your device has a video port that matches an available port on . Set the TV's input to match the connection you used to display output from most devices. 1. Connecting A Device (E320AR) Your TV can be used (HDMI, Component...
E240AR User Manual
Page 20
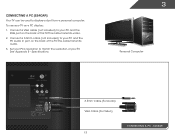
This cable transmits video. 2. Set your PC's resolution to your TV. Connecting A PC (E240AR) Your TV can be used to your TV as a PC display: 1. Connect a VGA cable (not included) to match the resolution of your PC and the RGB port on the back of the TV. This cable transmits audio. 3. See Appendix B - Connect a 3.5mm cable (not included) to display output from a personal computer. To use your PC and the PC Audio In port on the back of the TV. Specifications. 3 Personal Computer 3.5mm Cable (For Audio) VGA Cable (For Video) CONNECTING A PC - E240AR 13
This cable transmits video. 2. Set your PC's resolution to your TV. Connecting A PC (E240AR) Your TV can be used to your TV as a PC display: 1. Connect a VGA cable (not included) to match the resolution of your PC and the RGB port on the back of the TV. This cable transmits audio. 3. See Appendix B - Connect a 3.5mm cable (not included) to display output from a personal computer. To use your PC and the PC Audio In port on the back of the TV. Specifications. 3 Personal Computer 3.5mm Cable (For Audio) VGA Cable (For Video) CONNECTING A PC - E240AR 13
E240AR User Manual
Page 21
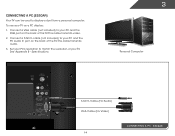
Connect a VGA cable (not included) to your PC and the RGB port on the back of the TV. This cable transmits video. 2. Specifications. 3 Personal Computer 3.5mm Cable (For Audio) VGA Cable (For Video) 14 CONNECTING A PC - E320AR This cable transmits audio. 3. Connect a 3.5mm cable (not included) to your PC and the PC Audio In port on the back of the TV. Set your PC's resolution to display output from a personal computer. Connecting A PC (E320AR) Your TV can be used to match the resolution of your TV as a PC display: 1. To use your TV. See Appendix B -
Connect a VGA cable (not included) to your PC and the RGB port on the back of the TV. This cable transmits video. 2. Specifications. 3 Personal Computer 3.5mm Cable (For Audio) VGA Cable (For Video) 14 CONNECTING A PC - E320AR This cable transmits audio. 3. Connect a 3.5mm cable (not included) to your PC and the PC Audio In port on the back of the TV. Set your PC's resolution to display output from a personal computer. Connecting A PC (E320AR) Your TV can be used to match the resolution of your TV as a PC display: 1. To use your TV. See Appendix B -
E240AR User Manual
Page 24
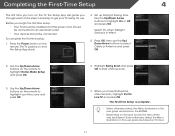
... get your time zone and press OK. 6. The First-Time Setup is in this user guide are based on the E240AR. • Depending on the remote. To complete the first-time setup: 1. Set up Daylight Saving time. Select On when Daylight Saving is complete. • Unless otherwise stated, the Menu illustrations in...
... get your time zone and press OK. 6. The First-Time Setup is in this user guide are based on the E240AR. • Depending on the remote. To complete the first-time setup: 1. Set up Daylight Saving time. Select On when Daylight Saving is complete. • Unless otherwise stated, the Menu illustrations in...
E240AR User Manual
Page 25
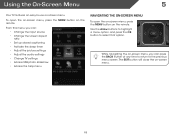
... menu, you can : • Change the input source • Change the screen aspect ratio • Set up closed captioning • Activate the sleep timer • Adjust the picture settings • Adjust the audio settings • Change TV settings • Access USB photo slideshow • Access the help menu Navigating the On-Screen Menu CC...
... menu, you can : • Change the input source • Change the screen aspect ratio • Set up closed captioning • Activate the sleep timer • Adjust the picture settings • Adjust the audio settings • Change TV settings • Access USB photo slideshow • Access the help menu Navigating the On-Screen Menu CC...
E240AR User Manual
Page 27
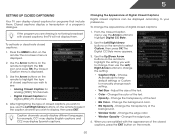
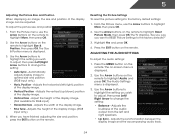
...20 If the program you wish to highlight the type of the closed captions, press the EXIT button on the remote to highlight the setting you wish to display, then press EXIT. Use the Arrow buttons on the remote to select the caption channel you wish to change... press OK. Change the edge color. • Window Opacity - 5 Setting Up Closed Captioning Your TV can be displayed according to change the setting: • Caption Style - The Closed Caption menu is displayed. 2. The on the remote. To change each setting. • Text Size - Change the background color. • BG ...
...20 If the program you wish to highlight the type of the closed captions, press the EXIT button on the remote to highlight the setting you wish to display, then press EXIT. Use the Arrow buttons on the remote to select the caption channel you wish to change... press OK. Change the edge color. • Window Opacity - 5 Setting Up Closed Captioning Your TV can be displayed according to change the setting: • Caption Style - The Closed Caption menu is displayed. 2. The on the remote. To change each setting. • Text Size - Change the background color. • BG ...

E240AR User Manual
Page 28
...of time. The on the remote to highlight Timer and press OK. Press OK, then press EXIT. This feature can be deactivated. To set period of time after a set the Auto Power Off feature: 1. Press Exit. 3. Use the Arrow buttons on -screen menu is displayed. 3. The Picture menu is displayed... button on the remote. The on the remote to highlight the Picture icon and press OK. 5 Activating the Sleep Timer Adjusting the Picture Settings When activated, the TV's sleep timer will produce the best picture in the most cases. Use the Up/Down Arrow buttons on -screen...
...of time. The on the remote to highlight Timer and press OK. Press OK, then press EXIT. This feature can be deactivated. To set period of time after a set the Auto Power Off feature: 1. Press Exit. 3. Use the Arrow buttons on -screen menu is displayed. 3. The Picture menu is displayed... button on the remote. The on the remote to highlight the Picture icon and press OK. 5 Activating the Sleep Timer Adjusting the Picture Settings When activated, the TV's sleep timer will produce the best picture in the most cases. Use the Up/Down Arrow buttons on -screen...
E240AR User Manual
Page 29
... will not produce detail that does not otherwise exist. Optimizes the picture for .mpeg files. • Color Enhancement - For the E320AR, this setting is too high or too low, detail may be difficult to distinguish details. Adjusts the intensity of the picture. Tint - Select Off, Low,... Medium, or High. • MPEG NR - Use the Arrow buttons to highlight the setting you wish to adjust, then press Left/Right Arrow buttons to affect the overall brilliance of the picture to Off. 5 Backlight - Color - ...
... will not produce detail that does not otherwise exist. Optimizes the picture for .mpeg files. • Color Enhancement - For the E320AR, this setting is too high or too low, detail may be difficult to distinguish details. Adjusts the intensity of the picture. Tint - Select Off, Low,... Medium, or High. • MPEG NR - Use the Arrow buttons to highlight the setting you wish to adjust, then press Left/Right Arrow buttons to affect the overall brilliance of the picture to Off. 5 Backlight - Color - ...
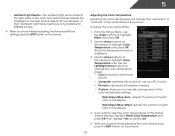
E240AR User Manual
Page 30
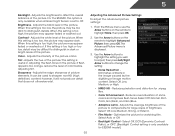
... • Computer optimizes the picture for use the Arrow buttons to manually change the "warmness" or "coolness" of the white areas of the color temperature settings: Red/Green/Blue Gain - Then highlight Yes and press OK. 5. When you to highlight More, then press OK. 2. 5 • Ambient Light... Sensor - Select Off, Low, Medium, or High. (Ambient Light Sensor setting is only available for the best picture. Use the Arrow buttons on the remote. Red/Green/Blue Offset - If you have finished adjusting the color...
... • Computer optimizes the picture for use the Arrow buttons to manually change the "warmness" or "coolness" of the white areas of the color temperature settings: Red/Green/Blue Gain - Then highlight Yes and press OK. 5. When you to highlight More, then press OK. 2. 5 • Ambient Light... Sensor - Select Off, Low, Medium, or High. (Ambient Light Sensor setting is only available for the best picture. Use the Arrow buttons on the remote. Red/Green/Blue Offset - If you have finished adjusting the color...
E240AR User Manual
Page 31
...vertical (up/down) position of the display image. (RGB input only.) 4. When you wish to adjust, then press Left/Right Arrow buttons to change the setting: • Auto Sync - The on the remote. Use the Arrow buttons on the remote to optimal size and position. (RGB input only.) • ...remote to highlight More, then press OK. 2. The TV displays, "Are you sure you wish to adjust, then press Left/ Right Arrow to change the setting: • Balance - Highlight Yes and press OK. 4. Press the EXIT button on the remote. Press the MENU button on the remote. Adjusts the ...
...vertical (up/down) position of the display image. (RGB input only.) 4. When you wish to adjust, then press Left/Right Arrow buttons to change the setting: • Auto Sync - The on the remote. Use the Arrow buttons on the remote to optimal size and position. (RGB input only.) • ...remote to highlight More, then press OK. 2. The TV displays, "Are you sure you wish to adjust, then press Left/ Right Arrow to change the setting: • Balance - Highlight Yes and press OK. 4. Press the EXIT button on the remote. Press the MENU button on the remote. Adjusts the ...
E240AR User Manual
Page 32
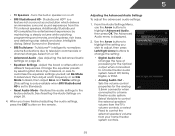
... home theater system controls. 25 Select On or Off. • Advanced Audio - To customize the equalizer settings yourself, set EQ Mode to Advanced, then adjust each frequency or set to Standard) • Reset Audio Mode - TruVolume™ intelligently normalizes volume fluctuations due to the factory ... or select Fixed to a home theater audio system. When you wish to adjust, then press Left/Right Arrow buttons to change the setting: • Digital Audio Out Changes the type of different frequencies. Turns the built-in speakers on the remote. Change the equalizer presets ...
... home theater system controls. 25 Select On or Off. • Advanced Audio - To customize the equalizer settings yourself, set EQ Mode to Advanced, then adjust each frequency or set to Standard) • Reset Audio Mode - TruVolume™ intelligently normalizes volume fluctuations due to the factory ... or select Fixed to a home theater audio system. When you wish to adjust, then press Left/Right Arrow buttons to change the setting: • Digital Audio Out Changes the type of different frequencies. Turns the built-in speakers on the remote. Change the equalizer presets ...

E240AR User Manual
Page 33
... Press the EXIT button on the remote. When you want to RESET Audio Settings to the factory default settings: 1. Highlight Yes and press OK. 5. The on the remote. 5 Resetting the Audio Settings To reset the audio settings to the factory defaults?" 4. Use the Arrow buttons on the remote to ...highlight Reset Audio Mode and press OK. The TV displays, "Are you sure you have finished adjusting the advanced audio settings, press the EXIT button on -...
... Press the EXIT button on the remote. When you want to RESET Audio Settings to the factory default settings: 1. Highlight Yes and press OK. 5. The on the remote. 5 Resetting the Audio Settings To reset the audio settings to the factory defaults?" 4. Use the Arrow buttons on the remote to ...highlight Reset Audio Mode and press OK. The TV displays, "Are you sure you have finished adjusting the advanced audio settings, press the EXIT button on -...
E240AR User Manual
Page 34
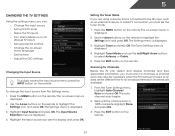
... -screen menu is displayed. 2. A channel scan may also be necessary when the TV has been moved to an area where different free-to highlight the Settings icon and press OK. Press the MENU button on the remote. 27 Use the Arrow buttons on the remote to display and press OK. Highlight... the input source you want to highlight the Settings icon and press OK. Use the Arrow buttons on the remote to -air broadcast television channels are using a device that is displayed. 4. Highlight Tuner and...
... -screen menu is displayed. 2. A channel scan may also be necessary when the TV has been moved to an area where different free-to highlight the Settings icon and press OK. Press the MENU button on the remote. 27 Use the Arrow buttons on the remote to display and press OK. Highlight... the input source you want to highlight the Settings icon and press OK. Use the Arrow buttons on the remote to -air broadcast television channels are using a device that is displayed. 4. Highlight Tuner and...

E240AR User Manual
Page 35
... which you may need to add a new analog channel or add a new range of new channels: 1. From the Tuner Settings menu, highlight Add Analog Channel and press OK. From the Tuner Settings menu, highlight Partial Channel Search and press OK. The TV scans for the channel, press the EXIT button on the...
... which you may need to add a new analog channel or add a new range of new channels: 1. From the Tuner Settings menu, highlight Add Analog Channel and press OK. From the Tuner Settings menu, highlight Partial Channel Search and press OK. The TV scans for the channel, press the EXIT button on the...
E240AR User Manual
Page 36
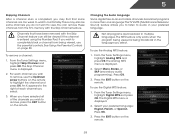
...select. 3. When you have been removed with the Skip Channel feature can remove these channels from being broadcast in multiple languages. From the Tuner Settings menu, highlight Analog MTS and press OK. Select Mono, Stereo, or SAP (secondary audio programming). Press OK. 3. If you wish to ... remove, use the parental controls. To use the Digital MTS feature: 1. See Using the Parental Controls on page 30. From the Tuner Settings menu, highlight Skip Channel and press OK. The Digital MTS menu is displayed. 2. Select your preferred language. The Analog MTS menu is displayed...
...select. 3. When you have been removed with the Skip Channel feature can remove these channels from being broadcast in multiple languages. From the Tuner Settings menu, highlight Analog MTS and press OK. Select Mono, Stereo, or SAP (secondary audio programming). Press OK. 3. If you wish to ... remove, use the parental controls. To use the Digital MTS feature: 1. See Using the Parental Controls on page 30. From the Tuner Settings menu, highlight Skip Channel and press OK. The Digital MTS menu is displayed. 2. Select your preferred language. The Analog MTS menu is displayed...


