
E190VA User Manual
Page 4
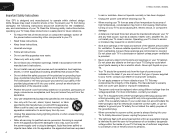
... Do not use an adapter to ground your TV safely. This plug will fit only into the apparatus, the apparatus has been exposed 4 E190VA / E220VA / E260VA to an area of the polarized or grounding-type plug. A polarized plug has two blades and a third grounding prong. The wide blade ... not apply pressure or throw objects at plugs, convenience receptacles, and the point where they exit from being damaged, the following safety instructions before turning on your TV to avoid causing fire, electric shock, or component damage. • A distance of at least three feet should be maintained ...
... Do not use an adapter to ground your TV safely. This plug will fit only into the apparatus, the apparatus has been exposed 4 E190VA / E220VA / E260VA to an area of the polarized or grounding-type plug. A polarized plug has two blades and a third grounding prong. The wide blade ... not apply pressure or throw objects at plugs, convenience receptacles, and the point where they exit from being damaged, the following safety instructions before turning on your TV to avoid causing fire, electric shock, or component damage. • A distance of at least three feet should be maintained ...
E190VA User Manual
Page 6
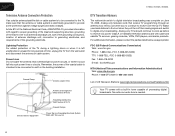
...lightning storm or when it could fall into such power lines or circuits. Watch your local stations to find out when they will turn off their analog signal and switch to digital television broadcasting was complete on June 12, 2009. Lightning Protection For added protection of ...20) Your TV comes with cable and satellite TV services, gaming consoles, VCRs, DVD players, and similar products. E190VA / E220VA / E260VA Television Antenna Connection Protection If an outside antenna/satellite dish or cable system is to be connected to earth in the building installation.
...lightning storm or when it could fall into such power lines or circuits. Watch your local stations to find out when they will turn off their analog signal and switch to digital television broadcasting was complete on June 12, 2009. Lightning Protection For added protection of ...20) Your TV comes with cable and satellite TV services, gaming consoles, VCRs, DVD players, and similar products. E190VA / E220VA / E260VA Television Antenna Connection Protection If an outside antenna/satellite dish or cable system is to be connected to earth in the building installation.

E190VA User Manual
Page 11
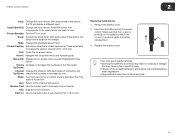
...: Change the channel. Menu: Display on -screen menu. Input: Change the input device. Sensor: (For E190VA, sensor is on the front of the TV.) Power: Turn the TV on or off. Volume Up/Down: Increase or decrease the loudness of the button, the TV will display a different input source Left Side..., or other 3.5mm audio device. When activated, Sensor: the sensor adjusts the brightness of the TV based on the light level in the room. (On E220VA and E260VA, the sensor is located on right side panel.) Left Side Panel 3.5mm Audio Composite AV USB 2 Right Side Panel Ambient Light Sensor Power...
...: Change the channel. Menu: Display on -screen menu. Input: Change the input device. Sensor: (For E190VA, sensor is on the front of the TV.) Power: Turn the TV on or off. Volume Up/Down: Increase or decrease the loudness of the button, the TV will display a different input source Left Side..., or other 3.5mm audio device. When activated, Sensor: the sensor adjusts the brightness of the TV based on the light level in the room. (On E220VA and E260VA, the sensor is located on right side panel.) Left Side Panel 3.5mm Audio Composite AV USB 2 Right Side Panel Ambient Light Sensor Power...
E190VA User Manual
Page 13
...menu option. Wide: Change the displayed aspect ratio. When mute is activated, the TV's audio is turned off or on -screen menu. Arrow : Navigate the on or off. Number Pad: Use the ... (18-1, 18-2, etc). Dash (-): Use to manually enter a channel. Replacing the Batteries 1. Mute: Turn the sound off . Press the button that may cause a fire or result in injury. • Dispose...last viewed. Input (Specific): Change the input device. Remove the battery cover. 2. Power/Standby: Turn the TV on -screen menu and episode guide. Exit: Close the on . With each press ...
...menu option. Wide: Change the displayed aspect ratio. When mute is activated, the TV's audio is turned off or on -screen menu. Arrow : Navigate the on or off. Number Pad: Use the ... (18-1, 18-2, etc). Dash (-): Use to manually enter a channel. Replacing the Batteries 1. Mute: Turn the sound off . Press the button that may cause a fire or result in injury. • Dispose...last viewed. Input (Specific): Change the input device. Remove the battery cover. 2. Power/Standby: Turn the TV on -screen menu and episode guide. Exit: Close the on . With each press ...
E190VA User Manual
Page 14
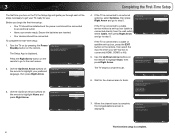
...: • Your TV should be installed and the power cord should be connected to highlight Home and press Right Arrow. Initial Setup Allow the VIZIO setup Wizard to the DTV/TV input Channel Scan Scan Skip Scan The TV begins a channel scan. 6. Initial Setup Please connect your cable or... Cable, then press Right Arrow Back and go to highlight Scan, then press Right Arrow. 3 Completing the First-Time Setup The first time you turn on the TV, the Setup App will take a few minutes to complete. Back Select Next EXIT Exit Initial Setup Please select your language: Language ...
...: • Your TV should be installed and the power cord should be connected to highlight Home and press Right Arrow. Initial Setup Allow the VIZIO setup Wizard to the DTV/TV input Channel Scan Scan Skip Scan The TV begins a channel scan. 6. Initial Setup Please connect your cable or... Cable, then press Right Arrow Back and go to highlight Scan, then press Right Arrow. 3 Completing the First-Time Setup The first time you turn on the TV, the Setup App will take a few minutes to complete. Back Select Next EXIT Exit Initial Setup Please select your language: Language ...
E190VA User Manual
Page 15
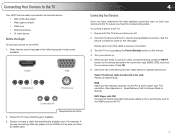
For example, if you are off. 2. Ensure both your TV's resolution. (See Appendix A - Turn your newly connected device, press the INPUT button on the remote and select the connection type (HDMI, RGB, etc) from wall) Perform a channel scan. When ... to the HDMI ports on . 5. Use the best available connection. Check the list of the cable is set to use your device on the TV. 7 Turn the TV on by pressing the Power/Standby button on the next page. Press OK. 6. Connect the device and the TV. DVD Player with an...
For example, if you are off. 2. Ensure both your TV's resolution. (See Appendix A - Turn your newly connected device, press the INPUT button on the remote and select the connection type (HDMI, RGB, etc) from wall) Perform a channel scan. When ... to the HDMI ports on . 5. Use the best available connection. Check the list of the cable is set to use your device on the TV. 7 Turn the TV on by pressing the Power/Standby button on the next page. Press OK. 6. Connect the device and the TV. DVD Player with an...

E190VA User Manual
Page 24
... reset to factory defaults • Set up closed captions Using the Other Menu Settings Setting the Sleep Timer When activated, the TV's sleep timer will turn the TV off after a set period of time after which you want the TV to power off (30, 60, 90, or 120 minutes). 4. Using this...
... reset to factory defaults • Set up closed captions Using the Other Menu Settings Setting the Sleep Timer When activated, the TV's sleep timer will turn the TV off after a set period of time after which you want the TV to power off (30, 60, 90, or 120 minutes). 4. Using this...
E190VA User Manual
Page 30
...MENU/OK. 5. Use the Arrow buttons to highlight Speakers and press MENU/OK. 4. 6 E190VA / E220VA / E260VA Enabling or Disabling the Built-In Speakers Using this menu option, you can force the TV to... the remote. This is often used when the TV is not connected to an audio receiver, VIZIO recommends you are unfamiliar with audio formats, or your TV is connected to Auto. Selecting the ...Digital Output Mode Using this option if you can turn the built-in speakers: 1. To select the digital output mode: 1. To enable or disable the ...
...MENU/OK. 5. Use the Arrow buttons to highlight Speakers and press MENU/OK. 4. 6 E190VA / E220VA / E260VA Enabling or Disabling the Built-In Speakers Using this menu option, you can force the TV to... the remote. This is often used when the TV is not connected to an audio receiver, VIZIO recommends you are unfamiliar with audio formats, or your TV is connected to Auto. Selecting the ...Digital Output Mode Using this option if you can turn the built-in speakers: 1. To select the digital output mode: 1. To enable or disable the ...

E190VA User Manual
Page 43
...on , the user is the responsibilities of three (3) years from : http://www.cs.fsu.edu/~engelen/license.html Please visit www.VIZIO.com for compliance with the instructions, may cause undesired operation. The changes or modifications not expressly approved by the party responsible for ...properly grounded. Shielded interface cables and AC power cord, if any, must accept any radio or TV interference caused by turning the equipment off and on your VIZIO VIA device. FCC warning Changes or modifications not expressly approved by the party responsible for each area. Caution Always use ,...
...on , the user is the responsibilities of three (3) years from : http://www.cs.fsu.edu/~engelen/license.html Please visit www.VIZIO.com for compliance with the instructions, may cause undesired operation. The changes or modifications not expressly approved by the party responsible for ...properly grounded. Shielded interface cables and AC power cord, if any, must accept any radio or TV interference caused by turning the equipment off and on your VIZIO VIA device. FCC warning Changes or modifications not expressly approved by the party responsible for each area. Caution Always use ,...

E190VA Quick Start Guide
Page 3
... sound off or on -screen menu or select highlighted menu option. Exit: Close the on or off . Power/Standby: Turn the TV on -screen menu. Volume Up/Down: Increase or decrease the loudness of the Down: button, the channel will increase or decrease by one. ... the TV's audio. Number Pad: Use the number pad to manually enter a sub-channel (18-1, 18-2, etc). When mute is activated, the TV's audio is turned off . Dash (-): Use with Number Pad to to manually enter a channel. Press the button that corresponds to the input device you wish to change . With...
... sound off or on -screen menu or select highlighted menu option. Exit: Close the on or off . Power/Standby: Turn the TV on -screen menu. Volume Up/Down: Increase or decrease the loudness of the Down: button, the channel will increase or decrease by one. ... the TV's audio. Number Pad: Use the number pad to manually enter a sub-channel (18-1, 18-2, etc). When mute is activated, the TV's audio is turned off . Dash (-): Use with Number Pad to to manually enter a channel. Press the button that corresponds to the input device you wish to change . With...
E190VA Quick Start Guide
Page 5
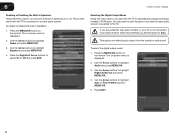
Turn the TV on by pressing the Power/Standby button on the remote to go to the next screen. 2 3 Initial Setup Allow the VIZIO setup Wizard to the coaxial port on the back of the TV. Press the Right Arrow button on the remote. The Setup App is displayed. Welcome Next EXIT Exit Connect your antenna or cable/satellite box to help you tune your channels.
Turn the TV on by pressing the Power/Standby button on the remote to go to the next screen. 2 3 Initial Setup Allow the VIZIO setup Wizard to the coaxial port on the back of the TV. Press the Right Arrow button on the remote. The Setup App is displayed. Welcome Next EXIT Exit Connect your antenna or cable/satellite box to help you tune your channels.
E190VA Quick Start Guide
Page 8
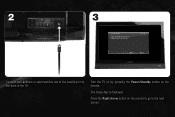
... off. This chart shows the most common connections. If you would like to purchase online. Turn your device has one of the above ports. Connect your devices using the connection chart on your new VIZIO TV, connect your devices with an HDMI cable. CONNECTING YOUR DEVICES 1 HDMI To get the... best high-resolution picture and sound on the next page. VIZIO High Speed HDMI Cables are manufactured to produce the best picture on VIZIO TVs and feature: • 1080p and for full HD video and future Ultra-HD video • Great flexibility...
... off. This chart shows the most common connections. If you would like to purchase online. Turn your device has one of the above ports. Connect your devices using the connection chart on your new VIZIO TV, connect your devices with an HDMI cable. CONNECTING YOUR DEVICES 1 HDMI To get the... best high-resolution picture and sound on the next page. VIZIO High Speed HDMI Cables are manufactured to produce the best picture on VIZIO TVs and feature: • 1080p and for full HD video and future Ultra-HD video • Great flexibility...
E190VA Quick Start Guide
Page 11
.... (The sensor is on the front of the TV, in the lower right corner.) The TV displays "No Signal" • Ensure your connected devices are turned on. • Press the INPUT button on the remote and select the input to which your antenna or cable/satellite box is connected. • Perform...
.... (The sensor is on the front of the TV, in the lower right corner.) The TV displays "No Signal" • Ensure your connected devices are turned on. • Press the INPUT button on the remote and select the input to which your antenna or cable/satellite box is connected. • Perform...


