

E261VA User Manual
Page 4
... a radiator, heater, oven, amplifier etc. If your outlet does not accommodate the three-pronged, have fallen into the apparatus, the apparatus has been exposed 4 E190VA / E220VA / E260VA / E261VA to ground your TV. Read the following instructions should be of sufficient magnitude to your TV. Wait before operating your TV. Do not...
... a radiator, heater, oven, amplifier etc. If your outlet does not accommodate the three-pronged, have fallen into the apparatus, the apparatus has been exposed 4 E190VA / E220VA / E260VA / E261VA to ground your TV. Read the following instructions should be of sufficient magnitude to your TV. Wait before operating your TV. Do not...
E261VA User Manual
Page 5
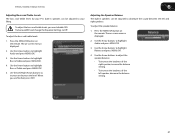
E190VA / E220VA / E260VA / E261VA • Do not overload power strips and extension cords. This will not be used for moving your TV. • When unplugging your dealer. ...
E190VA / E220VA / E260VA / E261VA • Do not overload power strips and extension cords. This will not be used for moving your TV. • When unplugging your dealer. ...
E261VA User Manual
Page 6
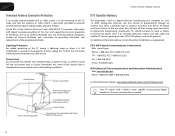
... receive over-the-air TV. Power Lines Do not locate the antenna near overhead light or power circuits, or where it is needed. E190VA / E220VA / E260VA / E261VA Television Antenna Connection Protection If an outside antenna/satellite dish or cable system is to be connected to digital-only broadcasting.
... receive over-the-air TV. Power Lines Do not locate the antenna near overhead light or power circuits, or where it is needed. E190VA / E220VA / E260VA / E261VA Television Antenna Connection Protection If an outside antenna/satellite dish or cable system is to be connected to digital-only broadcasting.
E261VA User Manual
Page 8
... AND LABOR 34 Parts and Labor 34 Type of Service 34 Limitations and Exclusions 34 Personal Data 34 Zero Bright Pixel Defect Guarantee 34 8 E190VA / E220VA / E260VA / E261VA Legal & Compliance 35 FCC Class B Radio Interference Statement 35 Notice...35 FCC warning 35 Caution 35 Open Source Software Notice 35
... AND LABOR 34 Parts and Labor 34 Type of Service 34 Limitations and Exclusions 34 Personal Data 34 Zero Bright Pixel Defect Guarantee 34 8 E190VA / E220VA / E260VA / E261VA Legal & Compliance 35 FCC Class B Radio Interference Statement 35 Notice...35 FCC warning 35 Caution 35 Open Source Software Notice 35
E261VA User Manual
Page 10
...or damage to the TV, ask someone to find the appropriate mount for the weight of debris that you will need a wall mount. E190VA / E220VA / E260VA / E261VA Be sure the mount you . 3. Consult the information below to help you choose is clear of this TV. Slide the ... that can begin the installation. To install your TV model: Screw Size: Screw Length: Screw Pitch: Hole Pattern: E190VA M4 10mm 0.7mm 75mm x 75mm E220VA M4 10mm 0.7mm 75mm x 75mm E260VA M4 10mm 0.7mm 100mm x 100mm Installing a TV on a wall requires lifting. See Appendix A Specifications for your...
...or damage to the TV, ask someone to find the appropriate mount for the weight of debris that you will need a wall mount. E190VA / E220VA / E260VA / E261VA Be sure the mount you . 3. Consult the information below to help you choose is clear of this TV. Slide the ... that can begin the installation. To install your TV model: Screw Size: Screw Length: Screw Pitch: Hole Pattern: E190VA M4 10mm 0.7mm 75mm x 75mm E220VA M4 10mm 0.7mm 75mm x 75mm E260VA M4 10mm 0.7mm 100mm x 100mm Installing a TV on a wall requires lifting. See Appendix A Specifications for your...
E261VA User Manual
Page 11
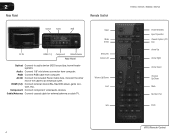
..., or other 3.5mm audio device. When activated, Sensor: the sensor adjusts the brightness of the TV based on the light level in the room. (On E220VA, E260VA, and E261VA, the sensor is on the front of the TV.) Power: Turn the TV on -screen menu. Input: Change the input device. Controls...
..., or other 3.5mm audio device. When activated, Sensor: the sensor adjusts the brightness of the TV based on the light level in the room. (On E220VA, E260VA, and E261VA, the sensor is on the front of the TV.) Power: Turn the TV on -screen menu. Input: Change the input device. Controls...
E261VA User Manual
Page 12
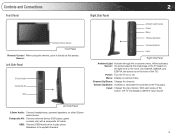
...: Connect the included Power Cable here. Connect the other end of the cable to audio device (VIZIO sound bar, home theater system). Input Wide Sleep Menu/OK Arrow Left Volume Up/Down Last Info 4 E190VA / E220VA / E260VA / E261VA Power/Standby Input (Specific) Closed Caption (CC) Exit Arrow Up Arrow Right Arrow Down...
...: Connect the included Power Cable here. Connect the other end of the cable to audio device (VIZIO sound bar, home theater system). Input Wide Sleep Menu/OK Arrow Left Volume Up/Down Last Info 4 E190VA / E220VA / E260VA / E261VA Power/Standby Input (Specific) Closed Caption (CC) Exit Arrow Up Arrow Right Arrow Down...
E261VA User Manual
Page 13
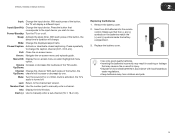
... the batteries match the (+) and (-) symbols inside the battery compartment. 3. Make sure that the (+) and (-) symbols on . Press repeatedly to the channel last viewed. E190VA / E220VA / E260VA / E261VA 2 Input: Change the input device. Input (Specific): Change the input device. Power/Standby: Turn the TV on -screen menu or select highlighted menu...
... the batteries match the (+) and (-) symbols inside the battery compartment. 3. Make sure that the (+) and (-) symbols on . Press repeatedly to the channel last viewed. E190VA / E220VA / E260VA / E261VA 2 Input: Change the input device. Input (Specific): Change the input device. Power/Standby: Turn the TV on -screen menu or select highlighted menu...

E261VA User Manual
Page 16
4 Select one of the connection types. Use the cable(s) shown to connect the TV to your device. BEST BETTER HDMI RF/ COAXIAL RGB COMPONENT GOOD COMPOSITE AV 8 E190VA / E220VA / E260VA / E261VA Select One: OR OR OR OR DIGITAL DIGITAL / ANALOG ANALOG ANALOG ANALOG Device Connection Chart
4 Select one of the connection types. Use the cable(s) shown to connect the TV to your device. BEST BETTER HDMI RF/ COAXIAL RGB COMPONENT GOOD COMPOSITE AV 8 E190VA / E220VA / E260VA / E261VA Select One: OR OR OR OR DIGITAL DIGITAL / ANALOG ANALOG ANALOG ANALOG Device Connection Chart
E261VA User Manual
Page 18
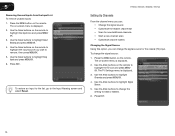
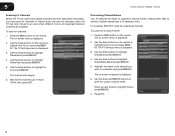
.... 4. The on the remote to highlight Skip Input and press MENU/OK. 6. Use the Arrow buttons to the Input Naming screen and select Reset. E190VA / E220VA / E260VA / E261VA Setting Up Channels From the channel menu you can: • Change the signal source • Customize the master channel list • Scan for...
.... 4. The on the remote to highlight Skip Input and press MENU/OK. 6. Use the Arrow buttons to the Input Naming screen and select Reset. E190VA / E220VA / E260VA / E261VA Setting Up Channels From the channel menu you can: • Change the signal source • Customize the master channel list • Scan for...
E261VA User Manual
Page 19
... your master channel list settings are preserved. Using the add channel feature, you can be displayed. 1. This is displayed. 3. See Scanning for new channels: 1. E190VA / E220VA / E260VA / E261VA 5 Customizing the Master Channel List By customizing the master channel list, you can choose which channels can restrict the scan to new channels...
... your master channel list settings are preserved. Using the add channel feature, you can be displayed. 1. This is displayed. 3. See Scanning for new channels: 1. E190VA / E220VA / E260VA / E261VA 5 Customizing the Master Channel List By customizing the master channel list, you can choose which channels can restrict the scan to new channels...
E261VA User Manual
Page 20
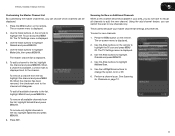
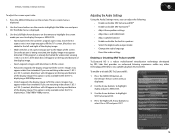
5 E190VA / E220VA / E260VA / E261VA Scanning for Channels Before the TV can detect and display channels and their associated information, you must scan for channels: 1. Use the Arrow ...
5 E190VA / E220VA / E260VA / E261VA Scanning for Channels Before the TV can detect and display channels and their associated information, you must scan for channels: 1. Use the Arrow ...
E261VA User Manual
Page 21
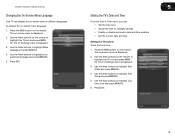
.... Press EXIT. 13 To change the on the remote to highlight your time zone and press MENU/OK. 6. The TV Settings menu is displayed. 3. E190VA / E220VA / E260VA / E261VA Changing the On-Screen Menu Language Your TV can : • Set the time zone • Adjust the time for daylight savings • Enable...
.... Press EXIT. 13 To change the on the remote to highlight your time zone and press MENU/OK. 6. The TV Settings menu is displayed. 3. E190VA / E220VA / E260VA / E261VA Changing the On-Screen Menu Language Your TV can : • Set the time zone • Adjust the time for daylight savings • Enable...
E261VA User Manual
Page 22
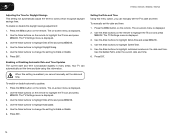
... time. Use the Arrow buttons to highlight Daylight Saving. 5. Press the MENU button on the remote. Use the Number Pad to Enable or Disable. 6. 5 E190VA / E220VA / E260VA / E261VA Adjusting the Time for Daylight Savings This setting will automatically adjust the time for zones which recognize daylight savings time. Press the MENU...
... time. Use the Arrow buttons to highlight Daylight Saving. 5. Press the MENU button on the remote. Use the Number Pad to Enable or Disable. 6. 5 E190VA / E220VA / E260VA / E261VA Adjusting the Time for Daylight Savings This setting will automatically adjust the time for zones which recognize daylight savings time. Press the MENU...

E261VA User Manual
Page 23
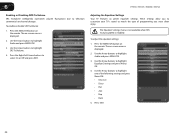
E190VA / E220VA / E260VA / E261VA 5 Adjusting the TV Settings for Use with A PC Your TV can be used to automatically adjust the picture for best quality, select Auto ...
E190VA / E220VA / E260VA / E261VA 5 Adjusting the TV Settings for Use with A PC Your TV can be used to automatically adjust the picture for best quality, select Auto ...
E261VA User Manual
Page 25
... options and press MENU/OK: • Sort - The menu is already inserted, continue with step 3. 3. Select to highlight an image, then press MENU/OK. E190VA / E220VA / E260VA / E261VA Remember: • The USB thumb drive must have a minimum 1GB memory • The TV will be displayed automatically. Load your photos onto a USB...
... options and press MENU/OK: • Sort - The menu is already inserted, continue with step 3. 3. Select to highlight an image, then press MENU/OK. E190VA / E220VA / E260VA / E261VA Remember: • The USB thumb drive must have a minimum 1GB memory • The TV will be displayed automatically. Load your photos onto a USB...
E261VA User Manual
Page 26
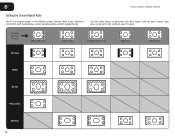
Original Content Format 480p/480i (4:3) 720p (16:9) 1080p/1080i (16:9) RGB (4:3) RGB (16:9) Normal Wide Zoom Panoramic Stretch 18 6 E190VA / E220VA / E260VA / E261VA Setting the Screen Aspect Ratio The TV can display images in red will not be visible on your content type. Each mode displays content according to determine the best aspect ratio for your TV screen. Use the table below to the content's original format. Areas in five different modes: Normal, Wide, Zoom, Panoramic, and Stretch.
Original Content Format 480p/480i (4:3) 720p (16:9) 1080p/1080i (16:9) RGB (4:3) RGB (16:9) Normal Wide Zoom Panoramic Stretch 18 6 E190VA / E220VA / E260VA / E261VA Setting the Screen Aspect Ratio The TV can display images in red will not be visible on your content type. Each mode displays content according to determine the best aspect ratio for your TV screen. Use the table below to the content's original format. Areas in five different modes: Normal, Wide, Zoom, Panoramic, and Stretch.
E261VA User Manual
Page 27
... you want to fill the TV's screen, black bars are watching widescreen (1.85:1 or 2.35:1) content, black bars will still appear on the remote. E190VA / E220VA / E260VA / E261VA To adjust the screen aspect ratio: 1. Images may appear distorted. The on the remote to highlight the screen mode you are added to...
... you want to fill the TV's screen, black bars are watching widescreen (1.85:1 or 2.35:1) content, black bars will still appear on the remote. E190VA / E220VA / E260VA / E261VA To adjust the screen aspect ratio: 1. Images may appear distorted. The on the remote to highlight the screen mode you are added to...
E261VA User Manual
Page 28
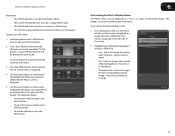
...; Rock 5. Press the MENU/OK button on the remote. Press the Right/Left Arrow buttons to television commercials or channel changes. Press EXIT. 20 6 E190VA / E220VA / E260VA / E261VA Enabling or Disabling SRS TruVolume SRS TruVolume intelligently normalizes volume fluctuations due to select On or Off and press EXIT. The Equalizer Settings...
...; Rock 5. Press the MENU/OK button on the remote. Press the Right/Left Arrow buttons to television commercials or channel changes. Press EXIT. 20 6 E190VA / E220VA / E260VA / E261VA Enabling or Disabling SRS TruVolume SRS TruVolume intelligently normalizes volume fluctuations due to select On or Off and press EXIT. The Equalizer Settings...
E261VA User Manual
Page 29
...: • To increase the loudness of the right speaker, increase the balance setting. • To increase the loudness of the left and right speakers. E190VA / E220VA / E260VA / E261VA 6 Adjusting Bass and Treble Levels The bass and treble levels for your liking. Press the MENU/OK button on the remote. To adjust...
...: • To increase the loudness of the right speaker, increase the balance setting. • To increase the loudness of the left and right speakers. E190VA / E220VA / E260VA / E261VA 6 Adjusting Bass and Treble Levels The bass and treble levels for your liking. Press the MENU/OK button on the remote. To adjust...


