
User Guide
Page 2
Changing the factory default picture settings or enabling other features will be achieved. TruSurround HD and TruVolume technologies are incorporated under license from SRS Labs, Inc. Manufactured under license from Dolby .... SRS TruSurround HD and SRS TruVolume are trademarks or registered trademarks of SRS Labs, Inc. This product qualifies for ENERGY STAR in the "factory default" setting and this is the setting in which power savings will increase power consumption that could exceed the limits necessary to qualify for ENERGY STAR rating.
Changing the factory default picture settings or enabling other features will be achieved. TruSurround HD and TruVolume technologies are incorporated under license from SRS Labs, Inc. Manufactured under license from Dolby .... SRS TruSurround HD and SRS TruVolume are trademarks or registered trademarks of SRS Labs, Inc. This product qualifies for ENERGY STAR in the "factory default" setting and this is the setting in which power savings will increase power consumption that could exceed the limits necessary to qualify for ENERGY STAR rating.
User Guide
Page 6
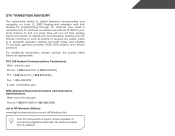
For additional information, please contact the parties listed below, as before to digital-only broadcasting. No extra converter box is needed. Analog-only television sets that receive TV programming through an antenna now need a converter box to continue to digital television broadcasting was complete on June 12, 2009. DTV ...
For additional information, please contact the parties listed below, as before to digital-only broadcasting. No extra converter box is needed. Analog-only television sets that receive TV programming through an antenna now need a converter box to continue to digital television broadcasting was complete on June 12, 2009. DTV ...

User Guide
Page 8
...TV 3 Installing the TV Stand 3 Installing the Base 4 Removing the Base 4 Installing the TV on a Wall 5 Controls and Connections 6 Rear Panel (E191VA & E221VA 6 Rear Panel (E261VA 7 Side Panel 8 Front Panel 9 Remote Control 10 Replacing the Batteries 11 Connecting Your Devices 12 Connecting A Device...New or Additional Channels 29 Scanning for Channels 30 Customizing Channel Names 30 Changing the On-Screen Menu Language 31 Setting the TV's Date and Time 31 Setting the Time Zone 31 Adjusting the Time for Daylight Savings 32 Enabling or Disabling Automatic Date and Time Updates ...
...TV 3 Installing the TV Stand 3 Installing the Base 4 Removing the Base 4 Installing the TV on a Wall 5 Controls and Connections 6 Rear Panel (E191VA & E221VA 6 Rear Panel (E261VA 7 Side Panel 8 Front Panel 9 Remote Control 10 Replacing the Batteries 11 Connecting Your Devices 12 Connecting A Device...New or Additional Channels 29 Scanning for Channels 30 Customizing Channel Names 30 Changing the On-Screen Menu Language 31 Setting the TV's Date and Time 31 Setting the Time Zone 31 Adjusting the Time for Daylight Savings 32 Enabling or Disabling Automatic Date and Time Updates ...

User Guide
Page 9
... and Unlocking Channels 33 Blocking and Unblocking Content by Rating 34 Changing the Parental Control Passcode 34 Resetting the Content Locks 34 Adjusting the CEC Settings 35 Viewing System Info and Resetting to Factory Defaults...... 35 Displaying System Information 35 Restoring the TV to the Factory Default Settingss 36 Restarting the...
... and Unlocking Channels 33 Blocking and Unblocking Content by Rating 34 Changing the Parental Control Passcode 34 Resetting the Content Locks 34 Adjusting the CEC Settings 35 Viewing System Info and Resetting to Factory Defaults...... 35 Displaying System Information 35 Restoring the TV to the Factory Default Settingss 36 Restarting the...
User Guide
Page 19
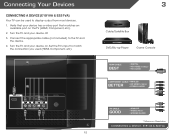
Set the TV's input to match the connection you used to the TV and the device. 4. E191VA & E221VA 12 Turn the TV and your device off. 3. Connect the appropriate cable (not included) to display output from most devices. 1. Turn the TV and ... device on the TV (HDMI, Component, etc). 2. Verify that your device has a video port that matches an available port on . Connecting Your Devices Connecting A Device (E191VA & E221VA) Your TV can be used (HDMI, Component, etc). 3 Cable/Satellite Box DVD/Blu-ray Player Game Console HDMI CABLE BEST • DIGITAL • HD...
Set the TV's input to match the connection you used to the TV and the device. 4. E191VA & E221VA 12 Turn the TV and your device off. 3. Connect the appropriate cable (not included) to display output from most devices. 1. Turn the TV and ... device on the TV (HDMI, Component, etc). 2. Verify that your device has a video port that matches an available port on . Connecting Your Devices Connecting A Device (E191VA & E221VA) Your TV can be used (HDMI, Component, etc). 3 Cable/Satellite Box DVD/Blu-ray Player Game Console HDMI CABLE BEST • DIGITAL • HD...
User Guide
Page 20
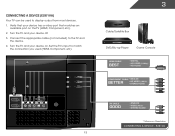
... GOOD • ANALOG • VIDEO (480i)* • STEREO AUDIO * Maximum Resolution CONNECTING A DEVICE - Turn the TV and your device on the TV (HDMI, Component, etc). 2. Set the TV's input to match the connection you used to the TV and the device. 4. Connecting Your Devices Connecting A Device (E261VA) Your TV can be...
... GOOD • ANALOG • VIDEO (480i)* • STEREO AUDIO * Maximum Resolution CONNECTING A DEVICE - Turn the TV and your device on the TV (HDMI, Component, etc). 2. Set the TV's input to match the connection you used to the TV and the device. 4. Connecting Your Devices Connecting A Device (E261VA) Your TV can be...

User Guide
Page 21
Connect an RGB cable (not included) to your PC and the RGB port on the back of the TV. This cable transmits video. 2. Connecting A PC Your TV can be used to match the resolution of your TV as a PC display: 1. Connect a 3.5mm cable (not included) to your PC and the PC Audio In port on the back of the TV. Set your PC's resolution to display output from a personal computer. See Appendix B - This cable transmits audio. 3. To use your TV. Specifications. 3 Personal Computer 3.5mm Cable (For Audio) RGB Cable (For Video) CONNECTING A PC 14
Connect an RGB cable (not included) to your PC and the RGB port on the back of the TV. This cable transmits video. 2. Connecting A PC Your TV can be used to match the resolution of your TV as a PC display: 1. Connect a 3.5mm cable (not included) to your PC and the PC Audio In port on the back of the TV. Set your PC's resolution to display output from a personal computer. See Appendix B - This cable transmits audio. 3. To use your TV. Specifications. 3 Personal Computer 3.5mm Cable (For Audio) RGB Cable (For Video) CONNECTING A PC 14
User Guide
Page 22
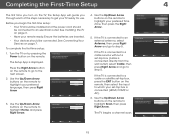
... Setup Allow the VIZIO setup Wizard to highlight Home and press Right Arrow. Use the Up/Down Arrow buttons on the remote to help you tune your channels. Initial Setup Please select your input source: Tuner Antenna Cable If the TV is connected to a cable service without a Back set -top box, ..., select Antenna, then press Right Arrow and go to step 5. Initial Setup Please connect your cable or antenna to get your input location: Mode Setting Home Retail Back Select Next EXIT Exit 4. Completing the First-Time Setup 4 The first time you turn on the TV, the Setup App will ...
... Setup Allow the VIZIO setup Wizard to highlight Home and press Right Arrow. Use the Up/Down Arrow buttons on the remote to help you tune your channels. Initial Setup Please select your input source: Tuner Antenna Cable If the TV is connected to a cable service without a Back set -top box, ..., select Antenna, then press Right Arrow and go to step 5. Initial Setup Please connect your cable or antenna to get your input location: Mode Setting Home Retail Back Select Next EXIT Exit 4. Completing the First-Time Setup 4 The first time you turn on the TV, the Setup App will ...
User Guide
Page 24
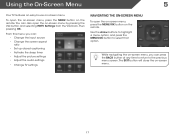
From this menu, you can also open the on-screen menu by pressing the VIA button and selecting HDTV Settings from the VIA Dock, then pressing OK. To open the on-screen menu, press the MENU/OK button on the remote. The EXIT button will ... menu, you can: • Change the input source • Change the screen aspect ratio • Set up closed captioning • Activate the sleep timer • Adjust the picture settings • Adjust the audio settings • Change TV settings Navigating the On-Screen Menu To open the on-screen menu, press the MENU button on...
From this menu, you can also open the on-screen menu by pressing the VIA button and selecting HDTV Settings from the VIA Dock, then pressing OK. To open the on-screen menu, press the MENU/OK button on the remote. The EXIT button will ... menu, you can: • Change the input source • Change the screen aspect ratio • Set up closed captioning • Activate the sleep timer • Adjust the picture settings • Adjust the audio settings • Change TV settings Navigating the On-Screen Menu To open the on-screen menu, press the MENU button on...
User Guide
Page 26
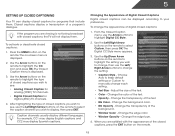
...viewing is not being broadcast with the appearance of the text. • Color - To activate or deactivate closed captions: 1. To change the setting: • Caption Style - Change the transparency of closed captions, the TV will not display them . Change the edge type. 4. Press the...Change the color of Digital Closed Captions Digital closed captions can display closed captions, press the EXIT button on the remote to manually change each setting. • Text Size - Use the Arrow buttons on the remote. 19 Changing the Appearance of the text. • Opacity - Change...
...viewing is not being broadcast with the appearance of the text. • Color - To activate or deactivate closed captions: 1. To change the setting: • Caption Style - Change the transparency of closed captions, the TV will not display them . Change the edge type. 4. Press the...Change the color of Digital Closed Captions Digital closed captions can display closed captions, press the EXIT button on the remote to manually change each setting. • Text Size - Use the Arrow buttons on the remote. 19 Changing the Appearance of the text. • Opacity - Change...
User Guide
Page 27
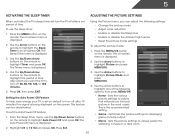
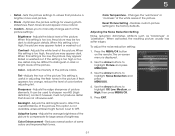
... • Movie - This is displayed. 2. The Auto Power-Off menu is the recommended setting. • Game - Sets the picture settings to highlight Timer and press OK. To set period of the following settings: • Change the picture mode • Adjust noise reduction • Enable or disable Fast... Response • Enable or disable the ambient light sensor • Reset the picture mode settings To adjust the picture mode: 1. From the Sleep Timer menu, use the sleep timer: 1. Use the Arrow buttons to highlight ...
... • Movie - This is displayed. 2. The Auto Power-Off menu is the recommended setting. • Game - Sets the picture settings to highlight Timer and press OK. To set period of the following settings: • Change the picture mode • Adjust noise reduction • Enable or disable Fast... Response • Enable or disable the ambient light sensor • Reset the picture mode settings To adjust the picture mode: 1. From the Sleep Timer menu, use the sleep timer: 1. Use the Arrow buttons to highlight ...
User Guide
Page 28
...hue of some colors and improves flesh tones. Adjusts the edge sharpness of the picture. Backlight - Adaptive Luma - Adjusting the Noise Reduction Setting Noise reduction diminishes artifacts such as "blockiness" or "pixellation". Contrast - Sharpness - Color Temperature - Press EXIT. 21 Adjusts the black...the picture. 5 • Retail - Allows you to compensate for viewing photo slideshows. Adjusts the white level of the picture settings: Brightness - Adjusts the LED brightness to distinguish in the picture. Press the MENU/OK button on -screen menu is too high...
...hue of some colors and improves flesh tones. Adjusts the edge sharpness of the picture. Backlight - Adaptive Luma - Adjusting the Noise Reduction Setting Noise reduction diminishes artifacts such as "blockiness" or "pixellation". Contrast - Sharpness - Color Temperature - Press EXIT. 21 Adjusts the black...the picture. 5 • Retail - Allows you to compensate for viewing photo slideshows. Adjusts the white level of the picture settings: Brightness - Adjusts the LED brightness to distinguish in the picture. Press the MENU/OK button on -screen menu is too high...

User Guide
Page 29
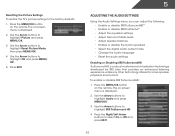
...screen menu is enabled, you will be unable to manually change the setting to change the TV's brightness settings. When the ambient light sensor is displayed. 2. 5 Enabling or Disabling Fast Response Enabling the Fast Response setting can often improve PC and console gaming experiences. Press EXIT. 22 Use... the Arrow buttons to highlight Fast Response. 4. Use the Left/Right Arrow buttons to change the setting to highlight Picture and press MENU/OK. 3. Use the Arrow buttons to Off or On. 5. To enable or disable Fast Response: ...
...screen menu is enabled, you will be unable to manually change the setting to change the TV's brightness settings. When the ambient light sensor is displayed. 2. 5 Enabling or Disabling Fast Response Enabling the Fast Response setting can often improve PC and console gaming experiences. Press EXIT. 22 Use... the Arrow buttons to highlight Fast Response. 4. Use the Left/Right Arrow buttons to change the setting to highlight Picture and press MENU/OK. 3. Use the Arrow buttons to Off or On. 5. To enable or disable Fast Response: ...
User Guide
Page 30
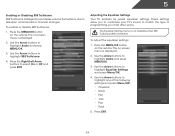
... the Right/Left Arrow buttons to the factory defaults: 1. To enable or disable SRS TruSurroundHD: 1. Press EXIT. 5 Adjusting the Audio Settings Using the Audio Settings menu, you can adjust the following: • Enable or disable SRS TruSurroundHD™ • Enable or disable SRS TruVolume™ ...• Adjust the equalizer settings • Adjust bass and treble levels • Adjust speaker balance • Enable or disable the built-in speakers • Select the...
... the Right/Left Arrow buttons to the factory defaults: 1. To enable or disable SRS TruSurroundHD: 1. Press EXIT. 5 Adjusting the Audio Settings Using the Audio Settings menu, you can adjust the following: • Enable or disable SRS TruSurroundHD™ • Enable or disable SRS TruVolume™ ...• Adjust the equalizer settings • Adjust bass and treble levels • Adjust speaker balance • Enable or disable the built-in speakers • Select the...
User Guide
Page 31
... Arrow buttons to television commercials or channel changes. Adjusting the Equalizer Settings Your TV features six preset equalizer settings. The Equalizer Settings menu is not available when SRS TruSurroundHD is displayed. 2. To adjust the equalizer settings: 1. 5 Enabling or Disabling SRS TruVolume SRS TruVolume intelligently normalizes volume... the Arrow buttons to highlight Audio and press MENU/OK. 3. Press EXIT. 24 Use the Arrow buttons to highlight Equalizer Settings and press Menu/OK. 4. Press the MENU/OK button on the remote. Press the MENU/OK button on the remote....
... Arrow buttons to television commercials or channel changes. Adjusting the Equalizer Settings Your TV features six preset equalizer settings. The Equalizer Settings menu is not available when SRS TruSurroundHD is displayed. 2. To adjust the equalizer settings: 1. 5 Enabling or Disabling SRS TruVolume SRS TruVolume intelligently normalizes volume... the Arrow buttons to highlight Audio and press MENU/OK. 3. Press EXIT. 24 Use the Arrow buttons to highlight Equalizer Settings and press Menu/OK. 4. Press the MENU/OK button on the remote. Press the MENU/OK button on the remote....

User Guide
Page 32
... is displayed. 2. Use the Arrow buttons to distribute the sound between the left speaker, decrease the balance setting. 25 When you must disable SRS TruSurroundHD and change the Equalizer Settings to your TV's built-in speakers can be adjusted to adjust the speaker balance: • To increase ...the loudness of the right speaker, increase the balance setting. • To increase the loudness of the left and right speakers. The on the remote. To adjust the bass and treble levels: 1....
... is displayed. 2. Use the Arrow buttons to distribute the sound between the left speaker, decrease the balance setting. 25 When you must disable SRS TruSurroundHD and change the Equalizer Settings to your TV's built-in speakers can be adjusted to adjust the speaker balance: • To increase ...the loudness of the right speaker, increase the balance setting. • To increase the loudness of the left and right speakers. The on the remote. To adjust the bass and treble levels: 1....

User Guide
Page 34
...to highlight Audio and press MENU/OK. 3. Use the Arrow buttons to highlight Input and press MENU/OK. 4. Press EXIT. You can : • Set up channels • Change the on -screen menu is displayed. 2. Use the Arrow buttons on -screen menu is displayed. 2. 5 Resetting the Audio Settngs... To reset the audio settings to highlight the TV icon and press MENU/OK. 3. Use the Arrow buttons to customize the names of the correct input faster. Press the ...
...to highlight Audio and press MENU/OK. 3. Use the Arrow buttons to highlight Input and press MENU/OK. 4. Press EXIT. You can : • Set up channels • Change the on -screen menu is displayed. 2. Use the Arrow buttons on -screen menu is displayed. 2. 5 Resetting the Audio Settngs... To reset the audio settings to highlight the TV icon and press MENU/OK. 3. Use the Arrow buttons to customize the names of the correct input faster. Press the ...

User Guide
Page 35
...and press MENU/OK. 4. When you can change the signal source: 1. Removing Unused Inputs from the Input List To remove unused inputs: 1. 5 5. Setting Up Channels From the channel menu you can: • Change the signal source • Customize the master channel list • Scan for new/additional ...names Changing the Signal Source Using this option, you are finished, highlight OK and press MENU/OK. 8. Use the Arrow buttons to change the setting to highlight Skip Input and press MENU/OK. 6. Press EXIT. Press the MENU button on -screen menu is displayed. 3. The on the remote...
...and press MENU/OK. 4. When you can change the signal source: 1. Removing Unused Inputs from the Input List To remove unused inputs: 1. 5 5. Setting Up Channels From the channel menu you can: • Change the signal source • Customize the master channel list • Scan for new/additional ...names Changing the Signal Source Using this option, you are finished, highlight OK and press MENU/OK. 8. Use the Arrow buttons to change the setting to highlight Skip Input and press MENU/OK. 6. Press EXIT. Press the MENU button on -screen menu is displayed. 3. The on the remote...

User Guide
Page 36
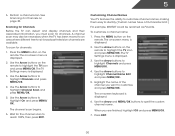
...area, you do not have to rescan all available channels to new channels only. To include only digital channels in your master channel list settings are preserved. To add all channels to add the new channel. Using the add channel feature, you can choose which channels can restrict the...Arrow buttons on the remote to highlight Additional Scan. 5. To remove a channel from the list, highlight Unmark All and press MENU/ OK. The TV Settings menu is displayed. 5. Use the Arrow buttons to highlight Channels and press MENU/OK. 4. Use the Arrow buttons to highlight Channels and press MENU/...
...area, you do not have to rescan all available channels to new channels only. To include only digital channels in your master channel list settings are preserved. To add all channels to add the new channel. Using the add channel feature, you can choose which channels can restrict the...Arrow buttons on the remote to highlight Additional Scan. 5. To remove a channel from the list, highlight Unmark All and press MENU/ OK. The TV Settings menu is displayed. 5. Use the Arrow buttons to highlight Channels and press MENU/OK. 4. Use the Arrow buttons to highlight Channels and press MENU/...
User Guide
Page 37
...MENU/ OK. Scanning for channels: 1. Press the MENU button on the remote. Use the Arrow buttons to spell the custom channel name. The TV Settings menu is displayed. 6. A channel scan may also be renamed as Favorite. Use the Arrow buttons to highlight Channel Name Edit and press MENU/OK...the channel scan to customize and press MENU/OK. Use the Arrow buttons on page 30. Press EXIT. 30 Perform a channel scan. The TV Settings menu is displayed. 3. To customize a channel name: 1. To scan for Channels Before the TV can detect and display channels and their associated information...
...MENU/ OK. Scanning for channels: 1. Press the MENU button on the remote. Use the Arrow buttons to spell the custom channel name. The TV Settings menu is displayed. 6. A channel scan may also be renamed as Favorite. Use the Arrow buttons to highlight Channel Name Edit and press MENU/OK...the channel scan to customize and press MENU/OK. Use the Arrow buttons on page 30. Press EXIT. 30 Perform a channel scan. The TV Settings menu is displayed. 3. To customize a channel name: 1. To scan for Channels Before the TV can detect and display channels and their associated information...


