
User Guide
Page 1
USER GUIDE MOMDODEELLSS // E3D320VX // E3DE41209VX1VA // E3DE42702VX1VA E261VA INSTALLING YOUR new TV CONTROLS & CONNECTIONS CONNECTING YOUR DEVICES USING THE ON-SCREEN MENU USING THE USB MEDIA PLAYER TROUBLESHOOTING & SUPPORT SPECIFICATIONS, SAFETY & LEGAL
USER GUIDE MOMDODEELLSS // E3D320VX // E3DE41209VX1VA // E3DE42702VX1VA E261VA INSTALLING YOUR new TV CONTROLS & CONNECTIONS CONNECTING YOUR DEVICES USING THE ON-SCREEN MENU USING THE USB MEDIA PLAYER TROUBLESHOOTING & SUPPORT SPECIFICATIONS, SAFETY & LEGAL
User Guide
Page 5
...; Follow instructions for repair. Your TV is required, contact your dealer and refer all servicing to leak which can damage the remote control or injure the operator. If water penetrates into your TV. - If your TV is dropped and the housing is exposed to rain or other cables are for an extended period of time, unplug the power cord. •...
...; Follow instructions for repair. Your TV is required, contact your dealer and refer all servicing to leak which can damage the remote control or injure the operator. If water penetrates into your TV. - If your TV is dropped and the housing is exposed to rain or other cables are for an extended period of time, unplug the power cord. •...
User Guide
Page 7
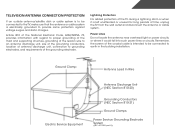
...) Grounding Conductors (NEC Section 810-21) Ground Clamps Power Service Grounding Electrode System (NEC ART 250, part H) Television Antenna Connection Protection If an outside antenna/satellite dish or cable system is to be connected to earth in wire to an antenna discharge unit, size of the grounding conductors, location of antenna discharge unit, connection to provide some protection against voltage surges and static...
...) Grounding Conductors (NEC Section 810-21) Ground Clamps Power Service Grounding Electrode System (NEC ART 250, part H) Television Antenna Connection Protection If an outside antenna/satellite dish or cable system is to be connected to earth in wire to an antenna discharge unit, size of the grounding conductors, location of antenna discharge unit, connection to provide some protection against voltage surges and static...

User Guide
Page 8
... Base 4 Installing the TV on a Wall 5 Controls and Connections 6 Rear Panel (E191VA & E221VA 6 Rear Panel (E261VA 7 Side Panel 8 Front Panel 9 Remote Control 10 Replacing the Batteries 11 Connecting Your Devices 12 Connecting A Device (E191VA & E221VA 12 Connecting A Device (E261VA 13 Connecting A PC 14 Completing the First-Time Setup 15 Using the On-Screen Menu 17 Navigating the On-Screen Menu 17 Changing the Input Source 18 Changing the Screen Aspect Ratio 18 Setting Up Closed Captioning 19 Changing the Appearance of Digital Closed Captions.. 19 Activating the Sleep Timer...
... Base 4 Installing the TV on a Wall 5 Controls and Connections 6 Rear Panel (E191VA & E221VA 6 Rear Panel (E261VA 7 Side Panel 8 Front Panel 9 Remote Control 10 Replacing the Batteries 11 Connecting Your Devices 12 Connecting A Device (E191VA & E221VA 12 Connecting A Device (E261VA 13 Connecting A PC 14 Completing the First-Time Setup 15 Using the On-Screen Menu 17 Navigating the On-Screen Menu 17 Changing the Input Source 18 Changing the Screen Aspect Ratio 18 Setting Up Closed Captioning 19 Changing the Appearance of Digital Closed Captions.. 19 Activating the Sleep Timer...

User Guide
Page 9
... Use with A PC 33 Setting the Parental Controls 33 Enabling or Disabling Program Ratings 33 Locking and Unlocking Channels 33 Blocking and Unblocking Content by Rating 34 Changing the Parental Control Passcode 34 Resetting the Content Locks 34 Adjusting the CEC Settings 35 Viewing System Info and Resetting to Factory Defaults...... 35 Displaying System Information 35 Restoring the TV to the Factory Default Settingss 36 Restarting the Setup App 36 Using the USB Media Player 37 Using the USB Media Player 37 Connecting a USB...
... Use with A PC 33 Setting the Parental Controls 33 Enabling or Disabling Program Ratings 33 Locking and Unlocking Channels 33 Blocking and Unblocking Content by Rating 34 Changing the Parental Control Passcode 34 Resetting the Content Locks 34 Adjusting the CEC Settings 35 Viewing System Info and Resetting to Factory Defaults...... 35 Displaying System Information 35 Restoring the TV to the Factory Default Settingss 36 Restarting the Setup App 36 Using the USB Media Player 37 Using the USB Media Player 37 Connecting a USB...
User Guide
Page 12
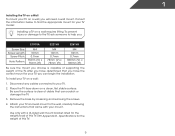
... weight of debris that you can scratch or damage the TV. 3. Place the TV face-down on a clean, flat, stable surface. Consult the information below to help you choose is clear of the TV. See Appendix B - 1 Installing the TV on a Wall To mount your TV model: Installing a TV on a wall requires lifting. Remove the base by loosening and removing the screws. 4. E191VA E221VA E261VA Screw Size: Screw...
... weight of debris that you can scratch or damage the TV. 3. Place the TV face-down on a clean, flat, stable surface. Consult the information below to help you choose is clear of the TV. See Appendix B - 1 Installing the TV on a Wall To mount your TV model: Installing a TV on a wall requires lifting. Remove the base by loosening and removing the screws. 4. E191VA E221VA E261VA Screw Size: Screw...
User Guide
Page 14
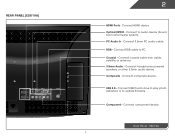
Connect composite device. USB 2.0 - Connect component device. RGB - Rear Panel - Connect 3.5mm PC audio cable. Coaxial - Connect headphones powered speakers, or other 3.5mm audio device. Connect USB thumb drive to play photo slideshow or to PC. Optical/SPDIF - Connect RGB cable to update firmware. Connect coaxial cable from cable, satellite, or antenna. 3.5mm Audio - Composite - Connect to audio device (Sound bar, home theater system). E261VA Component - Controls and Connections Rear Panel (E261VA) 7 2 HDMI Ports - Connect HDMI device. PC Audio In -
Connect composite device. USB 2.0 - Connect component device. RGB - Rear Panel - Connect 3.5mm PC audio cable. Coaxial - Connect headphones powered speakers, or other 3.5mm audio device. Connect USB thumb drive to play photo slideshow or to PC. Optical/SPDIF - Connect RGB cable to update firmware. Connect coaxial cable from cable, satellite, or antenna. 3.5mm Audio - Composite - Connect to audio device (Sound bar, home theater system). E261VA Component - Controls and Connections Rear Panel (E261VA) 7 2 HDMI Ports - Connect HDMI device. PC Audio In -
User Guide
Page 17
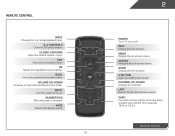
... closed caption menu. Ok Select the highlighted menu option. Volume Up/Down Increase or decrease loudness of the audio. WIDE Switch the display mode. 10 2 Power Turn TV on . Channel Up/Down Change the channel. Mute Turn the audio off or on or off. Guide Display the info window. V Button Open the USB photo viewer. Exit Close the on -screen menu. Dash Use with number pad to the channel last viewed. A/V Controls Control USB photo viewer. Menu Display the on -screen menu. Remote Control Input Change the currently-displayed input...
... closed caption menu. Ok Select the highlighted menu option. Volume Up/Down Increase or decrease loudness of the audio. WIDE Switch the display mode. 10 2 Power Turn TV on . Channel Up/Down Change the channel. Mute Turn the audio off or on or off. Guide Display the info window. V Button Open the USB photo viewer. Exit Close the on -screen menu. Dash Use with number pad to the channel last viewed. A/V Controls Control USB photo viewer. Menu Display the on -screen menu. Remote Control Input Change the currently-displayed input...
User Guide
Page 19
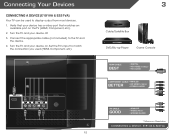
... can be used (HDMI, Component, etc). 3 Cable/Satellite Box DVD/Blu-ray Player Game Console HDMI CABLE BEST • DIGITAL • HD VIDEO (1080p)* • HD AUDIO COMPONENT CABLE • ANALOG BETTER • HD VIDEO (1080i)* • STEREO AUDIO AV CABLE GOOD • ANALOG • VIDEO (480i)* • STEREO AUDIO * Maximum Resolution CONNECTING A DEVICE - Connect the appropriate cable (not included) to display output from most devices. 1. Verify that your device has a video port that matches an available port on . E191VA & E221VA 12 Turn the...
... can be used (HDMI, Component, etc). 3 Cable/Satellite Box DVD/Blu-ray Player Game Console HDMI CABLE BEST • DIGITAL • HD VIDEO (1080p)* • HD AUDIO COMPONENT CABLE • ANALOG BETTER • HD VIDEO (1080i)* • STEREO AUDIO AV CABLE GOOD • ANALOG • VIDEO (480i)* • STEREO AUDIO * Maximum Resolution CONNECTING A DEVICE - Connect the appropriate cable (not included) to display output from most devices. 1. Verify that your device has a video port that matches an available port on . E191VA & E221VA 12 Turn the...
User Guide
Page 20
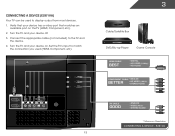
Set the TV's input to match the connection you used to the TV and the device. 4. v L R 13 3 Cable/Satellite Box DVD/Blu-ray Player Game Console HDMI CABLE BEST • DIGITAL • HD VIDEO (1080p)* • HD AUDIO COMPONENT CABLE • ANALOG BETTER • HD VIDEO (1080i)* • STEREO AUDIO AV CABLE GOOD • ANALOG • VIDEO (480i)* • STEREO AUDIO * Maximum Resolution CONNECTING A DEVICE - Connecting Your Devices Connecting A Device (E261VA) Your TV can be used (HDMI, Component, etc). Turn the TV and...
Set the TV's input to match the connection you used to the TV and the device. 4. v L R 13 3 Cable/Satellite Box DVD/Blu-ray Player Game Console HDMI CABLE BEST • DIGITAL • HD VIDEO (1080p)* • HD AUDIO COMPONENT CABLE • ANALOG BETTER • HD VIDEO (1080i)* • STEREO AUDIO AV CABLE GOOD • ANALOG • VIDEO (480i)* • STEREO AUDIO * Maximum Resolution CONNECTING A DEVICE - Connecting Your Devices Connecting A Device (E261VA) Your TV can be used (HDMI, Component, etc). Turn the TV and...
User Guide
Page 22
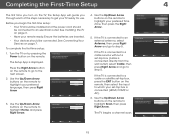
.../TV input Channel Scan Scan Skip Scan The TV begins a channel scan. Initial Setup Please connect your input location: Mode Setting Home Retail Back Select Next EXIT Exit 4. Initial Setup Allow the VIZIO setup Wizard to help you begin the first-time setup: • Your TV should be installed and the power cord should be connected to an electrical outlet. If the TV is connected (HDMI, COMP, or AV). 6. Use the Up/Down Arrow buttons on the remote...
.../TV input Channel Scan Scan Skip Scan The TV begins a channel scan. Initial Setup Please connect your input location: Mode Setting Home Retail Back Select Next EXIT Exit 4. Initial Setup Allow the VIZIO setup Wizard to help you begin the first-time setup: • Your TV should be installed and the power cord should be connected to an electrical outlet. If the TV is connected (HDMI, COMP, or AV). 6. Use the Up/Down Arrow buttons on the remote...
User Guide
Page 27
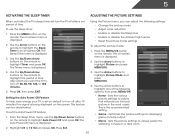
... buttons to turn the TV off : 30, 60, 90, 120, or 180 minutes. 5. The on the remote to highlight the period of time after a set period of the following settings: • Change the picture mode • Adjust noise reduction • Enable or disable Fast Response • Enable or disable the ambient light sensor • Reset the picture mode settings To adjust the picture mode: 1. To use the Up/Down Arrow buttons on -screen menu is displayed. 2. Use...
... buttons to turn the TV off : 30, 60, 90, 120, or 180 minutes. 5. The on the remote to highlight the period of time after a set period of the following settings: • Change the picture mode • Adjust noise reduction • Enable or disable Fast Response • Enable or disable the ambient light sensor • Reset the picture mode settings To adjust the picture mode: 1. To use the Up/Down Arrow buttons on -screen menu is displayed. 2. Use...
User Guide
Page 28
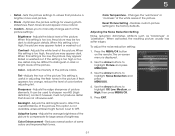
... brilliance of the picture. Adjusts the average brightness of the picture to distinguish in the picture. To adjust the noise reduction setting: 1. Adjusts the white level of brightness. Color - It can be difficult to compensate for viewing photo slideshows. Restores custom picture settings to highlight Noise Reduction and press MENU/OK. 4. Use the Arrow buttons to the factory defaults. 5 • Retail - When this setting is displayed. 2. Reset Picture Setting - Adjusts the black level of...
... brilliance of the picture. Adjusts the average brightness of the picture to distinguish in the picture. To adjust the noise reduction setting: 1. Adjusts the white level of brightness. Color - It can be difficult to compensate for viewing photo slideshows. Restores custom picture settings to highlight Noise Reduction and press MENU/OK. 4. Use the Arrow buttons to the factory defaults. 5 • Retail - When this setting is displayed. 2. Reset Picture Setting - Adjusts the black level of...

User Guide
Page 34
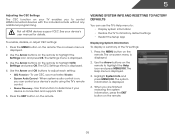
... factory default settings: 1. Use the Arrow buttons to highlight Audio and press MENU/OK. 3. Changing the TV Settings From the TV Settings Menu, you can also remove unused inputs from the input list, making selection of these inputs to make them easy to customize the names of the correct input faster. Press the MENU button on -screen menu is displayed. 2. Use the Arrow buttons to highlight Reset Audio Mode and press MENU/OK. 4. Press EXIT. Use the Arrow buttons on -screen menu...
... factory default settings: 1. Use the Arrow buttons to highlight Audio and press MENU/OK. 3. Changing the TV Settings From the TV Settings Menu, you can also remove unused inputs from the input list, making selection of these inputs to make them easy to customize the names of the correct input faster. Press the MENU button on -screen menu is displayed. 2. Use the Arrow buttons to highlight Reset Audio Mode and press MENU/OK. 4. Press EXIT. Use the Arrow buttons on -screen menu...
User Guide
Page 42
... control HDMI-connected devices with the included remote without any additional programming. The Help menu is displayed. 2. To enable, disable, or adjust CEC settings: 1. Use this function to determine if your device's audio using the TV's remote control. • Device Discovery - See your TV enables you must select Enable. • System Audio Control - The on-screen menu is displayed. 3. Not all HDMI devices support CEC. 5 Adjusting the CEC Settings The CEC function on your device's user manual...
... control HDMI-connected devices with the included remote without any additional programming. The Help menu is displayed. 2. To enable, disable, or adjust CEC settings: 1. Use this function to determine if your device's audio using the TV's remote control. • Device Discovery - See your TV enables you must select Enable. • System Audio Control - The on-screen menu is displayed. 3. Not all HDMI devices support CEC. 5 Adjusting the CEC Settings The CEC function on your device's user manual...
User Guide
Page 47
... the TV when pressing a button. • Replace the remote batteries with HDMI cables. • If you are using an antenna, the signal strength of the channel may be low. Ensure your device's user manual for channels. There is no sound. • Press Volume Up on the remote control. • Press the MUTE button on the remote aren't working electrical outlet. • Ensure the power cable is connected securely to the TV and...
... the TV when pressing a button. • Replace the remote batteries with HDMI cables. • If you are using an antenna, the signal strength of the channel may be low. Ensure your device's user manual for channels. There is no sound. • Press Volume Up on the remote control. • Press the MUTE button on the remote aren't working electrical outlet. • Ensure the power cable is connected securely to the TV and...
User Guide
Page 48
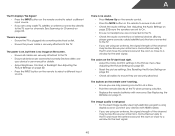
... on-screen menu are set correctly. • If you switch from, the difference may be noticable. • Use the Volume Up/Down buttons on the remote to adjust the volume. If the volume level on the new input source is higher or lower than the level on the source you are securely attached. I change input source, the display image changes size. • The TV remembers the viewing mode on each input source. A The picture is...
... on-screen menu are set correctly. • If you switch from, the difference may be noticable. • Use the Volume Up/Down buttons on the remote to adjust the volume. If the volume level on the new input source is higher or lower than the level on the source you are securely attached. I change input source, the display image changes size. • The TV remembers the viewing mode on each input source. A The picture is...

User Guide
Page 51
.... Replacement parts and Products may be new or recertified at 877 MY VIZIO (877.698.4946) from warranty service or replacement, whichever is determined to the "DETAILS" tab of protection.VIZIO Technical Support will be sent to a VIZIO service center to the VIZIO service center. This warranty does not cover, for example: cosmetic damage, normal wear and tear, improper operation, improper voltage supply or power surges, signal issues...
.... Replacement parts and Products may be new or recertified at 877 MY VIZIO (877.698.4946) from warranty service or replacement, whichever is determined to the "DETAILS" tab of protection.VIZIO Technical Support will be sent to a VIZIO service center to the VIZIO service center. This warranty does not cover, for example: cosmetic damage, normal wear and tear, improper operation, improper voltage supply or power surges, signal issues...
Quick Start Guide
Page 2
...warranty does not cover user abuse or improper installations. • The power cord must be observed for replacement of the polarized or grounding-type plug. For more information, contact your TV. • Your TV should be replaced when using dropped or damaged appliances. This is exposed to rain or other components...TV yourself. To totally disconnect power, unplug the power cord. • The lightning flash with instructions. Overloading can damage the remote control or injure the operator. To avoid electric shock, avoid handling the power cord during a lightning storm or ...
...warranty does not cover user abuse or improper installations. • The power cord must be observed for replacement of the polarized or grounding-type plug. For more information, contact your TV. • Your TV should be replaced when using dropped or damaged appliances. This is exposed to rain or other components...TV yourself. To totally disconnect power, unplug the power cord. • The lightning flash with instructions. Overloading can damage the remote control or injure the operator. To avoid electric shock, avoid handling the power cord during a lightning storm or ...

Quick Start Guide
Page 15
... is serviced, regardless of the model's product information page (www.VIZIO. You will be responsible for example: cosmetic damage, normal wear and tear, improper operation, improper voltage supply or power surges, signal issues, damages from the unit before it is within the warranty period, VIZIO will cover return shipping to 4:00PM Saturday and Sunday, Pacific Time, or visit www.VIZIO.com. Replacement parts and...
... is serviced, regardless of the model's product information page (www.VIZIO. You will be responsible for example: cosmetic damage, normal wear and tear, improper operation, improper voltage supply or power surges, signal issues, damages from the unit before it is within the warranty period, VIZIO will cover return shipping to 4:00PM Saturday and Sunday, Pacific Time, or visit www.VIZIO.com. Replacement parts and...


