
User Manual (English)
Page 3
To purchase an extended warranty service plan, visit www.VIZIO.com. When you to operate within defined design limits. To prevent your TV from being walked on or pinched particularly at (877) 698-4946. Keep these instructions in a safe place for future reference. •...; Heed all warnings. • Follow all instructions. • Do not use , and maintenance of your TV. WHEN READING THIS MANUAL When you either: • Register your VIZIO product at www.VIZIO.com • Complete and mail the enclosed registration card Extended Warranties For peace of mind, and to ensure ...
To purchase an extended warranty service plan, visit www.VIZIO.com. When you to operate within defined design limits. To prevent your TV from being walked on or pinched particularly at (877) 698-4946. Keep these instructions in a safe place for future reference. •...; Heed all warnings. • Follow all instructions. • Do not use , and maintenance of your TV. WHEN READING THIS MANUAL When you either: • Register your VIZIO product at www.VIZIO.com • Complete and mail the enclosed registration card Extended Warranties For peace of mind, and to ensure ...
User Manual (English)
Page 4
... company. • Do not apply pressure or throw objects at least three feet should be operated only from overheating, be maintained between your TV cabinet. Doing so could short circuit parts causing a fire or electric shock. If you to an area of high temperature, condensation may be...proper ventilation is used for your dealer. When a cart is provided. • Never push any objects on the label. Do not place your TV in the housing. The manufacturer's warranty does not cover user abuse or improper installations. • The power cord must be of sufficient magnitude ...
... company. • Do not apply pressure or throw objects at least three feet should be operated only from overheating, be maintained between your TV cabinet. Doing so could short circuit parts causing a fire or electric shock. If you to an area of high temperature, condensation may be...proper ventilation is used for your dealer. When a cart is provided. • Never push any objects on the label. Do not place your TV in the housing. The manufacturer's warranty does not cover user abuse or improper installations. • The power cord must be of sufficient magnitude ...
User Manual (English)
Page 5
...shock, do not touch the connector with wet hands. • Insert batteries in an area with heavy dust or high humidity. When your TV in accordance with instructions. Do not expose batteries to persons. h• The lightning flash with arrowhead symbol within an equilateral triangle is used ...sufficient magnitude to constitute a risk of electrical shock to excessive heat such as sunshine, fire or the like. • If any of your TV if any object drops into your dealer for use by qualified service personnel only. The performance of the following occurs, contact the dealer: - ...
...shock, do not touch the connector with wet hands. • Insert batteries in an area with heavy dust or high humidity. When your TV in accordance with instructions. Do not expose batteries to persons. h• The lightning flash with arrowhead symbol within an equilateral triangle is used ...sufficient magnitude to constitute a risk of electrical shock to excessive heat such as sunshine, fire or the like. • If any of your TV if any object drops into your dealer for use by qualified service personnel only. The performance of the following occurs, contact the dealer: - ...
User Manual (English)
Page 6
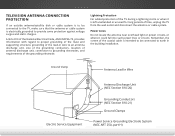
...Section 810-21) Ground Clamps Power Service Grounding Electrode System (NEC ART 250, part H) Lightning Protection For added protection of time, unplug the TV from the wall outlet and disconnect the antenna or cable system. TELEVISION ANTENNA CONNECTION PROTECTION If an outside antenna/satellite dish or cable ...charges. Remember, the screen of the coaxial cable is intended to be connected to the TV, make sure that the antenna or cable system is left unattended or unused for long periods of the TV during a lightning storm or when it could fall into such power lines or circuits....
...Section 810-21) Ground Clamps Power Service Grounding Electrode System (NEC ART 250, part H) Lightning Protection For added protection of time, unplug the TV from the wall outlet and disconnect the antenna or cable system. TELEVISION ANTENNA CONNECTION PROTECTION If an outside antenna/satellite dish or cable ...charges. Remember, the screen of the coaxial cable is intended to be connected to the TV, make sure that the antenna or cable system is left unattended or unused for long periods of the TV during a lightning storm or when it could fall into such power lines or circuits....
User Manual (English)
Page 7
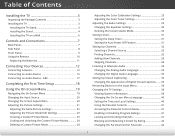
... Audio Language 35 Setting Up Closed Captioning 36 Changing the Appearance of Contents Installing the TV 3 Inspecting the Package Contents 3 Installing the TV 3 Installing the TV Stand 3 Installing the Stand 4 Installing the TV on the Input Menu 38 Changing the TV Settings 39 Viewing System Information 39 Changing the On-Screen Menu Language 40 Setting...
... Audio Language 35 Setting Up Closed Captioning 36 Changing the Appearance of Contents Installing the TV 3 Inspecting the Package Contents 3 Installing the TV 3 Installing the TV Stand 3 Installing the Stand 4 Installing the TV on the Input Menu 38 Changing the TV Settings 39 Viewing System Information 39 Changing the On-Screen Menu Language 40 Setting...
User Manual (English)
Page 8
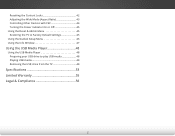
Resetting the Content Locks 42 Adjusting the Wide Mode (Aspect Ratio 43 Controlling Other Devices with CEC 44 Turning the Power Indicator On or Off 45 Using the Reset & Admin Menu 45 Restoring the TV to Factory Default Settings 45 Using the Guided Setup Menu 46 Using the Info Window 47 Using the USB Media Player 48 Using the USB Media Player 48 Preparing your USB drive to play USB media 48 Playing USB media 48 Removing the USB drive from the TV 48 Specifications 53 Limited Warranty 55 Legal & Compliance 56 2
Resetting the Content Locks 42 Adjusting the Wide Mode (Aspect Ratio 43 Controlling Other Devices with CEC 44 Turning the Power Indicator On or Off 45 Using the Reset & Admin Menu 45 Restoring the TV to Factory Default Settings 45 Using the Guided Setup Menu 46 Using the Info Window 47 Using the USB Media Player 48 Using the USB Media Player 48 Preparing your USB drive to play USB media 48 Playing USB media 48 Removing the USB drive from the TV 48 Specifications 53 Limited Warranty 55 Legal & Compliance 56 2
User Manual (English)
Page 9
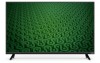
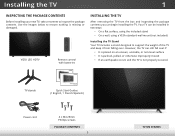
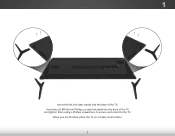
... stand • On a wall, using a VESA-standard wall mount (not included) Installing the TV Stand Your TV includes a stand designed to ensure nothing is not properly secured. VIZIO LED HDTV Remote control with batteries INSTALLING THE TV After removing the TV from falling over if: • It is placed on an uneven, unstable, or non...
... stand • On a wall, using a VESA-standard wall mount (not included) Installing the TV Stand Your TV includes a stand designed to ensure nothing is not properly secured. VIZIO LED HDTV Remote control with batteries INSTALLING THE TV After removing the TV from falling over if: • It is placed on an uneven, unstable, or non...
User Manual (English)
Page 10
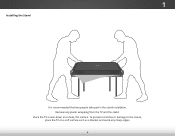
1 Installing the Stand It is recommended that two people take part in the stand installation. Remove any sharp edges. 4 To prevent scratches or damage to the screen, place the TV on a clean, flat surface. Place the TV screen-down on a soft surface such as a blanket and avoid any plastic wrapping from the TV and the stand.
1 Installing the Stand It is recommended that two people take part in the stand installation. Remove any sharp edges. 4 To prevent scratches or damage to the screen, place the TV on a clean, flat surface. Place the TV screen-down on a soft surface such as a blanket and avoid any plastic wrapping from the TV and the stand.
User Manual (English)
Page 11
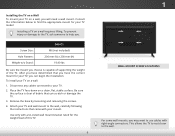
Insert two (2) M4 28 mm Phillips screws (included) into the base of the TV and tighten them using a Phillips screwdriver, to secure each stand to the TV. When you are finished, place the TV on a stable, level surface. 5 1 Insert the left and right stands into the back of the TV.
Insert two (2) M4 28 mm Phillips screws (included) into the base of the TV and tighten them using a Phillips screwdriver, to secure each stand to the TV. When you are finished, place the TV on a stable, level surface. 5 1 Insert the left and right stands into the back of the TV.
User Manual (English)
Page 12
...Size: Hole Pattern: Weight w/o Stand: D43-C1 M6 (not included) 200 mm (V) x 200 mm (H) 19.40 lbs Be sure the mount you will need a wall mount. To install your TV on a clean, flat, stable surface. After you have the correct mount for your TV, you have determined that can begin the... installation. Disconnect any cables connected to your TV model: Installing a TV on a wall requires lifting. Place the TV face-down on a wall: 1. Be sure the surface is capable of supporting the weight of the TV. This allows the TV to rest closer to find the appropriate mount for ...
...Size: Hole Pattern: Weight w/o Stand: D43-C1 M6 (not included) 200 mm (V) x 200 mm (H) 19.40 lbs Be sure the mount you will need a wall mount. To install your TV on a clean, flat, stable surface. After you have the correct mount for your TV, you have determined that can begin the... installation. Disconnect any cables connected to your TV model: Installing a TV on a wall requires lifting. Place the TV face-down on a wall: 1. Be sure the surface is capable of supporting the weight of the TV. This allows the TV to rest closer to find the appropriate mount for ...

User Manual (English)
Page 14
Press once to turn on the TV. Press once to turn off the TV Input - 2 Power - Press and hold to access the INPUT menu. 8 SIDE PANEL
Press once to turn on the TV. Press once to turn off the TV Input - 2 Power - Press and hold to access the INPUT menu. 8 SIDE PANEL

User Manual (English)
Page 15
To keep the power indicator on as long as the TV is on, see Turning the Power Indicator On or Off on , then goes out after several seconds. 2 FRONT PANEL REMOTE SENSOR & POWER INDICATOR When using the remote, aim it directly at this sensor. The power indicator flashes on when the TV turns on page 45. 9 FRONT PANEL
To keep the power indicator on as long as the TV is on, see Turning the Power Indicator On or Off on , then goes out after several seconds. 2 FRONT PANEL REMOTE SENSOR & POWER INDICATOR When using the remote, aim it directly at this sensor. The power indicator flashes on when the TV turns on page 45. 9 FRONT PANEL
User Manual (English)
Page 16
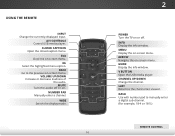
... decrease loudness of the audio. Ok Select the highlighted menu option. MUTE Turn the audio off . WIDE Switch the display mode. 10 2 POWER Turn the TV on or off or on. USING THE REMOTE INPUT Change the currently-displayed input. Exit Close the on -screen menu. MENU Display the on -screen...
... decrease loudness of the audio. Ok Select the highlighted menu option. MUTE Turn the audio off . WIDE Switch the display mode. 10 2 POWER Turn the TV on or off or on. USING THE REMOTE INPUT Change the currently-displayed input. Exit Close the on -screen menu. MENU Display the on -screen...
User Manual (English)
Page 18
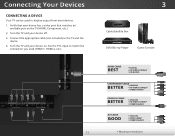
... port that matches an available port on . Connect the appropriate cable (not included) to display output from most devices. 1. Connecting Your Devices CONNECTING A DEVICE Your TV can be used (HDMI-1, HDMI-2, etc.). 12 3 Cable/Satellite Box DVD/Blu-ray Player Game Console HDMI CABLE BEST • DIGITAL • HD VIDEO (1080p...; HD VIDEO (1080i)* • STEREO AUDIO AV CABLE GOOD • ANALOG • VIDEO (480i)* • STEREO AUDIO * Maximum resolution Verify that your device on the TV (HDMI, Component, etc.). 2. Turn the TV and your device off. 3.
... port that matches an available port on . Connect the appropriate cable (not included) to display output from most devices. 1. Connecting Your Devices CONNECTING A DEVICE Your TV can be used (HDMI-1, HDMI-2, etc.). 12 3 Cable/Satellite Box DVD/Blu-ray Player Game Console HDMI CABLE BEST • DIGITAL • HD VIDEO (1080p...; HD VIDEO (1080i)* • STEREO AUDIO AV CABLE GOOD • ANALOG • VIDEO (480i)* • STEREO AUDIO * Maximum resolution Verify that your device on the TV (HDMI, Component, etc.). 2. Turn the TV and your device off. 3.

User Manual (English)
Page 19
... GOOD BETTER 13 AUDIO AND VIDEO CABLE TYPES AV CABLE AV cables (or composite cables) are the traditional way of connecting your devices to your TV. CONNECTING A DEVICE - Coaxial cables carry both audio and video signals through a single connector. • Video Resolutions up to 480i • Analog Connection • Audio and...
... GOOD BETTER 13 AUDIO AND VIDEO CABLE TYPES AV CABLE AV cables (or composite cables) are the traditional way of connecting your devices to your TV. CONNECTING A DEVICE - Coaxial cables carry both audio and video signals through a single connector. • Video Resolutions up to 480i • Analog Connection • Audio and...

User Manual (English)
Page 21
... bar. 1. Verify that your audio device off. 3. CONNECTING AN AUDIO DEVICE Your TV can output sound to the TV and the device. 4. Turn the TV and your device has an audio port that matches an available port on . 3 Home Audio Receiver VIZIO Sound Bar RCA CABLE GOOD • ANALOG STEREO CONNECTION • 2.0 CHANNEL OPTICAL...
... bar. 1. Verify that your audio device off. 3. CONNECTING AN AUDIO DEVICE Your TV can output sound to the TV and the device. 4. Turn the TV and your device has an audio port that matches an available port on . 3 Home Audio Receiver VIZIO Sound Bar RCA CABLE GOOD • ANALOG STEREO CONNECTION • 2.0 CHANNEL OPTICAL...

User Manual (English)
Page 22
... of connecting your devices to be sent over the red and white connectors. Audio signals are digitally transmitted between devices. Audio Return Channel-enabled (ARC) TVs allow audio to your audio device. 3 CONNECTING AN AUDIO DEVICE - OPTICAL/SPDIF CABLE Optical/SPDIF cables transmit audio signals as pulses of plastic fibers. See...
... of connecting your devices to be sent over the red and white connectors. Audio signals are digitally transmitted between devices. Audio Return Channel-enabled (ARC) TVs allow audio to your audio device. 3 CONNECTING AN AUDIO DEVICE - OPTICAL/SPDIF CABLE Optical/SPDIF cables transmit audio signals as pulses of plastic fibers. See...

User Manual (English)
Page 23
... Player Your Blu-ray Player 17 ARC Without HDMI ARC Built-in Tuner With HDMI ARC Built-in Tuner Without an HDMI ARC setup, your TV will transmit audio signal to and from the built-in tuner and VIA apps to your... TV with an all-digital audio/video connection. RCA (Audio) Your TV HDMI Your Home Audio Receiver HDMI Your TV HDMI With an HDMI ARC setup, the audio connection between your TV and home audio receiver can be removed.
... Player Your Blu-ray Player 17 ARC Without HDMI ARC Built-in Tuner With HDMI ARC Built-in Tuner Without an HDMI ARC setup, your TV will transmit audio signal to and from the built-in tuner and VIA apps to your... TV with an all-digital audio/video connection. RCA (Audio) Your TV HDMI Your Home Audio Receiver HDMI Your TV HDMI With an HDMI ARC setup, the audio connection between your TV and home audio receiver can be removed.
User Manual (English)
Page 24
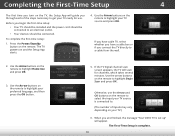
.../Standby button on the remote to highlight Home Use and press OK. 3. Use the Arrow buttons on the remote to highlight your mode. Choose your TV source and press OK. Select Home Use for use. The First-Time Setup is connected to. (The number of the steps necessary to get your... on the remote to highlight Begin Scan and press OK. When you are finished, the message "Your VIZIO TV is set up" will scan for in -home use. If the TV Signal channel scan screen appears, the TV will appear. Select Store Demo for channels, which takes several minutes. Store Demo Home Use 5. To...
.../Standby button on the remote to highlight Home Use and press OK. 3. Use the Arrow buttons on the remote to highlight your mode. Choose your TV source and press OK. Select Home Use for use. The First-Time Setup is connected to. (The number of the steps necessary to get your... on the remote to highlight Begin Scan and press OK. When you are finished, the message "Your VIZIO TV is set up" will scan for in -home use. If the TV Signal channel scan screen appears, the TV will appear. Select Store Demo for channels, which takes several minutes. Store Demo Home Use 5. To...

User Manual (English)
Page 25
... settings • Set the Sleep Timer • Adjust the Channel settings • Set up Closed Captioning • Select input devices • Adjust TV settings • Access the Guided Setup VIZIO TV SETTINGS Picture Audio Timers Channels CC Closed Captions Devices System Guided Setup NAVIGATING THE ON-SCREEN MENU To open the on-screen... on-screen menu, press the MENU button on the remote. The EXIT button will close the on -screen menu. Using the On-Screen Menu 5 Your TV features an easy-to-use on -screen menu.
... settings • Set the Sleep Timer • Adjust the Channel settings • Set up Closed Captioning • Select input devices • Adjust TV settings • Access the Guided Setup VIZIO TV SETTINGS Picture Audio Timers Channels CC Closed Captions Devices System Guided Setup NAVIGATING THE ON-SCREEN MENU To open the on-screen... on-screen menu, press the MENU button on the remote. The EXIT button will close the on -screen menu. Using the On-Screen Menu 5 Your TV features an easy-to-use on -screen menu.


