User Manual (English)
Page 5
... sunshine, fire or the like. • If any abnormality occurs. Liquid sprays or any way. - Your TV is exposed to leak which can damage the remote control or injure the operator. Your TV is dropped or damaged in any object drops into your TV is dropped and the housing is intended...
... sunshine, fire or the like. • If any abnormality occurs. Liquid sprays or any way. - Your TV is exposed to leak which can damage the remote control or injure the operator. Your TV is dropped or damaged in any object drops into your TV is dropped and the housing is intended...
User Manual (English)
Page 7
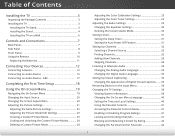
... Parental Control Passcode 42 1 Table of Digital Closed Captions........ 36 Renaming Devices on a Wall 6 Controls and Connections 7 Back Panel 7 Side Panel 8 Front Panel 9 Using the Remote 10 Replacing the Batteries 11 Connecting Your Devices 12 Connecting A Device 12 Connecting an Audio Device 15 Connecting an Audio Device -
... Parental Control Passcode 42 1 Table of Digital Closed Captions........ 36 Renaming Devices on a Wall 6 Controls and Connections 7 Back Panel 7 Side Panel 8 Front Panel 9 Using the Remote 10 Replacing the Batteries 11 Connecting Your Devices 12 Connecting A Device 12 Connecting an Audio Device 15 Connecting an Audio Device -
User Manual (English)
Page 9
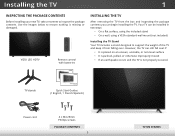
... nothing is not properly secured. TV stands Quick Start Guides (1 English, 1 French/Spanish) Power cord 4 x M4 28mm Phillips screws PACKAGE CONTENTS 3 TV ON STANDS VIZIO LED HDTV Remote control with batteries INSTALLING THE TV After removing the TV from falling over if: • It is placed on an uneven, unstable, or non...
... nothing is not properly secured. TV stands Quick Start Guides (1 English, 1 French/Spanish) Power cord 4 x M4 28mm Phillips screws PACKAGE CONTENTS 3 TV ON STANDS VIZIO LED HDTV Remote control with batteries INSTALLING THE TV After removing the TV from falling over if: • It is placed on an uneven, unstable, or non...

User Manual (English)
Page 15
To keep the power indicator on as long as the TV is on, see Turning the Power Indicator On or Off on , then goes out after several seconds. 2 FRONT PANEL REMOTE SENSOR & POWER INDICATOR When using the remote, aim it directly at this sensor. The power indicator flashes on when the TV turns on page 45. 9 FRONT PANEL
To keep the power indicator on as long as the TV is on, see Turning the Power Indicator On or Off on , then goes out after several seconds. 2 FRONT PANEL REMOTE SENSOR & POWER INDICATOR When using the remote, aim it directly at this sensor. The power indicator flashes on when the TV turns on page 45. 9 FRONT PANEL
User Manual (English)
Page 16
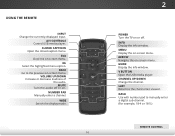
... enter a channel. INFO Display the info window. ARROW Navigate the on . GUIDE Display the info window. A/V CONTROLS Control USB media player. USING THE REMOTE INPUT Change the currently-displayed input. V BUTTON Open the USB media player. BACK Go to the channel last viewed. DASH Use with number pad to... manually enter a digital sub-channel. (For example, 18-4 or 18-5.) REMOTE CONTROL WIDE Switch the display mode. 10 2 POWER Turn the TV on or off or on -screen menu. CHANNEL UP/DOWN Change the channel.
... enter a channel. INFO Display the info window. ARROW Navigate the on . GUIDE Display the info window. A/V CONTROLS Control USB media player. USING THE REMOTE INPUT Change the currently-displayed input. V BUTTON Open the USB media player. BACK Go to the channel last viewed. DASH Use with number pad to... manually enter a digital sub-channel. (For example, 18-4 or 18-5.) REMOTE CONTROL WIDE Switch the display mode. 10 2 POWER Turn the TV on or off or on -screen menu. CHANNEL UP/DOWN Change the channel.

User Manual (English)
Page 17
2 Replacing the Batteries 1. Insert two batteries into the remote control. Remove the battery cover. 2. Make sure that the (+) and (-) symbols on the batteries match the (+) and (-) symbols inside the battery compartment. 3. Replace the battery cover. 11
2 Replacing the Batteries 1. Insert two batteries into the remote control. Remove the battery cover. 2. Make sure that the (+) and (-) symbols on the batteries match the (+) and (-) symbols inside the battery compartment. 3. Replace the battery cover. 11
User Manual (English)
Page 24
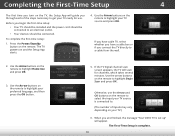
... Choose your TV source and press OK. Otherwise, use the Arrow and OK buttons on the remote to an electrical outlet. • Your devices should be connected. Choisissez "Home Use" pour ...Use the Arrow buttons on and the Setup App starts. 4. Use the arrow buttons on the remote. Seleccione "Home Use" para Modo de Casa o "Store Demo" para Demostración en la Tienda. When... finished, the message "Your VIZIO TV is connected to. (The number of the steps necessary to highlight Begin Scan and press OK. Press the Power/Standby button on the remote to get your TV ready for...
... Choose your TV source and press OK. Otherwise, use the Arrow and OK buttons on the remote to an electrical outlet. • Your devices should be connected. Choisissez "Home Use" pour ...Use the Arrow buttons on and the Setup App starts. 4. Use the arrow buttons on the remote. Seleccione "Home Use" para Modo de Casa o "Store Demo" para Demostración en la Tienda. When... finished, the message "Your VIZIO TV is connected to. (The number of the steps necessary to highlight Begin Scan and press OK. Press the Power/Standby button on the remote to get your TV ready for...

User Manual (English)
Page 25
...• Adjust the Channel settings • Set up Closed Captioning • Select input devices • Adjust TV settings • Access the Guided Setup VIZIO TV SETTINGS Picture Audio Timers Channels CC Closed Captions Devices System Guided Setup NAVIGATING THE ON-SCREEN MENU To open the on-screen menu, press... the MENU button on the remote. Wide Zoom Normal Panoramic While navigating the on -screen menu. The EXIT button will close the on the remote. ABC Input Wide CC Sleep Timer Picture Audio Network Settings Help 19 Use the ...
...• Adjust the Channel settings • Set up Closed Captioning • Select input devices • Adjust TV settings • Access the Guided Setup VIZIO TV SETTINGS Picture Audio Timers Channels CC Closed Captions Devices System Guided Setup NAVIGATING THE ON-SCREEN MENU To open the on-screen menu, press... the MENU button on the remote. Wide Zoom Normal Panoramic While navigating the on -screen menu. The EXIT button will close the on the remote. ABC Input Wide CC Sleep Timer Picture Audio Network Settings Help 19 Use the ...
User Manual (English)
Page 26
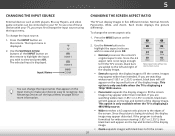
...source. • Wide stretches a 4:3 aspect ratio picture to the left and right of the screen. See Renaming Devices on the Input Menu on the remote. 2. The TV can display images in five different modes: Normal, Stretch, Panoramic, Wide, and Zoom. Press the WIDE button on page 38 for... widescreen viewing (1.85:1 or 2.35:1), then black bars will still appear on the remote. Normal Panoramic Normal Stretch Wide Wide Zoom Zoom Note: Aspect ratio settings may appear distorted. This option is only available when the TV is displayed...
...source. • Wide stretches a 4:3 aspect ratio picture to the left and right of the screen. See Renaming Devices on the Input Menu on the remote. 2. The TV can display images in five different modes: Normal, Stretch, Panoramic, Wide, and Zoom. Press the WIDE button on page 38 for... widescreen viewing (1.85:1 or 2.35:1), then black bars will still appear on the remote. Normal Panoramic Normal Stretch Wide Wide Zoom Zoom Note: Aspect ratio settings may appear distorted. This option is only available when the TV is displayed...
User Manual (English)
Page 27
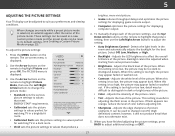
...Vivid sets the picture settings to adjust additional settings or EXIT. 21 To adjust the picture settings: 1. Use the Arrow buttons on the remote. To manually change each of the picture. • Color - Backlight cannot be used to sharpen non-HD (high definition) content; The...setting is too high, the picture Exit ma2yD appea3Dr faded or washed out. • Contrast - The on the remote to highlight that does not otherwise exist. 5. VIZIO PICTURE Picture Mode Auto Brightness Control Backlight - This adjusting the flesh tones in a brightly-lit room. When this...
...Vivid sets the picture settings to adjust additional settings or EXIT. 21 To adjust the picture settings: 1. Use the Arrow buttons on the remote. To manually change each of the picture. • Color - Backlight cannot be used to sharpen non-HD (high definition) content; The...setting is too high, the picture Exit ma2yD appea3Dr faded or washed out. • Contrast - The on the remote to highlight that does not otherwise exist. 5. VIZIO PICTURE Picture Mode Auto Brightness Control Backlight - This adjusting the flesh tones in a brightly-lit room. When this...

User Manual (English)
Page 30
... Picture Mode, then press OK. Sleep Timer Picture Audio Network Settings Help 24 Use the Number Pad on your remote to enter a unique 4-digit Save PIN. 3. VIZIO LOCK PICTURE MODE Create a picture control PIN to prevent change to the picture modes. 8. The LOCK PICTURE MODE...o2rD Unloc3Dk Picture Mode, then press OK. To lock all custom picture modes: 5. Create a 4 digit passcode using the number keys on the remote. To delete the user created Custom 1 picture mode, select the Delete button. Delete Cancel Input Wide CC 2. To unlock all custom picture modes:...
... Picture Mode, then press OK. Sleep Timer Picture Audio Network Settings Help 24 Use the Number Pad on your remote to enter a unique 4-digit Save PIN. 3. VIZIO LOCK PICTURE MODE Create a picture control PIN to prevent change to the picture modes. 8. The LOCK PICTURE MODE...o2rD Unloc3Dk Picture Mode, then press OK. To lock all custom picture modes: 5. Create a 4 digit passcode using the number keys on the remote. To delete the user created Custom 1 picture mode, select the Delete button. Delete Cancel Input Wide CC 2. To unlock all custom picture modes:...

User Manual (English)
Page 32
... 0 Gain 0 0 0 3. Use the Arrow buttons to highlight another color channel to turn off and on: 1. When you are indicated with an asterisk (*). on the remote to highlight Red, Green, or Blue. 4. From the PICTURE menu, use the Arrow buttons to highlight Color Calibration and press the OK button. Use the...Color Tuner menu is displayed. 2. To turn color channels off or on. The COLOR CALIBRATION menu is displayed. Use the Arrow buttons on the remote to highlight the Hue, Saturation, Brightness, (these 3 adjust the color) Offset, or Gain (these two adjust the color temperature) of the ...
... 0 Gain 0 0 0 3. Use the Arrow buttons to highlight another color channel to turn off and on: 1. When you are indicated with an asterisk (*). on the remote to highlight Red, Green, or Blue. 4. From the PICTURE menu, use the Arrow buttons to highlight Color Calibration and press the OK button. Use the...Color Tuner menu is displayed. 2. To turn color channels off or on. The COLOR CALIBRATION menu is displayed. Use the Arrow buttons on the remote to highlight the Hue, Saturation, Brightness, (these 3 adjust the color) Offset, or Gain (these two adjust the color temperature) of the ...

User Manual (English)
Page 33
... use the Arrow buttons to adjust the value. All changes here are finished press the OK button to adjust. Use the Arrow buttons on the remote to highlight the Gain and Color values you wish to save the setting. 3. From the Color Tuner menu, use the Left/Right Arrow buttons to... Color Tuner, and then press the Left/Right Arrow buttons until the 11 Point White Balance menu is displayed. Use the Arrow buttons on the remote to adjust additional settings or EXIT. 27 To hide the Color Bar Test Pattern, use the Arrow buttons to highlight Off. 3. When you are finished...
... use the Arrow buttons to adjust the value. All changes here are finished press the OK button to adjust. Use the Arrow buttons on the remote to highlight the Gain and Color values you wish to save the setting. 3. From the Color Tuner menu, use the Left/Right Arrow buttons to... Color Tuner, and then press the Left/Right Arrow buttons until the 11 Point White Balance menu is displayed. Use the Arrow buttons on the remote to adjust additional settings or EXIT. 27 To hide the Color Bar Test Pattern, use the Arrow buttons to highlight Off. 3. When you are finished...

User Manual (English)
Page 34
... an input that is displaying active content. Selecting a percentage immediately shows the flat pattern at that color ramp. -or- Use the Arrow buttons on the remote to adjust additional settings or EXIT. 2. When you are finished, press the BACK button to highlight Off. Flat Test Pattern Off To show or hide... highlight Color Tuner, and then press the Left/Right Arrow buttons until the Flat Test Pattern menu is displayed. Use the Arrow buttons on the remote to adjust additional settings or EXIT. 28 When you are finished, press the BACK button to highlight Off.
... an input that is displaying active content. Selecting a percentage immediately shows the flat pattern at that color ramp. -or- Use the Arrow buttons on the remote to adjust additional settings or EXIT. 2. When you are finished, press the BACK button to highlight Off. Flat Test Pattern Off To show or hide... highlight Color Tuner, and then press the Left/Right Arrow buttons until the Flat Test Pattern menu is displayed. Use the Arrow buttons on the remote to adjust additional settings or EXIT. 28 When you are finished, press the BACK button to highlight Off.
User Manual (English)
Page 35
... or custom settings. When you wish to adjust, then press Left/Right Arrow buttons to adjust additional settings or EXIT. 29 VIZIO AUDIO TV Speakers Surround Sound Volume Leveling Balance - Select On or Off. Adjusts the loudness of different frequencies using the Equalizer Settings...volume levels during transitions between the display image and the accompanying audio track. • Digital Audio Out - Use the Arrow buttons on the remote. The AUDIO menu is cannot be passed through digital audio outputs. • Surround Sound - Turns the built-in speakers on page 30...
... or custom settings. When you wish to adjust, then press Left/Right Arrow buttons to adjust additional settings or EXIT. 29 VIZIO AUDIO TV Speakers Surround Sound Volume Leveling Balance - Select On or Off. Adjusts the loudness of different frequencies using the Equalizer Settings...volume levels during transitions between the display image and the accompanying audio track. • Digital Audio Out - Use the Arrow buttons on the remote. The AUDIO menu is cannot be passed through digital audio outputs. • Surround Sound - Turns the built-in speakers on page 30...

User Manual (English)
Page 36
.... 5. To create, modify, or replace the single custom equalizer setting: 1. Press the MENU button on the remote to highlight Audio and press OK. Use the Arrow buttons on the remote. The Audio Mode and equalizer settings screen appears. 4. Use the Left and Right Arrow buttons to reflect the ... button to highlight a frequency and then press OK. 6. Press the MENU button on -screen menu is displayed. 3. The on the remote. Use the Arrow buttons on the remote to highlight Audio and press OK. The TV displays, "To delete the user created custom audio mode, select the Delete button." 4....
.... 5. To create, modify, or replace the single custom equalizer setting: 1. Press the MENU button on the remote to highlight Audio and press OK. Use the Arrow buttons on the remote. The Audio Mode and equalizer settings screen appears. 4. Use the Left and Right Arrow buttons to reflect the ... button to highlight a frequency and then press OK. 6. Press the MENU button on -screen menu is displayed. 3. The on the remote. Use the Arrow buttons on the remote to highlight Audio and press OK. The TV displays, "To delete the user created custom audio mode, select the Delete button." 4....

User Manual (English)
Page 37
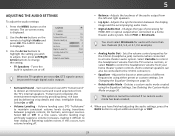
...ABC Input Wide CC Sleep Timer Picture Audio Network Settings Help 31 Use the Arrow buttons on the remote to highlight the period of time. 1. Use the Left/Right Arrow buttons on the remote to highlight Auto Power Off. 2. If you have finished setting the auto power off . 5 SETTING... to Off or 10 Wide Zoom Normal Panoramic minutes. 3. VIZIO TIMERS Sleep Timer Auto Power Off Off 10 minutes 3. From the TIMERS menu, use the Up/Down Arrow buttons on the remote. Press the MENU button on the remote to highlight Timers and press OK. This feature can be deactivated...
...ABC Input Wide CC Sleep Timer Picture Audio Network Settings Help 31 Use the Arrow buttons on the remote to highlight the period of time. 1. Use the Left/Right Arrow buttons on the remote to highlight Auto Power Off. 2. If you have finished setting the auto power off . 5 SETTING... to Off or 10 Wide Zoom Normal Panoramic minutes. 3. VIZIO TIMERS Sleep Timer Auto Power Off Off 10 minutes 3. From the TIMERS menu, use the Up/Down Arrow buttons on the remote. Press the MENU button on the remote to highlight Timers and press OK. This feature can be deactivated...
User Manual (English)
Page 38
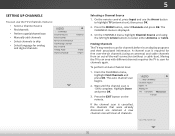
On the remote control, press Input and use the TV's Channels menu to: • Select a Channel Source • Find channels • Perform a partial channel scan • Manually add channels VIZIO CHANNELS Channel Source Find Channels • Select channels to skip • Select language for ...To perform an Auto Channel Scan: 1. Wait until the channel scan is required for channels again. Press the EXIT button on the remote. WiOden thZeooCmHANNoNrmEaLl S Pmaneonraum,ichighlight Channel Source and using an antenna) and cable channels from an out-of-the-wall connection (without ...
On the remote control, press Input and use the TV's Channels menu to: • Select a Channel Source • Find channels • Perform a partial channel scan • Manually add channels VIZIO CHANNELS Channel Source Find Channels • Select channels to skip • Select language for ...To perform an Auto Channel Scan: 1. Wait until the channel scan is required for channels again. Press the EXIT button on the remote. WiOden thZeooCmHANNoNrmEaLl S Pmaneonraum,ichighlight Channel Source and using an antenna) and cable channels from an out-of-the-wall connection (without ...

User Manual (English)
Page 39
...menu, highlight Add Analog Channel and press OK. Highlight Scan Mode and select the type of channel you may need to be added. 3. VIZIO ADD ANALOG CHANNEL Enter Channel # Add Channel 33 You can do this by using the Partial Channel Scan and Add Analog Channel options. ...TV is displayed. 2. The PARTIAL CHANNEL SEARCH menu is done scanning for the channel. 4. Highlight Start and press OK. Use the Number Pad on the remote. Highlight Add Channel and press OK. 5 Adding New Channels Occasionally, you are adding: Analog, Digital, or Analog/Digital. 3. To add a range of...
...menu, highlight Add Analog Channel and press OK. Highlight Scan Mode and select the type of channel you may need to be added. 3. VIZIO ADD ANALOG CHANNEL Enter Channel # Add Channel 33 You can do this by using the Partial Channel Scan and Add Analog Channel options. ...TV is displayed. 2. The PARTIAL CHANNEL SEARCH menu is done scanning for the channel. 4. Highlight Start and press OK. Use the Number Pad on the remote. Highlight Add Channel and press OK. 5 Adding New Channels Occasionally, you are adding: Analog, Digital, or Analog/Digital. 3. To add a range of...

User Manual (English)
Page 40
...Number Pad. Channels that some channels you do not want to highlight the channel and press OK. See Locking and Unlocking Channels on the remote to view. A P appears to adjust additional settings or EXIT. From the CHANNELS menu, highlight Skip Channel, and press OK. For ...each channel you wish to remove, press BACK to the right of the channels you select. 3. To remove a channel: 1. VIZIO SKIP CHANNEL 1 Test 0 1 Test 1 P 1-2 Test 2 P 2 Test 3 2-2 Test 4 P 2-3 Test 5 Wide Zoom Normal Panoramic Exit 2D 3D ABC Input Wide CC...
...Number Pad. Channels that some channels you do not want to highlight the channel and press OK. See Locking and Unlocking Channels on the remote to view. A P appears to adjust additional settings or EXIT. From the CHANNELS menu, highlight Skip Channel, and press OK. For ...each channel you wish to remove, press BACK to the right of the channels you select. 3. To remove a channel: 1. VIZIO SKIP CHANNEL 1 Test 0 1 Test 1 P 1-2 Test 2 P 2 Test 3 2-2 Test 4 P 2-3 Test 5 Wide Zoom Normal Panoramic Exit 2D 3D ABC Input Wide CC...


