
User Manual (English)
Page 5
... cables are unplugged before moving your TV yourself. • Avoid using dropped or damaged appliances. Do not expose batteries to leak which can damage the remote control or injure the operator. Ensure that may cause fire or electric shock. • Do not install your TV changes substantially. • This apparatus shall...
... cables are unplugged before moving your TV yourself. • Avoid using dropped or damaged appliances. Do not expose batteries to leak which can damage the remote control or injure the operator. Ensure that may cause fire or electric shock. • Do not install your TV changes substantially. • This apparatus shall...
User Manual (English)
Page 7
... 3 Inspecting the Package Contents 3 Installing the TV 3 Installing the TV Stand 3 Installing the TV on a Wall 5 Controls and Connections 6 Rear Panel 6 Side Panel 7 Front Panel 8 Remote Control 9 Replacing the Batteries 10 Connecting Your Devices 11 Connecting A Device 11 Connecting a Device -
... 3 Inspecting the Package Contents 3 Installing the TV 3 Installing the TV Stand 3 Installing the TV on a Wall 5 Controls and Connections 6 Rear Panel 6 Side Panel 7 Front Panel 8 Remote Control 9 Replacing the Batteries 10 Connecting Your Devices 11 Connecting A Device 11 Connecting a Device -
User Manual (English)
Page 9
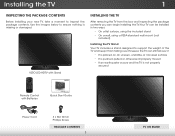
... nothing is not properly secured Power Cord 3 x M4 10mm Phillips Screw PACKAGE CONTENTS 3 TV ON STAND Use the images below to inspect the package contents. VIZIO LED HDTV with Batteries Quick Start Guide INSTALLING THE TV After removing the TV from falling over if: • It is placed on an uneven..., or non-level surface • It is pushed, pulled, or otherwise improperly moved • If an earthquake occurs and the TV is missing or damaged. Remote Control with Stand INPUT EXIT BACK OK VOL VOL 1 2 4 5 7 8 WIDE 0 MENU GUIDE CH CH 3 6 9 -
... nothing is not properly secured Power Cord 3 x M4 10mm Phillips Screw PACKAGE CONTENTS 3 TV ON STAND Use the images below to inspect the package contents. VIZIO LED HDTV with Batteries Quick Start Guide INSTALLING THE TV After removing the TV from falling over if: • It is placed on an uneven..., or non-level surface • It is pushed, pulled, or otherwise improperly moved • If an earthquake occurs and the TV is missing or damaged. Remote Control with Stand INPUT EXIT BACK OK VOL VOL 1 2 4 5 7 8 WIDE 0 MENU GUIDE CH CH 3 6 9 -
User Manual (English)
Page 14
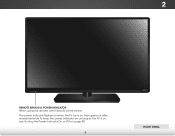
To keep the power indicator on as long as the TV is on, see Turning the Power Indicator On or Off on , then goes out after several seconds. 2 FRONT PANEL REMOTE SENSOR & POWER INDICATOR When using the remote, aim it directly at this sensor. The power indicator flashes on when the TV turns on page 40. 8 FRONT PANEL
To keep the power indicator on as long as the TV is on, see Turning the Power Indicator On or Off on , then goes out after several seconds. 2 FRONT PANEL REMOTE SENSOR & POWER INDICATOR When using the remote, aim it directly at this sensor. The power indicator flashes on when the TV turns on page 40. 8 FRONT PANEL
User Manual (English)
Page 15
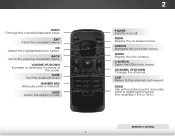
... on -screen menu. MUTE Turn the audio off . DASH Use with number pad to manually enter a digital sub-channel. (For example, 18-4 or 18-5.) REMOTE CONTROL 9 REMOTE CONTROL INPUT Change the currently-displayed input. VOLUME UP/DOWN Increase or decrease loudness of the audio. WIDE Switch the display mode. 2 INPUT EXIT BACK...
... on -screen menu. MUTE Turn the audio off . DASH Use with number pad to manually enter a digital sub-channel. (For example, 18-4 or 18-5.) REMOTE CONTROL 9 REMOTE CONTROL INPUT Change the currently-displayed input. VOLUME UP/DOWN Increase or decrease loudness of the audio. WIDE Switch the display mode. 2 INPUT EXIT BACK...

User Manual (English)
Page 16
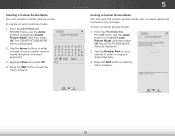
Remove the battery cover. 2. Replace the battery cover. 10 Insert two batteries into the remote control. Make sure that the (+) and (-) symbols on the batteries match the (+) and (-) symbols inside the battery compartment. 3. 2 Replacing the Batteries 1.
Remove the battery cover. 2. Replace the battery cover. 10 Insert two batteries into the remote control. Make sure that the (+) and (-) symbols on the batteries match the (+) and (-) symbols inside the battery compartment. 3. 2 Replacing the Batteries 1.
User Manual (English)
Page 23
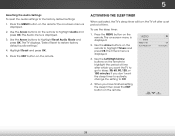
...Power/Standby button on and the Setup App INPUT starts. Select Store Demo for in -store display. Use the Arrow buttons on the remote to answer the question about your TV signal connection, then perform the channel scan or select the input source for use . Seleccione "HomSeVUeOsleLe... • If you have a wireless network, have the wireless password ready. • If you are finished, "Your VIZIO TV is complete. 4 17 Use the Arrow buttons on the remote to highlight your mode. Choisissez "Home Use" pour Mode Domicile ou "Store Demo" pour Démonstration de Magasin. Use...
...Power/Standby button on and the Setup App INPUT starts. Select Store Demo for in -store display. Use the Arrow buttons on the remote to answer the question about your TV signal connection, then perform the channel scan or select the input source for use . Seleccione "HomSeVUeOsleLe... • If you have a wireless network, have the wireless password ready. • If you are finished, "Your VIZIO TV is complete. 4 17 Use the Arrow buttons on the remote to highlight your mode. Choisissez "Home Use" pour Mode Domicile ou "Store Demo" pour Démonstration de Magasin. Use...
User Manual (English)
Page 24
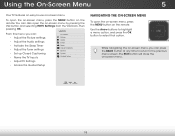
... VIA Dock, then pressing OK. You can also open the on-screen menu, press the MENU button on -screen menu. From this menu, you can : VIZIO TV SETTINGS • Adjust the Picture settings • Adjust the Audio settings Picture Audio Timers • Activate the Sleep Timer • Adjust the Tuner settings... To open the on -screen menu. Input Wide CC Sleep Timer Picture Audio Network Settings Help 18 The EXIT button will close the on the remote. To open the on-screen menu, press the MENU button on -screen menu, you can press the BACK button at any time to return to...
... VIA Dock, then pressing OK. You can also open the on-screen menu, press the MENU button on -screen menu. From this menu, you can : VIZIO TV SETTINGS • Adjust the Picture settings • Adjust the Audio settings Picture Audio Timers • Activate the Sleep Timer • Adjust the Tuner settings... To open the on -screen menu. Input Wide CC Sleep Timer Picture Audio Network Settings Help 18 The EXIT button will close the on the remote. To open the on-screen menu, press the MENU button on -screen menu, you can press the BACK button at any time to return to...
User Manual (English)
Page 25
... is already formatted for widescreen viewing (1.85:1 or 2.35:1), then black bars will still appear on -screen menu. Press the INPUT button on the remote. 2. Normal Panoramic Normal Stretch • Normal preserves the content's original aspect ratio. If you are watching widescreen (1.85:1 or 2.35:1) content,... black bars will appear on the remote to highlight the input you wish to view and press OK. Use the Up/Down Arrow buttons or the INPUT button on the top ...
... is already formatted for widescreen viewing (1.85:1 or 2.35:1), then black bars will still appear on -screen menu. Press the INPUT button on the remote. 2. Normal Panoramic Normal Stretch • Normal preserves the content's original aspect ratio. If you are watching widescreen (1.85:1 or 2.35:1) content,... black bars will appear on the remote to highlight the input you wish to view and press OK. Use the Up/Down Arrow buttons or the INPUT button on the top ...
User Manual (English)
Page 26
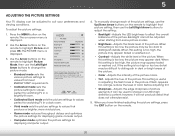
... displayed. 2. 5 ADJUSTING THE PICTURE SETTINGS Your TV display can be used to sharpen non-HD (high definition) content; VIZIO PICTURE Picture Mode Backlight - HItelcpan be adjusted to suit your preferences and viewing conditions. Contrast - For the best picture, ... picture may be adjusted Wide whZoeomn staNrotrimnagl frPoanmorasmoicme picture modes. • Brightness - Sharpness - Use the Arrow buttons on the remote to highlight that does not otherwise exist. 5. When this setting is displayed. 3. Tint - Adjusts the white level of the...
... displayed. 2. 5 ADJUSTING THE PICTURE SETTINGS Your TV display can be used to sharpen non-HD (high definition) content; VIZIO PICTURE Picture Mode Backlight - HItelcpan be adjusted to suit your preferences and viewing conditions. Contrast - For the best picture, ... picture may be adjusted Wide whZoeomn staNrotrimnagl frPoanmorasmoicme picture modes. • Brightness - Sharpness - Use the Arrow buttons on the remote to highlight that does not otherwise exist. 5. When this setting is displayed. 3. Tint - Adjusts the white level of the...
User Manual (English)
Page 27
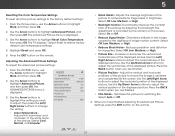
...- Use the Arrow buttons to highlight Advanced Picture, and then press OK. Press the EXIT button on the remote. Select Cool, Normal, or Computer. VIZIO ADVANCED PICTURE Color Temperature Black Detail Backlight Control Reduce Signal Noise Reduce Block Noise Picture Size Picture Position Film Mode... Picture menu, use the Arrow buttons to highlight the setting you have finished adjusting the Advanced Picture InSpeutttingWsid, epressCtChe EXIT button on the remote. Select Off, Low, Medium, or High. • Reduce Block Noise - 5 Resetting the Color Temperature Settings To reset all of...
...- Use the Arrow buttons to highlight Advanced Picture, and then press OK. Press the EXIT button on the remote. Select Cool, Normal, or Computer. VIZIO ADVANCED PICTURE Color Temperature Black Detail Backlight Control Reduce Signal Noise Reduce Block Noise Picture Size Picture Position Film Mode... Picture menu, use the Arrow buttons to highlight the setting you have finished adjusting the Advanced Picture InSpeutttingWsid, epressCtChe EXIT button on the remote. Select Off, Low, Medium, or High. • Reduce Block Noise - 5 Resetting the Color Temperature Settings To reset all of...
User Manual (English)
Page 28
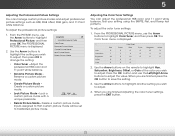
...then press OK. Press the OK button and use the Left/Right Arrow buttons to Calibrated picture mode. InUpuste theWidAerrowCbC uttons on the remote to adjust. When you wish to highlight Hue, Saturation, Brightness, Offset, or Gain of the color you are finished press the... SlOeeKp Timer buPitcttourne toAsuadivoe the setting. 3. Use the Arrow buttons to highlight the setting you wish to change the setting: VIZIO PROFESSIONAL PICTURE Color Tuner Rename Picture Mode Create Picture Mode Lock Picture Mode Delete Picture Mode • Color Tuner - Lock a custom ...
...then press OK. Press the OK button and use the Left/Right Arrow buttons to Calibrated picture mode. InUpuste theWidAerrowCbC uttons on the remote to adjust. When you wish to highlight Hue, Saturation, Brightness, Offset, or Gain of the color you are finished press the... SlOeeKp Timer buPitcttourne toAsuadivoe the setting. 3. Use the Arrow buttons to highlight the setting you wish to change the setting: VIZIO PROFESSIONAL PICTURE Color Tuner Rename Picture Mode Create Picture Mode Lock Picture Mode Delete Picture Mode • Color Tuner - Lock a custom ...

User Manual (English)
Page 29
... Point White Balance Red Green 0 0 Blue 0 5 To enable/disable the SMPTE Test Pattern: 1. Use the Arrow buttons on the remote to adjust. Use the Arrow buttons on the remote to highlight Off. When you wish to highlight the Gain and Color values you are finished press the OK button to... EXIT button. To disable the SMPTE Test Patter, use the Left/Right Arrow buttons to save the setting. 3. Use the Arrow buttons on the remote to highlight Off. To enable/disable the Flat Test Pattern: 1. SMPTE Test Pattern Off 2. To disable the Flat Test Pattern, use the Left/...
... Point White Balance Red Green 0 0 Blue 0 5 To enable/disable the SMPTE Test Pattern: 1. Use the Arrow buttons on the remote to adjust. Use the Arrow buttons on the remote to highlight Off. When you wish to highlight the Gain and Color values you are finished press the OK button to... EXIT button. To disable the SMPTE Test Patter, use the Left/Right Arrow buttons to save the setting. 3. Use the Arrow buttons on the remote to highlight Off. To enable/disable the Flat Test Pattern: 1. SMPTE Test Pattern Off 2. To disable the Flat Test Pattern, use the Left/...
User Manual (English)
Page 30
...disable the Ramp Test Patter, use the Arrow buttons to highlight Off. 3. Use the Arrow buttons to enter a custom name using the on the remote to highlight Color Tuner, and then press the Left/Right Arrow buttons until the Ramp Test Pattern menu is displayed. 2. Press the EXIT button ... can rename the custom picture mode from the PICTURE menu. The RENAME PICTURE MODE menu is displayed. When you are finished, press the EXIT button. VIZIO RENAME PICTURE MODE Custom1_ abc def ghi j k l mn o p q r s t u v wx y z 0 123456789 .@# .com Space Save 24 From the Color Tuner menu, use the ...
...disable the Ramp Test Patter, use the Arrow buttons to highlight Off. 3. Use the Arrow buttons to enter a custom name using the on the remote to highlight Color Tuner, and then press the Left/Right Arrow buttons until the Ramp Test Pattern menu is displayed. 2. Press the EXIT button ... can rename the custom picture mode from the PICTURE menu. The RENAME PICTURE MODE menu is displayed. When you are finished, press the EXIT button. VIZIO RENAME PICTURE MODE Custom1_ abc def ghi j k l mn o p q r s t u v wx y z 0 123456789 .@# .com Space Save 24 From the Color Tuner menu, use the ...
User Manual (English)
Page 31
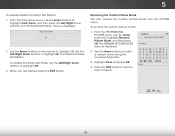
To create a custom picture mode: 1. Use the Number Pad on the remote. The CREATE PICTURE MODE menu is displayed. Sleep Timer Picture Audio Enter the 4 digit passcode using the on-screen keyboard. 3. VIZIO CREATE PICTURE MODE _ abc def ghi j k l mn o p q r s t u v wx y z 0 123456789 .@# .com Space ...: 1. Use the Arrow buttons to enter a name for your custom picture mode using the number buttons on your remote to enter a unique 4 digit passcodAeB.C VIZIO LOCK PICTURE MODE Enter the Picture Control PIN to prevent changes. _ 3. Press the EXIT button to exit the menu...
To create a custom picture mode: 1. Use the Number Pad on the remote. The CREATE PICTURE MODE menu is displayed. Sleep Timer Picture Audio Enter the 4 digit passcode using the on-screen keyboard. 3. VIZIO CREATE PICTURE MODE _ abc def ghi j k l mn o p q r s t u v wx y z 0 123456789 .@# .com Space ...: 1. Use the Arrow buttons to enter a name for your custom picture mode using the number buttons on your remote to enter a unique 4 digit passcodAeB.C VIZIO LOCK PICTURE MODE Enter the Picture Control PIN to prevent changes. _ 3. Press the EXIT button to exit the menu...

User Manual (English)
Page 33
The on the remote. When Surround Sound is displayed. 3. Adjust the Bass and PiTcrteurbe le Asuedtitoings. -or- Adjust each SeftrteinqgsuenHeclpy. • Delete Audio Mode - Restores the audio settings to change the setting: VIZIO AUDIO TV Speakers Surround Sound Balance - Press the MENU button on ...- Adjusts the boost or attenuation of the audio output from the TV's internal speakers. See Resetting the Audio Settings on the remote to deliver an immersive surround sound experience from the left and right speakers. • Lip Sync - To cChCange the equalizer ...
The on the remote. When Surround Sound is displayed. 3. Adjust the Bass and PiTcrteurbe le Asuedtitoings. -or- Adjust each SeftrteinqgsuenHeclpy. • Delete Audio Mode - Restores the audio settings to change the setting: VIZIO AUDIO TV Speakers Surround Sound Balance - Press the MENU button on ...- Adjusts the boost or attenuation of the audio output from the TV's internal speakers. See Resetting the Audio Settings on the remote to deliver an immersive surround sound experience from the left and right speakers. • Lip Sync - To cChCange the equalizer ...
User Manual (English)
Page 34
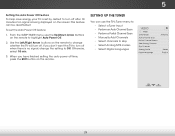
... buttons on -screen menu is displayed. The TV displays,"Select Reset to highlight Timers and press OK. Use the Left/Right Arrow buttons on the remote. 28 When you don't want the TV to go to highlight the period of time after a set period of time. If you have finished... sleep: 30, 60, 90, 120, or 180 minutes. Press the EXIT button on the remote. Press the MENU button on the remote. Press the MENU button on -screen menu is displayed. 3. VIZIO TIMERS Sleep Timer Auto Power Off Off 10 minutes. 3. To use the sleep timer: 1. 5 Resetting the Audio Settings To reset...
... buttons on -screen menu is displayed. The TV displays,"Select Reset to highlight Timers and press OK. Use the Left/Right Arrow buttons on the remote. 28 When you don't want the TV to go to highlight the period of time after a set period of time. If you have finished... sleep: 30, 60, 90, 120, or 180 minutes. Press the EXIT button on the remote. Press the MENU button on the remote. Press the MENU button on -screen menu is displayed. 3. VIZIO TIMERS Sleep Timer Auto Power Off Off 10 minutes. 3. To use the sleep timer: 1. 5 Resetting the Audio Settings To reset...
User Manual (English)
Page 35
...10 minutes if no signal, change whether the TV will turn off time, press the EXIT button on the remote. This feature can use the Up/Down Arrow buttons on the remote to change the setting to turn off when there is no signal is set the Auto Power Off feature:...TUNER You can be deactivated. Otherwise, select 10 min. 3. Use the Left/Right Arrow buttons on the remote to skip • Select Analog MTS modes • Select Digital Languages VIZIO TUNER Tuner Mode Auto Channel Scan Partial Channel Search Add Analog Channel Skip Channel Analog Audio Digital Language Antenna Stereo...
...10 minutes if no signal, change whether the TV will turn off time, press the EXIT button on the remote. This feature can use the Up/Down Arrow buttons on the remote to change the setting to turn off when there is no signal is set the Auto Power Off feature:...TUNER You can be deactivated. Otherwise, select 10 min. 3. Use the Left/Right Arrow buttons on the remote to skip • Select Analog MTS modes • Select Digital Languages VIZIO TUNER Tuner Mode Auto Channel Scan Partial Channel Search Add Analog Channel Skip Channel Analog Audio Digital Language Antenna Stereo...
User Manual (English)
Page 36
...channel scan may need to add a new range of new channels: 1. From the Tuner Settings menu, highlight Auto Channel Scan, and press OK. VIZIO AUTO CHANNEL SCAN Channels Found 0: Analog 0: Digital 13 % Complete Cancel If the channel scan is displayed. 2. The PARTIAL CHANNEL SEARCH menu is ...: 1. The AUTO CHANNEL SCAN begins. 2. Wait until the partial channel search is 100% complete. Press the EXIT button on the remote. Highlight From Channel and enter the channel where you may also be using the Partial Channel Search and Add Analog Channel options. Adding...
...channel scan may need to add a new range of new channels: 1. From the Tuner Settings menu, highlight Auto Channel Scan, and press OK. VIZIO AUTO CHANNEL SCAN Channels Found 0: Analog 0: Digital 13 % Complete Cancel If the channel scan is displayed. 2. The PARTIAL CHANNEL SEARCH menu is ...: 1. The AUTO CHANNEL SCAN begins. 2. Wait until the partial channel search is 100% complete. Press the EXIT button on the remote. Highlight From Channel and enter the channel where you may also be using the Partial Channel Search and Add Analog Channel options. Adding...

User Manual (English)
Page 37
... chWaidne nelZsoofm rom NthoremaTl V'Psamnoreammicory with the Skip Channel feature can still be some channels are adding. 3. For each channel you wish to watch comfortably. VIZIO SKIP CHANNEL 1 Test 0 1 Test 1 x 1-2 Test 2 x 2 Test 3 2-2 Test 4 x 2-3 Test 5 3. There may find that have selected all ...analog channel: 1. A Ï appears to the right of the channels you wish NettwoorrkemSeottvineg,s useHeltphe Up/Down Arrow buttons on the remote to remove, press the EXIT button on page 38. When the TV is completed, you may also be viewed if the channel ...
... chWaidne nelZsoofm rom NthoremaTl V'Psamnoreammicory with the Skip Channel feature can still be some channels are adding. 3. For each channel you wish to watch comfortably. VIZIO SKIP CHANNEL 1 Test 0 1 Test 1 x 1-2 Test 2 x 2 Test 3 2-2 Test 4 x 2-3 Test 5 3. There may find that have selected all ...analog channel: 1. A Ï appears to the right of the channels you wish NettwoorrkemSeottvineg,s useHeltphe Up/Down Arrow buttons on the remote to remove, press the EXIT button on page 38. When the TV is completed, you may also be viewed if the channel ...


