
User Manual English
Page 2
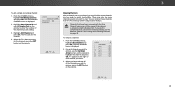
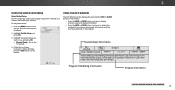
... Reset & Admin Menu 34 Resetting a Picture Mode 17 Restoring the TV to Factory Default Settings 34 Adjusting the Color Tuner Settings 18 Using the Guided Setup Menu 35 Adjusting the Audio Settings 20 Using the Info Window 35 Changing the Equalizer Settings 20 Deleting the Custom Audio Mode 21 Setting Timers 22 Setting the Sleep Timer 22 Setting the Auto Power Off Feature 22 Setting Up Channels 23 Using the USB Media Player 36 Preparing Your USB Drive to Play USB Media 36 Displaying USB Media 36 Removing the USB Drive from the TV 36 Troubleshooting & Technical Support...
... Reset & Admin Menu 34 Resetting a Picture Mode 17 Restoring the TV to Factory Default Settings 34 Adjusting the Color Tuner Settings 18 Using the Guided Setup Menu 35 Adjusting the Audio Settings 20 Using the Info Window 35 Changing the Equalizer Settings 20 Deleting the Custom Audio Mode 21 Setting Timers 22 Setting the Sleep Timer 22 Setting the Auto Power Off Feature 22 Setting Up Channels 23 Using the USB Media Player 36 Preparing Your USB Drive to Play USB Media 36 Displaying USB Media 36 Removing the USB Drive from the TV 36 Troubleshooting & Technical Support...
User Manual English
Page 3
... new VIZIO HDTV. Servicing is provided. • Never push any object into your outlet, consult an electrician for replacement of the obsolete outlet. • Protect the power cord from being damaged, the following safety instructions before using your product and retain them for the installation, use attachments/accessories specified by the manufacturer. • Use only with the cart, stand, tripod, bracket, or table specified...
... new VIZIO HDTV. Servicing is provided. • Never push any object into your outlet, consult an electrician for replacement of the obsolete outlet. • Protect the power cord from being damaged, the following safety instructions before using your product and retain them for the installation, use attachments/accessories specified by the manufacturer. • Use only with the cart, stand, tripod, bracket, or table specified...
User Manual English
Page 4
... remote control or injure the operator. moving your dealer for an extended period of time, unplug the power cord. • To reduce risk of electric shock, do not touch the connector with heavy dust or high humidity may • Do not use of uninsulated DANGEROUS VOLTAGE within an equilateral triangle is intended to alert the user to repair or service...
... remote control or injure the operator. moving your dealer for an extended period of time, unplug the power cord. • To reduce risk of electric shock, do not touch the connector with heavy dust or high humidity may • Do not use of uninsulated DANGEROUS VOLTAGE within an equilateral triangle is intended to alert the user to repair or service...
User Manual English
Page 5
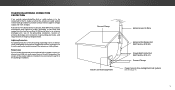
... and supporting structure, grounding of time, unplug the TV from the wall outlet and disconnect the antenna or cable system. Ground Clamp Antenna Lead In Wire Electric Service Equipment Antenna Discharge Unit (NEC Section 810-20) Grounding Conductors (NEC Section 810-21) Ground Clamps Power Service Grounding Electrode System (NEC ART 250, part H) v Power Lines Do not locate the antenna near overhead light or power circuits...
... and supporting structure, grounding of time, unplug the TV from the wall outlet and disconnect the antenna or cable system. Ground Clamp Antenna Lead In Wire Electric Service Equipment Antenna Discharge Unit (NEC Section 810-20) Grounding Conductors (NEC Section 810-21) Ground Clamps Power Service Grounding Electrode System (NEC ART 250, part H) v Power Lines Do not locate the antenna near overhead light or power circuits...
User Manual English
Page 9
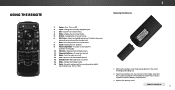
... - Change the channel. 12. Turn the audio on -screen menu. 6. Change the display mode. 16. Insert two batteries into the remote control. Input - V Button - Mute - Return to manually enter a digital sub-channel. (e.g. 18-4 or 18-5) 1. Wide - Use with number pad to the last viewed channel. 14. Change the currently displayed input. 3. Navigate the on or off. 13. Go to the previous on the arrow markings and sliding out. 2. Number Pad - Replace the battery cover. Back - Display...
... - Change the channel. 12. Turn the audio on -screen menu. 6. Change the display mode. 16. Insert two batteries into the remote control. Input - V Button - Mute - Return to manually enter a digital sub-channel. (e.g. 18-4 or 18-5) 1. Wide - Use with number pad to the last viewed channel. 14. Change the currently displayed input. 3. Navigate the on or off. 13. Go to the previous on the arrow markings and sliding out. 2. Number Pad - Replace the battery cover. Back - Display...
User Manual English
Page 12
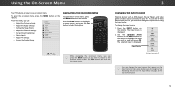
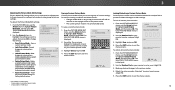
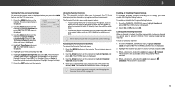
...-screen menu, press the MENU button on -screen menu. NAVIGATING THE ON-SCREEN MENU To open the on-screen menu, press the MENU button on -screen menu, you can change the input source: 1. Sleep Timer Picture Audio Network Settings Help While navigating the on the remote. HDMI-1 HDMI-2 Input Name COMP RGB Note: Inputs may vary by TV. From this menu, you can be connected to the previous menu screen. The EXIT button will close the on the remote. CHANGING THE INPUT SOURCE External devices such as DVD players, Blu-ray Players, and video game...
...-screen menu, press the MENU button on -screen menu. NAVIGATING THE ON-SCREEN MENU To open the on-screen menu, press the MENU button on -screen menu, you can change the input source: 1. Sleep Timer Picture Audio Network Settings Help While navigating the on the remote. HDMI-1 HDMI-2 Input Name COMP RGB Note: Inputs may vary by TV. From this menu, you can be connected to the previous menu screen. The EXIT button will close the on the remote. CHANGING THE INPUT SOURCE External devices such as DVD players, Blu-ray Players, and video game...
User Manual English
Page 13
...; 1080p and 1080i - Fills a 1080p screen • 1080p and 1080i - Some programs have black bars on HDMI-5. 3 13 Examples include wide-screen movies and older television programs. To change the screen aspect ratio: 1. Since the 4:3 aspect ratio is being stretched, the display image may vary by the left and right of the picture so that the picture keeps its original shape. Fills...
...; 1080p and 1080i - Fills a 1080p screen • 1080p and 1080i - Some programs have black bars on HDMI-5. 3 13 Examples include wide-screen movies and older television programs. To change the screen aspect ratio: 1. Since the 4:3 aspect ratio is being stretched, the display image may vary by the left and right of the picture so that the picture keeps its original shape. Fills...
User Manual English
Page 14
...-screen menu is useful in adjusting the flesh tones in dark or bright areas of the picture. • Color - Tint - Adjusts the white level of the picture. Adjusts the hue of the picture. This setting is displayed. 2. When you 've changes to the settings for displaying computer output. 4. Press the MENU button on the remote to highlight Picture and press OK. Use the Arrow buttons on the remote. 14 Contrast - The auto brightness control detects the light...
...-screen menu is useful in adjusting the flesh tones in dark or bright areas of the picture. • Color - Tint - Adjusts the white level of the picture. Adjusts the hue of the picture. This setting is displayed. 2. When you 've changes to the settings for displaying computer output. 4. Press the MENU button on the remote to highlight Picture and press OK. Use the Arrow buttons on the remote. 14 Contrast - The auto brightness control detects the light...
User Manual English
Page 16
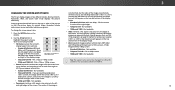
... all custom picture modes: 1. ABC To uInnpulot ck aWlildceustoCmC picture modes: Create a 4 digit passcode using the number keys on the top right corner of picture settings. Make any preset picture mode will be locked/unlocked with a unique PIN to prevent accidental changes to factory default values. The PICTURE MODE EDIT menu is locked) • Delete Picture Mode - Prevent changes to the picture modes. 4. WFridoem tZhoeomPICTNUorRmEal MPOanDorEamEicDIT menu, use the Arrow buttons to enter a unique 4-digit PIN. 3. Vivid* VIZIO PICTURE MODE EDIT - Wide...
... all custom picture modes: 1. ABC To uInnpulot ck aWlildceustoCmC picture modes: Create a 4 digit passcode using the number keys on the top right corner of picture settings. Make any preset picture mode will be locked/unlocked with a unique PIN to prevent accidental changes to factory default values. The PICTURE MODE EDIT menu is locked) • Delete Picture Mode - Prevent changes to the picture modes. 4. WFridoem tZhoeomPICTNUorRmEal MPOanDorEamEicDIT menu, use the Arrow buttons to enter a unique 4-digit PIN. 3. Vivid* VIZIO PICTURE MODE EDIT - Wide...
User Manual English
Page 18
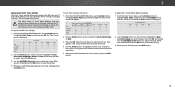
... adjust. 3 Adjusting the Color Tuner Settings The Color Tuner settings allow technicians to adjust. Calibration requires specialized training, an input with the color channels, press the EXIT button. When you wish to manually calibrate the TV. Press the OK button. 3. Only two color channels can be turned off . 4. To adjust the 11 Point White Balance settings: 1. Gain 5% 11 Point White Balance Red Green 0 0 Blue 0 2. Use the Arrow buttons on the remote to save the setting. 3. When you are finished adjusting the color tuner settings...
... adjust. 3 Adjusting the Color Tuner Settings The Color Tuner settings allow technicians to adjust. Calibration requires specialized training, an input with the color channels, press the EXIT button. When you wish to manually calibrate the TV. Press the OK button. 3. Only two color channels can be turned off . 4. To adjust the 11 Point White Balance settings: 1. Gain 5% 11 Point White Balance Red Green 0 0 Blue 0 2. Use the Arrow buttons on the remote to save the setting. 3. When you are finished adjusting the color tuner settings...
User Manual English
Page 20
... Fixed if an external audio device (sound bar or AV receiver) will control the volume. Input Wide CC • Equalizer - Press the MENU button on the remote. To create, modify, or replace the single custom equalizer setting: 1. See Deleting the Custom Audio Mode on the remote. To select a pre-set modes and allows you wish to adjust, then press Left/ Right Arrow buttons to On, DTS signals cannot be passed through digital audio outputs...
... Fixed if an external audio device (sound bar or AV receiver) will control the volume. Input Wide CC • Equalizer - Press the MENU button on the remote. To create, modify, or replace the single custom equalizer setting: 1. See Deleting the Custom Audio Mode on the remote. To select a pre-set modes and allows you wish to adjust, then press Left/ Right Arrow buttons to On, DTS signals cannot be passed through digital audio outputs...
User Manual English
Page 23
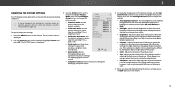
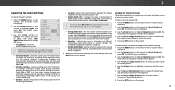
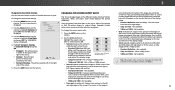
... Source • Find Channels • Perform a Partial Channel Scan • Manually Add Channels • Select channels to skip VIZIO CHANNELS Channels not searched Channel Source Find Channel Partial Channel Search Add Analog Channel Skip Channel Analog Audio Digital Language Cable Stereo English Selecting a Channel Source Select the type of tuner input you will clear all possible channels. Scanning for free over-the-air channels (using an antenna) and cable channels from an out-of -the-wall) connections. 1. CC To perform an Auto Channel Scan: VIZIO 1. From the CHANNELS menu...
... Source • Find Channels • Perform a Partial Channel Scan • Manually Add Channels • Select channels to skip VIZIO CHANNELS Channels not searched Channel Source Find Channel Partial Channel Search Add Analog Channel Skip Channel Analog Audio Digital Language Cable Stereo English Selecting a Channel Source Select the type of tuner input you will clear all possible channels. Scanning for free over-the-air channels (using an antenna) and cable channels from an out-of -the-wall) connections. 1. CC To perform an Auto Channel Scan: VIZIO 1. From the CHANNELS menu...
User Manual English
Page 24
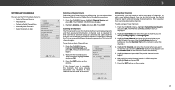
... 3D ABC Input Wide CC Sleep Timer Picture Audio Network Settings Help 3 24 You can still be some channels are adding. 3. Input Wide CC To remove a channel: 1. VIZIO SKIP CHANNEL 1 Test 0 1 Test 1 P 1-2 Test 2 P 2 Test 3 2-2 Test 4 P 2-3 Test 5 3. The ADD ANALOG CHANNEL menu is displayed. 2. Highlight Enter Channel # and use the parentalAcBoC ntrols. The TV scans for the channel, press the EXIT button on the remote. See Locking and Unlocking Channels on the remote. From the CHANNELS menu, highlight Add Analog Channel and press...
... 3D ABC Input Wide CC Sleep Timer Picture Audio Network Settings Help 3 24 You can still be some channels are adding. 3. Input Wide CC To remove a channel: 1. VIZIO SKIP CHANNEL 1 Test 0 1 Test 1 P 1-2 Test 2 P 2 Test 3 2-2 Test 4 P 2-3 Test 5 3. The ADD ANALOG CHANNEL menu is displayed. 2. Highlight Enter Channel # and use the parentalAcBoC ntrols. The TV scans for the channel, press the EXIT button on the remote. See Locking and Unlocking Channels on the remote. From the CHANNELS menu, highlight Add Analog Channel and press...
User Manual English
Page 26
.../Right Arrow buttons on the remote to highlight Closed Captions and then use the Left/ Right Arrow buttons to manually change the appearance of the text. • Text Opacity - As Broadcast Black As Broadcast Red As Broadcast • Text Color - Change the color of digital closed captioning box. 4. Change the color of the closed captions: 1. Change the opacity of the text edge effects. • Background Color - Exit 2D 3D ABC Input Wide CC Sleep Timer Picture Audio Network Settings Help 26...
.../Right Arrow buttons on the remote to highlight Closed Captions and then use the Left/ Right Arrow buttons to manually change the appearance of the text. • Text Opacity - As Broadcast Black As Broadcast Red As Broadcast • Text Color - Change the color of digital closed captioning box. 4. Change the color of the closed captions: 1. Change the opacity of the text edge effects. • Background Color - Exit 2D 3D ABC Input Wide CC Sleep Timer Picture Audio Network Settings Help 26...
User Manual English
Page 30
... time is displayed. 3. The TIME ZONE menu is displayed. Highlight your parental PIN. The DAYLIGHT SAVING TIME menu is displayed. 5. Input Wide CC Accessing the Parental Controls Menu To Salececpess Timer the Parental Picture Audio Controls menu: 1. Press the MENU button on page 31. The PARENTAL CONTROLS menu is locked, it is displayed. 2. To lock or unlock a channel: 1. Use the Arrow buttons on the remote to prevent children from viewing inappropriate material. Use the Arrow buttons on the remote to have a device connected using the tuner to receive...
... time is displayed. 3. The TIME ZONE menu is displayed. Highlight your parental PIN. The DAYLIGHT SAVING TIME menu is displayed. 5. Input Wide CC Accessing the Parental Controls Menu To Salececpess Timer the Parental Picture Audio Controls menu: 1. Press the MENU button on page 31. The PARENTAL CONTROLS menu is locked, it is displayed. 2. To lock or unlock a channel: 1. Use the Arrow buttons on the remote to prevent children from viewing inappropriate material. Use the Arrow buttons on the remote to have a device connected using the tuner to receive...
User Manual English
Page 32
... for widescreen viewing (1.85:1 or 2.35:1), then black bars will fill the screen. The picture extends off by Input source. • 720p and 720i HD - Use the Arrow buAtBtCons to fit the screen. 3 Changing the View Mode Settings You can display images in five different modes: Normal, Stretch, Panoramic, Wide, and Zoom. To change the screen aspect ratio: 1. Press the MENU button on the remote. 2. The on HDMI-5. • Standard...
... for widescreen viewing (1.85:1 or 2.35:1), then black bars will fill the screen. The picture extends off by Input source. • 720p and 720i HD - Use the Arrow buAtBtCons to fit the screen. 3 Changing the View Mode Settings You can display images in five different modes: Normal, Stretch, Panoramic, Wide, and Zoom. To change the screen aspect ratio: 1. Press the MENU button on the remote. 2. The on HDMI-5. • Standard...
User Manual English
Page 35
... - 12:00PM Sleep Timer Picture Audio Oliver wakes up the TV channel or to connect the TV with your network. Network Settings Help Program Title/Rating Information Program Description DIGITAL EPISODE GUIDE & INFO WINDOW 35 Highlight Guided Setup and press OK. Set up the TV channel. 4. USING THE INFO WINDOW The Info Window can be displayed by pressing the INFO or GUIDE button on the remote: • Press the INFO or GUIDE button one morning...
... - 12:00PM Sleep Timer Picture Audio Oliver wakes up the TV channel or to connect the TV with your network. Network Settings Help Program Title/Rating Information Program Description DIGITAL EPISODE GUIDE & INFO WINDOW 35 Highlight Guided Setup and press OK. Set up the TV channel. 4. USING THE INFO WINDOW The Info Window can be displayed by pressing the INFO or GUIDE button on the remote: • Press the INFO or GUIDE button one morning...
User Manual English
Page 40
... don't look right. • Adjust the Color and Tint settings in the Picture menu. The TV displays "No Signal." • Press the INPUT button on the remote aren't working electrical outlet. • Ensure the power cable is not good. • For the best image quality, view high-definition programs using an extremely high level of the TV to change the screen mode. see your antenna is connected securely to the TV and...
... don't look right. • Adjust the Color and Tint settings in the Picture menu. The TV displays "No Signal." • Press the INPUT button on the remote aren't working electrical outlet. • Ensure the power cable is not good. • For the best image quality, view high-definition programs using an extremely high level of the TV to change the screen mode. see your antenna is connected securely to the TV and...
User Manual English
Page 47
... with unreadable or removed serial numbers; (k) products This warranty contains a binding arbitration agreement and a class action (or copy) to protect your claim heard by law, this warranty. Binding Arbitration Agreement; remaining portion of God; (h) customer THE TERMS OF THIS WARRANTY, DO NOT USE THE VIZIO PRODUCT AND, Your Obligations Before Service misuse, modifications or adjustments; (i) installation, set-up, or repairs WITHIN THIRTY (30...
... with unreadable or removed serial numbers; (k) products This warranty contains a binding arbitration agreement and a class action (or copy) to protect your claim heard by law, this warranty. Binding Arbitration Agreement; remaining portion of God; (h) customer THE TERMS OF THIS WARRANTY, DO NOT USE THE VIZIO PRODUCT AND, Your Obligations Before Service misuse, modifications or adjustments; (i) installation, set-up, or repairs WITHIN THIRTY (30...
User Manual English
Page 49
... issue informally and wish to the model's product information page at VIZIO's PERIOD SET FORTH ABOVE. or (l) products sold "AS IS", "CLEARANCE", "FACTORY workmanship when the product is within the warranty period. You will usually be new or recertified at www.vizio.mx, you always clear all applicable user data and downloaded applications. To obtain warranty Displays that the product is used...
... issue informally and wish to the model's product information page at VIZIO's PERIOD SET FORTH ABOVE. or (l) products sold "AS IS", "CLEARANCE", "FACTORY workmanship when the product is within the warranty period. You will usually be new or recertified at www.vizio.mx, you always clear all applicable user data and downloaded applications. To obtain warranty Displays that the product is used...


