
User Manual English
Page 2
ARC 18 Skipping Channels 33 Listening to Alternate Audio 34 Changing the Analog Audio Language 34 Setting Up Closed Captioning 35 Changing the Appearance of Your TV 42 Saving a Custom Picture Mode 25 Adjusting the CEC Settings 42 Locking/Unlocking a Custom Picture Mode 25 Turning the Power Indicator On or Off 42 Deleting a Custom Picture Mode 26 Using the Reset & Admin Menu 43 Resetting a Picture Mode 26 Restoring the TV to Play USB Media 45 Installing the TV 8 Setting the Auto Power Off Feature 31 Displaying USB Media 45 Installing the TV Stand 8 Setting ...
ARC 18 Skipping Channels 33 Listening to Alternate Audio 34 Changing the Analog Audio Language 34 Setting Up Closed Captioning 35 Changing the Appearance of Your TV 42 Saving a Custom Picture Mode 25 Adjusting the CEC Settings 42 Locking/Unlocking a Custom Picture Mode 25 Turning the Power Indicator On or Off 42 Deleting a Custom Picture Mode 26 Using the Reset & Admin Menu 43 Resetting a Picture Mode 26 Restoring the TV to Play USB Media 45 Installing the TV 8 Setting the Auto Power Off Feature 31 Displaying USB Media 45 Installing the TV Stand 8 Setting ...
User Manual English
Page 3
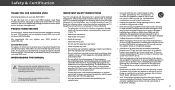
... missing or damaged parts. Do not place your TV in electric shock or fire. iii To purchase an extended warranty service plan, visit www.VIZIO.com. Keep these instructions. • Heed all warnings. • Follow all servicing to your home, consult your TV cabinet. Wait before ...using your TV and any way, such as radiators, heat registers, stoves, or other apparatus (including amplifiers) that you register your VIZIO product at least three feet should be sure these instructions before turning on your dealer or local power company. Be sure to inspect the ...
... missing or damaged parts. Do not place your TV in electric shock or fire. iii To purchase an extended warranty service plan, visit www.VIZIO.com. Keep these instructions. • Heed all warnings. • Follow all servicing to your home, consult your TV cabinet. Wait before ...using your TV and any way, such as radiators, heat registers, stoves, or other apparatus (including amplifiers) that you register your VIZIO product at least three feet should be sure these instructions before turning on your dealer or local power company. Be sure to inspect the ...

User Manual English
Page 4
The manufacturer's or odor becomes apparent, unplug the power cord and disconnect device, the disconnect device shall remain warranty does not cover user abuse or improper contact your TV. TV yourself. • CAUTION - To reduce the risk of voltage than two years of your dealer. Unplug the power that may damage the wires inside of age. h• The lightning flash with arrowhead symbol within an equilateral triangle is intended to alert the user to the • The lightning flash with arrowhead symbol within an equilateral triangle is intended to alert the user to the ...
The manufacturer's or odor becomes apparent, unplug the power cord and disconnect device, the disconnect device shall remain warranty does not cover user abuse or improper contact your TV. TV yourself. • CAUTION - To reduce the risk of voltage than two years of your dealer. Unplug the power that may damage the wires inside of age. h• The lightning flash with arrowhead symbol within an equilateral triangle is intended to alert the user to the • The lightning flash with arrowhead symbol within an equilateral triangle is intended to alert the user to the ...
User Manual English
Page 5
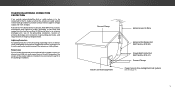
TELEVISION ANTENNA CONNECTION PROTECTION If an outside antenna/satellite dish or cable system is to be connected to the TV, make sure that the antenna or cable system is intended to be connected to earth in wire to an antenna discharge unit, size of the grounding conductors, location of antenna discharge unit, connection to grounding electrodes, and requirements of time, unplug the TV from the wall outlet and disconnect the antenna or cable system. Power Lines Do not locate the antenna near overhead light or power circuits, or where it is left unattended or unused for long periods of ...
TELEVISION ANTENNA CONNECTION PROTECTION If an outside antenna/satellite dish or cable system is to be connected to the TV, make sure that the antenna or cable system is intended to be connected to earth in wire to an antenna discharge unit, size of the grounding conductors, location of antenna discharge unit, connection to grounding electrodes, and requirements of time, unplug the TV from the wall outlet and disconnect the antenna or cable system. Power Lines Do not locate the antenna near overhead light or power circuits, or where it is left unattended or unused for long periods of ...

User Manual English
Page 6
For more information on the ENERGY STAR program, refer to qualify for ENERGY STAR in which power savings will be achieved. Dolby and the double-D symbol are trademarks or registered trademarks of Dolby Laboratories. HDMI, the HDMI logo and High-Definition Multimedia Interface are trademarks of HDMI Licensing LLC. All Rights Reserved. For DTS patents, see http://patents.dts.com. This product qualifies for ENERGY STAR rating. Changing the factory default picture settings or enabling other features will increase power consumption that could exceed the limits necessary ...
For more information on the ENERGY STAR program, refer to qualify for ENERGY STAR in which power savings will be achieved. Dolby and the double-D symbol are trademarks or registered trademarks of Dolby Laboratories. HDMI, the HDMI logo and High-Definition Multimedia Interface are trademarks of HDMI Licensing LLC. All Rights Reserved. For DTS patents, see http://patents.dts.com. This product qualifies for ENERGY STAR rating. Changing the factory default picture settings or enabling other features will increase power consumption that could exceed the limits necessary ...

User Manual English
Page 7
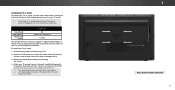
Use the images below to inspect the package contents. Getting to Know Your TV INSPECTING THE PACKAGE CONTENTS Before installing your new TV, take a moment to ensure nothing is missing or damaged. VIZIO LED HDTV Power Cord INPUT EXIT BACK OK VOL VOL 1 2 4 5 7 8 WIDE 0 MENU GUIDE CH CH 3 6 9 - Remote Control with Batteries TV Stands (Left and Right) 2 x Quick Start Guides (1 English, 1 French-Spanish) 4 x M4 Phillips Screws PACKAGE CONTENTS 1 7
Use the images below to inspect the package contents. Getting to Know Your TV INSPECTING THE PACKAGE CONTENTS Before installing your new TV, take a moment to ensure nothing is missing or damaged. VIZIO LED HDTV Power Cord INPUT EXIT BACK OK VOL VOL 1 2 4 5 7 8 WIDE 0 MENU GUIDE CH CH 3 6 9 - Remote Control with Batteries TV Stands (Left and Right) 2 x Quick Start Guides (1 English, 1 French-Spanish) 4 x M4 Phillips Screws PACKAGE CONTENTS 1 7

User Manual English
Page 8
Your TV can still fall over . 1 INSTALLING THE TV After removing the TV from falling over if: • It is placed on an uneven, unstable, or non-level surface • It is pushed, pulled, or otherwise improperly moved • If an earthquake occurs and the TV is for illustrative purposes only and may vary, depending on a soft surface, such as carpet, rug, or blanket. To install the stand: 1. Insert the screws into the base of the TV (the stands are finished, place the TV on a stable, level surface. Secure each stand to change. The actual number of the TV and keep it ...
Your TV can still fall over . 1 INSTALLING THE TV After removing the TV from falling over if: • It is placed on an uneven, unstable, or non-level surface • It is pushed, pulled, or otherwise improperly moved • If an earthquake occurs and the TV is for illustrative purposes only and may vary, depending on a soft surface, such as carpet, rug, or blanket. To install the stand: 1. Insert the screws into the base of the TV (the stands are finished, place the TV on a stable, level surface. Secure each stand to change. The actual number of the TV and keep it ...
User Manual English
Page 9
... the installation. Place the TV face-down on a clean, flat, stable surface. To prevent injury or damage to the TV, ask someone to your TV. 2. D32hn-D1 Screw Size: Hole Pattern: Weight w/o Stand: M4 100mm (V) x 100mm (H) 11.09 lbs Be sure the mount you . Remove the stands by loosening and removing the...
... the installation. Place the TV face-down on a clean, flat, stable surface. To prevent injury or damage to the TV, ask someone to your TV. 2. D32hn-D1 Screw Size: Hole Pattern: Weight w/o Stand: M4 100mm (V) x 100mm (H) 11.09 lbs Be sure the mount you . Remove the stands by loosening and removing the...

User Manual English
Page 10
FRONT PANEL 10 1 REMOTE SENSOR & POWER INDICATOR When using the remote, aim it directly at this sensor. The power indicator flashes on when the TV turns on page 46. To keep the power indicator on as long as the TV is on, see Turning the Power Indicator On or Off on , then goes out after several seconds.
FRONT PANEL 10 1 REMOTE SENSOR & POWER INDICATOR When using the remote, aim it directly at this sensor. The power indicator flashes on when the TV turns on page 46. To keep the power indicator on as long as the TV is on, see Turning the Power Indicator On or Off on , then goes out after several seconds.

User Manual English
Page 11
The actual number of ports and their locations may be subject to access the input menu. Stereo Audio Out- Component/Composite - Press and hold to play photo, music, or video. REAR PANEL 11 Connect a USB thumb drive to turn on the model. 1 HDMI - Connect an RCA audio device, such as home audio receiver. Connect an optical/SPDIF audio device, such as sound bar. Connect a component or composite device. Connect an HDMI device. PC Audio In Optical Audio Out - Connect a coaxial cable from cable, satellite, or antenna. Coaxial - Power - Press once to ...
The actual number of ports and their locations may be subject to access the input menu. Stereo Audio Out- Component/Composite - Press and hold to play photo, music, or video. REAR PANEL 11 Connect a USB thumb drive to turn on the model. 1 HDMI - Connect an RCA audio device, such as home audio receiver. Connect an optical/SPDIF audio device, such as sound bar. Connect a component or composite device. Connect an HDMI device. PC Audio In Optical Audio Out - Connect a coaxial cable from cable, satellite, or antenna. Coaxial - Power - Press once to ...

User Manual English
Page 12
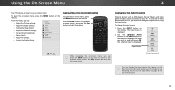
BACK Go to manually enter a digital sub-channel. (For example, 18-4 or 18-5.) 1. MUTE Turn the audio off . NUMBER PAD Manually enter a channel. POWER Turn TV on or off or on. GUIDE Display the info window. OK Select the highlighted menu option. ARROW Navigate the on the arrow markings and sliding out. 2. USING THE REMOTE INPUT Change the currently-displayed input. VOLUME UP/DOWN Increase or decrease the audio loudness. DASH Use with the number pad to the previous on -screen menu. REMOTE CONTROL 12 V BUTTON Open the USB media player. Remove the battery ...
BACK Go to manually enter a digital sub-channel. (For example, 18-4 or 18-5.) 1. MUTE Turn the audio off . NUMBER PAD Manually enter a channel. POWER Turn TV on or off or on. GUIDE Display the info window. OK Select the highlighted menu option. ARROW Navigate the on the arrow markings and sliding out. 2. USING THE REMOTE INPUT Change the currently-displayed input. VOLUME UP/DOWN Increase or decrease the audio loudness. DASH Use with the number pad to the previous on -screen menu. REMOTE CONTROL 12 V BUTTON Open the USB media player. Remove the battery ...

User Manual English
Page 13
The actual number of ports and their locations may be used (HDMI-1, HDMI-2, etc.). Turn the TV and your device on the model. 2 HDMI (HDMI )2 BEST • DIGITAL • HD VIDEO (1080p)1 • HD AUDIO COMPONENT CABLE BETTER • ANALOG • HD VIDEO (1080p)1 • STEREO AUDIO COAXIAL CABLE BETTER • ANALOG/DIGITAL • HD VIDEO (1080i)1 • STEREO/HD AUDIO AV CABLE GOOD • ANALOG • SD VIDEO (480i)1 • STEREO AUDIO 13 Verify that your device off. 3. Connect the appropriate cable (not included) to display output from most devices...
The actual number of ports and their locations may be used (HDMI-1, HDMI-2, etc.). Turn the TV and your device on the model. 2 HDMI (HDMI )2 BEST • DIGITAL • HD VIDEO (1080p)1 • HD AUDIO COMPONENT CABLE BETTER • ANALOG • HD VIDEO (1080p)1 • STEREO AUDIO COAXIAL CABLE BETTER • ANALOG/DIGITAL • HD VIDEO (1080i)1 • STEREO/HD AUDIO AV CABLE GOOD • ANALOG • SD VIDEO (480i)1 • STEREO AUDIO 13 Verify that your device off. 3. Connect the appropriate cable (not included) to display output from most devices...

User Manual English
Page 14
Coaxial cables carry both audio and video signals through a single connector. • Video Resolutions up to 480i • Analog Connection • Audio and Video Signals • HD Video Resolutions up to 1080i • Analog Connection • Audio and Video Signals COMPONENT CABLE Component cables are designed to 1080p • Analog Connection • Audio and Video Signals HDMI CABLE HDMI is sent over three connectors for optimal viewing. • HD Video Resolutions up to carry high definition video signals along with color information split up three different ways over ...
Coaxial cables carry both audio and video signals through a single connector. • Video Resolutions up to 480i • Analog Connection • Audio and Video Signals • HD Video Resolutions up to 1080i • Analog Connection • Audio and Video Signals COMPONENT CABLE Component cables are designed to 1080p • Analog Connection • Audio and Video Signals HDMI CABLE HDMI is sent over three connectors for optimal viewing. • HD Video Resolutions up to carry high definition video signals along with color information split up three different ways over ...

User Manual English
Page 15
... HDMI CABLE* BEST • ARC 2-WAY COMMUNICATION • 2.0-5.1 DIGITAL AUDIO • PCM, DTS, DOLBY DIGITAL 15 Verify that your audio device off. 3. Home Audio Receiver 2 VIZIO Sound Bar * Cables not included Note: The image shown here is for illustrative purposes only and may vary, depending on . Turn the TV and your...
... HDMI CABLE* BEST • ARC 2-WAY COMMUNICATION • 2.0-5.1 DIGITAL AUDIO • PCM, DTS, DOLBY DIGITAL 15 Verify that your audio device off. 3. Home Audio Receiver 2 VIZIO Sound Bar * Cables not included Note: The image shown here is for illustrative purposes only and may vary, depending on . Turn the TV and your...

User Manual English
Page 16
Audio Return Channel-enabled (ARC) TVs allow audio to your devices to be sent over the red and white connectors. ARC on page 17. • ARC 2-way Communication (Auto setup) • PCM, DTS, Dolby Digital • 2.0 - 5.1 Scaleable Lossless Digital Audio Connection • Audio and Video Signals HDMI HDMI GOOD BETTER BEST 16 Audio signals are digitally transmitted between devices. • Quality Stereo Connection • 2.0 Channel • Analog Connection • Audio Signal Only COMPONENT VIDEO L R • PCM Stream (Lossless) • Dolby Digital 5.1 Channel &#...
Audio Return Channel-enabled (ARC) TVs allow audio to your devices to be sent over the red and white connectors. ARC on page 17. • ARC 2-way Communication (Auto setup) • PCM, DTS, Dolby Digital • 2.0 - 5.1 Scaleable Lossless Digital Audio Connection • Audio and Video Signals HDMI HDMI GOOD BETTER BEST 16 Audio signals are digitally transmitted between devices. • Quality Stereo Connection • 2.0 Channel • Analog Connection • Audio Signal Only COMPONENT VIDEO L R • PCM Stream (Lossless) • Dolby Digital 5.1 Channel &#...

User Manual English
Page 17
Built-In Tuner Your TV HDMI Cable Your Home Audio Receiver HDMI Cable Your Blu-Ray Player 17 Built-In Tuner Your TV RCA (Audio) HDMI Cable Your Home Audio Receiver HDMI Cable Your Blu-Ray Player 2 With HDMI ARC With an HDMI ARC setup, the audio connection between your home audio receiver through a separate audio connection. The HDMI cable will transmit audio signal from your TV with an all-digital audio/video connection. ARC Without HDMI ARC Without an HDMI ARC setup, your TV will transmit audio signal to and from the built-in tuner and VIA apps to your TV and Home ...
Built-In Tuner Your TV HDMI Cable Your Home Audio Receiver HDMI Cable Your Blu-Ray Player 17 Built-In Tuner Your TV RCA (Audio) HDMI Cable Your Home Audio Receiver HDMI Cable Your Blu-Ray Player 2 With HDMI ARC With an HDMI ARC setup, the audio connection between your home audio receiver through a separate audio connection. The HDMI cable will transmit audio signal from your TV with an all-digital audio/video connection. ARC Without HDMI ARC Without an HDMI ARC setup, your TV will transmit audio signal to and from the built-in tuner and VIA apps to your TV and Home ...

User Manual English
Page 18
The TV powers on a1nd the2Setup A3pp starts. 4 5 6 7 8 9 WIDE 0 - 3 Use the Arrow buttons on the remote to highlight your language of the steps necessary to get your TV ready for in -store display. Select Store Demo for in -home use . Select Home Use for use . Store Demo Home Use Use the Arrow buttons on the remote. To complete the first-time setup: 1 INPUT EXIT BACK OK MENU GUIDE VOL CH VOL CH Press the Power button on the remote to highlight Home Use and press OK. If you have cable TV, select whether you have the network password ready. • If you ...
The TV powers on a1nd the2Setup A3pp starts. 4 5 6 7 8 9 WIDE 0 - 3 Use the Arrow buttons on the remote to highlight your language of the steps necessary to get your TV ready for in -store display. Select Store Demo for in -home use . Select Home Use for use . Store Demo Home Use Use the Arrow buttons on the remote. To complete the first-time setup: 1 INPUT EXIT BACK OK MENU GUIDE VOL CH VOL CH Press the Power button on the remote to highlight Home Use and press OK. If you have cable TV, select whether you have the network password ready. • If you ...

User Manual English
Page 19
When you are finished, the message "Setup is complete. 3 19 Otherwise, use the Arrow and OK buttons on the remote to highlight Begin Scan and press OK. The First-Time Setup is complete." Note: Number of ports may differ by TV. Use the arrow buttons on the remote to select the input your TV source is connected to scan for channels, which takes several minutes. will need to . 5 If the TV Signal channel scan screen appears, the TV will appear.
When you are finished, the message "Setup is complete. 3 19 Otherwise, use the Arrow and OK buttons on the remote to highlight Begin Scan and press OK. The First-Time Setup is complete." Note: Number of ports may differ by TV. Use the arrow buttons on the remote to select the input your TV source is connected to scan for channels, which takes several minutes. will need to . 5 If the TV Signal channel scan screen appears, the TV will appear.
User Manual English
Page 20
... the Sleep Timers • Adjust the Channel settings • Set up Closed Captioning • Name Inputs • Adjust TV settings • Access the Guided Setup VIZIO TV SETTINGS Picture Audio Timers Channels CC Closed Captions Devices System Guided Setup To open the on-screen menu, press the MENU button on the...
... the Sleep Timers • Adjust the Channel settings • Set up Closed Captioning • Name Inputs • Adjust TV settings • Access the Guided Setup VIZIO TV SETTINGS Picture Audio Timers Channels CC Closed Captions Devices System Guided Setup To open the on-screen menu, press the MENU button on the...

User Manual English
Page 21
Use the Arrow buttons to highlight the aspect ratio you are extremely stretched. Since the 4:3 aspect ratio is not large enough to fit the screen. Figures appear tall and thin. • Standard Definition - Not available. • Panoramic stretches a 4:3 aspect ratio picture to the edges of the display image. • Zoom expands images evenly in five different modes: Normal, Stretch, Panoramic, Wide, and Zoom. Not available. • 1080p and 1080i - If the program is not stretched, but the sides of the image are watching widescreen (1.85:1 or 2.35:1) content with black ...
Use the Arrow buttons to highlight the aspect ratio you are extremely stretched. Since the 4:3 aspect ratio is not large enough to fit the screen. Figures appear tall and thin. • Standard Definition - Not available. • Panoramic stretches a 4:3 aspect ratio picture to the edges of the display image. • Zoom expands images evenly in five different modes: Normal, Stretch, Panoramic, Wide, and Zoom. Not available. • 1080p and 1080i - If the program is not stretched, but the sides of the image are watching widescreen (1.85:1 or 2.35:1) content with black ...