User Manual English
Page 4
...TV will not be replaced when using different • Avoid using dropped or damaged appliances. Pulling on the apparatus. • Store the accessories (remote, batteries, etc.) in fire or electric shock. When your TV away from damage due to power surges. • Do not attempt to ... and no objects filled with continued exposure to loud noises, ears may become accustomed to the sound level, which can damage the remote control or injure the operator. To totally disconnect power, unplug the power cord. Ensure that contained in environments with arrowhead symbol within...
...TV will not be replaced when using different • Avoid using dropped or damaged appliances. Pulling on the apparatus. • Store the accessories (remote, batteries, etc.) in fire or electric shock. When your TV away from damage due to power surges. • Do not attempt to ... and no objects filled with continued exposure to loud noises, ears may become accustomed to the sound level, which can damage the remote control or injure the operator. To totally disconnect power, unplug the power cord. Ensure that contained in environments with arrowhead symbol within...
User Manual English
Page 7
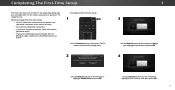
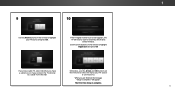
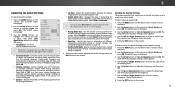
To complete the first-time setup: 1 Press the Power button on the remote. Seleccione "Home Use" para Modo de Casa o "Store Demo" para Demostración en la Tienda. Select Home Use for in...pour la Démo en Magasin. Store Demo Home Use Use the Arrow buttons on the remote to highlight Home Use and press OK. 1 3 Use the Arrow buttons on the remote to highlight your language of the steps necessary to get your TV ready for use . ...the network password ready. • If you through each of preference and press OK. 4 Use the Arrow buttons on the remote to highlight your mode.
To complete the first-time setup: 1 Press the Power button on the remote. Seleccione "Home Use" para Modo de Casa o "Store Demo" para Demostración en la Tienda. Select Home Use for in...pour la Démo en Magasin. Store Demo Home Use Use the Arrow buttons on the remote to highlight Home Use and press OK. 1 3 Use the Arrow buttons on the remote to highlight your language of the steps necessary to get your TV ready for use . ...the network password ready. • If you through each of preference and press OK. 4 Use the Arrow buttons on the remote to highlight your mode.
User Manual English
Page 8
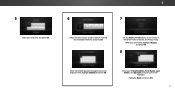
5 Select your time zone and press OK. 1 6 7 Select the name of your E-mail Address, First Name, Last Name, and Zip Code using the on-screen keyboard, then highlight Connect and press OK. Highlight Next and press OK. 8 When you are finished, highlight I Accept and press OK. 8 Enter the network password using the on the remote to review the Terms Of Service and Privacy Policy. Enter your wireless network from the list of available networks and press OK. Use the Arrow and OK buttons on -screen keyboard.
5 Select your time zone and press OK. 1 6 7 Select the name of your E-mail Address, First Name, Last Name, and Zip Code using the on-screen keyboard, then highlight Connect and press OK. Highlight Next and press OK. 8 When you are finished, highlight I Accept and press OK. 8 Enter the network password using the on the remote to review the Terms Of Service and Privacy Policy. Enter your wireless network from the list of available networks and press OK. Use the Arrow and OK buttons on -screen keyboard.
User Manual English
Page 9
Otherwise, use the Arrow and OK buttons on the remote to . will need to highlight Begin Scan and press OK. If you have cable TV, select whether you have a cable box or if you are ... to select the input your TV source and press OK. Note: Number of ports may differ by TV. 9 10 Use the Arrow buttons on the remote to a cable from the wall. When you connect the TV directly to highlight your TV source is complete." Use the arrow buttons on the...
Otherwise, use the Arrow and OK buttons on the remote to . will need to highlight Begin Scan and press OK. If you have cable TV, select whether you have a cable box or if you are ... to select the input your TV source and press OK. Note: Number of ports may differ by TV. 9 10 Use the Arrow buttons on the remote to a cable from the wall. When you connect the TV directly to highlight your TV source is complete." Use the arrow buttons on the...

User Manual English
Page 10
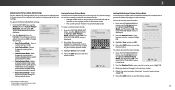
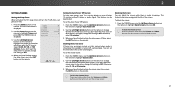
...these devices with your TV. Press the INPUT button on -screen menu. To use on the remote. To change the input names that option. The selected input is displayed. 2. HDMI-3 available only on model D50-D1 You can : • Adjust the Picture settings • Adjust the Audio settings • ...Guided Setup • View the User Manual VIZIO TV SETTINGS Picture Audio Timers Network Channels CC Closed Captions Devices System Guided Setup User Manual NAVIGATING THE ON-SCREEN MENU To open the on-screen menu, press the MENU button on the remote to highlight the input you wish to ...
...these devices with your TV. Press the INPUT button on -screen menu. To use on the remote. To change the input names that option. The selected input is displayed. 2. HDMI-3 available only on model D50-D1 You can : • Adjust the Picture settings • Adjust the Audio settings • ...Guided Setup • View the User Manual VIZIO TV SETTINGS Picture Audio Timers Network Channels CC Closed Captions Devices System Guided Setup User Manual NAVIGATING THE ON-SCREEN MENU To open the on-screen menu, press the MENU button on the remote to highlight the input you wish to ...
User Manual English
Page 11
Some programs have black bars on the remote. 2. Since the 4:3 aspect ratio is not large enough to fill the TV's screen, black bars are watching widescreen (1.85:1 or 2.35:1) content with black bars ...
Some programs have black bars on the remote. 2. Since the 4:3 aspect ratio is not large enough to fill the TV's screen, black bars are watching widescreen (1.85:1 or 2.35:1) content with black bars ...

User Manual English
Page 12
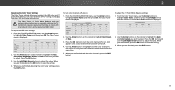
... ABC Input Wide CC Sleep Timer Picture Audio Network Settings Help Network Settings Help CENTERED OVERLAY 2 12 VIZIO VIEWING VIDEO WITH THE MENU OPENWide Zoom Normal Panoramic When the on the remote to the menu. Press the Up Arrow button on -screen menu opens, it covers the left edges...Brightness - Use the Arrow buttons on -screen menu is resized to fitEixnit to th2eD space3D to the right of the picture while the on the remote to cycle through the three display methods. 3. Brightness - The picture can be displayed in the area next to the menu, so that the ...
... ABC Input Wide CC Sleep Timer Picture Audio Network Settings Help Network Settings Help CENTERED OVERLAY 2 12 VIZIO VIEWING VIDEO WITH THE MENU OPENWide Zoom Normal Panoramic When the on the remote to the menu. Press the Up Arrow button on -screen menu opens, it covers the left edges...Brightness - Use the Arrow buttons on -screen menu is resized to fitEixnit to th2eD space3D to the right of the picture while the on the remote to cycle through the three display methods. 3. Brightness - The picture can be displayed in the area next to the menu, so that the ...

User Manual English
Page 13
... (high definition) content; When this setting is displayed. 2. If flesh appears too orange, reduce the level of the picture. VIZIO PICTURE Picture Mode Auto Brightness Control Backlight - Press the MENU button on -screen menu is too low, the picture may appear ... Computer mode optimizes the picture settings for a picture mode, an asterisks appears after its name (see Saving a Custom Picture Mode on the remote to distinguish details. To adjust the picture settings: 1. Input Wide CC • Brightness - When this setting is useful in adjusting the ...
... (high definition) content; When this setting is displayed. 2. If flesh appears too orange, reduce the level of the picture. VIZIO PICTURE Picture Mode Auto Brightness Control Backlight - Press the MENU button on -screen menu is too low, the picture may appear ... Computer mode optimizes the picture settings for a picture mode, an asterisks appears after its name (see Saving a Custom Picture Mode on the remote to distinguish details. To adjust the picture settings: 1. Input Wide CC • Brightness - When this setting is useful in adjusting the ...

User Manual English
Page 14
...Adjusting the Color Temperature Adjusting the color temperature changes the white balance of the displayed picture. VIZIO COLOR TEMPERATURE Cool Normal Computer 2. Select On or Off. • Clear Action - VIZIO MORE PICTURE Color Temperature Black Detail Active LED Zones Clear Action Reduce Noise Game Low Latency... you have finished adjusting More Picture Settings, press the EXIT button on the remote to change the setting: • Color Temperature See Adjusting the Color Temperature on the remote. Adjusts the average brightness of the picture to compensate for large areas of ...
...Adjusting the Color Temperature Adjusting the color temperature changes the white balance of the displayed picture. VIZIO COLOR TEMPERATURE Cool Normal Computer 2. Select On or Off. • Clear Action - VIZIO MORE PICTURE Color Temperature Black Detail Active LED Zones Clear Action Reduce Noise Game Low Latency... you have finished adjusting More Picture Settings, press the EXIT button on the remote to change the setting: • Color Temperature See Adjusting the Color Temperature on the remote. Adjusts the average brightness of the picture to compensate for large areas of ...
User Manual English
Page 15
... saved. MyMode Save Picture Mode Unlock Picture Mode Delete Picture Mode - Wide Zoom Normal Panoramic 2. EHxiitghligh2Dt Save3aDnd press OK. VIZIO LOCK PICTURE MODE Create a picture control PIN to prevent changes to the picture modes. 4. ABC To uInnpulot ck aWlildceustoCmC picture...STtMliom eeoehprdigeh, PlaiicgntuhdrettUhenAnluodpciorkePssicOtuKr.eThe UNLOCK PICTURE MODE menu is displayed. 2. Use either the oAnBC-screen keyboard or keyboard on the remote. 1. Highlight Save and press OK. 4. Use the Number Pad on HDMI input. MyMode Saving a Custom Picture Mode...
... saved. MyMode Save Picture Mode Unlock Picture Mode Delete Picture Mode - Wide Zoom Normal Panoramic 2. EHxiitghligh2Dt Save3aDnd press OK. VIZIO LOCK PICTURE MODE Create a picture control PIN to prevent changes to the picture modes. 4. ABC To uInnpulot ck aWlildceustoCmC picture...STtMliom eeoehprdigeh, PlaiicgntuhdrettUhenAnluodpciorkePssicOtuKr.eThe UNLOCK PICTURE MODE menu is displayed. 2. Use either the oAnBC-screen keyboard or keyboard on the remote. 1. Highlight Save and press OK. 4. Use the Number Pad on HDMI input. MyMode Saving a Custom Picture Mode...
User Manual English
Page 17
...turned off . 4. Calibration requires specialized training, an input with the color channels, press the EXIT button. Use the Arrow buttons on the remote to highlight the Gain and Color values you are finished adjusting the color tuner settings, press the EXIT button. When you are finished with... precisely set colors, and a specialized light meter. Use the Arrow buttons on the remote to adjust. From the COLOR CALIBRATION menu, use the Arrow buttons to manually calibrate the TV. Use the Arrow buttons to highlight another color...
...turned off . 4. Calibration requires specialized training, an input with the color channels, press the EXIT button. Use the Arrow buttons on the remote to highlight the Gain and Color values you are finished adjusting the color tuner settings, press the EXIT button. When you are finished with... precisely set colors, and a specialized light meter. Use the Arrow buttons on the remote to adjust. From the COLOR CALIBRATION menu, use the Arrow buttons to manually calibrate the TV. Use the Arrow buttons to highlight another color...
User Manual English
Page 18
...Arrow buttons to highlight Off. 3. Use the Left/Right Arrow buttons to highlight Off. Ramp Test Pattern Off 2. Use the Arrow buttons on the remote to select the percentage brightness for the ramp test pattern. Selecting a color immediately shows that brightness. -or- To disable the Flat Test Pattern, ...color for the flat test pattern. Use the Left/Right Arrow buttons to highlight On to highlight Off. 3. Use the Arrow buttons on the remote to highlight Off. 3. Use the Left/Right Arrow buttons to highlight Off. From the Color Tuner menu, use the Left/Right Arrow buttons...
...Arrow buttons to highlight Off. 3. Use the Left/Right Arrow buttons to highlight Off. Ramp Test Pattern Off 2. Use the Arrow buttons on the remote to select the percentage brightness for the ramp test pattern. Selecting a color immediately shows that brightness. -or- To disable the Flat Test Pattern, ...color for the flat test pattern. Use the Left/Right Arrow buttons to highlight On to highlight Off. 3. Use the Arrow buttons on the remote to highlight Off. 3. Use the Left/Right Arrow buttons to highlight Off. From the Color Tuner menu, use the Left/Right Arrow buttons...
User Manual English
Page 19
... or attenuation of processing for example). •Exit Ana2lDog Au3dDio Out - See Changing the Equalizer Settings on the remote. Changing the Equalizer Settings The graphic equalizer has several pre-set audio mode: 1. VIZIO AUDIO TV Speakers Surround Sound Volume Leveling Balance - Changes the type of different frequencies using the Equalizer Settings. The...
... or attenuation of processing for example). •Exit Ana2lDog Au3dDio Out - See Changing the Equalizer Settings on the remote. Changing the Equalizer Settings The graphic equalizer has several pre-set audio mode: 1. VIZIO AUDIO TV Speakers Surround Sound Volume Leveling Balance - Changes the type of different frequencies using the Equalizer Settings. The...
User Manual English
Page 20
Use the Arrow buttons to highlight Audio and press OK. The AUDIO menu is displayed. 2. Press the EXIT button on the remote. The TV displays, "To delete the user created custom audio mode, select the Delete button." 4. Deleting the Custom Audio Mode To delete the custom audio mode that has been created: 1. Press the MENU button on the remote. 2 20 Use the Arrow buttons on -screen menu is displayed. 3. The on the remote to highlight Delete Audio Mode and press OK. Highlight Delete and press OK. 5.
Use the Arrow buttons to highlight Audio and press OK. The AUDIO menu is displayed. 2. Press the EXIT button on the remote. The TV displays, "To delete the user created custom audio mode, select the Delete button." 4. Deleting the Custom Audio Mode To delete the custom audio mode that has been created: 1. Press the MENU button on the remote. 2 20 Use the Arrow buttons on -screen menu is displayed. 3. The on the remote to highlight Delete Audio Mode and press OK. Highlight Delete and press OK. 5.
User Manual English
Page 21
... timer will turn off time, press the EXIT button on the remote to exit the screen saver. 21 Use the Arrow buttons on the remote. The TIMERS menu is set by default to turn off after a set period of the screen. VIZIO TIMERS Sleep Timer Auto Power Off Screen Saver Blank Screen Off...
... timer will turn off time, press the EXIT button on the remote to exit the screen saver. 21 Use the Arrow buttons on the remote. The TIMERS menu is set by default to turn off after a set period of the screen. VIZIO TIMERS Sleep Timer Auto Power Off Screen Saver Blank Screen Off...

User Manual English
Page 22
... alternate domain name server 4. Input Wide CC Sleep Timer Picture Audio Network Settings Help 22 Press the MENU button on the remote. If you to highlight Network and press OK. VIZIO NETWORK Wired Connection Disconnected Wireless Access Points More Access Points WPS Manual Setup Hidden Network Test Connection 6. Your network's dAeBfCault gateway...
... alternate domain name server 4. Input Wide CC Sleep Timer Picture Audio Network Settings Help 22 Press the MENU button on the remote. If you to highlight Network and press OK. VIZIO NETWORK Wired Connection Disconnected Wireless Access Points More Access Points WPS Manual Setup Hidden Network Test Connection 6. Your network's dAeBfCault gateway...

User Manual English
Page 23
... Picture Audio Network Settings Help 2 23 Connecting to a Hidden Network To connect to an access point with a hidden SSID. 3. Using the on the remote. Using the on the remote. VIZIO ENTER ACCESS POINT NAME Enter your network connection: 1. This is used to connect to a wireless network whose network name (SSID) is displayed. 2. From...
... Picture Audio Network Settings Help 2 23 Connecting to a Hidden Network To connect to an access point with a hidden SSID. 3. Using the on the remote. Using the on the remote. VIZIO ENTER ACCESS POINT NAME Enter your network connection: 1. This is used to connect to a wireless network whose network name (SSID) is displayed. 2. From...

User Manual English
Page 24
...Stereo English Selecting a Channel Source Select the type of tuner input you are retained. CC To perform an Auto Channel Scan: VIZIO 1. Press the EXIT button on the remote to enter the channel.) 5. Cancel the channel scan. You can select either Antenna (Over-the-air) or Cable (Out...-of-the-wall) connections. 1. Use the Number Pad on the remote. From the CHANNELS menu, highlight Channel Source and press OK. Highlight Done and press OK. EWxitait un2tDil the p3ADaBCrtial channel search is quicker than ...
...Stereo English Selecting a Channel Source Select the type of tuner input you are retained. CC To perform an Auto Channel Scan: VIZIO 1. Press the EXIT button on the remote to enter the channel.) 5. Cancel the channel scan. You can select either Antenna (Over-the-air) or Cable (Out...-of-the-wall) connections. 1. Use the Number Pad on the remote. From the CHANNELS menu, highlight Channel Source and press OK. Highlight Done and press OK. EWxitait un2tDil the p3ADaBCrtial channel search is quicker than ...

User Manual English
Page 25
Highlight Add Channel and press OK. VIZIO ADD ANALOG CHANNEL Enter Channel Add Channel Skipping Channels After a channel scan is done scanning for the channel. 4. You can still be some channels are adding. 3. See Locking and Unlocking Channels on the remote. When the TV is completed, you may also be viewed if the...
Highlight Add Channel and press OK. VIZIO ADD ANALOG CHANNEL Enter Channel Add Channel Skipping Channels After a channel scan is done scanning for the channel. 4. You can still be some channels are adding. 3. See Locking and Unlocking Channels on the remote. When the TV is completed, you may also be viewed if the...

User Manual English
Page 26
... and cable channels broadcast programs in an alternate language using Secondary Audio Programming (SAP). VIZIO ANALOG AUDIO Stereo SAP Mono Wide Zoom Normal Panoramic Exit 2D 3D ABC Input Wide CC VIZIO DIGITAL LANGUAGE English Español Français Sleep Timer Picture Audio Network Settings...listen to audio in more than one language. Not all programs are broadcast in SAP. Press the EXIT button on the remote. Press the EXIT button on the remote. Select Stereo, SAP (secondary audio programming), or Mono. Select your preferred language: English, Español or Fran&#...
... and cable channels broadcast programs in an alternate language using Secondary Audio Programming (SAP). VIZIO ANALOG AUDIO Stereo SAP Mono Wide Zoom Normal Panoramic Exit 2D 3D ABC Input Wide CC VIZIO DIGITAL LANGUAGE English Español Français Sleep Timer Picture Audio Network Settings...listen to audio in more than one language. Not all programs are broadcast in SAP. Press the EXIT button on the remote. Press the EXIT button on the remote. Select Stereo, SAP (secondary audio programming), or Mono. Select your preferred language: English, Español or Fran&#...


