
User Manual
Page 3
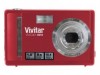
... HD) 1920x1080 pixels and (VGA) 640x480 pixels. Everything you for managing and enhancing your camera. Vivitar makes capturing those special moments so easy. Please read this manual carefully first in Flash y PhoTags Express software for purchasing the ViviCam X327 10.1 Mega-Pixel Digital Camera with Auto-Focus zoom lens. y 2.7 inch TFT LCD y 3x...
... HD) 1920x1080 pixels and (VGA) 640x480 pixels. Everything you for managing and enhancing your camera. Vivitar makes capturing those special moments so easy. Please read this manual carefully first in Flash y PhoTags Express software for purchasing the ViviCam X327 10.1 Mega-Pixel Digital Camera with Auto-Focus zoom lens. y 2.7 inch TFT LCD y 3x...

User Manual
Page 7
... photos taken with the correct polarity facing up. 3. Close the battery door. 4. Alkaline batteries are recommended. 1. A "Low battery" message will be downloaded otherwise they will flash on the bottom left of the camera. 2. Preparing Your Camera for a long time. 3. On powering on your camera the battery icon will power off. 2. Please...
... photos taken with the correct polarity facing up. 3. Close the battery door. 4. Alkaline batteries are recommended. 1. A "Low battery" message will be downloaded otherwise they will flash on the bottom left of the camera. 2. Preparing Your Camera for a long time. 3. On powering on your camera the battery icon will power off. 2. Please...

User Manual
Page 14
... camera is on the LCD screen if there is ready before taking a photo. Press the Flash button until the icon appears again. Force Flash, Auto, Red eye reduction, No Flash To set the flash: Note: The flash can also use the built-in Far mode . 1. The icon as well as the red... until the icon appears on the LCD screen. This will turn off the flash function. Flash In low light conditions it is charging. 4. This will activate the automatic flash. 3. If the flash is the default flash setting. 13 This is not ready, a red LED will light up and the icon will begin...
... camera is on the LCD screen if there is ready before taking a photo. Press the Flash button until the icon appears again. Force Flash, Auto, Red eye reduction, No Flash To set the flash: Note: The flash can also use the built-in Far mode . 1. The icon as well as the red... until the icon appears on the LCD screen. This will turn off the flash function. Flash In low light conditions it is charging. 4. This will activate the automatic flash. 3. If the flash is the default flash setting. 13 This is not ready, a red LED will light up and the icon will begin...

User Manual
Page 20
... will count down begin in the center of the LCD. 4. Press the Right/Left button to select the icon. 3. The Self-Timer icon selected will flash and then automatically take the photo. Press the Up/Down button to select one of the LCD screen. 7. Press the Shutter button until you see...
... will count down begin in the center of the LCD. 4. Press the Right/Left button to select the icon. 3. The Self-Timer icon selected will flash and then automatically take the photo. Press the Up/Down button to select one of the LCD screen. 7. Press the Shutter button until you see...

User Manual
Page 21
... appearing on the bottom of the LCD. 20 Press the Up/Down buttons to the camera standby mode. 4. Press the Up/Down buttons to use a flash or tripod. Press the MENU button. 2. ISO This is a special function that appears: 3. Exposure This setting allows you selected appears on your images. 1. Press the...
... appearing on the bottom of the LCD. 20 Press the Up/Down buttons to the camera standby mode. 4. Press the Up/Down buttons to use a flash or tripod. Press the MENU button. 2. ISO This is a special function that appears: 3. Exposure This setting allows you selected appears on your images. 1. Press the...

User Manual
Page 28
... the recording and save this indicates that you wish to select the Video mode. Prepare the object or subject you are in QVGA. message will flash on the top right of the LCD screen this file in Playback mode or once downloaded to 20 seconds in Video 1. Video Mode Press the...
... the recording and save this indicates that you wish to select the Video mode. Prepare the object or subject you are in QVGA. message will flash on the top right of the LCD screen this file in Playback mode or once downloaded to 20 seconds in Video 1. Video Mode Press the...

User Manual
Page 54
... White Balance Auto, Daylight, Cloudy, Incandescent , Fluorescent ISO Auto/100/200/400 Scene Auto/Night Portrait/Night Scenery/Portrait/Scenery/Sport/Party/Beach/High Sensitivity Flash Auto /Force/Red Eye Reduction/Off Self-timer 2, 5 or 10 sec delay Anti-Shake Yes PictBridge Yes Face Detect Yes Interface USB 2.0 System Requirements Window...
... White Balance Auto, Daylight, Cloudy, Incandescent , Fluorescent ISO Auto/100/200/400 Scene Auto/Night Portrait/Night Scenery/Portrait/Scenery/Sport/Party/Beach/High Sensitivity Flash Auto /Force/Red Eye Reduction/Off Self-timer 2, 5 or 10 sec delay Anti-Shake Yes PictBridge Yes Face Detect Yes Interface USB 2.0 System Requirements Window...

