
User Manual
Page 1
All other trademarks are registered trademarks of their respective companies. All rights reserved. Windows and the Windows logo are the property of Microsoft Corporation. ViviCam X327 Digital Camera Owner`s Manual © 2009 Sakar International, Inc.
All other trademarks are registered trademarks of their respective companies. All rights reserved. Windows and the Windows logo are the property of Microsoft Corporation. ViviCam X327 Digital Camera Owner`s Manual © 2009 Sakar International, Inc.

User Manual
Page 2
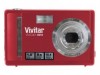
...for Windows Vista 4 Computer System Requirements for Macintosh 4 A Quick Look at Your Camera ...5 Preparing Your Camera for Use ...6 Installing SD Memory Card ...7 How to hold your camera correctly when capturing images 9 Starting Your Digital Camera ...10 Camera Mode ...11 Video Mode ...27 Playback Mode...30 Installing PhoTags Express Software ...37 ... and videos to your PC manually 50 Transferring photos and videos to your MAC manually 51 Maintenance of Your Digital Camera...51 Sakar Warranty Card...52 Appendix A: Technical Specifications ...53 Appendix B: Troubleshooting ...54 1
...for Windows Vista 4 Computer System Requirements for Macintosh 4 A Quick Look at Your Camera ...5 Preparing Your Camera for Use ...6 Installing SD Memory Card ...7 How to hold your camera correctly when capturing images 9 Starting Your Digital Camera ...10 Camera Mode ...11 Video Mode ...27 Playback Mode...30 Installing PhoTags Express Software ...37 ... and videos to your PC manually 50 Transferring photos and videos to your MAC manually 51 Maintenance of Your Digital Camera...51 Sakar Warranty Card...52 Appendix A: Technical Specifications ...53 Appendix B: Troubleshooting ...54 1

User Manual
Page 3
...2M HD) 1920x1080 pixels and (VGA) 640x480 pixels. Vivitar makes capturing those special moments so easy. Please read this manual carefully first in Flash y PhoTags Express software for purchasing the ViviCam X327 10.1 Mega-Pixel Digital Camera with Auto-Focus zoom lens. Introduction Thank you need ...to take quality digital photos and videos is inserted into the camera. Your digital camera can also be used as a removable disk when...
...2M HD) 1920x1080 pixels and (VGA) 640x480 pixels. Vivitar makes capturing those special moments so easy. Please read this manual carefully first in Flash y PhoTags Express software for purchasing the ViviCam X327 10.1 Mega-Pixel Digital Camera with Auto-Focus zoom lens. Introduction Thank you need ...to take quality digital photos and videos is inserted into the camera. Your digital camera can also be used as a removable disk when...

User Manual
Page 4
What your camera package includes y Digital Camera y PhoTags Express software Installation CD y USB cable y Quick Start Guide y Strap Computer System Requirements for Windows XP To be able to download photos to your PC, you will need the following minimum configuration: y Pentium III process or above with Windows XP y 128 MB RAM, with 150MB of free disk space y Available USB interface y CD-ROM Drive y 1024 x 768 Recommended screen resolution y 16-bit color or higher display adaptor 3
What your camera package includes y Digital Camera y PhoTags Express software Installation CD y USB cable y Quick Start Guide y Strap Computer System Requirements for Windows XP To be able to download photos to your PC, you will need the following minimum configuration: y Pentium III process or above with Windows XP y 128 MB RAM, with 150MB of free disk space y Available USB interface y CD-ROM Drive y 1024 x 768 Recommended screen resolution y 16-bit color or higher display adaptor 3

User Manual
Page 7
Insert the batteries correctly with the camera should be lost when the camera 6 Preparing Your Camera for Use Your digital camera needs 3 AAA batteries in order to use your camera for a long time. 3. On powering on your camera the battery icon will flash on the LCD when the battery power is...don't intend to operate. Slide and open the battery door on the bottom left of the camera. 2. Note: Full battery power Medium battery power Low battery power 1. Please remove your camera will be downloaded otherwise they will power off. 2. Alkaline batteries are recommended. 1.
Insert the batteries correctly with the camera should be lost when the camera 6 Preparing Your Camera for Use Your digital camera needs 3 AAA batteries in order to use your camera for a long time. 3. On powering on your camera the battery icon will flash on the LCD when the battery power is...don't intend to operate. Slide and open the battery door on the bottom left of the camera. 2. Note: Full battery power Medium battery power Low battery power 1. Please remove your camera will be downloaded otherwise they will power off. 2. Alkaline batteries are recommended. 1.
User Manual
Page 11
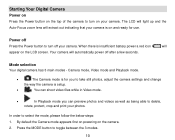
... the Power button on the top of the camera to select the mode, please follow the below steps: 1. Camera mode, Video mode and Playback mode. • The Camera mode is for use. By default the Camera mode appears first on powering on the camera. 2. Mode selection Your digital camera has 3 main modes - Press the MODE button to...
... the Power button on the top of the camera to select the mode, please follow the below steps: 1. Camera mode, Video mode and Playback mode. • The Camera mode is for use. By default the Camera mode appears first on powering on the camera. 2. Mode selection Your digital camera has 3 main modes - Press the MODE button to...
User Manual
Page 13
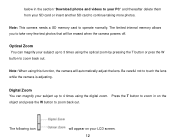
below in on your LCD screen. 12 Note: This camera needs a SD memory card to touch the lens while the camera is adjusting. Be careful not to operate normally. Digital Zoom You can magnify your subject up to 4 times using the digital zoom. The limited internal memory allows you to continue taking more photos. The...
below in on your LCD screen. 12 Note: This camera needs a SD memory card to touch the lens while the camera is adjusting. Be careful not to operate normally. Digital Zoom You can magnify your subject up to 4 times using the digital zoom. The limited internal memory allows you to continue taking more photos. The...

User Manual
Page 17
... the MENU button to confirm, save and exit to take . Your camera has two HD "7M" and "2M" high definition image sizes. The Image Size menu appears in order to the camera standby mode. 6. Anti-Shake Your Digital Camera has a function that prevents photos coming out blurry as a result of memory required for each...
... the MENU button to confirm, save and exit to take . Your camera has two HD "7M" and "2M" high definition image sizes. The Image Size menu appears in order to the camera standby mode. 6. Anti-Shake Your Digital Camera has a function that prevents photos coming out blurry as a result of memory required for each...

User Manual
Page 20
...automatically take the photo. Setup You can adjust the way your choice and exit to confirm, save your camera is setup with 11 setup option: Exposure, ISO, White Balance, Sharpness, Quality, Digital Zoom, Date, Auto Power off, Frequency, Language, Copy, Format and Default Setting. 1. The Setup menu... appears in the center of the LCD screen. 7. Your camera will count down begin in the center of the green frame ...
...automatically take the photo. Setup You can adjust the way your choice and exit to confirm, save your camera is setup with 11 setup option: Exposure, ISO, White Balance, Sharpness, Quality, Digital Zoom, Date, Auto Power off, Frequency, Language, Copy, Format and Default Setting. 1. The Setup menu... appears in the center of the LCD screen. 7. Your camera will count down begin in the center of the green frame ...

User Manual
Page 23
...Press the MENU button. 3. Press the Up/Down buttons to the camera standby mode. 5. Press the MENU button. 3. A HIGH setting means you selected appears on the bottom left corner of better quality. Press the Up/Down buttons to select the Digital Zoom option in the Setup menu. 2. Quality The quality of your... photos also affects the number of shots you can take fewer photos, but they will be of the LCD. Press the Up/Down button to the camera standby mode. 22 Press the Up...
...Press the MENU button. 3. Press the Up/Down buttons to the camera standby mode. 5. Press the MENU button. 3. A HIGH setting means you selected appears on the bottom left corner of better quality. Press the Up/Down buttons to select the Digital Zoom option in the Setup menu. 2. Quality The quality of your... photos also affects the number of shots you can take fewer photos, but they will be of the LCD. Press the Up/Down button to the camera standby mode. 22 Press the Up...

User Manual
Page 52
Click on the REMOVABLE STORAGE DEVICE to a folder on my computer" on a Mac. Maintenance of Your Digital Camera The digital camera is not compatible and will not install on the Removable Disk (F:) window. Choose "copy pictures to view the images. The images...1. A new drive should mount on the desktop. 2. Transferring photos and videos to finish transferring. 2. In order to transfer photos and videos from your camera to avoid damaging it. 51 Alternatively you choose. After you click "OK", step by the system to your Macintosh computer: 1. Follow the description and...
Click on the REMOVABLE STORAGE DEVICE to a folder on my computer" on a Mac. Maintenance of Your Digital Camera The digital camera is not compatible and will not install on the Removable Disk (F:) window. Choose "copy pictures to view the images. The images...1. A new drive should mount on the desktop. 2. Transferring photos and videos to finish transferring. 2. In order to transfer photos and videos from your camera to avoid damaging it. 51 Alternatively you choose. After you click "OK", step by the system to your Macintosh computer: 1. Follow the description and...


