
Camera Manual
Page 2
... Mode ...30 Video Capture Mode ...37 Video Playback Mode...49 Installing the Software ...53 Connecting the Camera to the Computer 54 Getting Photos and Videos from your Camera to Your Computer 55 Get started!...56 Transfer media from my camera to my computer manually (Using Windows 56 Transfer ...
... Mode ...30 Video Capture Mode ...37 Video Playback Mode...49 Installing the Software ...53 Connecting the Camera to the Computer 54 Getting Photos and Videos from your Camera to Your Computer 55 Get started!...56 Transfer media from my camera to my computer manually (Using Windows 56 Transfer ...

Camera Manual
Page 3
What‟s Included 1. Digital Camera 2. Vivitar Experience Image Manager software Installation CD 4. NOTE: Your camera needs an SD Memory card (up to 32GB) for purchasing this manual carefully first in order .... Wrist Strap NOTE: SD Memory Card not included 2 Everything you for normal use. Please read this camera. Introduction Thank you need to be purchased separately. Vivitar makes capturing those special moments as easy as possible. SD Memory cards are not included and need to take quality digital...
What‟s Included 1. Digital Camera 2. Vivitar Experience Image Manager software Installation CD 4. NOTE: Your camera needs an SD Memory card (up to 32GB) for purchasing this manual carefully first in order .... Wrist Strap NOTE: SD Memory Card not included 2 Everything you for normal use. Please read this camera. Introduction Thank you need to be purchased separately. Vivitar makes capturing those special moments as easy as possible. SD Memory cards are not included and need to take quality digital...
Camera Manual
Page 7
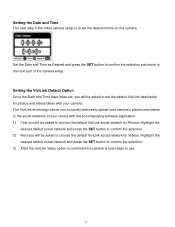
... the Date and Time as Desired and press the SET button to confirm the selection and move to choose the default ViviLink social network for photos and videos taken with the accompanying software application. 1) First you will be asked to the next part of your choice with your camera. ...The ViviLink technology allows you to quickly and easily upload your camera‟s photos and videos to the social networks of the camera setup. Highlight the desired default social network and press the SET button to confirm the selection...
... the Date and Time as Desired and press the SET button to confirm the selection and move to choose the default ViviLink social network for photos and videos taken with the accompanying software application. 1) First you will be asked to the next part of your choice with your camera. ...The ViviLink technology allows you to quickly and easily upload your camera‟s photos and videos to the social networks of the camera setup. Highlight the desired default social network and press the SET button to confirm the selection...
Camera Manual
Page 8
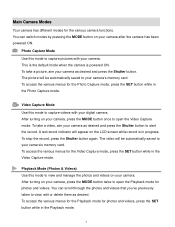
... Mode Use this mode to view, edit or delete them as desired and press the Shutter button. To access the various menus for photos and videos. To take a video, aim your camera, press the MODE button once to capture pictures with your camera. A red record indicator will be ... mode when the camera is in the Playback mode. 7 To access the various menus for the various camera functions. You can scroll through the photos and videos that you‟ve previously taken to capture videos with your digital camera. Video Capture Mode Use this mode to open the Playback...
... Mode Use this mode to view, edit or delete them as desired and press the Shutter button. To access the various menus for photos and videos. To take a video, aim your camera, press the MODE button once to capture pictures with your camera. A red record indicator will be ... mode when the camera is in the Playback mode. 7 To access the various menus for the various camera functions. You can scroll through the photos and videos that you‟ve previously taken to capture videos with your digital camera. Video Capture Mode Use this mode to open the Playback...

Camera Manual
Page 9
... Image Resolution Video Resolution File Format Internal Memory External Memory LCD Display Lens Zoom Exposure White Balance ISO Scene Flash Self-Timer Anti-Shake Print Photos Face Detect Smile Capture Macro Languages Interface System Requirements Battery Working Temperature CMOS Sensor (10M) 3648 X 2736 pixels, (8M) 3264 X 2448 pixels, (7M HD) 3648X2048..., (5M) 2592x1944 pixels, (3M) 2048x1536 pixels, (2M HD) 1920x1080 pixels and (VGA) 640x480 pixels 640X480 pixels (30 fps), 320X240 pixels (30 fps) JPEG/AVI 1 Test Photo Use Only SD Card (up to 32GB) 2.4 Inch TFT f=7.
... Image Resolution Video Resolution File Format Internal Memory External Memory LCD Display Lens Zoom Exposure White Balance ISO Scene Flash Self-Timer Anti-Shake Print Photos Face Detect Smile Capture Macro Languages Interface System Requirements Battery Working Temperature CMOS Sensor (10M) 3648 X 2736 pixels, (8M) 3264 X 2448 pixels, (7M HD) 3648X2048..., (5M) 2592x1944 pixels, (3M) 2048x1536 pixels, (2M HD) 1920x1080 pixels and (VGA) 640x480 pixels 640X480 pixels (30 fps), 320X240 pixels (30 fps) JPEG/AVI 1 Test Photo Use Only SD Card (up to 32GB) 2.4 Inch TFT f=7.

Camera Manual
Page 10
Computer System Requirements - WINDOWS OS To be able to download photos and videos to your PC, you will need the following minimum configuration: Pentium 4 processor or above with Windows XP service pack 2, Windows Vista or ...
Computer System Requirements - WINDOWS OS To be able to download photos and videos to your PC, you will need the following minimum configuration: Pentium 4 processor or above with Windows XP service pack 2, Windows Vista or ...

Camera Manual
Page 11
...that you can begin to capture videos with a rechargeable lithium battery, make sure it is first powered ON, the Photo Capture Mode will automatically turn your camera. 3) Playback Mode (for photos and videos) - The camera will be set from the Auto Power Off settings menu. Use this mode to ...that your camera is on, you can press the Power button again at any point to turn your camera OFF. Use this mode to capture photos with your camera. Powering the Camera On/Off Make sure the batteries have already taken with your camera. 2) Video Capture Mode - Powering the...
...that you can begin to capture videos with a rechargeable lithium battery, make sure it is first powered ON, the Photo Capture Mode will automatically turn your camera. 3) Playback Mode (for photos and videos) - The camera will be set from the Auto Power Off settings menu. Use this mode to ...that your camera is on, you can press the Power button again at any point to turn your camera OFF. Use this mode to capture photos with your camera. Powering the Camera On/Off Make sure the batteries have already taken with your camera. 2) Video Capture Mode - Powering the...
Camera Manual
Page 12
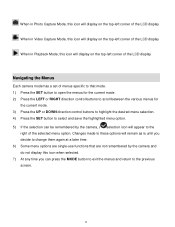
When in Photo Capture Mode, this icon will display on the top-left corner of the LCD display When in Video Capture Mode, this icon will display on ...
When in Photo Capture Mode, this icon will display on the top-left corner of the LCD display When in Video Capture Mode, this icon will display on ...

Camera Manual
Page 13
... that the Macro Switch on the side of these buttons may not be saved to the memory or SD card. NOTE: Self Portrait photos taken without Macro mode ON may vary per camera model. 3) Click the Shutter button to take the picture. The flower icon will automatically be properly ... camera to direct the camera at the scene you would like to capture. 2) Click the T/Zoom In and W/Zoom Out buttons to zoom in the photo, simply flip the LCD display out and hold the camera steady facing towards you at the camera lens. 5) Click the Shutter button to take the...
... that the Macro Switch on the side of these buttons may not be saved to the memory or SD card. NOTE: Self Portrait photos taken without Macro mode ON may vary per camera model. 3) Click the Shutter button to take the picture. The flower icon will automatically be properly ... camera to direct the camera at the scene you would like to capture. 2) Click the T/Zoom In and W/Zoom Out buttons to zoom in the photo, simply flip the LCD display out and hold the camera steady facing towards you at the camera lens. 5) Click the Shutter button to take the...

Camera Manual
Page 14
... hidden or visible as Quick Function buttons: Quick Function Button Function Left Scene Selection - Opens the Scene menu Up Right Down Flash Options - Photo Capture Mode Quick Function Buttons Your digital camera has a four-directional pad that functions as desired. 1) Hold the MODE button for..., use the Left, Up, Right, and Down directions control buttons. Saves your selected menu option Toggles between the Video Capture Mode, Photo Capture Mode, and Playback Mode Exits the menu screen Zooms In Zooms Out Hide/Show the LCD Icons The display of the icons on...
... hidden or visible as Quick Function buttons: Quick Function Button Function Left Scene Selection - Opens the Scene menu Up Right Down Flash Options - Photo Capture Mode Quick Function Buttons Your digital camera has a four-directional pad that functions as desired. 1) Hold the MODE button for..., use the Left, Up, Right, and Down directions control buttons. Saves your selected menu option Toggles between the Video Capture Mode, Photo Capture Mode, and Playback Mode Exits the menu screen Zooms In Zooms Out Hide/Show the LCD Icons The display of the icons on...

Camera Manual
Page 15
...want to activate Flash. When you want the camera to determine if Flash is enabled for each photo. NOTE: If you use this option in a well lit environment, your photo may be turned OFF when you arrive at your camera. NOTE: An initial flash appears to the mountain icon... . Flash Options There are several Flash options available on the Photo Capture Mode LCD screen in a photo caused by flash. NOTE: The Macro mode must be appear too bright/light (overexposed). Eliminates the red-eye effect in ...
...want to activate Flash. When you want the camera to determine if Flash is enabled for each photo. NOTE: If you use this option in a well lit environment, your photo may be turned OFF when you arrive at your camera. NOTE: An initial flash appears to the mountain icon... . Flash Options There are several Flash options available on the Photo Capture Mode LCD screen in a photo caused by flash. NOTE: The Macro mode must be appear too bright/light (overexposed). Eliminates the red-eye effect in ...
Camera Manual
Page 16
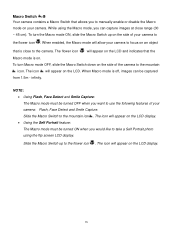
... icon. NOTE: Using Flash, Face Detect and Smile Capture: The Macro mode must be turned ON when you would like to take a Self Portrait photo using the Macro mode, you can be turned OFF when you to manually enable or disable the Macro mode on . To turn the Macro mode...
... icon. NOTE: Using Flash, Face Detect and Smile Capture: The Macro mode must be turned ON when you would like to take a Self Portrait photo using the Macro mode, you can be turned OFF when you to manually enable or disable the Macro mode on . To turn the Macro mode...
Camera Manual
Page 17
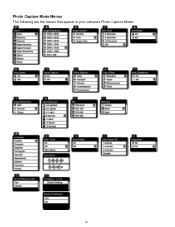
Photo Capture Mode Menus The following are the menus that appear in your camera‟s Photo Capture Mode: 16
Photo Capture Mode Menus The following are the menus that appear in your camera‟s Photo Capture Mode: 16
Camera Manual
Page 27
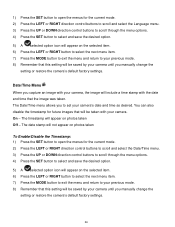
... timestamp for future images that this setting will be taken with the date and time that this setting will appear on photos taken Off - The date stamp will not appear on photos taken To Enable/Disable the Timestamp: 1) Press the SET button to open the menus for the current mode. 2) Press the...
... timestamp for future images that this setting will be taken with the date and time that this setting will appear on photos taken Off - The date stamp will not appear on photos taken To Enable/Disable the Timestamp: 1) Press the SET button to open the menus for the current mode. 2) Press the...

Camera Manual
Page 31
... Videos. You will be in Playback mode, press LEFT or RIGHT direction buttons to scroll through the images on the LCD screen. Photos will automatically exit the menu and return to the previous mode with the digital camera settings set to the Factory Default Settings. 7) If you would ... to exit the format, select „No‟ and press the SET button. Use the UP / DOWN / LEFT / RIGHT direction buttons to navigate around the photo. Press the W/Zoom Out button to Zoom Out of your digital video recorder‟s memory card until you find the image you would like...
... Videos. You will be in Playback mode, press LEFT or RIGHT direction buttons to scroll through the images on the LCD screen. Photos will automatically exit the menu and return to the previous mode with the digital camera settings set to the Factory Default Settings. 7) If you would ... to exit the format, select „No‟ and press the SET button. Use the UP / DOWN / LEFT / RIGHT direction buttons to navigate around the photo. Press the W/Zoom Out button to Zoom Out of your digital video recorder‟s memory card until you find the image you would like...
Camera Manual
Page 32
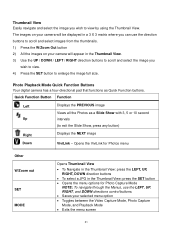
...UP, RIGHT, DOWN direction buttons To select a JPG in the Thumbnail View: press the SET button Opens the menu options for Photo Capture Mode NOTE: To navigate through the Menus, use the direction buttons to scroll and select images from the thumbnails. 1) Press the W/Zoom Out button... View. 3) Use the UP / DOWN / LEFT / RIGHT direction buttons to scroll and select the image you wish to enlarge the image full size. Photo Playback Mode Quick Function Buttons Your digital camera has a four-directional pad that functions as a Slide Show with 3, 5 or 10 second Up intervals (to...
...UP, RIGHT, DOWN direction buttons To select a JPG in the Thumbnail View: press the SET button Opens the menu options for Photo Capture Mode NOTE: To navigate through the Menus, use the direction buttons to scroll and select images from the thumbnails. 1) Press the W/Zoom Out button... View. 3) Use the UP / DOWN / LEFT / RIGHT direction buttons to scroll and select the image you wish to enlarge the image full size. Photo Playback Mode Quick Function Buttons Your digital camera has a four-directional pad that functions as a Slide Show with 3, 5 or 10 second Up intervals (to...
Camera Manual
Page 33
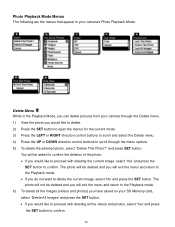
...; If you would like to proceed with deleting all the images (videos and photos) you have saved on your camera through the menu options. 5) To delete the selected photo, select "Delete This Photo?" You will exit the menu and return to the Playback mode. If you would like to delete. 2) Press the... control buttons to scroll and select the Delete menu. 4) Press the UP or DOWN direction control buttons to scroll through the Delete menu. 1) View the photo you do not want to delete the current image, select „No‟ and press the SET button. and press SET button. The...
...; If you would like to proceed with deleting all the images (videos and photos) you have saved on your camera through the menu options. 5) To delete the selected photo, select "Delete This Photo?" You will exit the menu and return to the Playback mode. If you would like to delete. 2) Press the... control buttons to scroll and select the Delete menu. 4) Press the UP or DOWN direction control buttons to scroll through the Delete menu. 1) View the photo you do not want to delete the current image, select „No‟ and press the SET button. and press SET button. The...

Camera Manual
Page 34
...delete. If you to quickly and easily upload your camera‟s photos and videos to the social networks of your choice with the ViviLink Quick-Function button in Capture mode (accessible with the accompanying Vivitar Experience Image Manager application. 1) Press the SET button to open the menus ... you manually set it from the ViviLink menu in Capture mode). 8) Changing the ViviLink destination site will exit the menu and return to Photo Capture mode. A new default can be assigned to your images will appear. A ViviLink destination will only be selected at any time through...
...delete. If you to quickly and easily upload your camera‟s photos and videos to the social networks of your choice with the ViviLink Quick-Function button in Capture mode (accessible with the accompanying Vivitar Experience Image Manager application. 1) Press the SET button to open the menus ... you manually set it from the ViviLink menu in Capture mode). 8) Changing the ViviLink destination site will exit the menu and return to Photo Capture mode. A new default can be assigned to your images will appear. A ViviLink destination will only be selected at any time through...
Camera Manual
Page 36
... button to open the menus for the current mode. 3) Press the LEFT or RIGHT direction control buttons to scroll and select the Print This Photo menu. 4) Press the UP or DOWN direction control buttons to scroll through the menu options. 5) Press the SET button when highlighting the "Print ...This Photo" option to print the selected photo. 6) You will not display the lock symbol. 8) Remember that you cannot delete or edit photos while they are not locked will be protected or "locked" to prevent any deletion or ...
... button to open the menus for the current mode. 3) Press the LEFT or RIGHT direction control buttons to scroll and select the Print This Photo menu. 4) Press the UP or DOWN direction control buttons to scroll through the menu options. 5) Press the SET button when highlighting the "Print ...This Photo" option to print the selected photo. 6) You will not display the lock symbol. 8) Remember that you cannot delete or edit photos while they are not locked will be protected or "locked" to prevent any deletion or ...
Camera Manual
Page 38
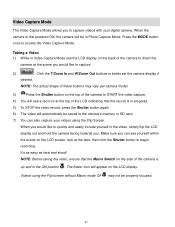
... display. NOTE: The actual shape of these buttons may vary per camera model. 3) Press the Shutter button on the top of the camera is in Photo Capture Mode. NOTE: Before taking the video, ensure that the record is up and in the video, simply flip the LCD display out and hold...
... display. NOTE: The actual shape of these buttons may vary per camera model. 3) Press the Shutter button on the top of the camera is in Photo Capture Mode. NOTE: Before taking the video, ensure that the record is up and in the video, simply flip the LCD display out and hold...


