
Camera Manual
Page 4
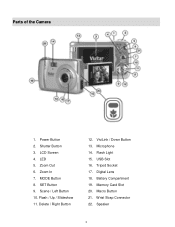
MODE Button 8. Delete / Right Button 12. Flash Light 15. Battery Compartment 19. Zoom In 7. Digital Lens 18. Wrist Strap Connector 22. Shutter Button 3. Zoom Out 6. Scene / Left Button 10. Microphone 14. Flash / Up / Slideshow 11. LCD Screen 4. ViviLink / Down Button 13. Speaker 3 LED 5. Tripod Socket 17. Power Button 2. USB Slot 16. Memory Card Slot 20. Parts of the Camera 1. SET Button 9. Macro Button 21.
MODE Button 8. Delete / Right Button 12. Flash Light 15. Battery Compartment 19. Zoom In 7. Digital Lens 18. Wrist Strap Connector 22. Shutter Button 3. Zoom Out 6. Scene / Left Button 10. Microphone 14. Flash / Up / Slideshow 11. LCD Screen 4. ViviLink / Down Button 13. Speaker 3 LED 5. Tripod Socket 17. Power Button 2. USB Slot 16. Memory Card Slot 20. Parts of the Camera 1. SET Button 9. Macro Button 21.
Camera Manual
Page 13
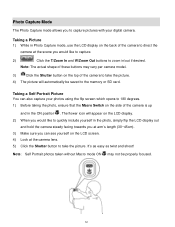
... Photo Capture mode allows you to capture pictures with your photos using the flip screen which opens to 180 degrees. 1) Before taking the photo, ensure that the Macro Switch on the side of the camera is up and in /out if desired. Note: The actual shape of the camera to ...camera lens. 5) Click the Shutter button to take the picture. 4) The picture will automatically be properly focused. 12 Note: Self Portrait photos taken without Macro mode ON may vary per camera model. 3) Click the Shutter button on the LCD display. 2) When you would like to take the picture. The flower icon...
... Photo Capture mode allows you to capture pictures with your photos using the flip screen which opens to 180 degrees. 1) Before taking the photo, ensure that the Macro Switch on the side of the camera is up and in /out if desired. Note: The actual shape of the camera to ...camera lens. 5) Click the Shutter button to take the picture. 4) The picture will automatically be properly focused. 12 Note: Self Portrait photos taken without Macro mode ON may vary per camera model. 3) Click the Shutter button on the LCD display. 2) When you would like to take the picture. The flower icon...
Camera Manual
Page 14
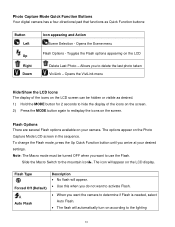
Note: The Macro mode must be hidden or visible as Quick Function buttons: Button Left Up Right Down Icon ...settings. The icon will automatically turn on the LCD display. Toggles the Flash options appearing on the Photo Capture Mode LCD screen in the sequence. Allows you arrive at your camera. Opens the ViviLink menu Hide/Show the ... The flash will appear on according to use the Flash. Slide the Macro Switch to delete the last photo taken ViviLink - To change the Flash mode, press the Up Quick Function button until you to the mountain icon . The ...
Note: The Macro mode must be hidden or visible as Quick Function buttons: Button Left Up Right Down Icon ...settings. The icon will automatically turn on the LCD display. Toggles the Flash options appearing on the Photo Capture Mode LCD screen in the sequence. Allows you arrive at your camera. Opens the ViviLink menu Hide/Show the ... The flash will appear on according to use the Flash. Slide the Macro Switch to delete the last photo taken ViviLink - To change the Flash mode, press the Up Quick Function button until you to the mountain icon . The ...
Camera Manual
Page 15
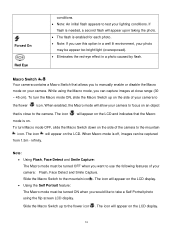
..., images can capture images at close to the camera. The icon will allow your photo may be captured from 1.5m - When enabled, the Macro mode will appear on the LCD and indicates that allows you can be appear too bright/light (overexposed). Eliminates the red-eye effect in... a well lit environment, your camera to focus on . To turn the Macro mode ON, slide the Macro Switch up to the flower icon . When Macro mode is close range (30 ~ 45 cm). Forced On Red Eye conditions. Note: An initial flash appears to ...
..., images can capture images at close to the camera. The icon will allow your photo may be captured from 1.5m - When enabled, the Macro mode will appear on the LCD and indicates that allows you can be appear too bright/light (overexposed). Eliminates the red-eye effect in... a well lit environment, your camera to focus on . To turn the Macro mode ON, slide the Macro Switch up to the flower icon . When Macro mode is close range (30 ~ 45 cm). Forced On Red Eye conditions. Note: An initial flash appears to ...
Camera Manual
Page 19
... consistently sharp and high-quality. The Anti-Shake option is in Macro mode. This feature is set to „On‟ allows the camera to appear on the LCD...in the camera‟s display. Face Detect Menu The Face Detect feature when set to your previous mode. 8) An icon reflecting your selection will display on the LCD screen. 9) Remember that this ...5th) of the camera for the mountain icon to use the Face Detect option, please ensure the following: Macro mode off - The subject‟s face must be no further than 8 to 9 feet (3.5 meters) from the camera ...
... consistently sharp and high-quality. The Anti-Shake option is in Macro mode. This feature is set to „On‟ allows the camera to appear on the LCD...in the camera‟s display. Face Detect Menu The Face Detect feature when set to your previous mode. 8) An icon reflecting your selection will display on the LCD screen. 9) Remember that this ...5th) of the camera for the mountain icon to use the Face Detect option, please ensure the following: Macro mode off - The subject‟s face must be no further than 8 to 9 feet (3.5 meters) from the camera ...
Camera Manual
Page 20
... properly focusing the image. Distance from the camera - Note: To properly use the Smile Capture feature, please ensure the following: Macro mode off - The Anti-Shake option is smiling. Facing the camera - Ensure that the Anti-Shake option is in the picture is „On...8223;s default factory settings. The face of the picture as „seen‟ on the LCD screen. 9) Remember that a subject in Macro mode. Smile Capture will be saved by default when you start using your camera until you are photographing must be facing the camera and must ...
... properly focusing the image. Distance from the camera - Note: To properly use the Smile Capture feature, please ensure the following: Macro mode off - The Anti-Shake option is smiling. Facing the camera - Ensure that the Anti-Shake option is in the picture is „On...8223;s default factory settings. The face of the picture as „seen‟ on the LCD screen. 9) Remember that a subject in Macro mode. Smile Capture will be saved by default when you start using your camera until you are photographing must be facing the camera and must ...


