
ViviCam T027 Camera Manual
Page 4
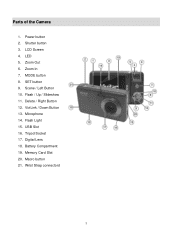
Shutter button 3. LED 5. Zoom Out 6. MODE button 8. SET button 9. Scene / Left Button 10. ViviLink / Down Button 13. Microphone 14. USB Slot 16. Parts of the Camera 1. Zoom In 7. Delete / Right Button 12. Digital Lens 18. Macro button 21. LCD Screen 4. Flash / Up / Slideshow 11. Tripod Socket 17. Memory Card Slot 20. Wrist Strap connectord 3 Power button 2. Flash Light 15. Battery Compartment 19.
Shutter button 3. LED 5. Zoom Out 6. MODE button 8. SET button 9. Scene / Left Button 10. ViviLink / Down Button 13. Microphone 14. USB Slot 16. Parts of the Camera 1. Zoom In 7. Delete / Right Button 12. Digital Lens 18. Macro button 21. LCD Screen 4. Flash / Up / Slideshow 11. Tripod Socket 17. Memory Card Slot 20. Wrist Strap connectord 3 Power button 2. Flash Light 15. Battery Compartment 19.
ViviCam T027 Camera Manual
Page 13
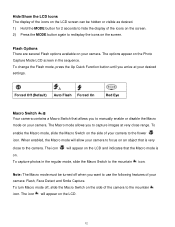
... the Macro Switch to manually enable or disable the Macro mode on the screen. Flash Options There are several Flash options available on the LCD. 12 To change the Flash mode, press the Up Quick Function button until you arrive at very close to the camera. When enabled, the Macro mode...
... the Macro Switch to manually enable or disable the Macro mode on the screen. Flash Options There are several Flash options available on the LCD. 12 To change the Flash mode, press the Up Quick Function button until you arrive at very close to the camera. When enabled, the Macro mode...

ViviCam T027 Camera Manual
Page 50
...: Click the "I accept the terms of this license agreement" and then click "Next" to continue. 10) On PC only: Let the "Vivitar Experience Image Manager" installer create the folder to wait a few seconds until the computer recognizes the device. 49 Click the "How to transfer photos...then click "Install". 11) Please wait while the application continues the installation process on your computer. 12) On PC: Click the "Close" button when the installation is complete. Click the "Launch Vivitar Experience Image Manager" to open the application. 14) If you close the application you can run...
...: Click the "I accept the terms of this license agreement" and then click "Next" to continue. 10) On PC only: Let the "Vivitar Experience Image Manager" installer create the folder to wait a few seconds until the computer recognizes the device. 49 Click the "How to transfer photos...then click "Install". 11) Please wait while the application continues the installation process on your computer. 12) On PC: Click the "Close" button when the installation is complete. Click the "Launch Vivitar Experience Image Manager" to open the application. 14) If you close the application you can run...
