Warranty
Page 1
...cosmetic damage and defects resulting from accident, abuse, misuse, failure to operate the product in accordance with relevant instructions, neglect, immersion in this product even if Vivitar has been advised of purchase. TIME PERIOD OF THIS WARRANTY The time period of this warranty starts from the... purchase, use this product which result from other extraneous causes such as unauthorised disassembly, repair or modification. During the period, Vivitar will repair or replace the product at no charge for any incidental or consequential damages arising from the date of the original ...
...cosmetic damage and defects resulting from accident, abuse, misuse, failure to operate the product in accordance with relevant instructions, neglect, immersion in this product even if Vivitar has been advised of purchase. TIME PERIOD OF THIS WARRANTY The time period of this warranty starts from the... purchase, use this product which result from other extraneous causes such as unauthorised disassembly, repair or modification. During the period, Vivitar will repair or replace the product at no charge for any incidental or consequential damages arising from the date of the original ...
User Manual
Page 51
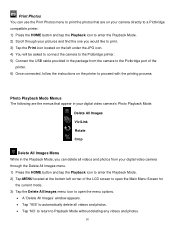
... and tap the Playback icon to enter the Playback Mode. 2) Tap MENU located at the bottom left corner of the printer. 6) Once connected, follow the instructions on the left under the JPG icon. 4) You will be asked to connect the camera to the Pictbridge printer. 5) Connect the USB cable provided in...
... and tap the Playback icon to enter the Playback Mode. 2) Tap MENU located at the bottom left corner of the printer. 6) Once connected, follow the instructions on the left under the JPG icon. 4) You will be asked to connect the camera to the Pictbridge printer. 5) Connect the USB cable provided in...

User Manual
Page 59
... point.' - 'Please touch Bottom-Right red point.' Touch Correction Menu Use this menu to reset your camera settings to open the menu options. 3) Follow the instructions on the LCD: 'Setting reset complete' Tap 'NO' to automatically return to the Setup Main Menu Screen without resetting the camera settings. 4) From the Setup...
... point.' - 'Please touch Bottom-Right red point.' Touch Correction Menu Use this menu to reset your camera settings to open the menu options. 3) Follow the instructions on the LCD: 'Setting reset complete' Tap 'NO' to automatically return to the Setup Main Menu Screen without resetting the camera settings. 4) From the Setup...

User Manual
Page 62
...the Software You must be connected to the internet to my computer" button for instructions. 61 Click the "How to transfer photos and videos from the camera. If the window does not appear, open . 2) On PC: The Vivitar Experience Image Manager Installer window appears. NOTE: If you can still download media .../DVD drive and click on "Setup.exe" to launch the installer. 3) On Macintosh: Click the icon that appears on the desktop to install the Vivitar Experience Image Manager. 4) If you do not have internet access, you do not have internet access at the time of inserting the CD-ROM, connect...
...the Software You must be connected to the internet to my computer" button for instructions. 61 Click the "How to transfer photos and videos from the camera. If the window does not appear, open . 2) On PC: The Vivitar Experience Image Manager Installer window appears. NOTE: If you can still download media .../DVD drive and click on "Setup.exe" to launch the installer. 3) On Macintosh: Click the icon that appears on the desktop to install the Vivitar Experience Image Manager. 4) If you do not have internet access, you do not have internet access at the time of inserting the CD-ROM, connect...