Camera Manual
Page 1
Windows and the Windows logo are the property of Microsoft Corporation. DVR 830XHD Digital Video Camcorder Owner's Manual © 2009 Sakar International, Inc. All other trademarks are registered trademarks of their respective companies. All rights reserved.
Windows and the Windows logo are the property of Microsoft Corporation. DVR 830XHD Digital Video Camcorder Owner's Manual © 2009 Sakar International, Inc. All other trademarks are registered trademarks of their respective companies. All rights reserved.
Camera Manual
Page 2
... and Precautions 5 Computer System Requirements for Windows XP 6 Computer System Requirement for Windows Vista 6 Computer System Requirements for Macintosh 7 A Quick Look at your Digital Video Camcorder 8 Preparing Your Camera for Use 9 Inserting and formatting SD Memory Card 14 Powering on and Menu Function Control 17 MODE selection ...18 Taking Still Photos... Mode Functions ...24 Capturing Videos ...36 Video Mode Functions ...38 Audio Mode...43 Playback Mode ...44 Playback Mode Functions 48 Setup Mode ...57 Connecting the Camcorder to a TV or HDTV 67 1
... and Precautions 5 Computer System Requirements for Windows XP 6 Computer System Requirement for Windows Vista 6 Computer System Requirements for Macintosh 7 A Quick Look at your Digital Video Camcorder 8 Preparing Your Camera for Use 9 Inserting and formatting SD Memory Card 14 Powering on and Menu Function Control 17 MODE selection ...18 Taking Still Photos... Mode Functions ...24 Capturing Videos ...36 Video Mode Functions ...38 Audio Mode...43 Playback Mode ...44 Playback Mode Functions 48 Setup Mode ...57 Connecting the Camcorder to a TV or HDTV 67 1
Camera Manual
Page 3
Your camera can shoot video clips, take individual photos and record audio files. Install the Vivitar Experience Image Manager Software 69 Connect your camera to the computer 73 Get photos and videos from your camera to your computer 73 Get started! ...... from my camera to my computer manually (Using Windows 76 Transfer media from my camera to 8GB should be used for purchasing the DVR 830XHD Digital Video Camcorder. With your DVR camera. In addition, a SD compatible memory card of your camera you for Web conferencing in order to expand the memory of up to...
Your camera can shoot video clips, take individual photos and record audio files. Install the Vivitar Experience Image Manager Software 69 Connect your camera to the computer 73 Get photos and videos from your camera to your computer 73 Get started! ...... from my camera to my computer manually (Using Windows 76 Transfer media from my camera to 8GB should be used for purchasing the DVR 830XHD Digital Video Camcorder. With your DVR camera. In addition, a SD compatible memory card of your camera you for Web conferencing in order to expand the memory of up to...
Camera Manual
Page 4
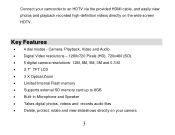
... Built-in Microphone and Speaker Takes digital photos, videos and records audio files Delete, protect, rotate and view slideshows directly on your camcorder to an HDTV via the provided HDMI cable, and easily view photos and playback recorded high-definition videos directly on the wide screen HDTV.
... Built-in Microphone and Speaker Takes digital photos, videos and records audio files Delete, protect, rotate and view slideshows directly on your camcorder to an HDTV via the provided HDMI cable, and easily view photos and playback recorded high-definition videos directly on the wide screen HDTV.

Camera Manual
Page 5
Vivitar Experience Image Manager software for uploading and managing photos and videos to or from the most popular photo sharing and social network websites. Use as a PC Camera for Web conferencing and instant messaging What your Digital Video Camcorder includes Digital Video Camcorder USB cable AV cable HDMI Cable Power Adapter Lithium-ion Rechargeable Battery Vivitar Experience Image Manager software Installation CD Quick Start Guide Built-in wrist strap 4
Vivitar Experience Image Manager software for uploading and managing photos and videos to or from the most popular photo sharing and social network websites. Use as a PC Camera for Web conferencing and instant messaging What your Digital Video Camcorder includes Digital Video Camcorder USB cable AV cable HDMI Cable Power Adapter Lithium-ion Rechargeable Battery Vivitar Experience Image Manager software Installation CD Quick Start Guide Built-in wrist strap 4
Camera Manual
Page 6
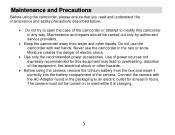
...way. Moisture creates the danger of the camera. The camera must not be carried out only by authorized service providers. Keep the camcorder away from the box and insert it is charging. 5 Maintenance and Precautions Before using the camera, remove the Lithium battery from water and other... liquids. Never use the camcorder with the AC-Adaptor found in the rain or snow. Maintenance and repairs should be turned on or used while it correctly into the ...
...way. Moisture creates the danger of the camera. The camera must not be carried out only by authorized service providers. Keep the camcorder away from the box and insert it is charging. 5 Maintenance and Precautions Before using the camera, remove the Lithium battery from water and other... liquids. Never use the camcorder with the AC-Adaptor found in the rain or snow. Maintenance and repairs should be turned on or used while it correctly into the ...
Camera Manual
Page 9
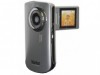
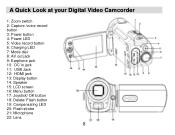
A Quick Look at your Digital Video Camcorder 1: Zoom switch 2: Capture /voice record button 3: Power button 4: Power LED 5: Video record button 6: Charging LED 7: Mode dial 8: AV out jack 9: Earphone jack 10: DC in jack 11: USB Jack 12: HDMI jack 13: Display button 14: Speaker 15: LCD screen 16: Menu button 17: Joystick/ OK button 18: Delete/ Flash button 19: Compensating LED 20: Flash strobe 21: Microphone 22: Lens 8
A Quick Look at your Digital Video Camcorder 1: Zoom switch 2: Capture /voice record button 3: Power button 4: Power LED 5: Video record button 6: Charging LED 7: Mode dial 8: AV out jack 9: Earphone jack 10: DC in jack 11: USB Jack 12: HDMI jack 13: Display button 14: Speaker 15: LCD screen 16: Menu button 17: Joystick/ OK button 18: Delete/ Flash button 19: Compensating LED 20: Flash strobe 21: Microphone 22: Lens 8
Camera Manual
Page 10
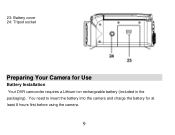
You need to insert the battery into the camera and charge the battery for Use Battery Installation Your DVR camcorder requires a Lithium-ion rechargeable battery (included in the packaging). 23: Battery cover 24: Tripod socket Preparing Your Camera for at least 8 hours first before using the camera. 9
You need to insert the battery into the camera and charge the battery for Use Battery Installation Your DVR camcorder requires a Lithium-ion rechargeable battery (included in the packaging). 23: Battery cover 24: Tripod socket Preparing Your Camera for at least 8 hours first before using the camera. 9
Camera Manual
Page 12
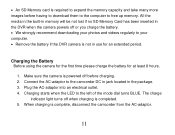
...Plug the AC-adaptor into an electrical outlet. 4. An SD Memory card is complete, disconnect the camcorder from the AC-adaptor. 11 Charging starts when the LED to the camcorder DC in jack located in the package. 3. The charge indicator light turns off when charging is powered off... or you charge the battery. We strongly recommend downloading your computer. Remove the battery if the DVR camera is not in the DVR when the ...
...Plug the AC-adaptor into an electrical outlet. 4. An SD Memory card is complete, disconnect the camcorder from the AC-adaptor. 11 Charging starts when the LED to the camcorder DC in jack located in the package. 3. The charge indicator light turns off when charging is powered off... or you charge the battery. We strongly recommend downloading your computer. Remove the battery if the DVR camera is not in the DVR when the ...
Camera Manual
Page 13
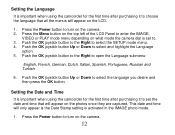
... the OK joystick button to the Right to select and highlight the Language option. 5. Setting the Date and Time It is important when using the camcorder for the first time after purchasing it to set to. 3. Push the OK joystick button to the Right to select the language you desire and... on the photos once they are captured. Press the Power button to turn on the camera. 2. Setting the Language It is important when using the camcorder for the first time after purchasing it to choose the language that will appear on the LCD. 1. This date and time will only appear is...
... the OK joystick button to the Right to select and highlight the Language option. 5. Setting the Date and Time It is important when using the camcorder for the first time after purchasing it to set to. 3. Push the OK joystick button to the Right to select the language you desire and... on the photos once they are captured. Press the Power button to turn on the camera. 2. Setting the Language It is important when using the camcorder for the first time after purchasing it to choose the language that will appear on the LCD. 1. This date and time will only appear is...
Camera Manual
Page 16
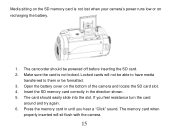
... card. 2. Insert the SD memory card correctly in until you feel resistance turn the card around and try again. 6. If you hear a "Click" sound. The camcorder should easily slide into the slot. Open the battery cover on the bottom of the camera and locate the SD card slot. 4. Locked cards will...
... card. 2. Insert the SD memory card correctly in until you feel resistance turn the card around and try again. 6. If you hear a "Click" sound. The camcorder should easily slide into the slot. Open the battery cover on the bottom of the camera and locate the SD card slot. 4. Locked cards will...
Camera Manual
Page 17
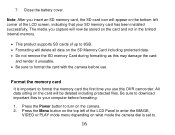
...; Formatting will delete all data on the SD Memory Card including protected data. Do not remove the SD memory Card during formatting as this DVR camcorder. Press the Menu button on the top left corner of the LCD screen, indicating that your computer before use this may damage the card and...
...; Formatting will delete all data on the SD Memory Card including protected data. Do not remove the SD memory Card during formatting as this DVR camcorder. Press the Menu button on the top left corner of the LCD screen, indicating that your computer before use this may damage the card and...
Camera Manual
Page 19
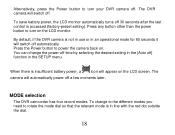
...button other than the power button to power the camera back on the LCD screen. By default, if the DVR camera is accessed (factory-preset setting). MODE selection The DVR camcorder has four record modes. To save battery power, the LCD monitor automatically turns off ] function in an ...operational mode for 60 seconds it will appear on . You can change to the different modes you need to turn your DVR camera off automatically Press...
...button other than the power button to power the camera back on the LCD screen. By default, if the DVR camera is accessed (factory-preset setting). MODE selection The DVR camcorder has four record modes. To save battery power, the LCD monitor automatically turns off ] function in an ...operational mode for 60 seconds it will appear on . You can change to the different modes you need to turn your DVR camera off automatically Press...
Camera Manual
Page 68
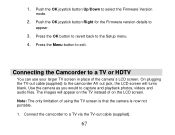
Push the OK joystick button Up/Down to the Setup menu. 4. Connecting the Camcorder to the camcorder AV out jack, the LCD screen will appear on the TV instead of on the LCD screen. The images will turns blank. Press the OK ... mode. 2. Note: The only limitation of the camera`s LCD screen. Press the Menu button to a TV via the TV-out cable (supplied). 67 Connect the camcorder to exit. 1. Push the OK joystick button Right for the Firmware version details to capture and playback photos, videos and audio files. Use the camera...
Push the OK joystick button Up/Down to the Setup menu. 4. Connecting the Camcorder to the camcorder AV out jack, the LCD screen will appear on the TV instead of on the LCD screen. The images will turns blank. Press the OK ... mode. 2. Note: The only limitation of the camera`s LCD screen. Press the Menu button to a TV via the TV-out cable (supplied). 67 Connect the camcorder to exit. 1. Push the OK joystick button Right for the Firmware version details to capture and playback photos, videos and audio files. Use the camera...
Camera Manual
Page 69
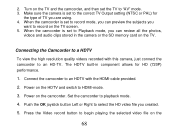
... videos and audio clips stored in component allows for the type of TV you created. 5. When the camcorder is set to record on the TV. Connect the camcorder to playback mode. 4. Power on the camcorder. 2. Power on the HDTV and switch to the correct TV Output setting (NTSC or PAL) for ...HD (720P) performance. 1. Turn on the 68 Connecting the Camcorder to a HDTV To view the high resolution quality videos recorded with the HDMI-cable provided. 2. Push the OK joystick button Left or Right to ...
... videos and audio clips stored in component allows for the type of TV you created. 5. When the camcorder is set to record on the TV. Connect the camcorder to playback mode. 4. Power on the camcorder. 2. Power on the HDTV and switch to the correct TV Output setting (NTSC or PAL) for ...HD (720P) performance. 1. Turn on the 68 Connecting the Camcorder to a HDTV To view the high resolution quality videos recorded with the HDMI-cable provided. 2. Push the OK joystick button Left or Right to ...
Camera Manual
Page 83
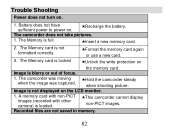
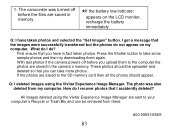
...Memory is blurry or out of focus. 1. non-PICT images. Image is full. ★Insert a new memory card. 2. The camcorder was moving ★Hold the camcorder steady when the image was captured. Image is locked ★Format the memory card again or use a new card. ★Unlock ...the LCD monitor. 1. Battery does not have sufficient power to power on the memory card . A memory card with non-PICT ★This camcorder cannot display images (recorded with other camera) is not formatted correctly. 3. The Memory card is loaded. Recorded files are not saved in memory...
...Memory is blurry or out of focus. 1. non-PICT images. Image is full. ★Insert a new memory card. 2. The camcorder was moving ★Hold the camcorder steady when the image was captured. Image is locked ★Format the memory card again or use a new card. ★Unlock ...the LCD monitor. 1. Battery does not have sufficient power to power on the memory card . A memory card with non-PICT ★This camcorder cannot display images (recorded with other camera) is not formatted correctly. 3. The Memory card is loaded. Recorded files are not saved in memory...
Camera Manual
Page 84
...then try downloading them to the computer the photos are saved to your computer`s Recycle or Trash Bin and can take more photos. The camcorder was also deleted from there. How do ? These photos should appear. The photo was turned off before the files are sent to ...the SD memory card then all the photos should be retrieved from my computer. All images deleted using the Vivitar Experience Image Manager. Q: I accidently deleted? Q: I recover photos that you upload them again. A00-090519GES 83 If the photos are stored in ...
...then try downloading them to the computer the photos are saved to your computer`s Recycle or Trash Bin and can take more photos. The camcorder was also deleted from there. How do ? These photos should appear. The photo was turned off before the files are sent to ...the SD memory card then all the photos should be retrieved from my computer. All images deleted using the Vivitar Experience Image Manager. Q: I accidently deleted? Q: I recover photos that you upload them again. A00-090519GES 83 If the photos are stored in ...


