Camera Manual
Page 2
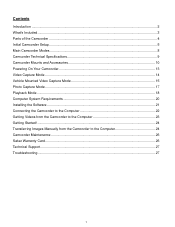
Contents Introduction ...2 What's Included...3 Parts of the Camcorder ...4 Initial Camcorder Setup ...5 Main Camcorder Modes ...8 Camcorder Technical Specifications 9 Camcorder Mounts and Accessories 10 Powering On Your Camcorder...13 Video Capture Mode ...14 Vehicle Mounted Video Capture Mode 15 Photo Capture Mode ...17 Playback Mode...18 Computer System Requirements 20 Installing the Software ...21 Connecting...
Contents Introduction ...2 What's Included...3 Parts of the Camcorder ...4 Initial Camcorder Setup ...5 Main Camcorder Modes ...8 Camcorder Technical Specifications 9 Camcorder Mounts and Accessories 10 Powering On Your Camcorder...13 Video Capture Mode ...14 Vehicle Mounted Video Capture Mode 15 Photo Capture Mode ...17 Playback Mode...18 Computer System Requirements 20 Installing the Software ...21 Connecting...
Camera Manual
Page 4
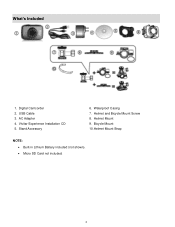
Bicycle Mount 10.Helmet Mount Strap NOTE: Built-in Lithium Battery included (not shown). Micro SD Card not included. 3 Helmet and Bicycle Mount Screw 8. Waterproof Casing 7. USB Cable 3. Vivitar Experience Installation CD 5. Helmet Mount 9. Digital Camcorder 2. What's Included 1. AC Adapter 4. Stand Accessory 6.
Bicycle Mount 10.Helmet Mount Strap NOTE: Built-in Lithium Battery included (not shown). Micro SD Card not included. 3 Helmet and Bicycle Mount Screw 8. Waterproof Casing 7. USB Cable 3. Vivitar Experience Installation CD 5. Helmet Mount 9. Digital Camcorder 2. What's Included 1. AC Adapter 4. Stand Accessory 6.
Camera Manual
Page 5
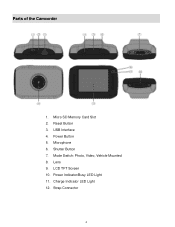
Shutter Button 7. Power Indicator/Busy LED Light 11. Microphone 6. Parts of the Camcorder 1. LCD TFT Screen 10. Power Button 5. Micro SD Memory Card Slot 2. Reset Button 3. Lens 9. Mode Switch: Photo, Video, Vehicle Mounted 8. USB Interface 4. Charge Indicator LED Light 12. Strap Connector 4
Shutter Button 7. Power Indicator/Busy LED Light 11. Microphone 6. Parts of the Camcorder 1. LCD TFT Screen 10. Power Button 5. Micro SD Memory Card Slot 2. Reset Button 3. Lens 9. Mode Switch: Photo, Video, Vehicle Mounted 8. USB Interface 4. Charge Indicator LED Light 12. Strap Connector 4
Camera Manual
Page 9
...Shutter button to start recording. Playback Mode (Photos & Videos) Use this mode to view and manage the photos and videos on the desired mount. Vehicle Mounted Video Capture Mode Use this mode to capture videos with your camcorder while you 've previously taken to view or delete them as desired. 8... Slide the MODE Switch to the Vehicle Mounted Capture icon to your camcorder's memory card. You can scroll through the photos and videos that you are in progress. Touch the Playback icon...
...Shutter button to start recording. Playback Mode (Photos & Videos) Use this mode to view and manage the photos and videos on the desired mount. Vehicle Mounted Video Capture Mode Use this mode to capture videos with your camcorder while you 've previously taken to view or delete them as desired. 8... Slide the MODE Switch to the Vehicle Mounted Capture icon to your camcorder's memory card. You can scroll through the photos and videos that you are in progress. Touch the Playback icon...

Camera Manual
Page 11
... can test the gasket by prying the clamp up - There is dry, the case and gasket are just two buttons required for about a minute. Camcorder Mounts and Accessories Waterproof Case 1. Before sealing the case, inspect the water sealing gasket to put the Mode Switch in your desired recording position before inserting...
... can test the gasket by prying the clamp up - There is dry, the case and gasket are just two buttons required for about a minute. Camcorder Mounts and Accessories Waterproof Case 1. Before sealing the case, inspect the water sealing gasket to put the Mode Switch in your desired recording position before inserting...
Camera Manual
Page 12
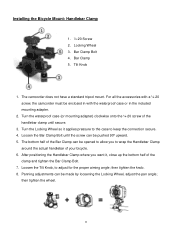
... Bar Clamp Bolt 4. For all the accessories with the waterproof case or in the included mounting adapter. 2. then tighten the knob. 8. Locking Wheel 3. The camcorder does not have a standard tripod mount. Tilt Knob 1. Loosen the Bar Clamp Bolt until secure. 3. Turn the waterproof case (...or mounting adapter) clockwise onto the ¼-20 screw of the clamp and tighten the Bar Clamp Bolt...
... Bar Clamp Bolt 4. For all the accessories with the waterproof case or in the included mounting adapter. 2. then tighten the knob. 8. Locking Wheel 3. The camcorder does not have a standard tripod mount. Tilt Knob 1. Loosen the Bar Clamp Bolt until secure. 3. Turn the waterproof case (...or mounting adapter) clockwise onto the ¼-20 screw of the clamp and tighten the Bar Clamp Bolt...

Camera Manual
Page 13
... both ends of the Belt and pull to keep the connection secure. 6. Locking Wheel 5. Loosen the Tilt Knob, to the Helmet Mount through the other side of the Helmet Mount. 2. Then insert the belt back through one of the slots in to the helmet vent and then back up to adjust for... the proper aiming angle; Thread the same end in the base of the Helmet mount. Turn the Locking Wheel so it applies pressure to the case to tighten and then attach together with vented helmets. 12 Insert the free end...
... both ends of the Belt and pull to keep the connection secure. 6. Locking Wheel 5. Loosen the Tilt Knob, to the Helmet Mount through the other side of the Helmet Mount. 2. Then insert the belt back through one of the slots in to the helmet vent and then back up to adjust for... the proper aiming angle; Thread the same end in the base of the Helmet mount. Turn the Locking Wheel so it applies pressure to the case to tighten and then attach together with vented helmets. 12 Insert the free end...
Camera Manual
Page 14
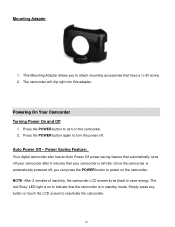
...5 minutes that your camcorder is automatically powered off . NOTE: After 2 minutes of inactivity, the camcorder LCD screen turns black to attach mounting accessories that the camcorder is on the camcorder. Powering On Your Camcorder Turning Power On and Off 1. Simply press any button or touch the... LCD screen to indicate that have a ¼-20 screw. 2. Mounting Adapter 1. Press the POWER button again to power on to reactivate the camcorder. 13 The red 'Busy' LED light is in standby mode. ...
...5 minutes that your camcorder is automatically powered off . NOTE: After 2 minutes of inactivity, the camcorder LCD screen turns black to attach mounting accessories that the camcorder is on the camcorder. Powering On Your Camcorder Turning Power On and Off 1. Simply press any button or touch the... LCD screen to indicate that have a ¼-20 screw. 2. Mounting Adapter 1. Press the POWER button again to power on to reactivate the camcorder. 13 The red 'Busy' LED light is in standby mode. ...

Camera Manual
Page 16
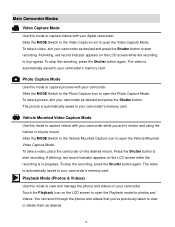
... Capture Mode allows you begin recording and moving. Make sure the resolution and zoom are in Vehicle Mounted Video Capture Mode use the supplied mounts to place your digital camcorder while you are set before you to the camcorder's Micro SD card. To stop the video ... Resolution Indicator HD HD (1280x720)@30fps 640 VGA (640x480)@60fps Zoom In Magnification Indicator 1.00 - 4.00 Zoom Out Battery Level Indicator Playback Mode Vehicle Mounted Video Capture Mode Taking a Video 1. The elapsed time appears on the bottom of the LCD screen. 5. The video is full, the...
... Capture Mode allows you begin recording and moving. Make sure the resolution and zoom are in Vehicle Mounted Video Capture Mode use the supplied mounts to place your digital camcorder while you are set before you to the camcorder's Micro SD card. To stop the video ... Resolution Indicator HD HD (1280x720)@30fps 640 VGA (640x480)@60fps Zoom In Magnification Indicator 1.00 - 4.00 Zoom Out Battery Level Indicator Playback Mode Vehicle Mounted Video Capture Mode Taking a Video 1. The elapsed time appears on the bottom of the LCD screen. 5. The video is full, the...

Camera Manual
Page 19
To enter the Playback Mode: From Photo, Video, or Vehicle Mounted Video Capture Mode touch the Playback Mode icon on the top, left corner of the LCD screen. Press the Shutter button or touch the PLAY ... PLAY arrow is playing: Pause the video by default. To exit the Playback Mode: Touch the current capture mode icon (Photo , Video , or Vehicle Mounted Video ) that you camcorder. Photos appear with you 've captured with 'JPG' displayed on the bottom, center of the LCD screen. While the video is...
To enter the Playback Mode: From Photo, Video, or Vehicle Mounted Video Capture Mode touch the Playback Mode icon on the top, left corner of the LCD screen. Press the Shutter button or touch the PLAY ... PLAY arrow is playing: Pause the video by default. To exit the Playback Mode: Touch the current capture mode icon (Photo , Video , or Vehicle Mounted Video ) that you camcorder. Photos appear with you 've captured with 'JPG' displayed on the bottom, center of the LCD screen. While the video is...

