
Camera Manual
Page 5
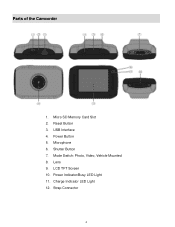
USB Interface 4. Power Indicator/Busy LED Light 11. Strap Connector 4 Shutter Button 7. Charge Indicator LED Light 12. LCD TFT Screen 10. Power Button 5. Parts of the Camcorder 1. Lens 9. Mode Switch: Photo, Video, Vehicle Mounted 8. Reset Button 3. Microphone 6. Micro SD Memory Card Slot 2.
USB Interface 4. Power Indicator/Busy LED Light 11. Strap Connector 4 Shutter Button 7. Charge Indicator LED Light 12. LCD TFT Screen 10. Power Button 5. Parts of the Camcorder 1. Lens 9. Mode Switch: Photo, Video, Vehicle Mounted 8. Reset Button 3. Microphone 6. Micro SD Memory Card Slot 2.
Camera Manual
Page 14
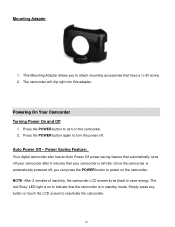
... have a ¼-20 screw. 2. NOTE: After 2 minutes of inactivity, the camcorder LCD screen turns black to reactivate the camcorder. 13 The red 'Busy' LED light is in standby mode. Powering On Your Camcorder Turning Power On and Off 1. Press the POWER button again to turn on to attach mounting accessories that the...
... have a ¼-20 screw. 2. NOTE: After 2 minutes of inactivity, the camcorder LCD screen turns black to reactivate the camcorder. 13 The red 'Busy' LED light is in standby mode. Powering On Your Camcorder Turning Power On and Off 1. Press the POWER button again to turn on to attach mounting accessories that the...

