

Camera Manual
Page 2
MAC OS 9 Powering ON/OFF Your Digital Camcorder 10 Changing Camera Mode ...10 Navigating the Menus...11 Video Capture Mode ...12 Video Playback Mode...20 Photo Capture Mode ...24 Photo Playback Mode ...37 Connecting the Camera to a TV 42 Connecting the Camera to a Headset 42 Installing the Software ...43 Connecting the Camera to the Computer 44 Getting Photos...
MAC OS 9 Powering ON/OFF Your Digital Camcorder 10 Changing Camera Mode ...10 Navigating the Menus...11 Video Capture Mode ...12 Video Playback Mode...20 Photo Capture Mode ...24 Photo Playback Mode ...37 Connecting the Camera to a TV 42 Connecting the Camera to a Headset 42 Installing the Software ...43 Connecting the Camera to the Computer 44 Getting Photos...
Camera Manual
Page 3
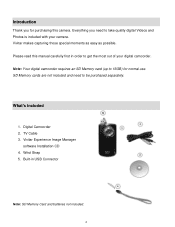
... get the most out of your camera. SD Memory cards are not included and need to take quality digital Videos and Photos is included with your digital camcorder. Digital Camcorder 2. Wrist Strap 5. Built-in order to be purchased separately. TV Cable 3. Vivitar Experience Image Manager software Installation CD 4. Please read this camera. Vivitar makes capturing those special moments...
... get the most out of your camera. SD Memory cards are not included and need to take quality digital Videos and Photos is included with your digital camcorder. Digital Camcorder 2. Wrist Strap 5. Built-in order to be purchased separately. TV Cable 3. Vivitar Experience Image Manager software Installation CD 4. Please read this camera. Vivitar makes capturing those special moments...

Camera Manual
Page 7
The Language selection menu will be prompted to confirm the selection. Press the SET button to select a language for you to capture your choice by pressing the UP or DOWN direction control buttons. 3. Select the language of your videos. 6 After selecting a language, the digital camcorder opens with the Video Capture mode ready for the camera. You will appear. 2. Setting the Camera Language 1.
The Language selection menu will be prompted to confirm the selection. Press the SET button to select a language for you to capture your choice by pressing the UP or DOWN direction control buttons. 3. Select the language of your videos. 6 After selecting a language, the digital camcorder opens with the Video Capture mode ready for the camera. You will appear. 2. Setting the Camera Language 1.
Camera Manual
Page 8
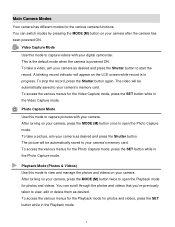
...mode to capture pictures with your camera after the camera has been powered ON. To access the various menus for photos and videos. You can switch modes by pressing the MODE (M) button on your digital camcorder. Video Capture Mode Use this mode to your camera, press the MODE (M) button ...once to view, edit or delete them as desired. A blinking record indicator will be automatically saved to capture videos with your camera‟s memory card. To stop the...
...mode to capture pictures with your camera after the camera has been powered ON. To access the various menus for photos and videos. You can switch modes by pressing the MODE (M) button on your digital camcorder. Video Capture Mode Use this mode to your camera, press the MODE (M) button ...once to view, edit or delete them as desired. A blinking record indicator will be automatically saved to capture videos with your camera‟s memory card. To stop the...

Camera Manual
Page 9
Camera Technical Specifications Product type Digital Video Resolution Digital Photo Resolution Image Sensor LCD Display Internal Memory External Memory Zoom Frequency Scene Self Timer Anti-Shake White Balance Multi SnapShots Exposure ISO Slide Show Language Speaker File Format TV out / Headset Power Saving Battery Transmission interface Working temperature Computer System Requirements Digital... Sensor 1.8 Inch TFT Limited for test images (3 seconds for video or 2 photos) SD card (up to 16GB) needs to be inserted to use the camera 2 x Digital Zoom 50Hz / 60 Hz Auto / Scenery / Portrait / Night...
Camera Technical Specifications Product type Digital Video Resolution Digital Photo Resolution Image Sensor LCD Display Internal Memory External Memory Zoom Frequency Scene Self Timer Anti-Shake White Balance Multi SnapShots Exposure ISO Slide Show Language Speaker File Format TV out / Headset Power Saving Battery Transmission interface Working temperature Computer System Requirements Digital... Sensor 1.8 Inch TFT Limited for test images (3 seconds for video or 2 photos) SD card (up to 16GB) needs to be inserted to use the camera 2 x Digital Zoom 50Hz / 60 Hz Auto / Scenery / Portrait / Night...
Camera Manual
Page 11
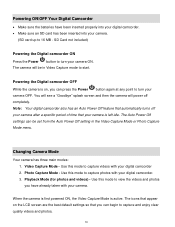
...Power Off settings can be in the Video Capture Mode or Photo Capture Mode menu. Use this mode to capture videos with your camera. Use this mode to capture and enjoy clear quality videos and photos. 10 Powering the Digital camcorder OFF While the camera is on the LCD screen are ...Power button again at any point to start. The camera will power off your camera after a specific period of time that you can begin to capture photos with your digital camcorder. 3. Video Capture Mode - When the camera is first powered ON, the Video Capture Mode is left idle. Powering ON/OFF Your...
...Power Off settings can be in the Video Capture Mode or Photo Capture Mode menu. Use this mode to capture videos with your camera. Use this mode to capture and enjoy clear quality videos and photos. 10 Powering the Digital camcorder OFF While the camera is on the LCD screen are ...Power button again at any point to start. The camera will power off your camera after a specific period of time that you can begin to capture photos with your digital camcorder. 3. Video Capture Mode - When the camera is first powered ON, the Video Capture Mode is left idle. Powering ON/OFF Your...
Camera Manual
Page 13
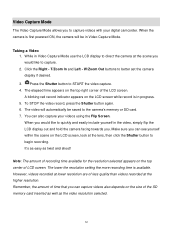
... twist and shoot! Remember, the amount of less quality than videos recorded at the scene you can also capture your digital camcorder. When the camera is first powered ON, the camera will automatically be in the video, simply flip the LCD display out and hold the camera facing towards you. T/Zoom In and Left - To STOP...
... twist and shoot! Remember, the amount of less quality than videos recorded at the scene you can also capture your digital camcorder. When the camera is first powered ON, the camera will automatically be in the video, simply flip the LCD display out and hold the camera facing towards you. T/Zoom In and Left - To STOP...
Camera Manual
Page 20
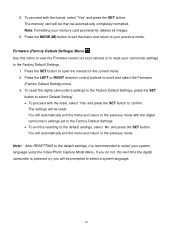
...menu to view the Firmware version on , you do not, the next time the digital camcorder is recommended to select your camcorder settings to the default settings, select „No‟ and... 19 Press the LEFT or RIGHT direction control buttons to reset your system language using the Video/Photo Capture Mode Menu. If you will be automatically completely formatted. The settings will be ...all images. 6. Note: After RESETTING to the default settings, it is powered on your camera or to scroll and select the Firmware (Factory Default Setting) menu. 3. 5. To proceed with the...
...menu to view the Firmware version on , you do not, the next time the digital camcorder is recommended to select your camcorder settings to the default settings, select „No‟ and... 19 Press the LEFT or RIGHT direction control buttons to reset your system language using the Video/Photo Capture Mode Menu. If you will be automatically completely formatted. The settings will be ...all images. 6. Note: After RESETTING to the default settings, it is powered on your camera or to scroll and select the Firmware (Factory Default Setting) menu. 3. 5. To proceed with the...

Camera Manual
Page 21
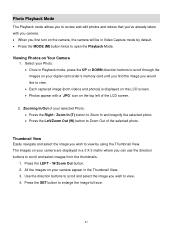
Play your digital camcorder‟s memory card until you find the image you can use the direction buttons to scroll and select images from the thumbnails. 1. Videos appear with an „AVI‟ icon. 4. Playing Videos on your camera will be in Video Capture mode by using the Thumbnail View. Thumbnail View Easily...AVI‟ icon on the top left of the LCD disappear. To fully STOP the video and restore the icons to the LCD, press the UP button. The images on your camera will appear in the Thumbnail View. 3. Press the SET button to select and enlarge the image full...
Play your digital camcorder‟s memory card until you find the image you can use the direction buttons to scroll and select images from the thumbnails. 1. Videos appear with an „AVI‟ icon. 4. Playing Videos on your camera will be in Video Capture mode by using the Thumbnail View. Thumbnail View Easily...AVI‟ icon on the top left of the LCD disappear. To fully STOP the video and restore the icons to the LCD, press the UP button. The images on your camera will appear in the Thumbnail View. 3. Press the SET button to select and enlarge the image full...
Camera Manual
Page 38
...is displayed on the LCD screen. Photos appear with you camera. When you first turn on the camera, the camera will be in Video Capture mode by using the Thumbnail View. Zooming In/Out of your digital camcorder‟s memory card until you find the image you would like... to Zoom Out of the LCD screen. 2. Press the LEFT - Viewing Photos on your camera are displayed in ...
...is displayed on the LCD screen. Photos appear with you camera. When you first turn on the camera, the camera will be in Video Capture mode by using the Thumbnail View. Zooming In/Out of your digital camcorder‟s memory card until you find the image you would like... to Zoom Out of the LCD screen. 2. Press the LEFT - Viewing Photos on your camera are displayed in ...
Camera Manual
Page 48
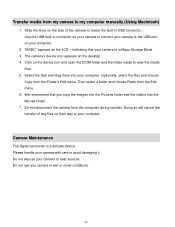
... the Pictures folder and the videos into your camera to avoid damaging it. Camera Maintenance The digital camcorder is in USB connector. Please handle your camera is a delicate device. Click on the LCD - Do not disconnect the camera from the Edit menu. 6. indicating that you camera in connector on your camera to connect your camera to your computer. 2. We...
... the Pictures folder and the videos into your camera to avoid damaging it. Camera Maintenance The digital camcorder is in USB connector. Please handle your camera is a delicate device. Click on the LCD - Do not disconnect the camera from the Edit menu. 6. indicating that you camera in connector on your camera to connect your camera to your computer. 2. We...

