
Camera Manual
Page 5
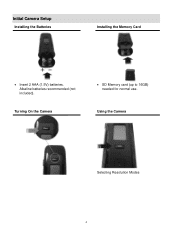
Turning On the Camera SD Memory card (up to 16GB) needed for normal use. Alkaline batteries recommended (not included). Using the Camera Selecting Resolution Modes 4 Initial Camera Setup Installing the Batteries Installing the Memory Card Insert 2 AAA (1.5V) batteries.
Turning On the Camera SD Memory card (up to 16GB) needed for normal use. Alkaline batteries recommended (not included). Using the Camera Selecting Resolution Modes 4 Initial Camera Setup Installing the Batteries Installing the Memory Card Insert 2 AAA (1.5V) batteries.
Camera Manual
Page 6
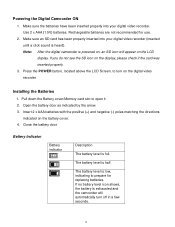
...indicated on the digital video recorder. Rechargeable batteries are not recommended for replacing batteries. Press the POWER button, located above the LCD Screen, to turn off in a few seconds. 5 Powering the Digital Camcorder ON 1. Make sure an SD card has been properly inserted into your digital video ...recorder (inserted until a click sound is powered on, an SD icon will automatically turn on the battery cover. 4. Open the battery door as indicated by the arrow. 3. The battery level is full. Note: After the ...
...indicated on the digital video recorder. Rechargeable batteries are not recommended for replacing batteries. Press the POWER button, located above the LCD Screen, to turn off in a few seconds. 5 Powering the Digital Camcorder ON 1. Make sure an SD card has been properly inserted into your digital video ...recorder (inserted until a click sound is powered on, an SD icon will automatically turn on the battery cover. 4. Open the battery door as indicated by the arrow. 3. The battery level is full. Note: After the ...
Camera Manual
Page 7
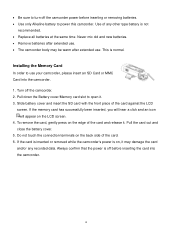
... an SD Card or MMC Card into the camcorder. 6 Pull the card out and close the battery cover. 5. Use of the card and release it. Turn off the camcorder power before inserting the card into the camcorder. 1. Do not touch the connection terminals on the edge of any recorded data. Installing...; Remove batteries after extended use. The camcorder body may damage the card and/or any other type battery is normal. Be sure to turn off the camcorder. 2. Always confirm that the power is on the LCD screen. 4.
... an SD Card or MMC Card into the camcorder. 6 Pull the card out and close the battery cover. 5. Use of the card and release it. Turn off the camcorder power before inserting the card into the camcorder. 1. Do not touch the connection terminals on the edge of any recorded data. Installing...; Remove batteries after extended use. The camcorder body may damage the card and/or any other type battery is normal. Be sure to turn off the camcorder. 2. Always confirm that the power is on the LCD screen. 4.
Camera Manual
Page 8
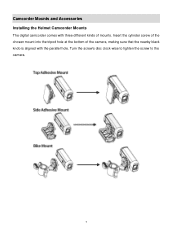
Insert the cylinder screw of the chosen mount into the tripod hole at the bottom of the camera, making sure that the nearby black knob is aligned with three different kinds of mounts. Camcorder Mounts and Accessories Installing the Helmet Camcorder Mounts The digital camcorder comes with the parallel hole. Turn the screw's disc clock-wise to tighten the screw to the camera. 7
Insert the cylinder screw of the chosen mount into the tripod hole at the bottom of the camera, making sure that the nearby black knob is aligned with three different kinds of mounts. Camcorder Mounts and Accessories Installing the Helmet Camcorder Mounts The digital camcorder comes with the parallel hole. Turn the screw's disc clock-wise to tighten the screw to the camera. 7
Camera Manual
Page 12
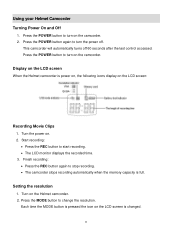
...following icons display on the LCD screen When the Helmet camcorder is changed. 11 Press the POWER button again to turn on . 2. Press the POWER button to turn the power off 60 seconds after the last control accessed. Setting the resolution 1. Press the MODE button to ...POWER button to stop recording. The camcorder stops recording automatically when the memory capacity is full. This camcorder will automatically turns off . Turn the power on the camcorder. 2. Display on the LCD screen: Recording Movie Clips 1. Finish recording: Press the REC button ...
...following icons display on the LCD screen When the Helmet camcorder is changed. 11 Press the POWER button again to turn on . 2. Press the POWER button to turn the power off 60 seconds after the last control accessed. Setting the resolution 1. Press the MODE button to ...POWER button to stop recording. The camcorder stops recording automatically when the memory capacity is full. This camcorder will automatically turns off . Turn the power on the camcorder. 2. Display on the LCD screen: Recording Movie Clips 1. Finish recording: Press the REC button ...
Camera Manual
Page 19
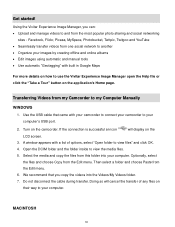
... a folder and choose Paste from the Edit menu. Use the USB cable that you can: Upload and manage videos to use the Vivitar Experience Image Manager open the Help file or click the "Take a Tour" button on the LCD screen. 3. A window appears with your camcorder... Picasa, MySpace, Photobucket, Twitpic, Twitgoo and YouTube Seamlessly transfer videos from my Camcorder to another Organize your computer's USB port. 2. Turn on their way to view the media files. 5. Using the Vivitar Experience Image Manager, you copy the videos into your computer.
... a folder and choose Paste from the Edit menu. Use the USB cable that you can: Upload and manage videos to use the Vivitar Experience Image Manager open the Help file or click the "Take a Tour" button on the LCD screen. 3. A window appears with your camcorder... Picasa, MySpace, Photobucket, Twitpic, Twitgoo and YouTube Seamlessly transfer videos from my Camcorder to another Organize your computer's USB port. 2. Turn on their way to view the media files. 5. Using the Vivitar Experience Image Manager, you copy the videos into your computer.
Camera Manual
Page 20
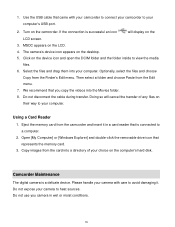
... transfer of your choice on the computer's hard disk. We recommend that you camera in a card reader that is connected to view the media files. 6. Turn on the desktop. 5. Click on the LCD screen. 3. Optionally, select the files and choose Copy from the Edit menu. 7. Please handle your camera with your...
... transfer of your choice on the computer's hard disk. We recommend that you camera in a card reader that is connected to view the media files. 6. Turn on the desktop. 5. Click on the LCD screen. 3. Optionally, select the files and choose Copy from the Edit menu. 7. Please handle your camera with your...

