Camera Manual
Page 1
All other trademarks are registered trademarks of their respective companies. All rights reserved. ViviCam 8225 Digital Camera User‟s Manual © 2009 Sakar International, Inc. Windows and the Windows logo are the property of Microsoft Corporation.
All other trademarks are registered trademarks of their respective companies. All rights reserved. ViviCam 8225 Digital Camera User‟s Manual © 2009 Sakar International, Inc. Windows and the Windows logo are the property of Microsoft Corporation.
Camera Manual
Page 2
... Macintosh 4 A Quick Look at Your Camera...5 Preparing Your Camera for Use...6 Install lithium battery...6 Installing SD Memory Card...8 How to hold your camera correctly when capturing images 10 Starting Your Digital Camera...11 Camera Mode...12 Video Mode ...34 Playback Mode ...37 Install the Vivitar Experience Image Manager Software 48 Connect your camera to the computer...50 Get...
... Macintosh 4 A Quick Look at Your Camera...5 Preparing Your Camera for Use...6 Install lithium battery...6 Installing SD Memory Card...8 How to hold your camera correctly when capturing images 10 Starting Your Digital Camera...11 Camera Mode...12 Video Mode ...34 Playback Mode ...37 Install the Vivitar Experience Image Manager Software 48 Connect your camera to the computer...50 Get...
Camera Manual
Page 3
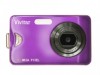
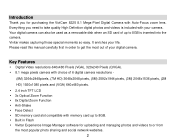
It enriches your digital camera. Vivitar makes capturing those special moments so easy. Key Features Digital Video resolutions-640x480 Pixels (VGA), 320x240 Pixels (QVGA). 8.1 mega pixels camera with choice of 6 digital camera resolutions - (8M) 3264x2448pixels, (7M HD) 3648x2048 pixels, (5M) 2592x1944 pixels, (3M...lens. Please read this manual carefully first in Flash Vivitar Experience Image Manager software for purchasing the ViviCam 8225 8.1 Mega-Pixel Digital Camera with your camera. Your digital camera can also be used as a removable disk when an SD...
It enriches your digital camera. Vivitar makes capturing those special moments so easy. Key Features Digital Video resolutions-640x480 Pixels (VGA), 320x240 Pixels (QVGA). 8.1 mega pixels camera with choice of 6 digital camera resolutions - (8M) 3264x2448pixels, (7M HD) 3648x2048 pixels, (5M) 2592x1944 pixels, (3M...lens. Please read this manual carefully first in Flash Vivitar Experience Image Manager software for purchasing the ViviCam 8225 8.1 Mega-Pixel Digital Camera with your camera. Your digital camera can also be used as a removable disk when an SD...
Camera Manual
Page 4
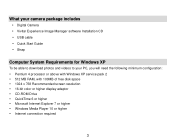
What your camera package includes Digital Camera Vivitar Experience Image Manager software Installation CD USB cable Quick Start Guide Strap Computer System Requirements for Windows XP To be able to ...
What your camera package includes Digital Camera Vivitar Experience Image Manager software Installation CD USB cable Quick Start Guide Strap Computer System Requirements for Windows XP To be able to ...
Camera Manual
Page 7
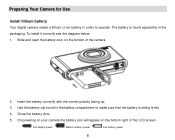
... icon will appear on the bottom of the LCD screen. Insert the battery correctly with the correct polarity facing up. 3. Preparing Your Camera for Use Install lithium battery Your digital camera needs a lithium Li-ion battery in order to make sure that the battery is found in the packaging. To install it correctly...
... icon will appear on the bottom of the LCD screen. Insert the battery correctly with the correct polarity facing up. 3. Preparing Your Camera for Use Install lithium battery Your digital camera needs a lithium Li-ion battery in order to make sure that the battery is found in the packaging. To install it correctly...
Camera Manual
Page 12
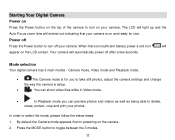
... to turn on your photos. Mode selection Your digital camera has 3 main modes - By default the Camera mode appears first on powering on the camera. 2. The LCD will light up and the Auto-Focus zoom lens will extend out indicating that your camera. When there is on and ready for you.... Power off Press the Power button to toggle between the 3 modes. 11 Camera mode, Video mode and Playback mode. The Camera mode is for use. In order to delete, rotate, protect, crop and print your camera. Starting Your Digital Camera Power on Press the Power button on the top of the...
... to turn on your photos. Mode selection Your digital camera has 3 main modes - By default the Camera mode appears first on powering on the camera. 2. The LCD will light up and the Auto-Focus zoom lens will extend out indicating that your camera. When there is on and ready for you.... Power off Press the Power button to toggle between the 3 modes. 11 Camera mode, Video mode and Playback mode. The Camera mode is for use. In order to delete, rotate, protect, crop and print your camera. Starting Your Digital Camera Power on Press the Power button on the top of the...
Camera Manual
Page 14
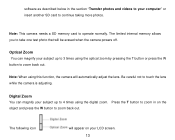
software as described below in on your subject up to 4 times using this function, the camera will automatically adjust the lens. Be careful not to continue taking more photos. Note: This camera needs a SD memory card to zoom back out. Optical Zoom You can magnify your subject up to 3 times ... the section "Transfer photos and videos to your computer" or insert another SD card to touch the lens while the camera is adjusting. The limited internal memory allows you to zoom back out. Digital Zoom You can magnify your LCD screen. 13 The following icon will be erased when the...
software as described below in on your subject up to 4 times using this function, the camera will automatically adjust the lens. Be careful not to continue taking more photos. Note: This camera needs a SD memory card to zoom back out. Optical Zoom You can magnify your subject up to 3 times ... the section "Transfer photos and videos to your computer" or insert another SD card to touch the lens while the camera is adjusting. The limited internal memory allows you to zoom back out. Digital Zoom You can magnify your LCD screen. 13 The following icon will be erased when the...
Camera Manual
Page 19
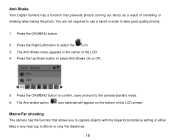
Press the Right/Left button to the camera standby mode. 6. Macro/Far shooting The camera has the function that prevents photos coming out blurry as a result of trembling or shaking when taking the photo. Press the OK/MENU button. 2. The ... Up/Down button to take good quality photos. 1. The Anti-shake option icon selected will appear on the bottom of the LCD. 4. Anti-Shake Your Digital Camera has a function that allows you to capture objects with the Hyperfocal distance setting of either Macro very near (up to 80cm) or very Far distances...
Press the Right/Left button to the camera standby mode. 6. Macro/Far shooting The camera has the function that prevents photos coming out blurry as a result of trembling or shaking when taking the photo. Press the OK/MENU button. 2. The ... Up/Down button to take good quality photos. 1. The Anti-shake option icon selected will appear on the bottom of the LCD. 4. Anti-Shake Your Digital Camera has a function that allows you to capture objects with the Hyperfocal distance setting of either Macro very near (up to 80cm) or very Far distances...

Camera Manual
Page 28
... or Off. 1. The Quality icon for the option you selected appears on the bottom left corner of the LCD will appear with or without the Digital zoom upper section depending on the right side of the LCD. Press the Up/Down button to select On or Off. 4. The Zoom icon on... what you selected. 27 Press the OK/MENU button to confirm, save and exit to the camera standby mode. 5. 4. Press the OK/MENU button to confirm, save and exit to the...
... or Off. 1. The Quality icon for the option you selected appears on the bottom left corner of the LCD will appear with or without the Digital zoom upper section depending on the right side of the LCD. Press the Up/Down button to select On or Off. 4. The Zoom icon on... what you selected. 27 Press the OK/MENU button to confirm, save and exit to the camera standby mode. 5. 4. Press the OK/MENU button to confirm, save and exit to the...
Camera Manual
Page 30
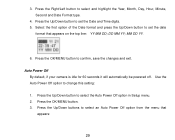
Auto Power Off By default, if your camera is idle for 60 seconds it will automatically be powered off. Press the Up/Down buttons to select and highlight the Year, Month, Day, Hour, ... button to select the Auto Power Off option in Setup menu. 2. DD MM YY; Press the Up/Down button to set the Date and Time digits. 5. Press the Up/Down button to change this setting: 1. MM DD YY. 6. Use the Auto Power Off option to set the date format that appears...
Auto Power Off By default, if your camera is idle for 60 seconds it will automatically be powered off. Press the Up/Down buttons to select and highlight the Year, Month, Day, Hour, ... button to select the Auto Power Off option in Setup menu. 2. DD MM YY; Press the Up/Down button to set the Date and Time digits. 5. Press the Up/Down button to change this setting: 1. MM DD YY. 6. Use the Auto Power Off option to set the date format that appears...
Camera Manual
Page 31
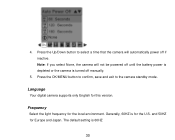
4. Generally, 60HZ is 60HZ 30 Press the OK/MENU button to confirm, save and exit to select a time that the camera will not be powered off until the battery power is depleted or the camera is turned off if inactive. Language Your digital camera supports only English for the local environment. Frequency Select the light frequency for this version. Note: If you select None, the camera will automatically power off manually. 5. Press the Up/Down button to the camera standby mode. The default setting is for Europe and Japan. and 50HZ for the U.S.
4. Generally, 60HZ is 60HZ 30 Press the OK/MENU button to confirm, save and exit to select a time that the camera will not be powered off until the battery power is depleted or the camera is turned off if inactive. Language Your digital camera supports only English for the local environment. Frequency Select the light frequency for this version. Note: If you select None, the camera will automatically power off manually. 5. Press the Up/Down button to the camera standby mode. The default setting is for Europe and Japan. and 50HZ for the U.S.
Camera Manual
Page 55
...folder and choose Paste from other than normal use, including but limited to, repair by unauthorized parties, tampering, 54 Please handle your camera with care to view the media files. 4. Click on their way to defects in material or workmanship and damages or malfunctions from... recommend that fail to function properly UNDER NORMAL USAGE, due to your computer. Your product will cancel the transfer of Your Digital Camera The digital camera is not transferable. What Is Not Covered By Warranty: Damages or malfunctions not resulting from defects in material or workmanship. Do...
...folder and choose Paste from other than normal use, including but limited to, repair by unauthorized parties, tampering, 54 Please handle your camera with care to view the media files. 4. Click on their way to defects in material or workmanship and damages or malfunctions from... recommend that fail to function properly UNDER NORMAL USAGE, due to your computer. Your product will cancel the transfer of Your Digital Camera The digital camera is not transferable. What Is Not Covered By Warranty: Damages or malfunctions not resulting from defects in material or workmanship. Do...


