
Camera Manual
Page 1
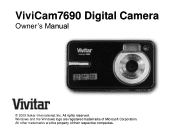
ViviCam7690 Digital Camera Owner‟s Manual © 2009 Sakar International, Inc. Windows and the Windows logo are the property of Microsoft Corporation. All rights reserved. All other trademarks are registered trademarks of their respective companies.
ViviCam7690 Digital Camera Owner‟s Manual © 2009 Sakar International, Inc. Windows and the Windows logo are the property of Microsoft Corporation. All rights reserved. All other trademarks are registered trademarks of their respective companies.

Camera Manual
Page 2
... Quick Look at Your Camera ...5 Prepare Your Camera for use...6 Install SD memory card...7 Starting Your Digital Camera ...9 Main Icons on the LCD ...11 Camera mode ...13 Video Mode ...28 Playback Mode ...30 Install the Vivitar Experience Image Manager Software 39 Connect your camera to the computer 41 ...Get photos and videos from your camera to your computer 41 Get...
... Quick Look at Your Camera ...5 Prepare Your Camera for use...6 Install SD memory card...7 Starting Your Digital Camera ...9 Main Icons on the LCD ...11 Camera mode ...13 Video Mode ...28 Playback Mode ...30 Install the Vivitar Experience Image Manager Software 39 Connect your camera to the computer 41 ...Get photos and videos from your camera to your computer 41 Get...
Camera Manual
Page 3
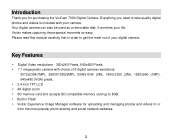
... memory card slot accepts SD compatible memory card up to 8GB. Built in Flash Vivitar Experience Image Manager software for purchasing the ViviCam 7690 Digital Camera. Your digital camera can also be used as a removable disk. Vivitar makes capturing those special moments so easy. Key Features Digital Video resolutions - 320x240 Pixels, 640x480...
... memory card slot accepts SD compatible memory card up to 8GB. Built in Flash Vivitar Experience Image Manager software for purchasing the ViviCam 7690 Digital Camera. Your digital camera can also be used as a removable disk. Vivitar makes capturing those special moments so easy. Key Features Digital Video resolutions - 320x240 Pixels, 640x480...
Camera Manual
Page 4
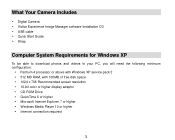
What Your Camera Includes Digital Camera Vivitar Experience Image Manager software Installation CD USB cable Quick Start Guide Strap Computer System Requirements for Windows XP To be able to ...
What Your Camera Includes Digital Camera Vivitar Experience Image Manager software Installation CD USB cable Quick Start Guide Strap Computer System Requirements for Windows XP To be able to ...

Camera Manual
Page 7
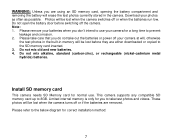
...Battery" message flashes on the LCD screen, you have an SD memory card in the camera, you will need to download the test photos you need to replace your camera‟s batteries. Close the battery compartment. Insert the alkaline batteries correctly, with the correct ...on the side of the camera. 2. If you do not have on the camera before switching off the camera. 6 Open the battery compartment on the battery cover. 3. Please refer to the following installation instructions: 1. Prepare Your Camera for use Install batteries Your camera requires three AAA batteries (...
...Battery" message flashes on the LCD screen, you have an SD memory card in the camera, you will need to download the test photos you need to replace your camera‟s batteries. Close the battery compartment. Insert the alkaline batteries correctly, with the correct ...on the side of the camera. 2. If you do not have on the camera before switching off the camera. 6 Open the battery compartment on the battery cover. 3. Please refer to the following installation instructions: 1. Prepare Your Camera for use Install batteries Your camera requires three AAA batteries (...
Camera Manual
Page 8
...the test photos currently stored in memory will be lost before switching off your photos as often as possible. Download your camera at will be lost when the camera switches-off or if the batteries are either downloaded or copied to the SD memory card inserted. 3. Install SD ...when you don‟t intend to use . Do not mix alkaline, standard (carbon-zinc), or rechargeable (nickel-cadmium metal hydride) batteries. This camera supports any compatible SD memory card up to prevent leakage and corrosion. 2. Do not open the battery door before they are removed. Limited internal ...
...the test photos currently stored in memory will be lost before switching off your photos as often as possible. Download your camera at will be lost when the camera switches-off or if the batteries are either downloaded or copied to the SD memory card inserted. 3. Install SD ...when you don‟t intend to use . Do not mix alkaline, standard (carbon-zinc), or rechargeable (nickel-cadmium metal hydride) batteries. This camera supports any compatible SD memory card up to prevent leakage and corrosion. 2. Do not open the battery door before they are removed. Limited internal ...
Camera Manual
Page 9
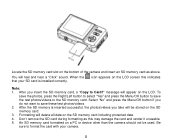
When the that your camera. 8 message will delete all data on the SD memory card. 3. icon appears on the LCD. Don‟t remove the SD ... on the LCD screen this may damage the card and render it unusable. 5. An SD memory card formatted on the bottom of the camera and insert an SD memory card as this indicates Note: 1. To save the photos, press the Right/Left button to select "Yes".../videos to Card?" You will be used. Locate the SD memory card slot on a PC or device other than the camera should not be stored on the SD memory card including protected data. 4.
When the that your camera. 8 message will delete all data on the SD memory card. 3. icon appears on the LCD. Don‟t remove the SD ... on the LCD screen this may damage the card and render it unusable. 5. An SD memory card formatted on the bottom of the camera and insert an SD memory card as this indicates Note: 1. To save the photos, press the Right/Left button to select "Yes".../videos to Card?" You will be used. Locate the SD memory card slot on a PC or device other than the camera should not be stored on the SD memory card including protected data. 4.
Camera Manual
Page 10
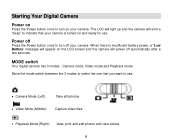
... switch between the 3 modes to select the one that your camera is insufficient battery power, a "Low Battery" message will appear on the LCD screen and the camera will emit a "beep" to turn on and ready for use . Camera Mode (Left): Take still photos Video Mode (Middle...): Capture video files Playback Mode (Right): View, print and edit photos and view videos 9 Camera mode, Video mode and Playback mode. When there is turned on your camera. Power off Press the Power button once to indicate that you want to turn off automatically after a few ...
... switch between the 3 modes to select the one that your camera is insufficient battery power, a "Low Battery" message will appear on the LCD screen and the camera will emit a "beep" to turn on and ready for use . Camera Mode (Left): Take still photos Video Mode (Middle...): Capture video files Playback Mode (Right): View, print and edit photos and view videos 9 Camera mode, Video mode and Playback mode. When there is turned on your camera. Power off Press the Power button once to indicate that you want to turn off automatically after a few ...

Camera Manual
Page 11
Main buttons on the camera 10 In Playback mode you can shoot video files while in Video mode. Camera mode is for you captured, rotate, protect, delete, crop and print your photos. You can preview the photos/videos you to take still photos.
Main buttons on the camera 10 In Playback mode you can shoot video files while in Video mode. Camera mode is for you captured, rotate, protect, delete, crop and print your photos. You can preview the photos/videos you to take still photos.
Camera Manual
Page 14
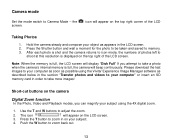
...buttons on the LCD screen. 3. Please download the test images to your subject using the Vivitar Experience Image Manager software as appears in the section "Transfer photos and videos to take a photo when the camera‟s internal memory is displayed on the top right of the LCD screen. icon will ...appear on the top right corner of photos left to shoot at this resolution is full, the camera will appear on the camera Digital Zoom function In the Photo, Video and Playback modes, you attempt to icon mode, the numbers of the LCD Taking Photos ...
...buttons on the LCD screen. 3. Please download the test images to your subject using the Vivitar Experience Image Manager software as appears in the section "Transfer photos and videos to take a photo when the camera‟s internal memory is displayed on the top right of the LCD screen. icon will ...appear on the top right corner of photos left to shoot at this resolution is full, the camera will appear on the camera Digital Zoom function In the Photo, Video and Playback modes, you attempt to icon mode, the numbers of the LCD Taking Photos ...
Camera Manual
Page 15
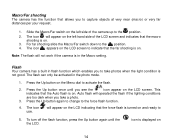
... Menu dial to the force flash function. 4. Press the Up button again to change to activate the flash. 2. The icon will not work if the camera is in the Macro setting. Note: The flash will appear on the left side of the LCD screen and indicates that the macro shooting is... flash if the lighting conditions are too dark when you take photos when the light condition is displayed on the left hand side of the camera up to capture objects at very near (macro) or very far distances per your request. 1. icon is not good. Slide the Macro/Far switch on...
... Menu dial to the force flash function. 4. Press the Up button again to change to activate the flash. 2. The icon will not work if the camera is in the Macro setting. Note: The flash will appear on the left side of the LCD screen and indicates that the macro shooting is... flash if the lighting conditions are too dark when you take photos when the light condition is displayed on the left hand side of the camera up to capture objects at very near (macro) or very far distances per your request. 1. icon is not good. Slide the Macro/Far switch on...
Camera Manual
Page 16
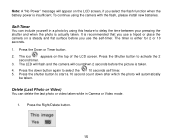
... when the battery power is recommended that you use a tripod or place the camera on the LCD screen, if you use the self-timer. The timer is actually taken. The LED will ...flash and the camera will automatically be taken. Press the shutter button to delay the time between your pressing the... the photo is either for 2 or 10 seconds. 1. Delete (Last Photo or Video) You can include yourself in Camera or Video mode. 1. To continue using this feature to start a 10 second count down button again to activate the ...
... when the battery power is recommended that you use a tripod or place the camera on the LCD screen, if you use the self-timer. The timer is actually taken. The LED will ...flash and the camera will automatically be taken. Press the shutter button to delay the time between your pressing the... the photo is either for 2 or 10 seconds. 1. Delete (Last Photo or Video) You can include yourself in Camera or Video mode. 1. To continue using this feature to start a 10 second count down button again to activate the ...
Camera Manual
Page 17
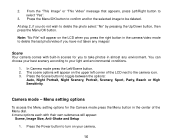
.... At step 2, if you to take photos in almost any images! Note: "No File" will appear on your camera, 16 You can choose your light and environmental conditions. 1. Press the Power button to the camera icon. 3. The scene options will appear: Scene, Image Size, Anti-Shake and Setup 1. 2. Press the Menu/OK... press the Menu button in the center of the Menu dial. 4 menu options each with built-in the camera/video mode to select "Yes". 3. Menu setting options To access the Menu setting options for the selected image to toggle between the options: Auto, Night ...
.... At step 2, if you to take photos in almost any images! Note: "No File" will appear on your camera, 16 You can choose your light and environmental conditions. 1. Press the Power button to the camera icon. 3. The scene options will appear: Scene, Image Size, Anti-Shake and Setup 1. 2. Press the Menu/OK... press the Menu button in the center of the Menu dial. 4 menu options each with built-in the camera/video mode to select "Yes". 3. Menu setting options To access the Menu setting options for the selected image to toggle between the options: Auto, Night ...

Camera Manual
Page 18
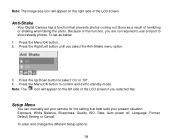
...menu options that appear. 5. Auto, Night Portrait, Night Scenery, Portrait, Scenery, Sport, Party, Beach or High Sensitivity. 4. Press the Menu/OK button. 2. Scene Your camera comes with built-in almost any environment. Press the Up/Down button to confirm and save the setting. Press the Left/Right buttons to... Camera Mode - the icon will appear on the LCD screen. 3. Press the Menu/OK button to select the best scenery per your light condition and...
...menu options that appear. 5. Auto, Night Portrait, Night Scenery, Portrait, Scenery, Sport, Party, Beach or High Sensitivity. 4. Press the Menu/OK button. 2. Scene Your camera comes with built-in almost any environment. Press the Up/Down button to confirm and save the setting. Press the Left/Right buttons to... Camera Mode - the icon will appear on the LCD screen. 3. Press the Menu/OK button to select the best scenery per your light condition and...
Camera Manual
Page 20
... the LCD screen if you are not required to use a tripod to shoot steady photos. Press the Menu/OK button. 2. To set your camera for the setting that prevents photos coming out blurry as below: 1. Press the Menu/OK button to confirm and exit to select „On&#...8223; or „Off‟. 4. Setup Menu You can manually set as a result of trembling or shaking when taking the photo. Anti-Shake Your Digital Camera has a function that best suits your present situation: Exposure, White Balance, Sharpness, Quality, ISO, Date, Auto power off, Language, Format, Default Setting or ...
... the LCD screen if you are not required to use a tripod to shoot steady photos. Press the Menu/OK button. 2. To set your camera for the setting that prevents photos coming out blurry as below: 1. Press the Menu/OK button to confirm and exit to select „On&#...8223; or „Off‟. 4. Setup Menu You can manually set as a result of trembling or shaking when taking the photo. Anti-Shake Your Digital Camera has a function that best suits your present situation: Exposure, White Balance, Sharpness, Quality, ISO, Date, Auto power off, Language, Format, Default Setting or ...
Camera Manual
Page 22
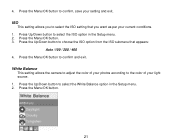
ISO This setting allows you to select the ISO setting that appears: Auto /100 / 200 / 400 4. White Balance This setting allows the camera to adjust the color of your photos according to choose the ISO option from the ISO submenu that you want as per your light source. 1. ...
ISO This setting allows you to select the ISO setting that appears: Auto /100 / 200 / 400 4. White Balance This setting allows the camera to adjust the color of your photos according to choose the ISO option from the ISO submenu that you want as per your light source. 1. ...
Camera Manual
Page 26
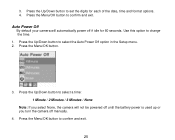
... not be powered off until the battery power is used up or you select None, the camera will automatically power off manually. 4. Press the Menu/OK button to change the time. 1. Press the Up/Down button to select the Auto Power Off ... Up/Down button to confirm and exit. 25 Press the Up/Down button to select a time: 1 Minute / 2 Minutes / 3 Minutes / None Note: If you turn the camera off if idle for each of the date, time and format options. 4. Press the Menu/OK button. 3. 3.
... not be powered off until the battery power is used up or you select None, the camera will automatically power off manually. 4. Press the Menu/OK button to change the time. 1. Press the Up/Down button to select the Auto Power Off ... Up/Down button to confirm and exit. 25 Press the Up/Down button to select a time: 1 Minute / 2 Minutes / 3 Minutes / None Note: If you turn the camera off if idle for each of the date, time and format options. 4. Press the Menu/OK button. 3. 3.

Camera Manual
Page 27
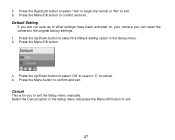
Press the Menu/OK button. 3. Press the Menu/OK button to select „OK‟. 4. Language Your Digital Camera only supports English for now. Press the Up/Down button to confirm. Press the Up/Down button to select the Format option in memory including files that have been protected, please operate cautiously. 1. The following Format message will erase all files in the Setup menu. 2. Format This function reformats the memory card and will appear on the LCD. 26
Press the Menu/OK button. 3. Press the Menu/OK button to select „OK‟. 4. Language Your Digital Camera only supports English for now. Press the Up/Down button to confirm. Press the Up/Down button to select the Format option in memory including files that have been protected, please operate cautiously. 1. The following Format message will erase all files in the Setup menu. 2. Format This function reformats the memory card and will appear on the LCD. 26
Camera Manual
Page 28
... Up/Down button to select „OK‟ to reset or „C‟ to confirm and exit. Cancel This is for you can reset the camera to exit the Setup menu manually. Press the Up/Down button to confirm and exit. 5. Press the Menu/OK button. 3. Press the Menu button to... exit. 6. Select the Cancel option in the Setup menu. 2. Default Setting If you are not sure as to what settings have been activated on your camera you to the original factory settings. 1. Press the Right/Left button to select "Yes" to begin the format or "No" to exit. 27
... Up/Down button to select „OK‟ to reset or „C‟ to confirm and exit. Cancel This is for you can reset the camera to exit the Setup menu manually. Press the Up/Down button to confirm and exit. 5. Press the Menu/OK button. 3. Press the Menu button to... exit. 6. Select the Cancel option in the Setup menu. 2. Default Setting If you are not sure as to what settings have been activated on your camera you to the original factory settings. 1. Press the Right/Left button to select "Yes" to begin the format or "No" to exit. 27
Camera Manual
Page 29
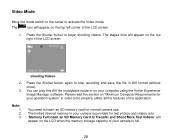
... to stop recording and save this AVI file in order to be properly utilize all the features of your computer using the Vivitar Experience Image Manager software. Please read the section on "Minimum Computer Requirements for normal camera use. You need to Transfer and Shoot More Test Videos" will appear on your... provided for test photos and videos only. "Memory Full insert an SD Memory Card to insert an SD memory card for your camera is full. 28 Press the Shutter button to activate the Video mode. The icon will appear on the top left corner of the LCD screen. 2. ...
... to stop recording and save this AVI file in order to be properly utilize all the features of your computer using the Vivitar Experience Image Manager software. Please read the section on "Minimum Computer Requirements for normal camera use. You need to Transfer and Shoot More Test Videos" will appear on your... provided for test photos and videos only. "Memory Full insert an SD Memory Card to insert an SD memory card for your camera is full. 28 Press the Shutter button to activate the Video mode. The icon will appear on the top left corner of the LCD screen. 2. ...


