Warranty
Page 2
... description of your local toll free number. -2- If you shipping prepaid. WHAT TO DO WHEN SERVICE IS NEEDED STEP 1. Package the product and relevant accessories carefully, using ample padding materials and a sturdy mailing container to prevent damage in the UK call from country and State to : (in the U.S.): Vivitar Attn: Technical Support 195 Carter Drive Edison NJ...
... description of your local toll free number. -2- If you shipping prepaid. WHAT TO DO WHEN SERVICE IS NEEDED STEP 1. Package the product and relevant accessories carefully, using ample padding materials and a sturdy mailing container to prevent damage in the UK call from country and State to : (in the U.S.): Vivitar Attn: Technical Support 195 Carter Drive Edison NJ...
ManualEnglish
Page 1
Configuration & installation 1 2. Shooting 3 5. Other setup 12 II Software & Download 15 1 PC-CAM driver installation 15 2 How to use PC CAM function 22 3 How to know your camera 1 1. Image review setup 10 8. CONTENTS English I Getting to download the photos 23 III Maintenance 23 IV Specification and system requirement 27 Video& Audio recording 7 6. Audio input /output 8 7. Preparation before capture 2 4. Monitor screen display 2 3.
Configuration & installation 1 2. Shooting 3 5. Other setup 12 II Software & Download 15 1 PC-CAM driver installation 15 2 How to use PC CAM function 22 3 How to know your camera 1 1. Image review setup 10 8. CONTENTS English I Getting to download the photos 23 III Maintenance 23 IV Specification and system requirement 27 Video& Audio recording 7 6. Audio input /output 8 7. Preparation before capture 2 4. Monitor screen display 2 3.

ManualEnglish
Page 2
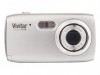
Configuration & installation English 1 Shutter button 2 Power button 3 Flash light 4 Macro switch 5 USB jack 6 Lens 7 TFT monitor screen 8 Left/self-timer button 9 Playback button 10 Zoom out button 11 Zoom in button 12 Busy light 13 Macro light 14 Up/Display button 15 Ok button 16 Right / Flash button 17 Down/Mode button 18 Delete Button 19 Menu button 20 Battery cover 21 SD card slot 22 Tripod socket 1 I Getting to know your camera 1.
Configuration & installation English 1 Shutter button 2 Power button 3 Flash light 4 Macro switch 5 USB jack 6 Lens 7 TFT monitor screen 8 Left/self-timer button 9 Playback button 10 Zoom out button 11 Zoom in button 12 Busy light 13 Macro light 14 Up/Display button 15 Ok button 16 Right / Flash button 17 Down/Mode button 18 Delete Button 19 Menu button 20 Battery cover 21 SD card slot 22 Tripod socket 1 I Getting to know your camera 1.

ManualEnglish
Page 4
...Shooting English 1): Press POWER button to enter the default capture mode; 2): Press the SHUTTER button to view the pictures. Press the LEFT or RIGHT button to select the picture. 4.2 Delete photos a) Press the PLAYBACK button to enter the DELETE mode; Attention: z Do not take pictures. Press any key to restart the screen. 4.1 Review photos Press PLAYBACK button to take the memory card or battery out when camera is not in working status for 2 options: "Image" mode and "Setup" mode: Select "Image", the following settings are: Resolution, Quality, White Balance, Color...
...Shooting English 1): Press POWER button to enter the default capture mode; 2): Press the SHUTTER button to view the pictures. Press the LEFT or RIGHT button to select the picture. 4.2 Delete photos a) Press the PLAYBACK button to enter the DELETE mode; Attention: z Do not take pictures. Press any key to restart the screen. 4.1 Review photos Press PLAYBACK button to take the memory card or battery out when camera is not in working status for 2 options: "Image" mode and "Setup" mode: Select "Image", the following settings are: Resolution, Quality, White Balance, Color...

ManualEnglish
Page 6
... 2 option: "Single", "Burst"; a) Press the UP or DOWN button to select the time you picture a) Press the UP or DOWN button RIGHT button to take 3 pictures continuously. H. Self-timer: a) Press the UP or DOWN button to select "Selftimer", press the RIGHT button to exit. E. c) Press the "OK" button to confirm and press the MENU button to select: "Disable", "10SEC", "20SEC"; c) press the "OK" to confirm and...
... 2 option: "Single", "Burst"; a) Press the UP or DOWN button to select the time you picture a) Press the UP or DOWN button RIGHT button to take 3 pictures continuously. H. Self-timer: a) Press the UP or DOWN button to select "Selftimer", press the RIGHT button to exit. E. c) Press the "OK" button to confirm and press the MENU button to select: "Disable", "10SEC", "20SEC"; c) press the "OK" to confirm and...

ManualEnglish
Page 7
Flashlight Auto: Automatically turn on/off according to the light Flash on: Force on the flash Flash off: Force off the flash In capture mode, press the FLASH button to zoom in the image will not work in "Burst snapshot" mode. In the camera/video/playback mode, press the ZOOM IN or ZOOM OUT button to adjust the flash mode. ● The screen is in blank when the flash is in charge status, the next image can be shot only...
Flashlight Auto: Automatically turn on/off according to the light Flash on: Force on the flash Flash off: Force off the flash In capture mode, press the FLASH button to zoom in the image will not work in "Burst snapshot" mode. In the camera/video/playback mode, press the ZOOM IN or ZOOM OUT button to adjust the flash mode. ● The screen is in blank when the flash is in charge status, the next image can be shot only...

ManualEnglish
Page 8
... "MODE" button to select video mode" " ; 2): Press the SHUTTER button to start video recording; 3): Press the SHUTTER button again to stop recording. 5.1 Play video files a) Press the PLAYBACK button to select the video file; Attention: Please note that this camera does not support the speaker; b): Press the LEFT or RIGHT button to view the video file. the volume is only available when connecting with TV or PC. 5.2 Delete video file See page 3 for detail set up. 5.3 Video recording setup In the video mode press the "MENU" button to continue...
... "MODE" button to select video mode" " ; 2): Press the SHUTTER button to start video recording; 3): Press the SHUTTER button again to stop recording. 5.1 Play video files a) Press the PLAYBACK button to select the video file; Attention: Please note that this camera does not support the speaker; b): Press the LEFT or RIGHT button to view the video file. the volume is only available when connecting with TV or PC. 5.2 Delete video file See page 3 for detail set up. 5.3 Video recording setup In the video mode press the "MENU" button to continue...

ManualEnglish
Page 9
...; Audio recording 6.1 Audio input a): Power on the screen; 8 b) Press the UP or DOWN button English to exit. c) Press the OK button to confirm and press the MENU button to select the resolution. b): Press the "MODE" button to select Audio Mode; ( ) c): Press the SHUTTER button to select "Audio", press the RIGHT button for detail set up. C: White balance See page 5 for 2 options :"Enable" or "Disable"; a) Press the "MENU" button under the video mode...
...; Audio recording 6.1 Audio input a): Power on the screen; 8 b) Press the UP or DOWN button English to exit. c) Press the OK button to confirm and press the MENU button to select the resolution. b): Press the "MODE" button to select Audio Mode; ( ) c): Press the SHUTTER button to select "Audio", press the RIGHT button for detail set up. C: White balance See page 5 for 2 options :"Enable" or "Disable"; a) Press the "MENU" button under the video mode...

ManualEnglish
Page 10
English 6.2 Delete audio files See page 4 for detail set up 6.3. c): Press the MODE button to stop recording. d): Press the SHUTTER button again to enter the PLAYBACK mode; d): Press LEFT or RIGHT button to connect with the TV system(see page 16); ● Please adjust the TV setting if the image does not display at the center of the camera. ● Please use the cable attached to select the file. this is connected to...
English 6.2 Delete audio files See page 4 for detail set up 6.3. c): Press the MODE button to stop recording. d): Press the SHUTTER button again to enter the PLAYBACK mode; d): Press LEFT or RIGHT button to connect with the TV system(see page 16); ● Please adjust the TV setting if the image does not display at the center of the camera. ● Please use the cable attached to select the file. this is connected to...

ManualEnglish
Page 11
... be deleted. 7.3 Thumbnail a) Press "MENU" button in "play " and "Setup". Attention: The locked image can also delete current file by the DELETE button. 7.2 Lock image a) Press the UP or DOWN button to select "lock", press the RIGHT button for 2 options: "play " mode: Delete Current, Delete All, lock, thumbnail, set logo, rotate, slideshow. 7.1 Delete image a) Press the UP or DOWN button "delete all". Press RIGHT button to delete all the images. c) Select "Delete All" to confirm. There are 8 Options in image playback mode, then...
... be deleted. 7.3 Thumbnail a) Press "MENU" button in "play " and "Setup". Attention: The locked image can also delete current file by the DELETE button. 7.2 Lock image a) Press the UP or DOWN button to select "lock", press the RIGHT button for 2 options: "play " mode: Delete Current, Delete All, lock, thumbnail, set logo, rotate, slideshow. 7.1 Delete image a) Press the UP or DOWN button "delete all". Press RIGHT button to delete all the images. c) Select "Delete All" to confirm. There are 8 Options in image playback mode, then...
ManualEnglish
Page 12
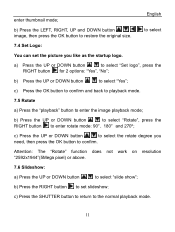
... "playback" button to select "Set logo", press the RIGHT button for 2 options: "Yes", "No"; a) Press the UP or DOWN button to enter the image playback mode; English b) Press the LEFT, RIGHT, UP and DOWN button image, then press the OK button to the normal playback mode. 11 to select 7.4 Set Logo: You can set slideshow; c) Press the SHUTTER button to return to restore the original size. enter thumbnail mode;
... "playback" button to select "Set logo", press the RIGHT button for 2 options: "Yes", "No"; a) Press the UP or DOWN button to enter the image playback mode; English b) Press the LEFT, RIGHT, UP and DOWN button image, then press the OK button to the normal playback mode. 11 to select 7.4 Set Logo: You can set slideshow; c) Press the SHUTTER button to return to restore the original size. enter thumbnail mode;
ManualEnglish
Page 13
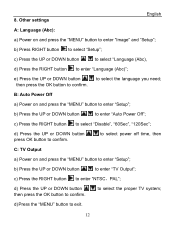
... the "MENU" button to confirm. 8. b) Press the UP or DOWN button to select "Setup"; b) Press RIGHT button to enter "TV Output"; to select power off time, then C: TV Output a) Power on and press the "MENU" button to enter "Auto Power Off"; Other settings English A: Language (Abc): a) Power on and press the "MENU" button to confirm. d) Press the UP or DOWN button then press the OK button to enter "Image" and "Setup"; b) Press...
... the "MENU" button to confirm. 8. b) Press the UP or DOWN button to select "Setup"; b) Press RIGHT button to enter "TV Output"; to select power off time, then C: TV Output a) Power on and press the "MENU" button to enter "Auto Power Off"; Other settings English A: Language (Abc): a) Power on and press the "MENU" button to confirm. d) Press the UP or DOWN button then press the OK button to enter "Image" and "Setup"; b) Press...

ManualEnglish
Page 14
... startup screen is displayed when you need; D: Play Logo English a) Press the UP or DOWN button to select " Play Logo ";l b) Press the RIGHT button to select year, month, date, hour, and minute; F: Date/Time a) Power on and press the "MENU" button to select "Setup"; d) Press the RIGHT button to select "Enable" or "Disable"; c) Press the UP or DOWN button then press the OK button to confirm. c) Press the RIGHT button button...
... startup screen is displayed when you need; D: Play Logo English a) Press the UP or DOWN button to select " Play Logo ";l b) Press the RIGHT button to select year, month, date, hour, and minute; F: Date/Time a) Power on and press the "MENU" button to select "Setup"; d) Press the RIGHT button to select "Enable" or "Disable"; c) Press the UP or DOWN button then press the OK button to confirm. c) Press the RIGHT button button...

ManualEnglish
Page 15
... the saved files will disappear if you format the memory. J: USB Mode 14 H: Format a) Power on and press the "MENU" button to select "Setup"; I: Default setting a) Power on and press the "MENU" button to the default setting. b) Press the UP or DOWN button select "Default setting"; e) Press the OK button to confirm. press the right button to select "Enable" or "Disable", and then press the OK button to confirm. to select "Yes" to format the camera internal d) Press...
... the saved files will disappear if you format the memory. J: USB Mode 14 H: Format a) Power on and press the "MENU" button to select "Setup"; I: Default setting a) Power on and press the "MENU" button to the default setting. b) Press the UP or DOWN button select "Default setting"; e) Press the OK button to confirm. press the right button to select "Enable" or "Disable", and then press the OK button to confirm. to select "Yes" to format the camera internal d) Press...

ManualEnglish
Page 16
... interface appears as a PC camera. d) Press UP or DOWN button to install the camera driver. 15 English Select "PC Camera" mode when you download, delete or upload file, it will show the firmware version d) Press OK button to exit. a) Power on and press the "MENU" button to select "USB Mode"; Select "Mass Storage" mode when you use this camera as follows, Click the "Install Camera Driver" to select; b) Press the UP or DOWN button to enter "Setup"; Software & Download 1.
... interface appears as a PC camera. d) Press UP or DOWN button to install the camera driver. 15 English Select "PC Camera" mode when you download, delete or upload file, it will show the firmware version d) Press OK button to exit. a) Power on and press the "MENU" button to select "USB Mode"; Select "Mass Storage" mode when you use this camera as follows, Click the "Install Camera Driver" to select; b) Press the UP or DOWN button to enter "Setup"; Software & Download 1.

ManualEnglish
Page 24
... camera becomes a removable storage device: a): Connect the USB cable with PC and the camera; III. English 3. How to download the photos Set the USB mode to the camera; Camera Use dry, soft and clean cloths to PC, otherwise the files might be destroyed or lost. 2. do not take out the SD card or the batteries when you can restart the camera. Maintenance Always keep your PC. if you connect the USB cable to your camera...
... camera becomes a removable storage device: a): Connect the USB cable with PC and the camera; III. English 3. How to download the photos Set the USB mode to the camera; Camera Use dry, soft and clean cloths to PC, otherwise the files might be destroyed or lost. 2. do not take out the SD card or the batteries when you can restart the camera. Maintenance Always keep your PC. if you connect the USB cable to your camera...

ManualEnglish
Page 25
... abrasive of laundry to a warm environment. 2. z Don't take out the battery when power on ). Battery Energy management The energy status of the power can be displayed on LCD as high temperature tool bag, trolley case and so on , otherwise it will affect the 24 English Do not use when you bring the camera from a low temperature environment to avoid the...
... abrasive of laundry to a warm environment. 2. z Don't take out the battery when power on ). Battery Energy management The energy status of the power can be displayed on LCD as high temperature tool bag, trolley case and so on , otherwise it will affect the 24 English Do not use when you bring the camera from a low temperature environment to avoid the...

ManualEnglish
Page 26
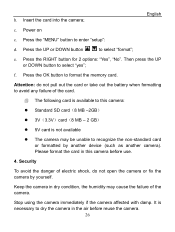
internal settings and functions of the battery: z LCD turn on when using . 3. Please replace new battery when battery low, and follow the battery instruction on ; All data will be deleted and unable to format the card first when it does not working in another camera. Don't insert the leakage, eroded or inflated battery into the camera. c): It is important to recover when the card is necessary in playback status for a long time. Memory card format a. Note: if you...
internal settings and functions of the battery: z LCD turn on when using . 3. Please replace new battery when battery low, and follow the battery instruction on ; All data will be deleted and unable to format the card first when it does not working in another camera. Don't insert the leakage, eroded or inflated battery into the camera. c): It is important to recover when the card is necessary in playback status for a long time. Memory card format a. Note: if you...
ManualEnglish
Page 27
... "MENU" button to format the memory card. Security To avoid the danger of electric shock, do not pull out the card or take out the battery when formatting to recognize the non-standard card or formatted by yourself. English c. e. Press the RIGHT button for 2 options: "Yes", "No". f. Stop using the camera immediately if the camera affected with damp. Insert the card into the camera; Press the OK button to...
... "MENU" button to format the memory card. Security To avoid the danger of electric shock, do not pull out the card or take out the battery when formatting to recognize the non-standard card or formatted by yourself. English c. e. Press the RIGHT button for 2 options: "Yes", "No". f. Stop using the camera immediately if the camera affected with damp. Insert the card into the camera; Press the OK button to...
ManualEnglish
Page 28
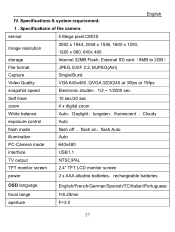
... Video Quality snapshot speed VGA 640x480 ,QVGA 320X240 at 30fps or 15fps Electronic shutter:1/2 ~ 1/2000 sec Self timer 10 sec/20 sec zoom 4 x digital zoom White balance Auto、Daylight、tungsten、fluorescent 、Cloudy exposure control Auto flash mode flash off ,flash on,flash Auto illumination Auto PC-Camera mode 640x480 interface USB1.1 TV output NTSC/PAL TFT monitor screen 2.4" TFT LCD monitor screen power 2 x AAA alkaline batteries、rechargeable batteries OSD language focal range aperture English...
... Video Quality snapshot speed VGA 640x480 ,QVGA 320X240 at 30fps or 15fps Electronic shutter:1/2 ~ 1/2000 sec Self timer 10 sec/20 sec zoom 4 x digital zoom White balance Auto、Daylight、tungsten、fluorescent 、Cloudy exposure control Auto flash mode flash off ,flash on,flash Auto illumination Auto PC-Camera mode 640x480 interface USB1.1 TV output NTSC/PAL TFT monitor screen 2.4" TFT LCD monitor screen power 2 x AAA alkaline batteries、rechargeable batteries OSD language focal range aperture English...


