User Guide English
Page 1
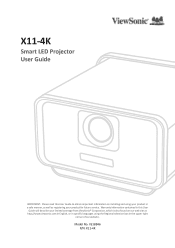
VS18846 P/N: X11-4K X11-4K Smart LED Projector User Guide IMPORTANT: Please read this User Guide will describe your product for future service. Model No. Warranty information contained in this User Guide to obtain important information on installing and using your product in a safe manner, as well as registering your limited coverage from ViewSonic® Corporation, which is also found on our web site at http://www.viewsonic.com in English, or in specific languages using the Regional selection box in the upper right corner of our website.
VS18846 P/N: X11-4K X11-4K Smart LED Projector User Guide IMPORTANT: Please read this User Guide will describe your product for future service. Model No. Warranty information contained in this User Guide to obtain important information on installing and using your product in a safe manner, as well as registering your limited coverage from ViewSonic® Corporation, which is also found on our web site at http://www.viewsonic.com in English, or in specific languages using the Regional selection box in the upper right corner of our website.
User Guide English
Page 3
... objects on the projector or connection cables. • Do not stand the projector on . • Do not block the projection lens with any heat sources such as this user guide in a safe place for replacement. • Do not use of sustained heat. The projector may damage your eyes. • Always open the lens shutter or remove the lens cap when the projector lamp is under operation as radiators, heat...
... objects on the projector or connection cables. • Do not stand the projector on . • Do not block the projection lens with any heat sources such as this user guide in a safe place for replacement. • Do not use of sustained heat. The projector may damage your eyes. • Always open the lens shutter or remove the lens cap when the projector lamp is under operation as radiators, heat...
User Guide English
Page 7
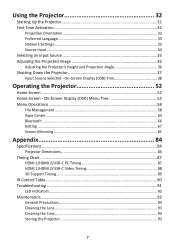
... Operating the Projector 52 Home Screen...52 Home Screen - On-Screen Display (OSD) Menu Tree 53 Menu Operations 58 File Management 58 Apps Center...63 Bluetooth...66 Setting...67 Screen Mirroring...81 Appendix 84 Specifications...84 Projector Dimensions 86 Timing Chart...87 HDMI 1/HDMI 2/USB-C PC Timing 87 HDMI 1/HDMI 2/USB-C Video Timing 88 3D Support Timing 89 IR Control Table...90 Troubleshooting...91 LED Indicators...92 Maintenance...93 General Precautions 93 Cleaning the Lens 93 Cleaning the Case 93 Storing the Projector 93 7 Using the Projector...
... Operating the Projector 52 Home Screen...52 Home Screen - On-Screen Display (OSD) Menu Tree 53 Menu Operations 58 File Management 58 Apps Center...63 Bluetooth...66 Setting...67 Screen Mirroring...81 Appendix 84 Specifications...84 Projector Dimensions 86 Timing Chart...87 HDMI 1/HDMI 2/USB-C PC Timing 87 HDMI 1/HDMI 2/USB-C Video Timing 88 3D Support Timing 89 IR Control Table...90 Troubleshooting...91 LED Indicators...92 Maintenance...93 General Precautions 93 Cleaning the Lens 93 Cleaning the Case 93 Storing the Projector 93 7 Using the Projector...
User Guide English
Page 12
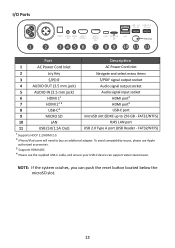
...; Please use the supplied USB-C cable, and ensure your USB-C device can push the reset button located below the microSD slot. 12 NOTE: If the system crashes, you can support video transmission. FAT32/NTFS) ¹ Supports HDCP 2.2/HDMI 2.0. ² iPhone/iPad users will need to 256 GB - FAT32/NTFS) 10 LAN RJ45 LAN port 11 USB (5V/1.5A Out) USB 2.0 Type A port (USB Reader - I/O Ports 1 USB 1 (2.0) USB 2 (2.0) 5V/1.5A 5V/1.5A S/PDIF AUDIO AUDIO HDMI 1 OUT...
...; Please use the supplied USB-C cable, and ensure your USB-C device can push the reset button located below the microSD slot. 12 NOTE: If the system crashes, you can support video transmission. FAT32/NTFS) ¹ Supports HDCP 2.2/HDMI 2.0. ² iPhone/iPad users will need to 256 GB - FAT32/NTFS) 10 LAN RJ45 LAN port 11 USB (5V/1.5A Out) USB 2.0 Type A port (USB Reader - I/O Ports 1 USB 1 (2.0) USB 2 (2.0) 5V/1.5A 5V/1.5A S/PDIF AUDIO AUDIO HDMI 1 OUT...
User Guide English
Page 13
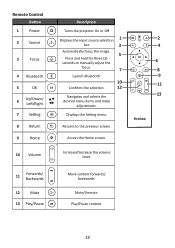
Remote Control Button Description 1 Power Turns the projector On or Off 2 Source Displays the input source selection 1 bar. 3 2 4 Automatically focus the image. 5 3 Focus Press and hold for three (3) seconds to manually adjust the 6 focus. 7 8 4 Bluetooth Launch Bluetooth. 9 5 OK 10 Confirms the selection. 12 11 6 Up/Down/ pq Left/Right tu Navigates and selects the desired menu items and make adjustments. 13 7 Setting Displays the Setting menu. 8 Return Returns to the previous screen. 9 Home Access the...
Remote Control Button Description 1 Power Turns the projector On or Off 2 Source Displays the input source selection 1 bar. 3 2 4 Automatically focus the image. 5 3 Focus Press and hold for three (3) seconds to manually adjust the 6 focus. 7 8 4 Bluetooth Launch Bluetooth. 9 5 OK 10 Confirms the selection. 12 11 6 Up/Down/ pq Left/Right tu Navigates and selects the desired menu items and make adjustments. 13 7 Setting Displays the Setting menu. 8 Return Returns to the previous screen. 9 Home Access the...
User Guide English
Page 17
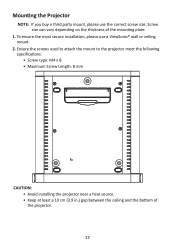
Ensure the screws used to attach the mount to the projector meet the following specifications: • Screw type: M4 x 8 • Maximum Screw Length: 8 mm CAUTION: • Avoid installing the projector near a heat source. • Keep at least a 10 cm (3.9 in.) gap between the ceiling and the bottom of the mounting plate. 1. Screw size can vary depending on the thickness of the projector. 17 To ensure the most secure installation, please use the correct screw size. Mounting the Projector NOTE: If you buy a third party mount, please use a ViewSonic® wall or ceiling mount. 2.
Ensure the screws used to attach the mount to the projector meet the following specifications: • Screw type: M4 x 8 • Maximum Screw Length: 8 mm CAUTION: • Avoid installing the projector near a heat source. • Keep at least a 10 cm (3.9 in.) gap between the ceiling and the bottom of the mounting plate. 1. Screw size can vary depending on the thickness of the projector. 17 To ensure the most secure installation, please use the correct screw size. Mounting the Projector NOTE: If you buy a third party mount, please use a ViewSonic® wall or ceiling mount. 2.
User Guide English
Page 18
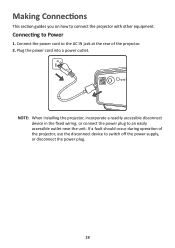
Connecting to an easily accessible outlet near the unit. NOTE: When installing the projector, incorporate a readily accessible disconnect device in the fixed wiring, or connect the power plug to Power 1. Making Connections This section guides you on how to switch off the power supply, or disconnect the power plug. 18 Plug the power cord into a power outlet. If a fault should occur during operation of the projector. 2. Connect the power cord to the AC IN jack at the rear of the projector, use the disconnect device to connect the projector with other equipment.
Connecting to an easily accessible outlet near the unit. NOTE: When installing the projector, incorporate a readily accessible disconnect device in the fixed wiring, or connect the power plug to Power 1. Making Connections This section guides you on how to switch off the power supply, or disconnect the power plug. 18 Plug the power cord into a power outlet. If a fault should occur during operation of the projector. 2. Connect the power cord to the AC IN jack at the rear of the projector, use the disconnect device to connect the projector with other equipment.
User Guide English
Page 31
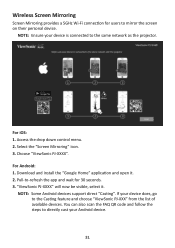
.... 31 Download and install the "Google Home" application and open it . Choose "ViewSonic PJ-XXXX". "ViewSonic PJ-XXXX" will now be visible, select it . 2. Access the drop down control menu. 2. NOTE: Some Android devices support direct "Casting". If your device does, go to the same network as the projector. For iOS: 1. For Android: 1. Wireless Screen Mirroring Screen Mirroring provides a 5GHz Wi-Fi connection for 30...
.... 31 Download and install the "Google Home" application and open it . Choose "ViewSonic PJ-XXXX". "ViewSonic PJ-XXXX" will now be visible, select it . 2. Access the drop down control menu. 2. NOTE: Some Android devices support direct "Casting". If your device does, go to the same network as the projector. For iOS: 1. For Android: 1. Wireless Screen Mirroring Screen Mirroring provides a 5GHz Wi-Fi connection for 30...
User Guide English
Page 44
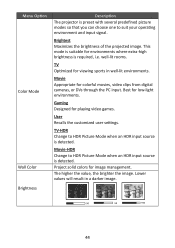
Menu Option Color Mode Wall Color Description The projector is detected. User Recalls the customized user settings. TV-HDR Change to HDR Picture Mode when an HDR input source is preset with several predefined picture modes so that you can choose one to HDR Picture Mode when an HDR input source is required, i.e. Brightness 44 The higher the value, the brighter the image. Movie Appropriate for viewing sports in a darker image. well-lit...
Menu Option Color Mode Wall Color Description The projector is detected. User Recalls the customized user settings. TV-HDR Change to HDR Picture Mode when an HDR input source is preset with several predefined picture modes so that you can choose one to HDR Picture Mode when an HDR input source is required, i.e. Brightness 44 The higher the value, the brighter the image. Movie Appropriate for viewing sports in a darker image. well-lit...
User Guide English
Page 45
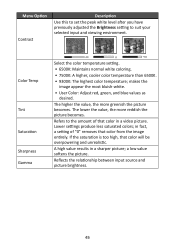
... highest color temperature; The higher the value, the more reddish the picture becomes. Menu Option Contrast Description Use this to set the peak white level after you have previously adjusted the Brightness setting to the amount of "0" removes that color will be overpowering and unrealistic. Refers to suit your selected input and viewing environment. makes the image appear the most bluish-white. • User Color: Adjust red, green, and blue values...
... highest color temperature; The higher the value, the more reddish the picture becomes. Menu Option Contrast Description Use this to set the peak white level after you have previously adjusted the Brightness setting to the amount of "0" removes that color will be overpowering and unrealistic. Refers to suit your selected input and viewing environment. makes the image appear the most bluish-white. • User Color: Adjust red, green, and blue values...
User Guide English
Page 50
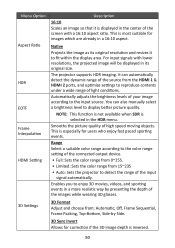
... color range from the HDMI 1 & HDMI 2 ports, and optimize settings to reproduce contents under a wide range of the input signal automatically. Menu Option Aspect Ratio HDR EOTF Frame Interpolation HDMI Setting 3D Settings Description 16:10 Scales an image so that it to fit within the display area. The projector supports HDR imaging. You can automatically detect the dynamic range of the source from 15~235 • Auto: Sets...
... color range from the HDMI 1 & HDMI 2 ports, and optimize settings to reproduce contents under a wide range of the input signal automatically. Menu Option Aspect Ratio HDR EOTF Frame Interpolation HDMI Setting 3D Settings Description 16:10 Scales an image so that it to fit within the display area. The projector supports HDR imaging. You can automatically detect the dynamic range of the source from 15~235 • Auto: Sets...
User Guide English
Page 60
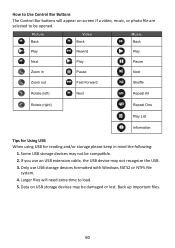
... files. 60 Larger files will appear on USB storage devices may be opened. Data on screen if a video, music, or photo file are selected to load. 5. How to Use Control Bar Buttons The Control Bar buttons will need extra time to be damaged or lost. Only use an USB extension cable, the USB device may not be compatible. 2. Some USB storage devices may not recognize the...
... files. 60 Larger files will appear on USB storage devices may be opened. Data on screen if a video, music, or photo file are selected to load. 5. How to Use Control Bar Buttons The Control Bar buttons will need extra time to be damaged or lost. Only use an USB extension cable, the USB device may not be compatible. 2. Some USB storage devices may not recognize the...
User Guide English
Page 70
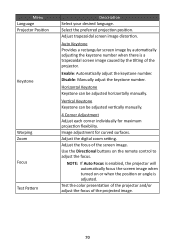
... adjust the keystone number. Adjust the digital zoom setting. Test the color presentation of the projector and/or adjust the focus of the screen image. Horizontal Keystone Keystone can be adjusted horizontally manually. Vertical Keystone Keystone can be adjusted vertically manually. 4 Corner Adjustment Adjust each corner individually for curved surfaces. Use the Directional buttons on or when the position or angle is a trapezoidal screen image caused by automatically adjusting the keystone number when there is adjusted. Menu Language Projector Position Keystone Warping Zoom...
... adjust the keystone number. Adjust the digital zoom setting. Test the color presentation of the projector and/or adjust the focus of the screen image. Horizontal Keystone Keystone can be adjusted horizontally manually. Vertical Keystone Keystone can be adjusted vertically manually. 4 Corner Adjustment Adjust each corner individually for curved surfaces. Use the Directional buttons on or when the position or angle is a trapezoidal screen image caused by automatically adjusting the keystone number when there is adjusted. Menu Language Projector Position Keystone Warping Zoom...
User Guide English
Page 73
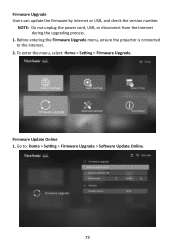
To enter the menu, select: Home > Setting > Firmware Upgrade. Firmware Update Online 1. Go to the Internet. 2. Before entering the Firmware Upgrade menu, ensure the projector is connected to : Home > Setting > Firmware Upgrade > Software Update Online. 73 NOTE: Do not unplug the power cord, USB, or disconnect from the Internet during the upgrading process. 1. Firmware Upgrade Users can update the firmware by internet or USB, and check the version number.
To enter the menu, select: Home > Setting > Firmware Upgrade. Firmware Update Online 1. Go to the Internet. 2. Before entering the Firmware Upgrade menu, ensure the projector is connected to : Home > Setting > Firmware Upgrade > Software Update Online. 73 NOTE: Do not unplug the power cord, USB, or disconnect from the Internet during the upgrading process. 1. Firmware Upgrade Users can update the firmware by internet or USB, and check the version number.
User Guide English
Page 77
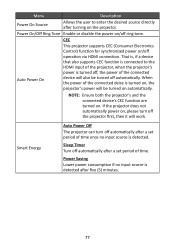
... a set period of time. Menu Power On Source Description Allows the user to the HDMI input of the projector, when the projector's power is turned off, the power of the connected device will also be turned on automatically. Sleep Timer Turn off ring tone. When the power of the connected deice is turned on, the projector's power will work. Smart Energy Auto Power Off The projector can turn off operation via HDMI connection. Auto Power On CEC This projector supports CEC (Consumer Electronics Control) function...
... a set period of time. Menu Power On Source Description Allows the user to the HDMI input of the projector, when the projector's power is turned off, the power of the connected device will also be turned on automatically. Sleep Timer Turn off ring tone. When the power of the connected deice is turned on, the projector's power will work. Smart Energy Auto Power Off The projector can turn off operation via HDMI connection. Auto Power On CEC This projector supports CEC (Consumer Electronics Control) function...
User Guide English
Page 79
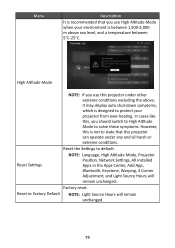
... not to Factory Default NOTE: Light Source Hours will remain unchanged. Reset Settings NOTE: Language, High Altitude Mode, Projector Position, Network Settings, All installed Apps in the Apps Center, Add App, Bluetooth, Keystone, Warping, 4 Corner Adjustment, and Light Source Hours will remain unchanged. 79 High Altitude Mode NOTE: If you use High Altitude Mode when your projector from over-heating. Factory reset. In cases like this, you use this is between 1,500-3,000 m above , it may display auto shut-down...
... not to Factory Default NOTE: Light Source Hours will remain unchanged. Reset Settings NOTE: Language, High Altitude Mode, Projector Position, Network Settings, All installed Apps in the Apps Center, Add App, Bluetooth, Keystone, Warping, 4 Corner Adjustment, and Light Source Hours will remain unchanged. 79 High Altitude Mode NOTE: If you use High Altitude Mode when your projector from over-heating. Factory reset. In cases like this, you use this is between 1,500-3,000 m above , it may display auto shut-down...
User Guide English
Page 84
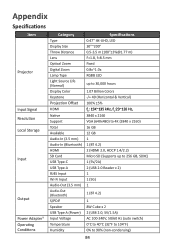
... Item Projector Input Signal Resolution Local Storage Input Output Power Adapter¹ Operating Conditions Category Type Display Size Throw Distance Lens Optical Zoom Digital Zoom Lamp Type Light Source Life (Normal) Display Color Keystone Projection Offset HDMI Native Support Total Available Audio-In (3.5 mm) Audio-In (Bluetooth) HDMI SD Card USB Type-C USB Type-A RJ45 Input Wi-Fi Input Audio-Out (3.5 mm) Audio-Out (Bluetooth) S/PDIF Speaker USB Type A (Power) Input Voltage Temperature Humidity Specifications 0.47" 4K-UHD, LED 30"~200" 0.5-3.5 m (100"±3%@1.77 m) F=1.8, f=8.5 mm Fixed...
... Item Projector Input Signal Resolution Local Storage Input Output Power Adapter¹ Operating Conditions Category Type Display Size Throw Distance Lens Optical Zoom Digital Zoom Lamp Type Light Source Life (Normal) Display Color Keystone Projection Offset HDMI Native Support Total Available Audio-In (3.5 mm) Audio-In (Bluetooth) HDMI SD Card USB Type-C USB Type-A RJ45 Input Wi-Fi Input Audio-Out (3.5 mm) Audio-Out (Bluetooth) S/PDIF Speaker USB Type A (Power) Input Voltage Temperature Humidity Specifications 0.47" 4K-UHD, LED 30"~200" 0.5-3.5 m (100"±3%@1.77 m) F=1.8, f=8.5 mm Fixed...
User Guide English
Page 93
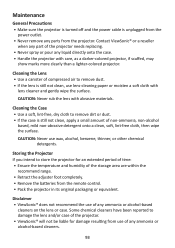
... surface. Cleaning the Lens • Use a canister of compressed air to damage the lens and/or case of the projector. • ViewSonic® will not be liable for an extended period of time: • Ensure the temperature and humidity of the storage area are within the recommend range. • Retract the adjuster foot completely. • Remove the batteries from the remote control. •...
... surface. Cleaning the Lens • Use a canister of compressed air to damage the lens and/or case of the projector. • ViewSonic® will not be liable for an extended period of time: • Ensure the temperature and humidity of the storage area are within the recommend range. • Retract the adjuster foot completely. • Remove the batteries from the remote control. •...
User Guide English
Page 102
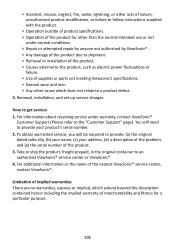
... the "Customer Support" page). For information about receiving service under normal conditions. ͫ Repair or attempted repair by anyone not authorized by ViewSonic®. ͫ Any damage of the product due to shipment. ͫ Removal or installation of the product. ͫ Causes external to the product, such as electric power fluctuations or failure. ͫ Use of supplies or parts not meeting Viewsonic's specifications. ͫ...
... the "Customer Support" page). For information about receiving service under normal conditions. ͫ Repair or attempted repair by anyone not authorized by ViewSonic®. ͫ Any damage of the product due to shipment. ͫ Removal or installation of the product. ͫ Causes external to the product, such as electric power fluctuations or failure. ͫ Use of supplies or parts not meeting Viewsonic's specifications. ͫ...
User Guide English
Page 104
... serial number has been defaced, modified or removed. 2. Any product exhibiting a condition commonly known as electrical power fluctuations or failure. ͫ Use of supplies or parts not meeting ViewSonic®'s specifications. ͫ Normal wear and tear. ͫ Any other acts of nature, unauthorized product modification, unauthorized attempted repair, or failure to follow instructions supplied with a like product. Removal, installation, insurance, and set-up service charges. 104 Replacement product or parts...
... serial number has been defaced, modified or removed. 2. Any product exhibiting a condition commonly known as electrical power fluctuations or failure. ͫ Use of supplies or parts not meeting ViewSonic®'s specifications. ͫ Normal wear and tear. ͫ Any other acts of nature, unauthorized product modification, unauthorized attempted repair, or failure to follow instructions supplied with a like product. Removal, installation, insurance, and set-up service charges. 104 Replacement product or parts...


