
VX2245WM-1 User Guide, English
Page 3
Compliance Information FFor U.S.A. These limits are cautioned that changes or modifications not expressly approved by turning the equipment off and on a circuit different from that interference will not occur in a particular installation. For Canada This Class B ... to radio communications. This equipment has been tested and found to part 15 of FCC Rules. Warning: You are designed to local law. ViewSonic VX2245wm 1 Operation is in compliance with regard to which can radiate radio frequency energy, and if not installed and used in a residential installation. ...
Compliance Information FFor U.S.A. These limits are cautioned that changes or modifications not expressly approved by turning the equipment off and on a circuit different from that interference will not occur in a particular installation. For Canada This Class B ... to radio communications. This equipment has been tested and found to part 15 of FCC Rules. Warning: You are designed to local law. ViewSonic VX2245wm 1 Operation is in compliance with regard to which can radiate radio frequency energy, and if not installed and used in a residential installation. ...
VX2245WM-1 User Guide, English
Page 8
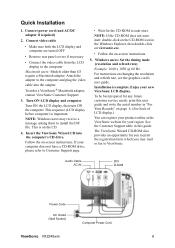
... ViewSonic VX2245wm 6 Connect video cable • Make sure both the LCD display and computer are turned OFF • Remove rear panel covers if necessary • Connect the video cable from the LCD display to auto-start. NOTE: Windows users may mail or fax to ViewSonic. This is complete. Turn ON LCD display and computer Turn ON the LCD display, then turn...
... ViewSonic VX2245wm 6 Connect video cable • Make sure both the LCD display and computer are turned OFF • Remove rear panel covers if necessary • Connect the video cable from the LCD display to auto-start. NOTE: Windows users may mail or fax to ViewSonic. This is complete. Turn ON LCD display and computer Turn ON the LCD display, then turn...
VX2245WM-1 User Guide, English
Page 9
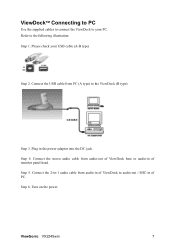
Step 4. ViewSonic VX2245wm 7 Turn on the power. Connect the stereo audio cable from PC (A type) to the ViewDock (B type) Step 3. Refer to the following illustration: Step 1. Step 6. Plug in of PC. Step 5. Connect the USB cable from audio-out of ViewDock base to audio-in of ViewDock to audio-out / MIC-in the power adaptor into the DC jack. Please check your PC. Connect the 2-in-1 audio cable from audio-in of monitor panel head. ViewDockTM Connecting to PC Use the supplied cables to connect the ViewDock to your USB cable (A-B type) Step 2.
Step 4. ViewSonic VX2245wm 7 Turn on the power. Connect the stereo audio cable from PC (A type) to the ViewDock (B type) Step 3. Refer to the following illustration: Step 1. Step 6. Plug in of PC. Step 5. Connect the USB cable from audio-out of ViewDock base to audio-in of ViewDock to audio-out / MIC-in the power adaptor into the DC jack. Please check your PC. Connect the 2-in-1 audio cable from audio-in of monitor panel head. ViewDockTM Connecting to PC Use the supplied cables to connect the ViewDock to your USB cable (A-B type) Step 2.
VX2245WM-1 User Guide, English
Page 10
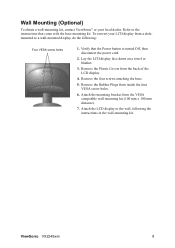
Wall Mounting (Optional) To obtain a wall-mounting kit, contact ViewSonic® or your LCD display from inside the four VESA screw holes. 6. Attach the LCD display to the wall, following : Four VESA screw holes 1. ViewSonic VX2245wm 8 Verify that come with the base mounting kit. Remove the Plastic...towel or blanket. 3. Attach the mounting bracket from the back of the LCD display. 4. To convert your local dealer. Remove the Rubber Plugs from a deskmounted to the instructions that the Power button is turned Off, then disconnect the power cord. 2. Remove the four screws attaching ...
Wall Mounting (Optional) To obtain a wall-mounting kit, contact ViewSonic® or your LCD display from inside the four VESA screw holes. 6. Attach the LCD display to the wall, following : Four VESA screw holes 1. ViewSonic VX2245wm 8 Verify that come with the base mounting kit. Remove the Plastic...towel or blanket. 3. Attach the mounting bracket from the back of the LCD display. 4. To convert your local dealer. Remove the Rubber Plugs from a deskmounted to the instructions that the Power button is turned Off, then disconnect the power cord. 2. Remove the four screws attaching ...
VX2245WM-1 User Guide, English
Page 11
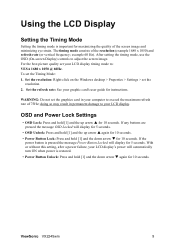
...1050 @ 60Hz. Set the refresh rate: See your LCD display timing mode to your LCD display. WARNING: Do not set your graphic card's user...Button Locked will display for 10 seconds. doing so may result in your LCD display's power will display for 5 seconds. • OSD Unlock: Press ...Properties > Settings > set the Timing Mode: 1. To set the resolution. 2. ViewSonic VX2245wm 9 The timing mode consists of 75Hz; After setting the timing mode, use ... to adjust the screen image. example 60 Hz). Using the LCD Display Setting the Timing Mode Setting the timing mode is important for...
...1050 @ 60Hz. Set the refresh rate: See your LCD display timing mode to your LCD display. WARNING: Do not set your graphic card's user...Button Locked will display for 10 seconds. doing so may result in your LCD display's power will display for 5 seconds. • OSD Unlock: Press ...Properties > Settings > set the Timing Mode: 1. To set the resolution. 2. ViewSonic VX2245wm 9 The timing mode consists of 75Hz; After setting the timing mode, use ... to adjust the screen image. example 60 Hz). Using the LCD Display Setting the Timing Mode Setting the timing mode is important for...
VX2245WM-1 User Guide, English
Page 17
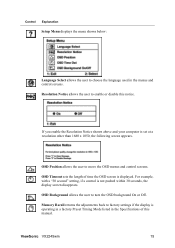
Resolution Notice allows the user to enable or disable this manual. OSD Position allows the user to turn the OSD background On or Off. Memory Recall returns the adjustments back to factory settings if the display is not pushed within 30 seconds, the ... computer is displayed. For example, with a "30 second" setting, if a control is operating in a factory Preset Timing Mode listed in the menus and control screens. ViewSonic VX2245wm 15
Resolution Notice allows the user to enable or disable this manual. OSD Position allows the user to turn the OSD background On or Off. Memory Recall returns the adjustments back to factory settings if the display is not pushed within 30 seconds, the ... computer is displayed. For example, with a "30 second" setting, if a control is operating in a factory Preset Timing Mode listed in the menus and control screens. ViewSonic VX2245wm 15

VX2245WM-1 User Guide, English
Page 22
... of stereo speakers in the monitor head via volume control 2. Make sure the ViewDock power is a default setting for multimedia base. Play your iPod into the universal iPod docking station with iTunes software (for the iTunes software to launch. 5. The iPod LED indicator will turn on amber 4. ViewSonic VX2245wm 20 ViewDockTM Connecting with dock...
... of stereo speakers in the monitor head via volume control 2. Make sure the ViewDock power is a default setting for multimedia base. Play your iPod into the universal iPod docking station with iTunes software (for the iTunes software to launch. 5. The iPod LED indicator will turn on amber 4. ViewSonic VX2245wm 20 ViewDockTM Connecting with dock...
VX2245WM-1 User Guide, English
Page 26
...-ammonia, non-alcohol based, mild non-abrasive detergent onto a clean, soft, lint-free cloth, then wipe the surface. To clean the case: 1. ViewSonic VX2245wm 24 If the case still not clean, apply a small amount of non-ammonia, non-alcohol based glass cleaner onto a clean, soft, lint-free cloth...any ammonia or alcohol-based cleaners on the LCD display screen or case. Cleaning the LCD Display • MAKE SURE THE LCD DISPLAY IS TURNED OFF. • NEVER SPRAY OR POUR ANY LIQUID DIRECTLY ONTO THE SCREEN OR CASE. Disclaimer • ViewSonic® does not recommend the use of any...
...-ammonia, non-alcohol based, mild non-abrasive detergent onto a clean, soft, lint-free cloth, then wipe the surface. To clean the case: 1. ViewSonic VX2245wm 24 If the case still not clean, apply a small amount of non-ammonia, non-alcohol based glass cleaner onto a clean, soft, lint-free cloth...any ammonia or alcohol-based cleaners on the LCD display screen or case. Cleaning the LCD Display • MAKE SURE THE LCD DISPLAY IS TURNED OFF. • NEVER SPRAY OR POUR ANY LIQUID DIRECTLY ONTO THE SCREEN OR CASE. Disclaimer • ViewSonic® does not recommend the use of any...


