VX1945wm-3 User Guide, English
Page 2
... 4 Getting Started Package Contents 5 Precautions 5 Quick Installation 6 ViewDockTM Connecting to PC 7 Wall Mounting (Optional 8 Using the LCD Display Setting the Timing Mode 9 OSD and Power Lock Settings 9 Adjusting the Screen Image 10 Main Menu Controls 12 ViewDockTM Key Features 16 Physical Description 17 Card reader Installation 18 USB Hub Installation 19 ViewDockTM Connecting with iPod 20 Volume control of Sub Woofer 20 Other Information Specifications 21 Troubleshooting 22 Customer Support 23 Cleaning the LCD Display 24 Limited Warranty 25 ViewSonic VX1945wm
... 4 Getting Started Package Contents 5 Precautions 5 Quick Installation 6 ViewDockTM Connecting to PC 7 Wall Mounting (Optional 8 Using the LCD Display Setting the Timing Mode 9 OSD and Power Lock Settings 9 Adjusting the Screen Image 10 Main Menu Controls 12 ViewDockTM Key Features 16 Physical Description 17 Card reader Installation 18 USB Hub Installation 19 ViewDockTM Connecting with iPod 20 Volume control of Sub Woofer 20 Other Information Specifications 21 Troubleshooting 22 Customer Support 23 Cleaning the LCD Display 24 Limited Warranty 25 ViewSonic VX1945wm

VX1945wm-3 User Guide, English
Page 3
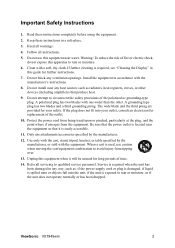
...ViewSonic VX1945wm...changes or modifications not expressly approved by the party responsible for EU-member states: The mark shown to local law. This equipment generates, uses, and can be determined by turning the equipment off and on, the user...instructions, may cause harmful interference to operate the equipment. This equipment has been tested and found to "Safety." However, there is in a residential installation. For Canada This Class B digital apparatus complies with the limits for help...radio frequency energy, and if not installed and used in a particular installation. Warning...
...ViewSonic VX1945wm...changes or modifications not expressly approved by the party responsible for EU-member states: The mark shown to local law. This equipment generates, uses, and can be determined by turning the equipment off and on, the user...instructions, may cause harmful interference to operate the equipment. This equipment has been tested and found to "Safety." However, there is in a residential installation. For Canada This Class B digital apparatus complies with the limits for help...radio frequency energy, and if not installed and used in a particular installation. Warning...
VX1945wm-3 User Guide, English
Page 4
.... Protect the power cord from being tread upon or pinched, particularly at the plug, and the point where if emerges from tipping over. 13. When a cart is required, see "Cleaning the Display" in any ventilation openings. If further cleaning is used, use caution when moving.... 9. Unplug this guide for replacement of the polarized or grounding-type plug. Do not install near any heat sources such as : if the power-supply cord or plug is damaged, if liquid is spilled onto or objects fall into your safety. Heed all instructions. 5. ViewSonic VX1945wm 2 Be sure that...
.... Protect the power cord from being tread upon or pinched, particularly at the plug, and the point where if emerges from tipping over. 13. When a cart is required, see "Cleaning the Display" in any ventilation openings. If further cleaning is used, use caution when moving.... 9. Unplug this guide for replacement of the polarized or grounding-type plug. Do not install near any heat sources such as : if the power-supply cord or plug is damaged, if liquid is spilled onto or objects fall into your safety. Heed all instructions. 5. ViewSonic VX1945wm 2 Be sure that...
VX1945wm-3 User Guide, English
Page 6
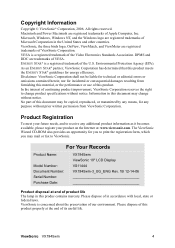
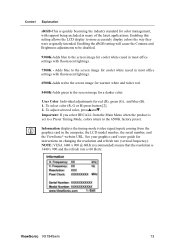
...: Model Number: Document Number: Serial Number: Purchase Date: VX1945wm ViewSonic 19" LCD Display VS11444 VX1945wm-3_UG_ENG Rev. 1B 12-14-06 Product disposal at the end of in accordance with local, state or federal laws. ENERGY STAR® is concerned about the preservation of this material, or the performance or use of our environment. Product Registration To meet your future needs, and to change...
...: Model Number: Document Number: Serial Number: Purchase Date: VX1945wm ViewSonic 19" LCD Display VS11444 VX1945wm-3_UG_ENG Rev. 1B 12-14-06 Product disposal at the end of in accordance with local, state or federal laws. ENERGY STAR® is concerned about the preservation of this material, or the performance or use of our environment. Product Registration To meet your future needs, and to change...
VX1945wm-3 User Guide, English
Page 7
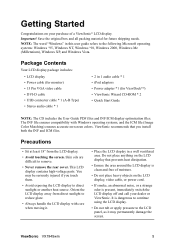
... the LCD panel, as it . • Place the LCD display in 1 audio cable * 1 • iPod adaptors • Power adapter *1 (for future shipping needs. Getting Started Congratulations on your dealer or ViewSonic. Save the original box and all packing material for ViewDockTM) • ViewSonic Wizard CD-ROM * 2 • Quick Start Guide NOTE: The CD includes the User Guide PDF files and INF/ICM display optimization files. Important! It is present, immediately switch the LCD display...
... the LCD panel, as it . • Place the LCD display in 1 audio cable * 1 • iPod adaptors • Power adapter *1 (for future shipping needs. Getting Started Congratulations on your dealer or ViewSonic. Save the original box and all packing material for ViewDockTM) • ViewSonic Wizard CD-ROM * 2 • Quick Start Guide NOTE: The CD includes the User Guide PDF files and INF/ICM display optimization files. Important! It is present, immediately switch the LCD display...
VX1945wm-3 User Guide, English
Page 8
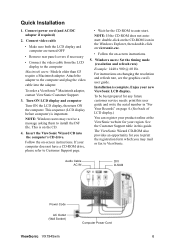
... this user guide and write the serial number in the Windows Explorer, then double-click on viewsonic.exe. • Follow the on the CD. 4. Audio Cable AC IN DVI D-SUB Power Code AC Outlet (Wall Socket) Computer Power Cord ViewSonic VX1945wm 6 Insert the ViewSonic Wizard CD into the adapter. For instructions on -screen instructions. This sequence (LCD display before computer) is important. Connect video cable • Make sure both the LCD display and computer are turned OFF • Remove rear panel covers if...
... this user guide and write the serial number in the Windows Explorer, then double-click on viewsonic.exe. • Follow the on the CD. 4. Audio Cable AC IN DVI D-SUB Power Code AC Outlet (Wall Socket) Computer Power Cord ViewSonic VX1945wm 6 Insert the ViewSonic Wizard CD into the adapter. For instructions on -screen instructions. This sequence (LCD display before computer) is important. Connect video cable • Make sure both the LCD display and computer are turned OFF • Remove rear panel covers if...
VX1945wm-3 User Guide, English
Page 9
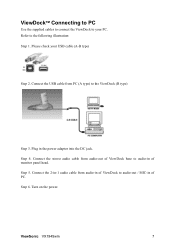
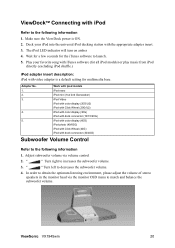
Plug in of PC. Step 4. Connect the USB cable from audio-out of ViewDock base to audio-in of ViewDock to audio-out / MIC-in the power adaptor into the DC jack. Connect the 2-in-1 audio cable from audio-in of monitor panel head. ViewSonic VX1945wm 7 Please check your PC. Connect the stereo audio cable from PC (A type) to the ViewDock (B type) Step 3. Step 6. Step 5. Turn on the power. ViewDockTM Connecting to PC Use the supplied cables to connect the ViewDock to your USB cable (A-B type) Step 2. Refer to the following illustration: Step 1.
Plug in of PC. Step 4. Connect the USB cable from audio-out of ViewDock base to audio-in of ViewDock to audio-out / MIC-in the power adaptor into the DC jack. Connect the 2-in-1 audio cable from audio-in of monitor panel head. ViewSonic VX1945wm 7 Please check your PC. Connect the stereo audio cable from PC (A type) to the ViewDock (B type) Step 3. Step 6. Step 5. Turn on the power. ViewDockTM Connecting to PC Use the supplied cables to connect the ViewDock to your USB cable (A-B type) Step 2. Refer to the following illustration: Step 1.

VX1945wm-3 User Guide, English
Page 10
... the LCD display to the wall, following : Four VESA screw holes 1. Remove the Plastic Covers from the back of the LCD display. 4. To convert your local dealer. ViewSonic VX1945wm 8 Refer to the instructions that the Power button is turned Off, then disconnect the power cord. 2. Wall Mounting (Optional) To obtain a wall-mounting kit, contact ViewSonic® or your LCD display from a deskmounted to a wall-mounted display, do the following the instructions in the wall-mounting kit. Remove the four screws attaching the base. 5.
... the LCD display to the wall, following : Four VESA screw holes 1. Remove the Plastic Covers from the back of the LCD display. 4. To convert your local dealer. ViewSonic VX1945wm 8 Refer to the instructions that the Power button is turned Off, then disconnect the power cord. 2. Wall Mounting (Optional) To obtain a wall-mounting kit, contact ViewSonic® or your LCD display from a deskmounted to a wall-mounted display, do the following the instructions in the wall-mounting kit. Remove the four screws attaching the base. 5.
VX1945wm-3 User Guide, English
Page 11
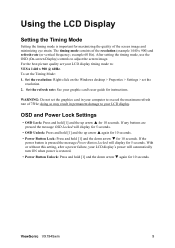
... [1] and the up arrow S again for 10 seconds. • Power Button Lock: Press and hold [1] and the up arrow S for 10 seconds. ViewSonic VX1945wm 9 To set the resolution. 2. WARNING: Do not set your graphic card's user guide for instructions. Using the LCD Display Setting the Timing Mode Setting the timing mode is important for maximizing the quality of 75Hz; The timing mode consists of the resolution (example 1440 x 900) and refresh rate (or vertical frequency;
... [1] and the up arrow S again for 10 seconds. • Power Button Lock: Press and hold [1] and the up arrow S for 10 seconds. ViewSonic VX1945wm 9 To set the resolution. 2. WARNING: Do not set your graphic card's user guide for instructions. Using the LCD Display Setting the Timing Mode Setting the timing mode is important for maximizing the quality of 75Hz; The timing mode consists of the resolution (example 1440 x 900) and refresh rate (or vertical frequency;

VX1945wm-3 User Guide, English
Page 12
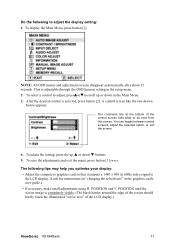
... control screen and saves adjustments. Standby Power On/Off Power light Blue = ON Orange = Power Saving Scrolls through menu options and adjusts the displayed control. Also a shortcut to Auto Image Adjust. The OSD controls are explained at the top of the next page and are defined in detail Displays the control screen for the highlighted control. ViewSonic VX1945wm 10 Also toggles between two controls on page 12. Also a shortcut to display the Contrast adjustment control screen. Adjusting the Screen Image Use the buttons on the front control panel...
... control screen and saves adjustments. Standby Power On/Off Power light Blue = ON Orange = Power Saving Scrolls through menu options and adjusts the displayed control. Also a shortcut to Auto Image Adjust. The OSD controls are explained at the top of the next page and are defined in detail Displays the control screen for the highlighted control. ViewSonic VX1945wm 10 Also toggles between two controls on page 12. Also a shortcut to display the Contrast adjustment control screen. Adjusting the Screen Image Use the buttons on the front control panel...
VX1945wm-3 User Guide, English
Page 13
... x 900 @ 60Hz video signal to the LCD display. (Look for instructions on "changing the refresh rate" in the graphics card's user guide.) • If necessary, make small adjustments using H. You can toggle between control screens, adjust the selected option, or exit the screen. 4. The following to do next from this screen. After the desired control is adjustable through the OSD timeout setting in the setup menu. 2. POSITION until the screen image is completely visible. (The black border around the...
... x 900 @ 60Hz video signal to the LCD display. (Look for instructions on "changing the refresh rate" in the graphics card's user guide.) • If necessary, make small adjustments using H. You can toggle between control screens, adjust the selected option, or exit the screen. 4. The following to do next from this screen. After the desired control is adjustable through the OSD timeout setting in the setup menu. 2. POSITION until the screen image is completely visible. (The black border around the...

VX1945wm-3 User Guide, English
Page 14
... red (R), green (G), and blue (B). Color Adjust provides several color adjustment modes, including preset color temperatures and a User Color mode which allows independent adjustment of the screen image. ViewSonic VX1945wm 12 Mute temporarily silences audio output. Control Explanation Auto Image Adjust sizes and centers the screen image automatically. Contrast adjusts the difference between inputs if you have more than one computer connected to the VX1945wm. Input Select toggles between the image background (black level) and the foreground (white level). Main Menu Controls Adjust...
... red (R), green (G), and blue (B). Color Adjust provides several color adjustment modes, including preset color temperatures and a User Color mode which allows independent adjustment of the screen image. ViewSonic VX1945wm 12 Mute temporarily silences audio output. Control Explanation Auto Image Adjust sizes and centers the screen image automatically. Contrast adjusts the difference between inputs if you have more than one computer connected to the VX1945wm. Input Select toggles between the image background (black level) and the foreground (white level). Main Menu Controls Adjust...
VX1945wm-3 User Guide, English
Page 15
... the resolution is 1440 x 900 and the refresh rate is 60 Hertz. Enabling the sRGB setting will cause the Contrast and Brightness adjustments to be disabled. 9300K-Adds blue to the screen image for cooler white (used in most office settings with support being included in the computer, the LCD model number, the serial number, and the ViewSonic® website URL. See your graphics card's user guide for red (R), green (G), and blue (B). 1. Enabling this setting allows the LCD display to...
... the resolution is 1440 x 900 and the refresh rate is 60 Hertz. Enabling the sRGB setting will cause the Contrast and Brightness adjustments to be disabled. 9300K-Adds blue to the screen image for cooler white (used in most office settings with support being included in the computer, the LCD model number, the serial number, and the ViewSonic® website URL. See your graphics card's user guide for red (R), green (G), and blue (B). 1. Enabling this setting allows the LCD display to...

VX1945wm-3 User Guide, English
Page 16
Size (Horizontal Size) adjusts the width of the screen image. Fine Tune sharpens the focus by aligning text and/or graphics with pixel boundaries. ViewSonic VX1945wm 14 NOTE: Try Auto Image Adjust first. Setup Menu displays the menu shown below: Language Select allows the user to choose the language used in the menus and control screens. Sharpness adjusts the clarity and focus of the screen image. Control Explanation Manual Image Adjust Sub-menu H. Position (Horizontal/Vertical Position) moves the screen image left or right and up or down. H./V.
Size (Horizontal Size) adjusts the width of the screen image. Fine Tune sharpens the focus by aligning text and/or graphics with pixel boundaries. ViewSonic VX1945wm 14 NOTE: Try Auto Image Adjust first. Setup Menu displays the menu shown below: Language Select allows the user to choose the language used in the menus and control screens. Sharpness adjusts the clarity and focus of the screen image. Control Explanation Manual Image Adjust Sub-menu H. Position (Horizontal/Vertical Position) moves the screen image left or right and up or down. H./V.

VX1945wm-3 User Guide, English
Page 17
..." setting, if a control is set at a resolution other than 1440 x 900, the following screen appears. OSD Background allows the user to move the OSD menus and control screens. Memory Recall returns the adjustments back to enable or disable this manual. ViewSonic VX1945wm 15 Control Explanation Resolution Notice allows the user to factory settings if the display is displayed. OSD Timeout sets the length of time the OSD screen is operating in a factory Preset Timing Mode listed in the Specifications...
..." setting, if a control is set at a resolution other than 1440 x 900, the following screen appears. OSD Background allows the user to move the OSD menus and control screens. Memory Recall returns the adjustments back to enable or disable this manual. ViewSonic VX1945wm 15 Control Explanation Resolution Notice allows the user to factory settings if the display is displayed. OSD Timeout sets the length of time the OSD screen is operating in a factory Preset Timing Mode listed in the Specifications...
VX1945wm-3 User Guide, English
Page 21
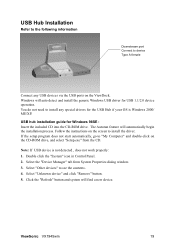
.... 4. Select "Unknown device" and click "Remove" button. 5. ViewSonic VX1945wm 19 Windows will automatically begin the installation process. You do not need to install any USB devices via the USB ports on the ViewDock. If the setup program does not start automatically, go to "My Computer" and double-click on the screen to install the driver. Double click the "System" icon in Control Panel. 2. USB hub installation guide for Windows 98SE : Insert the included CD...
.... 4. Select "Unknown device" and click "Remove" button. 5. ViewSonic VX1945wm 19 Windows will automatically begin the installation process. You do not need to install any USB devices via the USB ports on the ViewDock. If the setup program does not start automatically, go to "My Computer" and double-click on the screen to install the driver. Double click the "System" icon in Control Panel. 2. USB hub installation guide for Windows 98SE : Insert the included CD...
VX1945wm-3 User Guide, English
Page 22
Make sure the ViewDock power is a default setting for multimedia base. The iPod LED indicator will turn on amber 4. Play your iPod into the universal iPod docking station with the appropriate adapter insert. 3. Adapter No. 1. 2. 3. 4. 5. Adjust subwoofer volume via the monitor OSD menu to match and balance the subwoofer volume. " " Turn right to decreases the subwoofer volume. 4. Wait for a few seconds for all iPod models) or play music from iPod...
Make sure the ViewDock power is a default setting for multimedia base. The iPod LED indicator will turn on amber 4. Play your iPod into the universal iPod docking station with the appropriate adapter insert. 3. Adapter No. 1. 2. 3. 4. 5. Adjust subwoofer volume via the monitor OSD menu to match and balance the subwoofer volume. " " Turn right to decreases the subwoofer volume. 4. Wait for a few seconds for all iPod models) or play music from iPod...
VX1945wm-3 User Guide, English
Page 23
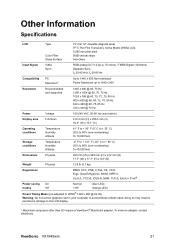
Other Information Specifications LCD Type Color Filter Glass Surface 19" (full 19" viewable diagonal area), TFT (Thin Film Transistor), Active Matrix WXGA LCD, 0.285 mm pixel pitch RGB vertical stripe Anti-Glare Input Signal Video Sync RGB analog (0.7/1.0 Vp-p, 75 ohms) / TMDS Digital (100ohms) Separate Sync, fh:30-82 kHz, fv:50-85 Hz Compatibility PC Macintosh1 Up to 1440 x 900 Non-interlaced Power Macintosh up to 1440 x 900 Resolution Recommended and...
Other Information Specifications LCD Type Color Filter Glass Surface 19" (full 19" viewable diagonal area), TFT (Thin Film Transistor), Active Matrix WXGA LCD, 0.285 mm pixel pitch RGB vertical stripe Anti-Glare Input Signal Video Sync RGB analog (0.7/1.0 Vp-p, 75 ohms) / TMDS Digital (100ohms) Separate Sync, fh:30-82 kHz, fv:50-85 Hz Compatibility PC Macintosh1 Up to 1440 x 900 Non-interlaced Power Macintosh up to 1440 x 900 Resolution Recommended and...

VX1945wm-3 User Guide, English
Page 24
... to verify that the outlet is supplying proper voltage. Wrong or abnormal colors • If any colors (red, green, or blue) are using an Macintosh older than G3, you have an older graphics card, contact ViewSonic® for a non-DDC adapter. Troubleshooting No power • Make sure power button (or switch) is ON. • Make sure A/C power cord is securely connected to the LCD display. • Plug another computer. • If you need a Macintosh adapter.
... to verify that the outlet is supplying proper voltage. Wrong or abnormal colors • If any colors (red, green, or blue) are using an Macintosh older than G3, you have an older graphics card, contact ViewSonic® for a non-DDC adapter. Troubleshooting No power • Make sure power button (or switch) is ON. • Make sure A/C power cord is securely connected to the LCD display. • Plug another computer. • If you need a Macintosh adapter.

VX1945wm-3 User Guide, English
Page 27
... rights, and you . Sales outside of supplies or parts not meeting ViewSonic's specifications. and Canada, contact ViewSonic or your address, (d) a description of the problem, and (e) the serial number of nature, unauthorized product modification, or failure to follow instructions supplied with a like product. Limited Warranty VIEWSONIC® LCD DISPLAY What the warranty covers: ViewSonic warrants its sole option, repair or replace the product with the product. Who the...
... rights, and you . Sales outside of supplies or parts not meeting ViewSonic's specifications. and Canada, contact ViewSonic or your address, (d) a description of the problem, and (e) the serial number of nature, unauthorized product modification, or failure to follow instructions supplied with a like product. Limited Warranty VIEWSONIC® LCD DISPLAY What the warranty covers: ViewSonic warrants its sole option, repair or replace the product with the product. Who the...


