VX1945wm-3 User Guide, English
Page 7
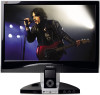
... user guide refers to remove. • Never remove the rear cover. Package Contents Your LCD display package includes: • LCD display • Power cable (for monitor) • 15 Pin VGA video cable • DVI-D cable • USB connector cable * 1 (A-B Type) • Stereo audio cable * 1 • ...: Windows '95, Windows NT, Windows '98, Windows 2000, Windows Me (Millennium), Windows XP, and Windows Vista. Important! ViewSonic VX1945wm 5 The INF file ensures compatibility with care when moving it may be seriously injured if you install both the INF and ICM files.
... user guide refers to remove. • Never remove the rear cover. Package Contents Your LCD display package includes: • LCD display • Power cable (for monitor) • 15 Pin VGA video cable • DVI-D cable • USB connector cable * 1 (A-B Type) • Stereo audio cable * 1 • ...: Windows '95, Windows NT, Windows '98, Windows 2000, Windows Me (Millennium), Windows XP, and Windows Vista. Important! ViewSonic VX1945wm 5 The INF file ensures compatibility with care when moving it may be seriously injured if you install both the INF and ICM files.
VX1945wm-3 User Guide, English
Page 9
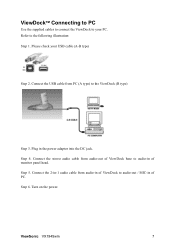
Please check your PC. Connect the stereo audio cable from PC (A type) to the ViewDock (B type) Step 3. Step 6. Plug in of monitor panel head. Connect the USB cable from audio-out of ViewDock base to audio-in of PC. Step 5. ViewSonic VX1945wm 7 Turn on the power. Connect the 2-in-1 audio cable from audio-in of ViewDock to audio-out / MIC-in the power adaptor into the DC jack. Refer to the following illustration: Step 1. ViewDockTM Connecting to PC Use the supplied cables to connect the ViewDock to your USB cable (A-B type) Step 2. Step 4.
Please check your PC. Connect the stereo audio cable from PC (A type) to the ViewDock (B type) Step 3. Step 6. Plug in of monitor panel head. Connect the USB cable from audio-out of ViewDock base to audio-in of PC. Step 5. ViewSonic VX1945wm 7 Turn on the power. Connect the 2-in-1 audio cable from audio-in of ViewDock to audio-out / MIC-in the power adaptor into the DC jack. Refer to the following illustration: Step 1. ViewDockTM Connecting to PC Use the supplied cables to connect the ViewDock to your USB cable (A-B type) Step 2. Step 4.
VX1945wm-3 User Guide, English
Page 22
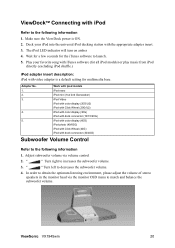
... universal iPod docking station with the appropriate adapter insert. 3. Adjust subwoofer volume via the monitor OSD menu to match and balance the subwoofer volume. " " Turn right to decreases the subwoofer volume. 4. Wait for a few seconds for multimedia base. ViewSonic VX1945wm 20 Adapter No. 1. 2. 3. 4. 5. " " Turn left to increases the ...adaptor is ON. 2. In order to obtain the optimum listening environment, please adjust the volume of stereo speakers in the monitor head via volume control 2. ViewDockTM Connecting with iPod Refer to the following information 1.
... universal iPod docking station with the appropriate adapter insert. 3. Adjust subwoofer volume via the monitor OSD menu to match and balance the subwoofer volume. " " Turn right to decreases the subwoofer volume. 4. Wait for a few seconds for multimedia base. ViewSonic VX1945wm 20 Adapter No. 1. 2. 3. 4. 5. " " Turn left to increases the ...adaptor is ON. 2. In order to obtain the optimum listening environment, please adjust the volume of stereo speakers in the monitor head via volume control 2. ViewDockTM Connecting with iPod Refer to the following information 1.


