VX1945wm-3 User Guide, English
Page 7
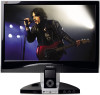
Package Contents Your LCD display package includes: • LCD display • Power cable (for monitor) • 15 Pin VGA video cable • DVI-D cable • USB connector cable * 1 (A-B Type) • Stereo audio cable * 1 • 2 in 1 audio cable ...Orient the LCD display away from the LCD display. • Avoid touching the screen. ViewSonic VX1945wm 5 Important! NOTE: The word "Windows" in a well ventilated area. This LCD display contains high-voltage parts. ViewSonic recommends that prevents heat dissipation. • Ensure the area around the LCD display is ...
Package Contents Your LCD display package includes: • LCD display • Power cable (for monitor) • 15 Pin VGA video cable • DVI-D cable • USB connector cable * 1 (A-B Type) • Stereo audio cable * 1 • 2 in 1 audio cable ...Orient the LCD display away from the LCD display. • Avoid touching the screen. ViewSonic VX1945wm 5 Important! NOTE: The word "Windows" in a well ventilated area. This LCD display contains high-voltage parts. ViewSonic recommends that prevents heat dissipation. • Ensure the area around the LCD display is ...
VX1945wm-3 User Guide, English
Page 9
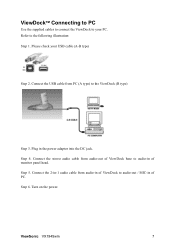
ViewDockTM Connecting to PC Use the supplied cables to connect the ViewDock to your USB cable (A-B type) Step 2. Connect the USB cable from audio-out of ViewDock base to audio-out / MIC-in of monitor panel head. Turn on the power. Step 6. Plug in of PC. Step 5. Connect the 2-in-1 audio cable from audio-in of ViewDock to audio-in the power adaptor into the DC jack. Connect the stereo audio cable from PC (A type) to the following illustration: Step 1. Step 4. Refer to the ViewDock (B type) Step 3. Please check your PC. ViewSonic VX1945wm 7
ViewDockTM Connecting to PC Use the supplied cables to connect the ViewDock to your USB cable (A-B type) Step 2. Connect the USB cable from audio-out of ViewDock base to audio-out / MIC-in of monitor panel head. Turn on the power. Step 6. Plug in of PC. Step 5. Connect the 2-in-1 audio cable from audio-in of ViewDock to audio-in the power adaptor into the DC jack. Connect the stereo audio cable from PC (A type) to the following illustration: Step 1. Step 4. Refer to the ViewDock (B type) Step 3. Please check your PC. ViewSonic VX1945wm 7
VX1945wm-3 User Guide, English
Page 22
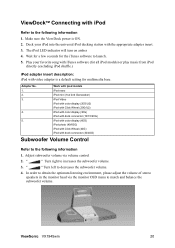
..." Turn left to launch. 5. Dock your favorite song with iTunes software (for multimedia base. Adjust subwoofer volume via the monitor OSD menu to increases the subwoofer volume. 3. ViewSonic VX1945wm 20 Play your iPod into the universal iPod docking station with the appropriate adapter insert. 3. The iPod LED indicator will turn ...adaptor is ON. 2. In order to obtain the optimum listening environment, please adjust the volume of stereo speakers in the monitor head via volume control 2. " " Turn right to match and balance the subwoofer volume. Adapter No. 1. 2. 3. 4. 5.
..." Turn left to launch. 5. Dock your favorite song with iTunes software (for multimedia base. Adjust subwoofer volume via the monitor OSD menu to increases the subwoofer volume. 3. ViewSonic VX1945wm 20 Play your iPod into the universal iPod docking station with the appropriate adapter insert. 3. The iPod LED indicator will turn ...adaptor is ON. 2. In order to obtain the optimum listening environment, please adjust the volume of stereo speakers in the monitor head via volume control 2. " " Turn right to match and balance the subwoofer volume. Adapter No. 1. 2. 3. 4. 5.


