
VP2770-LED Datasheet Hires (English,US)
Page 1
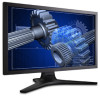
...-Link DVI and VGA, along with 4 USB ports for connecting your professional display needs. 2560x1440 Wide Quad HD Resolution At four times the resolution of a traditional 720p panel, and almost double that of your HD content since HD contents are natively designed in a much sharper image, with support for up to 1.07 billion colors. Backed by ViewSonic's best industry leading pixel policy and full 3-year limited warranty, the VP2770-LED...
...-Link DVI and VGA, along with 4 USB ports for connecting your professional display needs. 2560x1440 Wide Quad HD Resolution At four times the resolution of a traditional 720p panel, and almost double that of your HD content since HD contents are natively designed in a much sharper image, with support for up to 1.07 billion colors. Backed by ViewSonic's best industry leading pixel policy and full 3-year limited warranty, the VP2770-LED...
VP2770-LED Datasheet Hires (English,US)
Page 2
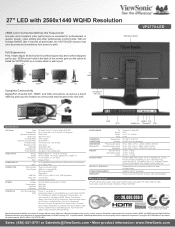
27" LED with 2560x1440 WQHD Resolution sRGB Color Correction Defines the Truest Color Accurate and consistent color performance is essential for professionals in graphic design, video editing and other professional environments. With an average Delta-E (de)
27" LED with 2560x1440 WQHD Resolution sRGB Color Correction Defines the Truest Color Accurate and consistent color performance is essential for professionals in graphic design, video editing and other professional environments. With an average Delta-E (de)

VP2770-LED, VP2770-LED-CN User Guide (English)
Page 1
... web site at http:// www.viewsonic.com in English, or in specific languages using your product for future service. VS14703 "Antes de operar su equipo lea cu idadosamente las instrucciones en este manual" Model No. VP2770-LED LCD Display User Guide IMPORTANT: Please read this User Guide will describe your limited coverage from ViewSonic Corporation, which is also found on installing and using the Regional selection box in a safe...
... web site at http:// www.viewsonic.com in English, or in specific languages using your product for future service. VS14703 "Antes de operar su equipo lea cu idadosamente las instrucciones en este manual" Model No. VP2770-LED LCD Display User Guide IMPORTANT: Please read this User Guide will describe your limited coverage from ViewSonic Corporation, which is also found on installing and using the Regional selection box in a safe...
VP2770-LED, VP2770-LED-CN User Guide (English)
Page 3
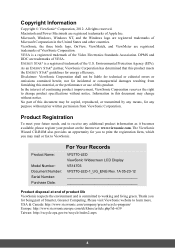
Contents Compliance Information 1 Important Safety Instructions 2 Declaration of RoHS Compliance 3 Copyright Information 4 Product Registration 4 Getting Started Package Contents 5 Precautions 5 Quick Installation 6 Wall Mounting (Optional 7 Using the LCD Display Setting the Timing Mode 8 OSD and Power Lock Settings 8 Adjusting the Screen Image 9 Main Menu Controls 11 Other Information Specifications 15 Troubleshooting 16 Customer Support 17 Cleaning the LCD Display 18 Limited Warranty 19 Mexico Limited Warranty 21
Contents Compliance Information 1 Important Safety Instructions 2 Declaration of RoHS Compliance 3 Copyright Information 4 Product Registration 4 Getting Started Package Contents 5 Precautions 5 Quick Installation 6 Wall Mounting (Optional 7 Using the LCD Display Setting the Timing Mode 8 OSD and Power Lock Settings 8 Adjusting the Screen Image 9 Main Menu Controls 11 Other Information Specifications 15 Troubleshooting 16 Customer Support 17 Cleaning the LCD Display 18 Limited Warranty 19 Mexico Limited Warranty 21
VP2770-LED, VP2770-LED-CN User Guide (English)
Page 7
... Product Name: Model Number: Document Number: Serial Number: Purchase Date: VP2770-LED ViewSonic Widescreen LCD Display VS14703 VP2770-LED-1_UG_ENG Rev. 1A 05-23-12 Product disposal at : www.viewsonic.com. All rights reserved. Disclaimer: ViewSonic Corporation shall not be copied, reproduced, or transmitted by any additional product information as it becomes available, please register your future needs, and to change without notice. The ViewSonic Wizard CD...
... Product Name: Model Number: Document Number: Serial Number: Purchase Date: VP2770-LED ViewSonic Widescreen LCD Display VS14703 VP2770-LED-1_UG_ENG Rev. 1A 05-23-12 Product disposal at : www.viewsonic.com. All rights reserved. Disclaimer: ViewSonic Corporation shall not be copied, reproduced, or transmitted by any additional product information as it becomes available, please register your future needs, and to change without notice. The ViewSonic Wizard CD...

VP2770-LED, VP2770-LED-CN User Guide (English)
Page 8
... screen. 5 Package Contents Your LCD display package includes: • LCD display • Power cord • D-Sub cable • DVI cable • DisplayPort cable • USB cable • ViewSonic Wizard CD-ROM • Quick Start Guide NOTE: The CD includes the User Guide PDF files and INF/ICM display optimization files. This LCD display contains high-voltage parts. Do not place anything on the LCD display that you touch them. • Avoid exposing the LCD display to remove. • Never remove the rear cover...
... screen. 5 Package Contents Your LCD display package includes: • LCD display • Power cord • D-Sub cable • DVI cable • DisplayPort cable • USB cable • ViewSonic Wizard CD-ROM • Quick Start Guide NOTE: The CD includes the User Guide PDF files and INF/ICM display optimization files. This LCD display contains high-voltage parts. Do not place anything on the LCD display that you touch them. • Avoid exposing the LCD display to remove. • Never remove the rear cover...
VP2770-LED, VP2770-LED-CN User Guide (English)
Page 9
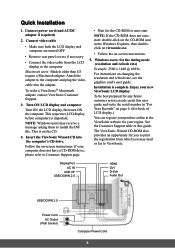
... install the INF file. Follow the on -screen instructions. 5. If your new ViewSonic LCD display. To order a ViewSonic® Macintosh adapter, contact ViewSonic Customer Support. 3. For instructions on changing the resolution and refresh rate, see the graphics card's user guide. Connect video cable • Make sure both the LCD display and computer are turned OFF • Remove rear panel covers if necessary • Connect the video cable from the LCD display to auto-start. See the Customer Support table in this user guide and write the serial number in the Windows...
... install the INF file. Follow the on -screen instructions. 5. If your new ViewSonic LCD display. To order a ViewSonic® Macintosh adapter, contact ViewSonic Customer Support. 3. For instructions on changing the resolution and refresh rate, see the graphics card's user guide. Connect video cable • Make sure both the LCD display and computer are turned OFF • Remove rear panel covers if necessary • Connect the video cable from the LCD display to auto-start. See the Customer Support table in this user guide and write the serial number in the Windows...

VP2770-LED, VP2770-LED-CN User Guide (English)
Page 11
... a wall-mounting kit or height adjustment base, contact ViewSonic® or your LCD display from the VESA compatible wall mounting kit (100 mm x 100 mm distance), using screws of correct length. Refer to the instructions that the power button is turned Off, then disconnect the power cord. Lay the LCD display face down on a towel or blanket. Step 4. Four screws attaching the base 8 Step 3. Step 2. Attach the LCD display to a wall-mounted display, do the following the instructions in the wall-mounting...
... a wall-mounting kit or height adjustment base, contact ViewSonic® or your LCD display from the VESA compatible wall mounting kit (100 mm x 100 mm distance), using screws of correct length. Refer to the instructions that the power button is turned Off, then disconnect the power cord. Lay the LCD display face down on a towel or blanket. Step 4. Four screws attaching the base 8 Step 3. Step 2. Attach the LCD display to a wall-mounted display, do the following the instructions in the wall-mounting...
VP2770-LED, VP2770-LED-CN User Guide (English)
Page 12
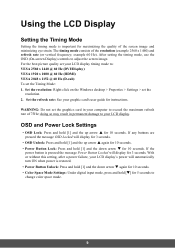
... resolution: Right-click on the Windows desktop > Properties > Settings > set the graphics card in permanent damage to your computer to adjust the screen image. Set the refresh rate: See your LCD display timing mode to change color space mode. 9 OSD and Power Lock Settings • OSD Lock: Press and hold [1] and the up arrow S again for 10 seconds. • Power Button Lock: Press and hold [1] and the down arrow T again for 10 seconds. • Color Space Mode Settings: Under digital input mode...
... resolution: Right-click on the Windows desktop > Properties > Settings > set the graphics card in permanent damage to your computer to adjust the screen image. Set the refresh rate: See your LCD display timing mode to change color space mode. 9 OSD and Power Lock Settings • OSD Lock: Press and hold [1] and the up arrow S again for 10 seconds. • Power Button Lock: Press and hold [1] and the down arrow T again for 10 seconds. • Color Space Mode Settings: Under digital input mode...

VP2770-LED, VP2770-LED-CN User Guide (English)
Page 13
... User Setting (S) Displays the control screen for the highlighted control. Main Menu with OSD controls Front Control Panel shown below in "Main Menu Controls" on page 12. Displays the Main Menu or exits the control screen and saves adjustments. Power light Blue = ON Orange = Power Saving 10 The OSD controls are explained at the top of the next page and are defined in detail Scrolls through menu options and adjusts the displayed control. Audio Adjust (T) / Also a shortcut to toggle analog and digital connection. Adjusting the Screen Image Use the buttons...
... User Setting (S) Displays the control screen for the highlighted control. Main Menu with OSD controls Front Control Panel shown below in "Main Menu Controls" on page 12. Displays the Main Menu or exits the control screen and saves adjustments. Power light Blue = ON Orange = Power Saving 10 The OSD controls are explained at the top of the next page and are defined in detail Scrolls through menu options and adjusts the displayed control. Audio Adjust (T) / Also a shortcut to toggle analog and digital connection. Adjusting the Screen Image Use the buttons...
VP2770-LED, VP2770-LED-CN User Guide (English)
Page 14
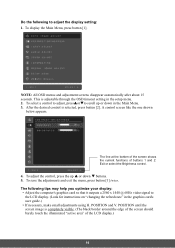
... the desired control is selected, press button [2]. The line at the bottom of the screen shows the current functions of the LCD display.) 11 Do the following tips may help you optimize your display: • Adjust the computer's graphics card so that it outputs a 2560 x 1440 @ 60Hz video signal to the LCD display. (Look for instructions on "changing the refresh rate" in the graphics card's user guide.) • If necessary, make small adjustments using H.
... the desired control is selected, press button [2]. The line at the bottom of the screen shows the current functions of the LCD display.) 11 Do the following tips may help you optimize your display: • Adjust the computer's graphics card so that it outputs a 2560 x 1440 @ 60Hz video signal to the LCD display. (Look for instructions on "changing the refresh rate" in the graphics card's user guide.) • If necessary, make small adjustments using H.
VP2770-LED, VP2770-LED-CN User Guide (English)
Page 15
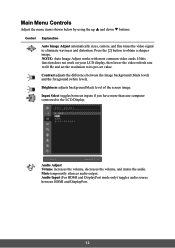
... LCD display, then lower the video refresh rate to 60 Hz and set the resolution to the LCD Display. Contrast adjusts the difference between inputs if you have more than one computer connected to its pre-set value. Audio Adjust Volume increases the volume, decreases the volume, and mutes the audio. Main Menu Controls Adjust the menu items shown below by using the up S and down T buttons. Brightness adjusts background black level of the screen image. Audio Input (For HDMI and DisplayPort mode only) toggles audio source...
... LCD display, then lower the video refresh rate to 60 Hz and set the resolution to the LCD Display. Contrast adjusts the difference between inputs if you have more than one computer connected to its pre-set value. Audio Adjust Volume increases the volume, decreases the volume, and mutes the audio. Main Menu Controls Adjust the menu items shown below by using the up S and down T buttons. Brightness adjusts background black level of the screen image. Audio Input (For HDMI and DisplayPort mode only) toggles audio source...

VP2770-LED, VP2770-LED-CN User Guide (English)
Page 16
... cause the Contrast and Brightness adjustments to the Native factory preset. 13 Native -Adds red to the screen image for cooler white (used in many of red (R), green (G), and blue (B). Enabling this product is native. Warm -Adds red to more accurately display colors the way they were originally intended. User Color Individual adjustments for this setting allows the LCD display to the screen image for warmer white and richer red. The factory setting for red (R), green (G), and blue (B). 1. Control Explanation Color Adjust provides several color adjustment modes, including preset...
... cause the Contrast and Brightness adjustments to the Native factory preset. 13 Native -Adds red to the screen image for cooler white (used in many of red (R), green (G), and blue (B). Enabling this product is native. Warm -Adds red to more accurately display colors the way they were originally intended. User Color Individual adjustments for this setting allows the LCD display to the screen image for warmer white and richer red. The factory setting for red (R), green (G), and blue (B). 1. Control Explanation Color Adjust provides several color adjustment modes, including preset...
VP2770-LED, VP2770-LED-CN User Guide (English)
Page 17
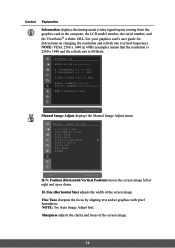
... and the refresh rate is 60 Hertz. H. Manual Image Adjust displays the Manual Image Adjust menu. Sharpness adjusts the clarity and focus of the screen image. See your graphics card's user guide for instructions on changing the resolution and refresh rate (vertical frequency). NOTE: Try Auto Image Adjust first. Control Explanation Information displays the timing mode (video signal input) coming from the graphics card in the computer, the LCD model number, the serial number, and the ViewSonic® website URL. Size (Horizontal Size) adjusts the width of the screen image. 14
... and the refresh rate is 60 Hertz. H. Manual Image Adjust displays the Manual Image Adjust menu. Sharpness adjusts the clarity and focus of the screen image. See your graphics card's user guide for instructions on changing the resolution and refresh rate (vertical frequency). NOTE: Try Auto Image Adjust first. Control Explanation Information displays the timing mode (video signal input) coming from the graphics card in the computer, the LCD model number, the serial number, and the ViewSonic® website URL. Size (Horizontal Size) adjusts the width of the screen image. 14

VP2770-LED, VP2770-LED-CN User Guide (English)
Page 18
.... Standard: Sets Gamma curve to use. Gamma allows the user to move the OSD menus and control screens. Auto Power Off, if enabled, will power off the display automatically when no signal is detected for 4:3 and full screen. For example, with a "15 second" setting, if a control is displayed. OSD Position allows the user to adjust gray color linearity. Conserve: Decreases the brightness by 50 %. Control Explanation Dynamic Contrast allows the user to turn the OSD background...
.... Standard: Sets Gamma curve to use. Gamma allows the user to move the OSD menus and control screens. Auto Power Off, if enabled, will power off the display automatically when no signal is detected for 4:3 and full screen. For example, with a "15 second" setting, if a control is displayed. OSD Position allows the user to adjust gray color linearity. Conserve: Decreases the brightness by 50 %. Control Explanation Dynamic Contrast allows the user to turn the OSD background...
VP2770-LED, VP2770-LED-CN User Guide (English)
Page 19
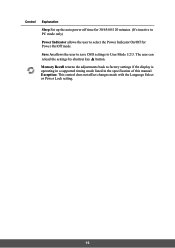
...; button. Control Explanation Sleep Set up the auto power off time for Power On/Off mode. Save As allows the user to save OSD settings to select the Power Indicator On/Off for 30/45/60/120 minutes. (It's inactive in the specification of this manual. Memory Recall returns the adjustments back to factory settings if the display is operating in a supported timing mode listed in PC mode only) Power Indicator allows the user to User Mode...
...; button. Control Explanation Sleep Set up the auto power off time for Power On/Off mode. Save As allows the user to save OSD settings to select the Power Indicator On/Off for 30/45/60/120 minutes. (It's inactive in the specification of this manual. Memory Recall returns the adjustments back to factory settings if the display is operating in a supported timing mode listed in PC mode only) Power Indicator allows the user to User Mode...
VP2770-LED, VP2770-LED-CN User Guide (English)
Page 20
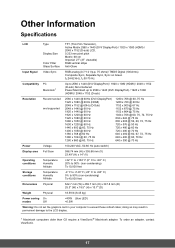
Other Information Specifications LCD Type Display Size Color Filter Glass Surface TFT (Thin Film Transistor), Active Matrix 2560 x 1440 (DVI/ DisplayPort) / 1920 x 1080 (HDMI) / 2048 x 1152 (D-sub) LCD, 0.233 mm pixel pitch Metric: 68 cm Imperial: 27" (27" viewable) RGB vertical stripe Anti-Glare Input Signal Video Sync Compatibility PC Macintosh1 RGB analog (0.7/1.0 Vp-p, 75 ohms)/ TMDS Digital (100ohms) Composite Sync, Separate Sync, Sync on Green fh:24-82 kHz, fv:50-75 Hz Up...
Other Information Specifications LCD Type Display Size Color Filter Glass Surface TFT (Thin Film Transistor), Active Matrix 2560 x 1440 (DVI/ DisplayPort) / 1920 x 1080 (HDMI) / 2048 x 1152 (D-sub) LCD, 0.233 mm pixel pitch Metric: 68 cm Imperial: 27" (27" viewable) RGB vertical stripe Anti-Glare Input Signal Video Sync Compatibility PC Macintosh1 RGB analog (0.7/1.0 Vp-p, 75 ohms)/ TMDS Digital (100ohms) Composite Sync, Separate Sync, Sync on Green fh:24-82 kHz, fv:50-75 Hz Up...

VP2770-LED, VP2770-LED-CN User Guide (English)
Page 21
... power button (or switch) is ON. • Make sure A/C power cord is securely connected to the LCD display. • Plug another computer. • If you need a Macintosh adapter. Wrong or abnormal colors • If any colors (red, green, or blue) are using an Macintosh older than G3, you have an older graphics card, contact ViewSonic® for a non-DDC adapter. Power is ON but no screen image • Make sure the video cable supplied with the LCD display is securely connected. Control buttons...
... power button (or switch) is ON. • Make sure A/C power cord is securely connected to the LCD display. • Plug another computer. • If you need a Macintosh adapter. Wrong or abnormal colors • If any colors (red, green, or blue) are using an Macintosh older than G3, you have an older graphics card, contact ViewSonic® for a non-DDC adapter. Power is ON but no screen image • Make sure the video cable supplied with the LCD display is securely connected. Control buttons...
VP2770-LED, VP2770-LED-CN User Guide (English)
Page 24
... instructions supplied with a like product. c. Removal or installation of the nearest ViewSonic service center, contact ViewSonic. e. Any other acts of time. 4. For information about receiving service under normal use, during the warranty period, ViewSonic will, at its products to provide your address, (d) a description of the problem, and (e) the serial number of merchantability and fitness for the first consumer purchaser. port (Please refer to get service...
... instructions supplied with a like product. c. Removal or installation of the nearest ViewSonic service center, contact ViewSonic. e. Any other acts of time. 4. For information about receiving service under normal use, during the warranty period, ViewSonic will, at its products to provide your address, (d) a description of the problem, and (e) the serial number of merchantability and fitness for the first consumer purchaser. port (Please refer to get service...
VP2770-LED, VP2770-LED-CN User Guide (English)
Page 26
.... Removal, installation, insurance, and set-up service charges. For Your Records Product Name Model Number Document Number Serial Number Purchase Date Extended Warranty Purchase Y/N) If so, what date does warranty expire 1. Take or ship the product in " which does not relate to be free from : a. ViewSonic shall not be defective in the product, damages based upon inconvenience, loss of use . Repair or attempted repair by...
.... Removal, installation, insurance, and set-up service charges. For Your Records Product Name Model Number Document Number Serial Number Purchase Date Extended Warranty Purchase Y/N) If so, what date does warranty expire 1. Take or ship the product in " which does not relate to be free from : a. ViewSonic shall not be defective in the product, damages based upon inconvenience, loss of use . Repair or attempted repair by...


