

User Manual
Page 2
Content Compliance Information 1 Important Safety Instructions 2 Product Registration 3 For Your Records 3 Getting Started Package Contents 4 Precautions 4 Quick Installation 5 Landscape/Portrait Modes 6 To Raise and Lower the display 6 Installation of Wall Mount (Optional 7 Using the LCD Display Setting the Timing Mode 8 OSD and Power Lock Settings 8 Adjusting the Screen Image 9 Main Menu Controls 10 Other Information Specifications 15 Troubleshooting 16 Customer Support 17 Cleaning the LCD Display 18 Limited Warranty 19 09/15/04 A ViewSonic VP171b/VP171s
Content Compliance Information 1 Important Safety Instructions 2 Product Registration 3 For Your Records 3 Getting Started Package Contents 4 Precautions 4 Quick Installation 5 Landscape/Portrait Modes 6 To Raise and Lower the display 6 Installation of Wall Mount (Optional 7 Using the LCD Display Setting the Timing Mode 8 OSD and Power Lock Settings 8 Adjusting the Screen Image 9 Main Menu Controls 10 Other Information Specifications 15 Troubleshooting 16 Customer Support 17 Cleaning the LCD Display 18 Limited Warranty 19 09/15/04 A ViewSonic VP171b/VP171s

User Manual
Page 3
However, there is no guarantee that to which the receiver is encouraged to try to "Safety." ViewSonic VP171b/VP171s 1 For Canada This Class B digital apparatus meets all requirements of the FCC Rules. These limits are included with regard to correct the interference by ...
However, there is no guarantee that to which the receiver is encouraged to try to "Safety." ViewSonic VP171b/VP171s 1 For Canada This Class B digital apparatus meets all requirements of the FCC Rules. These limits are included with regard to correct the interference by ...

User Manual
Page 4
... damaged in accordance with the unit. Keep these instructions. 2. Important Safety Instructions 1. Do not block any way, such as radiators, heat registers, stoves, or other . ViewSonic VP171b/VP171s 2 Do not defeat the safety purpose of time. 14. Protect the power cord from the unit. When a cart is damaged, liquid has been spilled...
... damaged in accordance with the unit. Keep these instructions. 2. Important Safety Instructions 1. Do not block any way, such as radiators, heat registers, stoves, or other . ViewSonic VP171b/VP171s 2 Do not defeat the safety purpose of time. 14. Protect the power cord from the unit. When a cart is damaged, liquid has been spilled...

User Manual
Page 5
... may change product specifications without notice. Taiwan: recycle.epa.gov.tw ViewSonic VP171b/VP171s 3 Europe: www.viewsoniceurope.com 3. All rights reserved. ViewSonic, the three birds logo, OnView, ViewMatch, and ViewMeter are registered trademarks of ViewSonic Corporation. As an ENERGY STAR® partner, ViewSonic Corporation has determined that this product properly at the end of the...
... may change product specifications without notice. Taiwan: recycle.epa.gov.tw ViewSonic VP171b/VP171s 3 Europe: www.viewsoniceurope.com 3. All rights reserved. ViewSonic, the three birds logo, OnView, ViewMatch, and ViewMeter are registered trademarks of ViewSonic Corporation. As an ENERGY STAR® partner, ViewSonic Corporation has determined that this product properly at the end of the...

User Manual
Page 6
... Windows operating systems, and the ICM file (Image Color Matching) ensures accurate onscreen colors. Your LCD display contains high-voltage parts. Important! Skin oils are difficult to continue using the LCD display. ViewSonic VP171b/VP171s 4 Getting Started Congratulations on the LCD display, video cable, or power cord. • If smoke, abnormal noise, or strange odor...
... Windows operating systems, and the ICM file (Image Color Matching) ensures accurate onscreen colors. Your LCD display contains high-voltage parts. Important! Skin oils are difficult to continue using the LCD display. ViewSonic VP171b/VP171s 4 Getting Started Congratulations on the LCD display, video cable, or power cord. • If smoke, abnormal noise, or strange odor...

User Manual
Page 7
...Windows Explorer, then double-click on viewsonic.exe. • Follow the on page 2. (See back of LCD display.) You can register your region. Insert the ViewSonic Wizard CD into the adapter. To order a ViewSonic® Macintosh adapter, contact ViewSonic Customer Support. 3. Enjoy your ...auto-start. DVI-D D-SUB 2 D-SUB 1 AC IN Power Switch Power Code AC Outlet (Wall Socket) Computer Power Cord ViewSonic VP171b/VP171s 5 If your new ViewSonic, LCD display. Quick Installation 1. Windows users: Set the timing mode (resolution and refresh rate) Example: 1280 x 1024 @ 60 ...
...Windows Explorer, then double-click on viewsonic.exe. • Follow the on page 2. (See back of LCD display.) You can register your region. Insert the ViewSonic Wizard CD into the adapter. To order a ViewSonic® Macintosh adapter, contact ViewSonic Customer Support. 3. Enjoy your ...auto-start. DVI-D D-SUB 2 D-SUB 1 AC IN Power Switch Power Code AC Outlet (Wall Socket) Computer Power Cord ViewSonic VP171b/VP171s 5 If your new ViewSonic, LCD display. Quick Installation 1. Windows users: Set the timing mode (resolution and refresh rate) Example: 1280 x 1024 @ 60 ...

User Manual
Page 8
...base. 3. From the front, gently raise the LCD display to Portrait mode, do the following: 1. To Raise and Lower the display You can operate in either Landscape or Portrait mode. ViewSonic VP171b/VP171s 6 Manually rotate the LCD display clockwise 90 degrees as shown above. Perfect Portrait... software is compatible with your LCD display. Pull the bottom of the head and pull up or down. Landscape...
...base. 3. From the front, gently raise the LCD display to Portrait mode, do the following: 1. To Raise and Lower the display You can operate in either Landscape or Portrait mode. ViewSonic VP171b/VP171s 6 Manually rotate the LCD display clockwise 90 degrees as shown above. Perfect Portrait... software is compatible with your LCD display. Pull the bottom of the head and pull up or down. Landscape...

User Manual
Page 9
... VESA compatible wall mounting kit (100 mm x 100 mm distance). 6. To convert your local dealer. Lay the LCD display face down on a towel or blanket. 3. Let the plate hang on the neck of Wall Mount (Optional) ...To obtain a wall-mounting kit, contact ViewSonic or your LCD display from the head of the LCD display. Attach the LCD display to the wall, following : Remove four screws 1. Refer to a wall-mounted... the instructions that come with the base mounting kit. Installation of the LCD display as shown on the left. ViewSonic VP171b/VP171s 7
... VESA compatible wall mounting kit (100 mm x 100 mm distance). 6. To convert your local dealer. Lay the LCD display face down on a towel or blanket. 3. Let the plate hang on the neck of Wall Mount (Optional) ...To obtain a wall-mounting kit, contact ViewSonic or your LCD display from the head of the LCD display. Attach the LCD display to the wall, following : Remove four screws 1. Refer to a wall-mounted... the instructions that come with the base mounting kit. Installation of the LCD display as shown on the left. ViewSonic VP171b/VP171s 7

User Manual
Page 10
...LCD display's power will display for 10 seconds. If any buttons are pressed the message OSD Locked will display for 5 seconds. • OSD Unlock: Press and hold [1] and the up arrow again for 10 seconds. • Power Button Lock: Press and hold [1] and the up arrow for instructions. ViewSonic VP171b...If the power button is pressed the message Power Button Locked will automatically turn ON when power is important for 10 seconds. Using the LCD Display Setting the Timing Mode Setting the timing mode is restored. • Power Button Unlock: Press and hold [1] and the down ...
...LCD display's power will display for 10 seconds. If any buttons are pressed the message OSD Locked will display for 5 seconds. • OSD Unlock: Press and hold [1] and the up arrow again for 10 seconds. • Power Button Lock: Press and hold [1] and the up arrow for instructions. ViewSonic VP171b...If the power button is pressed the message Power Button Locked will automatically turn ON when power is important for 10 seconds. Using the LCD Display Setting the Timing Mode Setting the timing mode is restored. • Power Button Unlock: Press and hold [1] and the down ...

User Manual
Page 11
... defined in detail Displays the Main Menu or exits the control screen and saves adjustments. Power light Green = ON Orange = Power Saving Power On/Off ViewSonic VP171b/VP171s 9 Adjusting the Screen Image Use the buttons on the front control panel to display and adjust the OnView® controls which display on page...
... defined in detail Displays the Main Menu or exits the control screen and saves adjustments. Power light Green = ON Orange = Power Saving Power On/Off ViewSonic VP171b/VP171s 9 Adjusting the Screen Image Use the buttons on the front control panel to display and adjust the OnView® controls which display on page...
User Manual
Page 12
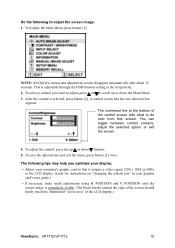
... select a control you optimize your display: • Adjust your computer's graphic card so that it outputs a video signal 1280 x 1024 @ 60Hz to the LCD display. (Look for instructions on "changing the refresh rate" in the setup menu. 2. POSITION and V. The following to adjust the screen image: 1. To ...adjust the control, press the up or down buttons. 5. The command line at the bottom of the LCD display.) ViewSonic VP171b/VP171s 10 This is selected, press button [2]. Do the following tips may help you want to adjust, press or to scroll up or...
... select a control you optimize your display: • Adjust your computer's graphic card so that it outputs a video signal 1280 x 1024 @ 60Hz to the LCD display. (Look for instructions on "changing the refresh rate" in the setup menu. 2. POSITION and V. The following to adjust the screen image: 1. To ...adjust the control, press the up or down buttons. 5. The command line at the bottom of the LCD display.) ViewSonic VP171b/VP171s 10 This is selected, press button [2]. Do the following tips may help you want to adjust, press or to scroll up or...

User Manual
Page 13
... several color adjustment modes: preset color temperatures and RGB which allows you have more than one computer connected to the VP171/VP171b. Control Explanation Auto Image Adjust sizes and centers the screen image automatically. Contrast adjusts the difference between inputs if you to... the screen image for a darker color. 5000K-Adds blue and green to adjust red (R), green (G), and blue (B) separately. ViewSonic VP171b/VP171s 11 Input Select toggles between the image background (black level) and the foreground (white level). The factory setting for this product is...
... several color adjustment modes: preset color temperatures and RGB which allows you have more than one computer connected to the VP171/VP171b. Control Explanation Auto Image Adjust sizes and centers the screen image automatically. Contrast adjusts the difference between inputs if you to... the screen image for a darker color. 5000K-Adds blue and green to adjust red (R), green (G), and blue (B) separately. ViewSonic VP171b/VP171s 11 Input Select toggles between the image background (black level) and the foreground (white level). The factory setting for this product is...

User Manual
Page 14
...adjust selected color, press or . Important: If you select RECALL from the graphics card in your graphic cards user guide for red (R), green (G), and blue (B). 1. ViewSonic VP171b/VP171s 12 NOTE: VESA 1280 x 1024 @ 60Hz (recommended) means that the resolution is 1280 x 1024 and the refresh rate is set to a Preset Timing Mode... is 60 Hertz. Control Explanation User Color Individual adjustments for instructions on changing the resolution and refresh rate (vertical frequency). See your computer, the LCD model number, the serial number, and the ViewSonic website URL.
...adjust selected color, press or . Important: If you select RECALL from the graphics card in your graphic cards user guide for red (R), green (G), and blue (B). 1. ViewSonic VP171b/VP171s 12 NOTE: VESA 1280 x 1024 @ 60Hz (recommended) means that the resolution is 1280 x 1024 and the refresh rate is set to a Preset Timing Mode... is 60 Hertz. Control Explanation User Color Individual adjustments for instructions on changing the resolution and refresh rate (vertical frequency). See your computer, the LCD model number, the serial number, and the ViewSonic website URL.

User Manual
Page 15
NOTE: Try Auto Image Adjust first. ViewSonic VP171b/VP171s 13 If you to enable or disable this notice. Setup menu displays the menu shown below: Language allows you enable the Resolution Notice shown above and your computer is set at a resolution other than 1280 x 1024, the following screen appears. Resolution Notice allows you to choose the language used in the menus and control screens. Sharpness adjusts the clarity and focus of the screen image. Control Explanation Fine Tune sharpens the focus by aligning the text and/or graphic characters.
NOTE: Try Auto Image Adjust first. ViewSonic VP171b/VP171s 13 If you to enable or disable this notice. Setup menu displays the menu shown below: Language allows you enable the Resolution Notice shown above and your computer is set at a resolution other than 1280 x 1024, the following screen appears. Resolution Notice allows you to choose the language used in the menus and control screens. Sharpness adjusts the clarity and focus of the screen image. Control Explanation Fine Tune sharpens the focus by aligning the text and/or graphic characters.

User Manual
Page 16
... Position allows you to move the on . For example, with a "30 second" setting, if a control is first turned on -screen display menus and control screens. ViewSonic VP171b/VP171s 14 OSD Timeout sets the length of only one time detection for available inputs when first powered on D-SUB1, then the next priority will...
... Position allows you to move the on . For example, with a "30 second" setting, if a control is first turned on -screen display menus and control screens. ViewSonic VP171b/VP171s 14 OSD Timeout sets the length of only one time detection for available inputs when first powered on D-SUB1, then the next priority will...

User Manual
Page 17
Other Information Specifications LCD Type Color Filter Glass Surface 17" (full 17" viewable diagonal area), TFT (Thin Film Transistor), Active Matrix SXGA LCD, 0.264 mm pixel pitch RGB vertical stripe Anti-Glare Input Signal Video Sync RGB analog (0.7/1.0 Vp...13.8" (H) x 9.4" (D) 371.0 mm (W) x 309.0 mm (H) x 65.4 mm (D) 14.6" (W) x 12.2" (H) x 2.6" (D) Weight Physical LCD display only 14.31 lb (6.5 kg) 9.3 lb (4.2 kg) Regulations VCCI, BSMI, PSB, C-Tick, CE, GS, Ergo, TCO03(VP171s), TCO'99(VP171b), PCT, CCC, UL/cUL, FCC-B, ICES, NOM, TUV-S, ENERGY STAR® Power saving On modes...
Other Information Specifications LCD Type Color Filter Glass Surface 17" (full 17" viewable diagonal area), TFT (Thin Film Transistor), Active Matrix SXGA LCD, 0.264 mm pixel pitch RGB vertical stripe Anti-Glare Input Signal Video Sync RGB analog (0.7/1.0 Vp...13.8" (H) x 9.4" (D) 371.0 mm (W) x 309.0 mm (H) x 65.4 mm (D) 14.6" (W) x 12.2" (H) x 2.6" (D) Weight Physical LCD display only 14.31 lb (6.5 kg) 9.3 lb (4.2 kg) Regulations VCCI, BSMI, PSB, C-Tick, CE, GS, Ergo, TCO03(VP171s), TCO'99(VP171b), PCT, CCC, UL/cUL, FCC-B, ICES, NOM, TUV-S, ENERGY STAR® Power saving On modes...

User Manual
Page 18
...ON. • Make sure A/C power cord is securely connected to the LCD display. • Plug another computer. • If you need a... image • Make sure the video cable supplied with the LCD display is supplying proper voltage. Wrong or abnormal colors •...check the video cable to make sure it to the LCD display, tightly secure it is securely connected. If the...could cause an improper connection. • Connect the LCD display to another electrical device (like a radio) into...cable is not attached permanently to the LCD display. • Adjust brightness and contrast. •...
...ON. • Make sure A/C power cord is securely connected to the LCD display. • Plug another computer. • If you need a... image • Make sure the video cable supplied with the LCD display is supplying proper voltage. Wrong or abnormal colors •...check the video cable to make sure it to the LCD display, tightly secure it is securely connected. If the...could cause an improper connection. • Connect the LCD display to another electrical device (like a radio) into...cable is not attached permanently to the LCD display. • Adjust brightness and contrast. •...

User Manual
Page 19
...@au.viewsonic.com Singapore, Southeast Asia, and India www.viewsonic.com.sg T=+ 65 273 4018 F=+ 65 273 1566 service@sg.viewsonic.com South Africa and www.viewsonic.com other countries T=+886 (2) 2246 3456 service@sd.viewsonic.com F=+886 (2) 8242 3668 Hong Kong www.hk.viewsonic.com T=+886 (2) 2246 3456 service@hk.viewsonic.com F=+886 (2) 8242 3668 ViewSonic VP171b/VP171s 17
...@au.viewsonic.com Singapore, Southeast Asia, and India www.viewsonic.com.sg T=+ 65 273 4018 F=+ 65 273 1566 service@sg.viewsonic.com South Africa and www.viewsonic.com other countries T=+886 (2) 2246 3456 service@sd.viewsonic.com F=+886 (2) 8242 3668 Hong Kong www.hk.viewsonic.com T=+886 (2) 2246 3456 service@hk.viewsonic.com F=+886 (2) 8242 3668 ViewSonic VP171b/VP171s 17

User Manual
Page 20
... on the LCD display screen or case. Use a soft, dry cloth. 2. To clean the screen: 1. If still not clean, apply a small amount of non-ammonia, non-alcohol based glass cleaner onto a clean, soft, lint-free cloth, and wipe the screen. ViewSonic VP171b/VP171s 18 Cleaning the LCD Display •...; MAKE SURE THE LCD DISPLAY IS TURNED OFF. • NEVER SPRAY OR POUR ANY LIQUID DIRECTLY ONTO THE SCREEN OR CASE.
... on the LCD display screen or case. Use a soft, dry cloth. 2. To clean the screen: 1. If still not clean, apply a small amount of non-ammonia, non-alcohol based glass cleaner onto a clean, soft, lint-free cloth, and wipe the screen. ViewSonic VP171b/VP171s 18 Cleaning the LCD Display •...; MAKE SURE THE LCD DISPLAY IS TURNED OFF. • NEVER SPRAY OR POUR ANY LIQUID DIRECTLY ONTO THE SCREEN OR CASE.

User Manual
Page 21
... DAMAGES. 2. ANY CLAIM AGAINST THE CUSTOMER BY ANY OTHER PARTY. ViewSonic LCD Warranty (V3.0) ViewSonic VP171b/VP171s 19 b. Removal or installation of the product. 3. To obtain service under warranty, contact ViewSonic Customer Support. ANY OTHER DAMAGES, WHETHER INCIDENTAL, CONSEQUENTIAL OR OTHERWISE. ...Take or ship the product freight prepaid in material or workmanship during the warranty period. Limited Warranty VIEWSONIC LCD DISPLAY What the warranty covers: ViewSonic® warrants its sole option, repair or replace the product with the product. c. You will...
... DAMAGES. 2. ANY CLAIM AGAINST THE CUSTOMER BY ANY OTHER PARTY. ViewSonic LCD Warranty (V3.0) ViewSonic VP171b/VP171s 19 b. Removal or installation of the product. 3. To obtain service under warranty, contact ViewSonic Customer Support. ANY OTHER DAMAGES, WHETHER INCIDENTAL, CONSEQUENTIAL OR OTHERWISE. ...Take or ship the product freight prepaid in material or workmanship during the warranty period. Limited Warranty VIEWSONIC LCD DISPLAY What the warranty covers: ViewSonic® warrants its sole option, repair or replace the product with the product. c. You will...