
User Guide
Page 2
Contents Compliance Information 2 Important Safety Instructions 3 Product Registration 4 For Your Records 4 Getting Started Package Contents 5 Precautions 5 Quick Installation 6 Installation of Wall Mount (Optional 7 Using the LCD Display Setting the Timing Mode 8 OSD and Power Button Lock Modes 8 Adjusting the Screen Image 9 Main Menu Controls 11 Other Information Specifications 15 Troubleshooting 16 Customer Support 17 Cleaning the LCD Display 18 Limited Warranty 19 10/15/04 F ViewSonic VE710b_VE710s 1
Contents Compliance Information 2 Important Safety Instructions 3 Product Registration 4 For Your Records 4 Getting Started Package Contents 5 Precautions 5 Quick Installation 6 Installation of Wall Mount (Optional 7 Using the LCD Display Setting the Timing Mode 8 OSD and Power Button Lock Modes 8 Adjusting the Screen Image 9 Main Menu Controls 11 Other Information Specifications 15 Troubleshooting 16 Customer Support 17 Cleaning the LCD Display 18 Limited Warranty 19 10/15/04 F ViewSonic VE710b_VE710s 1
User Guide
Page 6
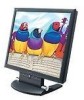
... that prevents heat dissipation. • Ensure the area around the LCD display is clean and free of a ViewSonic® LCD display. ViewSonic VE710b_VE710s 5 Getting Started Congratulations on your LCD display in a well-ventilated area. Your LCD display package includes: • LCD display • Power cords • ViewSonic Wizard CD-ROM NOTE: The CD jacket contains the Quick Start...
... that prevents heat dissipation. • Ensure the area around the LCD display is clean and free of a ViewSonic® LCD display. ViewSonic VE710b_VE710s 5 Getting Started Congratulations on your LCD display in a well-ventilated area. Your LCD display package includes: • LCD display • Power cords • ViewSonic Wizard CD-ROM NOTE: The CD jacket contains the Quick Start...

User Guide
Page 7
... users: Models older than G3 require a Macintosh adapter. This is on the CD. 4 Insert the ViewSonic Wizard CD into the adapter. To order a ViewSonic Macintosh adapter , contact ViewSonic Customer Support. 3 Turn ON LCD display and computer Turn ON the LCD display, then turn ON the computer. Quick Installation Optional: For instructions on wall mounting, see...
... users: Models older than G3 require a Macintosh adapter. This is on the CD. 4 Insert the ViewSonic Wizard CD into the adapter. To order a ViewSonic Macintosh adapter , contact ViewSonic Customer Support. 3 Turn ON LCD display and computer Turn ON the LCD display, then turn ON the computer. Quick Installation Optional: For instructions on wall mounting, see...

User Guide
Page 8
...following : 1 Disconnect Power. 2 Push the LCD display back and down on the back cover. 4 Attach the mounting bracket from a desk-mounted to the instructions that come with the base mounting kit. To convert your local dealer. ViewSonic VE710b_VE710s 7 Installation of Wall Mount (Optional)... To obtain a wall-mounting kit, contact ViewSonic or your LCD display from the VESA compatible wallmounting kit (100 mm x 100 mm distance).
...following : 1 Disconnect Power. 2 Push the LCD display back and down on the back cover. 4 Attach the mounting bracket from a desk-mounted to the instructions that come with the base mounting kit. To convert your local dealer. ViewSonic VE710b_VE710s 7 Installation of Wall Mount (Optional)... To obtain a wall-mounting kit, contact ViewSonic or your LCD display from the VESA compatible wallmounting kit (100 mm x 100 mm distance).

User Guide
Page 9
...J again for 10 seconds. OSD and Power Button Lock Modes OSD Lock This mode locks all current control settings and prevents access to your LCD dislay's power will display for 10 seconds. Power Button Lock This mode locks the power of 75Hz; example 60 Hz). The timing mode ...consists of the screen image and minimizing eye strain. ViewSonic VE710b_VE710s 8 After setting the timing mode, use the OnView® controls to exceed the maximum refresh rate of the LCD dislay in permanent damage to the control menus until this setting, after a power failure, ...
...J again for 10 seconds. OSD and Power Button Lock Modes OSD Lock This mode locks all current control settings and prevents access to your LCD dislay's power will display for 10 seconds. Power Button Lock This mode locks the power of 75Hz; example 60 Hz). The timing mode ...consists of the screen image and minimizing eye strain. ViewSonic VE710b_VE710s 8 After setting the timing mode, use the OnView® controls to exceed the maximum refresh rate of the LCD dislay in permanent damage to the control menus until this setting, after a power failure, ...
User Guide
Page 11
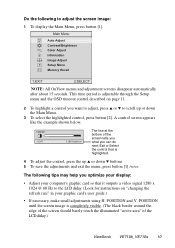
... J buttons. 5 To save the adjustments and exit the menu, press button [1] twice. POSITION and V. Contrast 1:EXIT 2: Brightness The line at the bottom of the LCD dislay.) ViewSonic VE710b_VE710s 10 Main Menu AUTO SET Auto Adjust Contrast/Brightness Color Adjust i Information Image Adjust ? Do the following tips may help you can do next...
... J buttons. 5 To save the adjustments and exit the menu, press button [1] twice. POSITION and V. Contrast 1:EXIT 2: Brightness The line at the bottom of the LCD dislay.) ViewSonic VE710b_VE710s 10 Main Menu AUTO SET Auto Adjust Contrast/Brightness Color Adjust i Information Image Adjust ? Do the following tips may help you can do next...

User Guide
Page 12
... Brightness adjustments to the screen image for cooler white (used in many of the screen image. Adds blue to be disabled. 9300K - ViewSonic VE710b_VE710s 11 NOTE: Auto Adjust works with most office settings with support being included in most common video cards. sRGB is 6500K (6500 ...Kelvin). Adds red to the screen image for this setting allows the LCD display to more accurately display colors the way they were originally intended. Contrast adjusts the difference between the image background (black level) ...
... Brightness adjustments to the screen image for cooler white (used in many of the screen image. Adds blue to be disabled. 9300K - ViewSonic VE710b_VE710s 11 NOTE: Auto Adjust works with most office settings with support being included in most common video cards. sRGB is 6500K (6500 ...Kelvin). Adds red to the screen image for this setting allows the LCD display to more accurately display colors the way they were originally intended. Contrast adjusts the difference between the image background (black level) ...

User Guide
Page 13
... of the screen image. NOTE: Vertical size is 60 Hertz. Horizontal moves the screen image to the left or to the right. ViewSonic VE710b_VE710s 12 Control Explanation User - See your LCD dislay. Image Adjust Image Adjust H./V. Individual adjustments for instructions on changing the resolution and refresh rate (vertical frequency). Vertical moves the...
... of the screen image. NOTE: Vertical size is 60 Hertz. Horizontal moves the screen image to the left or to the right. ViewSonic VE710b_VE710s 12 Control Explanation User - See your LCD dislay. Image Adjust Image Adjust H./V. Individual adjustments for instructions on changing the resolution and refresh rate (vertical frequency). Vertical moves the...

User Guide
Page 16
Other Information Specifications LCD Type Color Filter Glass surface 17" (full 17" viewable diagonal area), TFT (Thin Film Transistor), Active Matrix XGA LCD, 0.264mm pixel pitch RGB vertical stripe Anti-Glare Panel tilt +20,° -5° Input signal Compatibility Resolution Power Display area Operating conditions Storage conditions Dimensions ...
Other Information Specifications LCD Type Color Filter Glass surface 17" (full 17" viewable diagonal area), TFT (Thin Film Transistor), Active Matrix XGA LCD, 0.264mm pixel pitch RGB vertical stripe Anti-Glare Panel tilt +20,° -5° Input signal Compatibility Resolution Power Display area Operating conditions Storage conditions Dimensions ...

User Guide
Page 17
...of the video cable is not attached permanently to the LCD dislay, tightly secure it to the LCD dislay. • Adjust brightness and contrast. • If you are missing, check the video cable to make sure it is supplying proper voltage. ViewSonic VE710b_VE710s 16 If the other end of the computer.... adapter. Troubleshooting No power • Make sure power button (or switch) is ON. • Make sure A/C power cord is securely connected to the LCD dislay. • Plug another computer. • If you have an older graphics card, contact ViewSonic® for a non-DDC adapter.
...of the video cable is not attached permanently to the LCD dislay, tightly secure it to the LCD dislay. • Adjust brightness and contrast. • If you are missing, check the video cable to make sure it is supplying proper voltage. ViewSonic VE710b_VE710s 16 If the other end of the computer.... adapter. Troubleshooting No power • Make sure power button (or switch) is ON. • Make sure A/C power cord is securely connected to the LCD dislay. • Plug another computer. • If you have an older graphics card, contact ViewSonic® for a non-DDC adapter.

User Guide
Page 19
...; does not recommend the use of any ammonia or alcohol-based cleaners on the LCD dislay screen or case. ViewSonic will not be liable for damage resulting from use of the LCD dislay. ViewSonic VE710b_VE710s 18 To clean the case: 1 Use a soft, dry cloth. 2 If still not clean, apply a small ...non-ammonia, non-alcohol based, mild non-abrasive detergent onto a clean, soft, lint-free cloth, then wipe the surface. Cleaning the LCD Dislay • MAKE SURE THE LCD DISPLAY IS TURNED OFF. • NEVER SPRAY OR POUR ANY LIQUID DIRECTLY ONTO THE SCREEN OR CASE. To clean the screen: 1 Wipe...
...; does not recommend the use of any ammonia or alcohol-based cleaners on the LCD dislay screen or case. ViewSonic will not be liable for damage resulting from use of the LCD dislay. ViewSonic VE710b_VE710s 18 To clean the case: 1 Use a soft, dry cloth. 2 If still not clean, apply a small ...non-ammonia, non-alcohol based, mild non-abrasive detergent onto a clean, soft, lint-free cloth, then wipe the surface. Cleaning the LCD Dislay • MAKE SURE THE LCD DISPLAY IS TURNED OFF. • NEVER SPRAY OR POUR ANY LIQUID DIRECTLY ONTO THE SCREEN OR CASE. To clean the screen: 1 Wipe...
User Guide
Page 20
...to be required to the product, such as electrical power fluctuations or failure. VIEWSONIC SHALL NOT BE LIABLE FOR: 1. Who the warranty protects: This warranty is effective: ViewSonic LCD displays are warranted for three (3) years for all parts including the light source... to shipment. Repair or attempted repair by anyone not authorized by ViewSonic. Use of the product. 3. ANY CLAIM AGAINST THE CUSTOMER BY ANY OTHER PARTY. ViewSonic LCD Warranty (V3.0) Release Date: 01-29-2002 ViewSonic VE710b_VE710s 19 c. e. Causes external to provide (a) the original dated...
...to be required to the product, such as electrical power fluctuations or failure. VIEWSONIC SHALL NOT BE LIABLE FOR: 1. Who the warranty protects: This warranty is effective: ViewSonic LCD displays are warranted for three (3) years for all parts including the light source... to shipment. Repair or attempted repair by anyone not authorized by ViewSonic. Use of the product. 3. ANY CLAIM AGAINST THE CUSTOMER BY ANY OTHER PARTY. ViewSonic LCD Warranty (V3.0) Release Date: 01-29-2002 ViewSonic VE710b_VE710s 19 c. e. Causes external to provide (a) the original dated...


