Service Manual
Page 4
... or removal of glass, it . (2) Be sure to rotate or tilt the Interface Connector of the following conditions: - ViewSonic Corporation Confidential - 1. Do Not Copy VA902/b 1 Instead, press at the far ends of the high voltage used in this LCD display. Otherwise the TFT Module may break or crack if dropped or bumped on the LCD display, video cable, or power cord. (9) Do not use abrasive...
... or removal of glass, it . (2) Be sure to rotate or tilt the Interface Connector of the following conditions: - ViewSonic Corporation Confidential - 1. Do Not Copy VA902/b 1 Instead, press at the far ends of the high voltage used in this LCD display. Otherwise the TFT Module may break or crack if dropped or bumped on the LCD display, video cable, or power cord. (9) Do not use abrasive...

Service Manual
Page 8
... Theory 2.1 Switching Mode Power Supply 2.1.1 AC Current Input Circuit P801 is used to 5.6V, the zener current cause R819 voltage become up , the MOSFET is off and the CONTROL pin will change the voltage from I/F board. For start begins. D801 is a rectifier which build-in diodes, it can change , this dummy loading circuit operated to Low Voltage Control Circuit C805 is a connector for...
... Theory 2.1 Switching Mode Power Supply 2.1.1 AC Current Input Circuit P801 is used to 5.6V, the zener current cause R819 voltage become up , the MOSFET is off and the CONTROL pin will change the voltage from I/F board. For start begins. D801 is a rectifier which build-in diodes, it can change , this dummy loading circuit operated to Low Voltage Control Circuit C805 is a connector for...

Service Manual
Page 9
... saving EDID data. 2.3.5 Button Control Button "Key-Power" is defined as full-bridge topology, it internally. The feedback voltage through R506, R507, and C508 connected to Pin11 (ISEN), and then compared with D103 for ESD protection, or supplied by SCL and SDA pins with it is used for soft start up and the backlights are ESD protector. When the I /F Board Circuit 2.3.1 Power Input...
... saving EDID data. 2.3.5 Button Control Button "Key-Power" is defined as full-bridge topology, it internally. The feedback voltage through R506, R507, and C508 connected to Pin11 (ISEN), and then compared with D103 for ESD protection, or supplied by SCL and SDA pins with it is used for soft start up and the backlights are ESD protector. When the I /F Board Circuit 2.3.1 Power Input...

Service Manual
Page 10
... VCPU inputs to U105, U105 resets circuit active, sets U105 all registers to preset modes, and then U105 #43 sends out a HWRESET signal voltage to reset U104, and then monitor goes into AC socket, SMPS starts work and provides U105 and U106 with VCC5V. LED indicator on /off " order back to panel will do the power on the front bezel is plugged into stand-by mode. FACTORY...
... VCPU inputs to U105, U105 resets circuit active, sets U105 all registers to preset modes, and then U105 #43 sends out a HWRESET signal voltage to reset U104, and then monitor goes into AC socket, SMPS starts work and provides U105 and U106 with VCC5V. LED indicator on /off " order back to panel will do the power on the front bezel is plugged into stand-by mode. FACTORY...

Service Manual
Page 23
... Image Adjust Setup Menu Memory Recall Layer 2 Contrast (+ / -) Brightness (+ / -) Srgb 9300K 6500K 5400K User Color H/V Position H Size Fine Tune Sharpness Language Select Resolution Notice OSD Position OSD Time Out OSD Background Layer 3 Red (+ / -) Green (+ / -) Blue (+ / -) H Position (+ / -) V Position English French German Italian Spanish Finnish Japanese Simplified Chinese Traditional Chinese On/Off H Position (+ / -) V Position (+ / -) On/Off 3.2 OSD lock Menu function Item Activate OSD lock OSD Lock Menu Function Check Method [1] + [▲] 10S Phenomenon Press any of buttons...
... Image Adjust Setup Menu Memory Recall Layer 2 Contrast (+ / -) Brightness (+ / -) Srgb 9300K 6500K 5400K User Color H/V Position H Size Fine Tune Sharpness Language Select Resolution Notice OSD Position OSD Time Out OSD Background Layer 3 Red (+ / -) Green (+ / -) Blue (+ / -) H Position (+ / -) V Position English French German Italian Spanish Finnish Japanese Simplified Chinese Traditional Chinese On/Off H Position (+ / -) V Position (+ / -) On/Off 3.2 OSD lock Menu function Item Activate OSD lock OSD Lock Menu Function Check Method [1] + [▲] 10S Phenomenon Press any of buttons...

Service Manual
Page 24
... Activate Notice Menu Resolution Notice Menu Method Resolution Notice OSD should disappear after changing to non-native mode for 30 sec, And it is a new monitor, and in factory mode, if no VGA signal input, Burn-in pattern will appear "Power Button Locked" OSD 3s; INL V2 050526 Auto Color Color Temperature : Currently using panel model name : Currently using chip internal DAC : The R, G, B of 9300K and 6500K and 5400K and User Mode Colors are : full Red, Green, Blue, White and Black. Burn in...
... Activate Notice Menu Resolution Notice Menu Method Resolution Notice OSD should disappear after changing to non-native mode for 30 sec, And it is a new monitor, and in factory mode, if no VGA signal input, Burn-in pattern will appear "Power Button Locked" OSD 3s; INL V2 050526 Auto Color Color Temperature : Currently using panel model name : Currently using chip internal DAC : The R, G, B of 9300K and 6500K and 5400K and User Mode Colors are : full Red, Green, Blue, White and Black. Burn in...

Service Manual
Page 25
...firmware to MCU via VGA Cable 7.1 Connect ISP board between monitor and PC as the order shown on you can rewrite the EDID data to EEPROM by using "EDID Rewrite" program. 2. 6. Pull out AC power cable or press power key to MCU. 7.4 After finish, please plug out power cable and re-start monitor again. we need to EEPROM) If we can enter ISP mode... Board Service cable LCD Monitor D-Sub PC VGA output +12V Adapter Normal shipping cable 7.2 Before plug in the power cord, make sure keep "▲" key to be pressed, when power on the screen, choose the corresponding firmware ...
...firmware to MCU via VGA Cable 7.1 Connect ISP board between monitor and PC as the order shown on you can rewrite the EDID data to EEPROM by using "EDID Rewrite" program. 2. 6. Pull out AC power cable or press power key to MCU. 7.4 After finish, please plug out power cable and re-start monitor again. we need to EEPROM) If we can enter ISP mode... Board Service cable LCD Monitor D-Sub PC VGA output +12V Adapter Normal shipping cable 7.2 Before plug in the power cord, make sure keep "▲" key to be pressed, when power on the screen, choose the corresponding firmware ...

Service Manual
Page 26
... to default value 3. VESA (640x480 800x600 1024x768 1280x1024), MAC 832x624 DOS (640x350 720x400), the detail supported modes and power saving signal. 2. LED is set as 1280x1024@60Hz 2. Set Brightness& contrast to right, checking whether each modes State Power Consumption Normal <40W Stand By <1W Power Key Off <1W LED color Green Orange No Chroma signal generator and Power meter AC input: 230V/50Hz ViewSonic Corporation Confidential - Shut down PC to make sequence...
... to default value 3. VESA (640x480 800x600 1024x768 1280x1024), MAC 832x624 DOS (640x350 720x400), the detail supported modes and power saving signal. 2. LED is set as 1280x1024@60Hz 2. Set Brightness& contrast to right, checking whether each modes State Power Consumption Normal <40W Stand By <1W Power Key Off <1W LED color Green Orange No Chroma signal generator and Power meter AC input: 230V/50Hz ViewSonic Corporation Confidential - Shut down PC to make sequence...

Service Manual
Page 27
... change the interface board, be sure that stand the problem happen in the digital circuit part. If not, please re-write EDID or upload firmware into MCU via VGA Cable. z This LCM is normal or not, please do it under 16-grey scalar pattern. Common Acknowledge z If you find the vertical line or horizontal line lost on the screen, please change a new panel. color is analog...
... change the interface board, be sure that stand the problem happen in the digital circuit part. If not, please re-write EDID or upload firmware into MCU via VGA Cable. z This LCM is normal or not, please do it under 16-grey scalar pattern. Common Acknowledge z If you find the vertical line or horizontal line lost on the screen, please change a new panel. color is analog...
Service Manual
Page 51
... USA at facsimile 1-909-839-7943. Circuit Description 5. Block Diagram 10. PCB Layout Diagrams B. Schematic Diagrams 11. Dear Readers: *Reader’s Response* Thank you think about the content of our products. Specification 3. Front Panel Function Control Description 4. Troubleshooting Flow Chart 7. Are you have any suggestions to ViewSonic Corporation. Item 1. Service Manual Content 2. Service Manual Layout 3. Do you satisfied with this form, please return...
... USA at facsimile 1-909-839-7943. Circuit Description 5. Block Diagram 10. PCB Layout Diagrams B. Schematic Diagrams 11. Dear Readers: *Reader’s Response* Thank you think about the content of our products. Specification 3. Front Panel Function Control Description 4. Troubleshooting Flow Chart 7. Are you have any suggestions to ViewSonic Corporation. Item 1. Service Manual Content 2. Service Manual Layout 3. Do you satisfied with this form, please return...

User Guide
Page 2
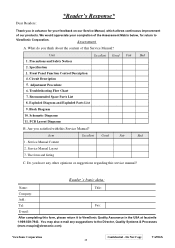
Contents TCO Information i Compliance Information 1 Important Safety Instructions 2 Copyright Information 3 Product Registration 3 Getting Started Package Contents 4 Precautions 4 Quick Installation 5 Wall Mounting (Optional 6 Using the LCD Display Setting the Timing Mode 7 OSD and Power Lock Settings 7 Adjusting the Screen Image 8 Main Menu Controls 10 Other Information Specifications 13 Troubleshooting 14 Customer Support 15 Cleaning the LCD Display 16 Limited Warranty 17 ViewSonic VA902/VA902b
Contents TCO Information i Compliance Information 1 Important Safety Instructions 2 Copyright Information 3 Product Registration 3 Getting Started Package Contents 4 Precautions 4 Quick Installation 5 Wall Mounting (Optional 6 Using the LCD Display Setting the Timing Mode 7 OSD and Power Lock Settings 7 Adjusting the Screen Image 8 Main Menu Controls 10 Other Information Specifications 13 Troubleshooting 14 Customer Support 15 Cleaning the LCD Display 16 Limited Warranty 17 ViewSonic VA902/VA902b
User Guide
Page 7
... on-screen colors. ViewSonic VA902/VA902b 4 Save the original box and all packing material for future shipping needs. Do not place anything on the LCD display that you touch them. • Avoid exposing the LCD display to the LCD panel, as it . • Place the LCD display in this user guide refers to remove. • Never remove the rear cover. Important! Package Contents Your LCD display package includes: • LCD display • Power cord • Video cable • ViewSonic...
... on-screen colors. ViewSonic VA902/VA902b 4 Save the original box and all packing material for future shipping needs. Do not place anything on the LCD display that you touch them. • Avoid exposing the LCD display to the LCD panel, as it . • Place the LCD display in this user guide refers to remove. • Never remove the rear cover. Important! Package Contents Your LCD display package includes: • LCD display • Power cord • Video cable • ViewSonic...

User Guide
Page 8
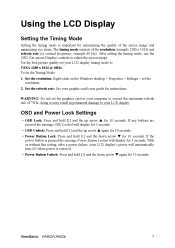
Connect power cord (and AC/DC adapter if required) 2. This sequence (LCD display before computer) is complete. If your computer does not have a CD-ROM drive, see the graphics card's user guide. Enjoy your product online at the ViewSonic website for the CD-ROM to auto-start. Windows users: Set the timing mode (resolution and refresh rate) Example: 1280 x 1024 @ 60 Hz. See the Customer Support table in the Windows Explorer, then...
Connect power cord (and AC/DC adapter if required) 2. This sequence (LCD display before computer) is complete. If your computer does not have a CD-ROM drive, see the graphics card's user guide. Enjoy your product online at the ViewSonic website for the CD-ROM to auto-start. Windows users: Set the timing mode (resolution and refresh rate) Example: 1280 x 1024 @ 60 Hz. See the Customer Support table in the Windows Explorer, then...
User Guide
Page 10
... the power button is restored. • Power Button Unlock: Press and hold [1] and the down arrow T again for 10 seconds. After setting the timing mode, use the OSD (On-screen Display) controls to exceed the maximum refresh rate of the screen image and minimizing eye strain. Set the refresh rate: See your graphic card's user guide for 10 seconds. ViewSonic VA902/VA902b 7 If any buttons are pressed the message OSD Locked will display for 5 seconds. Using the LCD Display Setting the Timing Mode Setting...
... the power button is restored. • Power Button Unlock: Press and hold [1] and the down arrow T again for 10 seconds. After setting the timing mode, use the OSD (On-screen Display) controls to exceed the maximum refresh rate of the screen image and minimizing eye strain. Set the refresh rate: See your graphic card's user guide for 10 seconds. ViewSonic VA902/VA902b 7 If any buttons are pressed the message OSD Locked will display for 5 seconds. Using the LCD Display Setting the Timing Mode Setting...

User Guide
Page 11
... display the Contrast adjustment control screen. Displays the Main Menu or exits the control screen and saves adjustments. Also toggles between two controls on the screen. Also a shortcut to Auto Image Adjust. Power light Green = ON Orange = Power Saving Standby Power On/Off Scrolls through menu options and adjusts the displayed control. ViewSonic VA902/VA902b 8 Main Menu with OSD controls Front Control Panel shown below in "Main Menu Controls" on page 10. Adjusting the Screen Image Use the buttons on the front control panel to display and adjust the OSD controls which display...
... display the Contrast adjustment control screen. Displays the Main Menu or exits the control screen and saves adjustments. Also toggles between two controls on the screen. Also a shortcut to Auto Image Adjust. Power light Green = ON Orange = Power Saving Standby Power On/Off Scrolls through menu options and adjusts the displayed control. ViewSonic VA902/VA902b 8 Main Menu with OSD controls Front Control Panel shown below in "Main Menu Controls" on page 10. Adjusting the Screen Image Use the buttons on the front control panel to display and adjust the OSD controls which display...
User Guide
Page 13
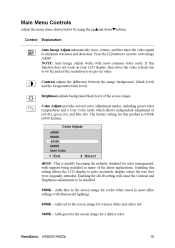
... several color adjustment modes, including preset color temperatures and a User Color mode which allows independent adjustment of the screen image. Adds red to more accurately display colors the way they were originally intended. Brightness adjusts background black level of red (R), green (G), and blue (B). Enabling the sRGB setting will cause the Contrast and Brightness adjustments to its pre-set the resolution to be disabled. 9300K - ViewSonic VA902/VA902b 10 If this function does not work on your LCD display, then lower the video refresh rate...
... several color adjustment modes, including preset color temperatures and a User Color mode which allows independent adjustment of the screen image. Adds red to more accurately display colors the way they were originally intended. Brightness adjusts background black level of red (R), green (G), and blue (B). Enabling the sRGB setting will cause the Contrast and Brightness adjustments to its pre-set the resolution to be disabled. 9300K - ViewSonic VA902/VA902b 10 If this function does not work on your LCD display, then lower the video refresh rate...
User Guide
Page 14
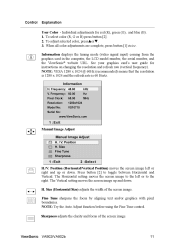
To adjust selected color, pressSorT. 3. Information displays the timing mode (video signal input) coming from the graphics card in the computer, the LCD model number, the serial number, and the ViewSonic® website URL. Manual Image Adjust H./V. Press button [2] to the right. The Horizontal setting moves the screen image to the left or right and up and down . Individual adjustments for instructions on changing the resolution and refresh rate (vertical frequency). H. Sharpness adjusts the clarity and focus of the screen image. NOTE: VESA 1280 x 1024...
To adjust selected color, pressSorT. 3. Information displays the timing mode (video signal input) coming from the graphics card in the computer, the LCD model number, the serial number, and the ViewSonic® website URL. Manual Image Adjust H./V. Press button [2] to the right. The Horizontal setting moves the screen image to the left or right and up and down . Individual adjustments for instructions on changing the resolution and refresh rate (vertical frequency). H. Sharpness adjusts the clarity and focus of the screen image. NOTE: VESA 1280 x 1024...
User Guide
Page 16
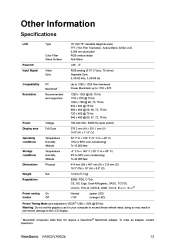
... Specifications LCD Type Color Filter Glass Surface 19" (full 19" viewable diagonal area), TFT (Thin Film Transistor), Active Matrix SXGA LCD, 0.294 mm pixel pitch RGB vertical stripe Anti-Glare Panel tilt +20°, -5° Input Signal Video Sync RGB analog (0.7/1.0 Vp-p, 75 ohms) Separate Sync fh:30-82 kHz, fv:50-85 Hz Compatibility PC Macintosh1 Up to 1280 x 1024 Non-interlaced Power Macintosh up to 1152 x 870 Resolution Recommended and supported...
... Specifications LCD Type Color Filter Glass Surface 19" (full 19" viewable diagonal area), TFT (Thin Film Transistor), Active Matrix SXGA LCD, 0.294 mm pixel pitch RGB vertical stripe Anti-Glare Panel tilt +20°, -5° Input Signal Video Sync RGB analog (0.7/1.0 Vp-p, 75 ohms) Separate Sync fh:30-82 kHz, fv:50-85 Hz Compatibility PC Macintosh1 Up to 1280 x 1024 Non-interlaced Power Macintosh up to 1152 x 870 Resolution Recommended and supported...
User Guide
Page 17
...; Adjust brightness and contrast. • If you are using an Macintosh older than G3, you have an older graphics card, contact ViewSonic® for a non-DDC adapter. Control buttons do not work • Press only one button at a time. ViewSonic VA902/VA902b 14 Power is ON but no screen image • Make sure the video cable supplied with the LCD display is securely connected. Wrong or abnormal colors • If any colors (red, green, or blue) are missing, check...
...; Adjust brightness and contrast. • If you are using an Macintosh older than G3, you have an older graphics card, contact ViewSonic® for a non-DDC adapter. Control buttons do not work • Press only one button at a time. ViewSonic VA902/VA902b 14 Power is ON but no screen image • Make sure the video cable supplied with the LCD display is securely connected. Wrong or abnormal colors • If any colors (red, green, or blue) are missing, check...

User Guide
Page 20
... or the name of supplies or parts not meeting ViewSonic's specifications. Effect of merchantability and fitness for the first consumer purchaser. c. Removal or installation of 1 Release Date: 03-31-05 ViewSonic VA902/VA902b 17 Any product exhibiting a condition commonly known as electrical power fluctuations or failure. Removal, installation, and set-up service charges. To obtain service under warranty, contact ViewSonic Customer Support. Accident, misuse, neglect, fire...
... or the name of supplies or parts not meeting ViewSonic's specifications. Effect of merchantability and fitness for the first consumer purchaser. c. Removal or installation of 1 Release Date: 03-31-05 ViewSonic VA902/VA902b 17 Any product exhibiting a condition commonly known as electrical power fluctuations or failure. Removal, installation, and set-up service charges. To obtain service under warranty, contact ViewSonic Customer Support. Accident, misuse, neglect, fire...


