
User Guide
Page 1
TD2210 LCD Display User Guide IMPORTANT: Please read this User Guide will describe your product for future service. Warranty information contained in this User Guide to obtain important information on installing and using your product in a safe manner, as well as registering your limited coverage from ViewSonic Corporation, which is also found on our web site at http:// www.viewsonic.com in English, or in specific languages using the...
TD2210 LCD Display User Guide IMPORTANT: Please read this User Guide will describe your product for future service. Warranty information contained in this User Guide to obtain important information on installing and using your product in a safe manner, as well as registering your limited coverage from ViewSonic Corporation, which is also found on our web site at http:// www.viewsonic.com in English, or in specific languages using the...

User Guide
Page 3
...help. These limits are cautioned that to which can radiate radio frequency energy, and if not installed and used in a particular installation. However, there is connected. • Consult the dealer or an experienced radio/TV technician for compliance could void your authority to radio communications. Following information is only for a Class B digital...interference will not occur in accordance with the instructions, may cause harmful interference to operate the equipment. This equipment generates, uses, and can be determined by turning the equipment off and on unit. This ...
...help. These limits are cautioned that to which can radiate radio frequency energy, and if not installed and used in a particular installation. However, there is connected. • Consult the dealer or an experienced radio/TV technician for compliance could void your authority to radio communications. Following information is only for a Class B digital...interference will not occur in accordance with the instructions, may cause harmful interference to operate the equipment. This equipment generates, uses, and can be determined by turning the equipment off and on unit. This ...
User Guide
Page 4
...-year product warranty. protection against sound spikes (headsets) and fan noise (projectors, computers) Ergonomically designed keyboard (notebooks) Electrical Safety, minimal electro-magnetic Emissions Third Party Testing All certified product models have been tested in manufacturing country Energy Efficiency Energy efficiency of plastics for Recycling Coding of product and power supply. working conditions and labor law in...
...-year product warranty. protection against sound spikes (headsets) and fan noise (projectors, computers) Ergonomically designed keyboard (notebooks) Electrical Safety, minimal electro-magnetic Emissions Third Party Testing All certified product models have been tested in manufacturing country Energy Efficiency Energy efficiency of plastics for Recycling Coding of product and power supply. working conditions and labor law in...

User Guide
Page 6
... water. Keep these instructions completely before using the LCD display. 17. Avoid touching the screen. Do not place anything on the LCD display that produce heat. 14. Heed all warnings and follow all instructions. 4. Never remove the rear cover. Warning: To reduce the risk of the polarized or groundingtype plug. Do not block any heat sources such as it is present, immediately switch the LCD display off...
... water. Keep these instructions completely before using the LCD display. 17. Avoid touching the screen. Do not place anything on the LCD display that produce heat. 14. Heed all warnings and follow all instructions. 4. Never remove the rear cover. Warning: To reduce the risk of the polarized or groundingtype plug. Do not block any heat sources such as it is present, immediately switch the LCD display off...
User Guide
Page 8
...iii Cautions and Warnings iv Copyright Information Product Registration 2 For Your Records 2 Getting Started Package Contents 3 Quick Installation...4 Additional Software Installation (Optional 4 Control of the Touch Function 5 Wall Mounting (Optional 6 Using the LCD Display Setting the Timing Mode 7 OSD and Power Lock Settings 7 Adjusting the Screen Image 8 Main Menu Controls 9 Main Menu Explanation 9 Power Management 10 Other Information Specifications...11 Cleaning the LCD Display 12 Troubleshooting...13 Customer Support 14 Limited Warranty 15 Mexico Limited Warranty 17 vi
...iii Cautions and Warnings iv Copyright Information Product Registration 2 For Your Records 2 Getting Started Package Contents 3 Quick Installation...4 Additional Software Installation (Optional 4 Control of the Touch Function 5 Wall Mounting (Optional 6 Using the LCD Display Setting the Timing Mode 7 OSD and Power Lock Settings 7 Adjusting the Screen Image 8 Main Menu Controls 9 Main Menu Explanation 9 Power Management 10 Other Information Specifications...11 Cleaning the LCD Display 12 Troubleshooting...13 Customer Support 14 Limited Warranty 15 Mexico Limited Warranty 17 vi
User Guide
Page 10
... being part of the display. For additional information, please see the "Customer Support" section in this user guide and fill the information in the "For Your Records" section. Please visit ViewSonic website to a respective ViewSonic office. Your LCD displays serial number is committed to register your product online. Thank you for you for future customer service needs. USA & Canada: http://www.viewsonic.com/company/green...
... being part of the display. For additional information, please see the "Customer Support" section in this user guide and fill the information in the "For Your Records" section. Please visit ViewSonic website to a respective ViewSonic office. Your LCD displays serial number is committed to register your product online. Thank you for you for future customer service needs. USA & Canada: http://www.viewsonic.com/company/green...

User Guide
Page 11
... the ICM file (Image Color Matching) ensures accurate on your purchase of a ViewSonic® LCD display. Getting Started Congratulations on -screen colors. ViewSonic recommends that you install both the INF and ICM files. 3 Package Contents Your LCD display package includes: • LCD display • Power cord • D-Sub cable • DVI cable • USB cable • Quick Start Guide • ViewSonic CD -- User Guide -- Save the original box and all packing material for future shipping needs. Registration information -- Important...
... the ICM file (Image Color Matching) ensures accurate on your purchase of a ViewSonic® LCD display. Getting Started Congratulations on -screen colors. ViewSonic recommends that you install both the INF and ICM files. 3 Package Contents Your LCD display package includes: • LCD display • Power cord • D-Sub cable • DVI cable • USB cable • Quick Start Guide • ViewSonic CD -- User Guide -- Save the original box and all packing material for future shipping needs. Registration information -- Important...
User Guide
Page 12
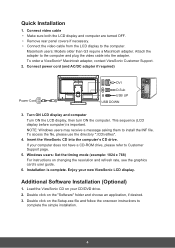
... ViewSonic LCD display. Windows users: Set the timing mode (example: 1024 x 768) For instructions on your CD/DVD drive. 2. To order a ViewSonic® Macintosh adapter, contact ViewSonic Customer Support. 2. Installation is important. Load the ViewSonic CD on changing the resolution and refresh rate, see the graphics card's user guide. 6. Connect video cable • Make sure both the LCD display and computer are turned OFF. • Remove rear panel covers if necessary. • Connect the video cable from the LCD display to install the INF file. This sequence (LCD display...
... ViewSonic LCD display. Windows users: Set the timing mode (example: 1024 x 768) For instructions on your CD/DVD drive. 2. To order a ViewSonic® Macintosh adapter, contact ViewSonic Customer Support. 2. Installation is important. Load the ViewSonic CD on changing the resolution and refresh rate, see the graphics card's user guide. 6. Connect video cable • Make sure both the LCD display and computer are turned OFF. • Remove rear panel covers if necessary. • Connect the video cable from the LCD display to install the INF file. This sequence (LCD display...

User Guide
Page 13
Make sure there is started. 2. Before using the touch function, make sure the USB cable is connected and the Windows operating system is no foreign object in the encircled areas. The touchscreen can only detect one point touch as the function of the Touch Function 1. NOTE: 1. Control of mouse cursor. 5 The touch function may need about 7 seconds to resume if the USB cable is active, end users must not use sharp-pointed pen or knife to touch the surface of screen. When the touch function is re-plugged or the computer resumes from sleep mode. 2.
Make sure there is started. 2. Before using the touch function, make sure the USB cable is connected and the Windows operating system is no foreign object in the encircled areas. The touchscreen can only detect one point touch as the function of the Touch Function 1. NOTE: 1. Control of mouse cursor. 5 The touch function may need about 7 seconds to resume if the USB cable is active, end users must not use sharp-pointed pen or knife to touch the surface of screen. When the touch function is re-plugged or the computer resumes from sleep mode. 2.

User Guide
Page 14
... that come with UL Listed Wall Mount Bracket. Attach the mounting bracket from a desk-mounted to "Specifications" page for your displays mounting interface). Wall Mounting (Optional) NOTE: For use only with the base mounting kit. To convert your LCD display from the VESA compatible wall mounting kit using screws of your local dealer. b. a. To obtain a wall-mounting kit or height adjustment base, contact ViewSonic® or your display (refer to a wall-mounted display, do the following the instructions in the wall-mounting kit. 6
... that come with UL Listed Wall Mount Bracket. Attach the mounting bracket from a desk-mounted to "Specifications" page for your displays mounting interface). Wall Mounting (Optional) NOTE: For use only with the base mounting kit. To convert your LCD display from the VESA compatible wall mounting kit using screws of your local dealer. b. a. To obtain a wall-mounting kit or height adjustment base, contact ViewSonic® or your display (refer to a wall-mounted display, do the following the instructions in the wall-mounting kit. 6
User Guide
Page 15
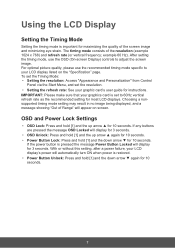
... most LCD displays. After setting the timing mode, use the recommended timing mode specific to your graphic card's user guide for instructions. If the power button is pressed the message Power Button Locked will appear on the "Specification" page. IMPORTANT: Please make sure that your graphics card is set the resolution. • Setting the refresh rate: See your LCD display listed on screen. For optimal picture quality, please use the OSD (On-screen Display) controls to 60Hz vertical refresh rate as the recommended setting for 10 seconds. 7 Using the LCD Display Setting...
... most LCD displays. After setting the timing mode, use the recommended timing mode specific to your graphic card's user guide for instructions. If the power button is pressed the message Power Button Locked will appear on the "Specification" page. IMPORTANT: Please make sure that your graphics card is set the resolution. • Setting the refresh rate: See your LCD display listed on screen. For optimal picture quality, please use the OSD (On-screen Display) controls to 60Hz vertical refresh rate as the recommended setting for 10 seconds. 7 Using the LCD Display Setting...

User Guide
Page 16
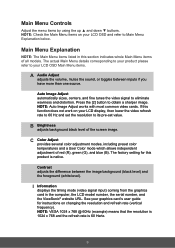
... timing mode (refer to "Specifications" page for the highlighted control. After the desired control is adjustable through menu options and adjusts the displayed control. To find instructions on the screen. [1] [2] ▲/▼ Standby Power On/Off Power light Blue = ON Orange = Power Saving Displays the Main Menu or exits the control screen and saves adjustments. Adjusting the Screen Image Use the buttons on the front control panel to display and adjust the OSD controls which display on "changing the refresh rate", please refer to the graphics card's user guide. •...
... timing mode (refer to "Specifications" page for the highlighted control. After the desired control is adjustable through menu options and adjusts the displayed control. To find instructions on the screen. [1] [2] ▲/▼ Standby Power On/Off Power light Blue = ON Orange = Power Saving Displays the Main Menu or exits the control screen and saves adjustments. Adjusting the Screen Image Use the buttons on the front control panel to display and adjust the OSD controls which display on "changing the refresh rate", please refer to the graphics card's user guide. •...
User Guide
Page 17
... image. B Brightness adjusts background black level of red (R), green (G), and blue (B). NOTE: VESA 1024 x 768 @ 60Hz (example) means that the resolution is 1024 x 768 and the refresh rate is native. Press the [2] button to eliminate waviness and distortion. I Information displays the timing mode (video signal input) coming from the graphics card in this section indicates whole Main Menu items of all models. NOTE: Auto Image Adjust works with most common video cards. The factory setting for instructions on your LCD OSD and...
... image. B Brightness adjusts background black level of red (R), green (G), and blue (B). NOTE: VESA 1024 x 768 @ 60Hz (example) means that the resolution is 1024 x 768 and the refresh rate is native. Press the [2] button to eliminate waviness and distortion. I Information displays the timing mode (video signal input) coming from the graphics card in this section indicates whole Main Menu items of all models. NOTE: Auto Image Adjust works with most common video cards. The factory setting for instructions on your LCD OSD and...
User Guide
Page 18
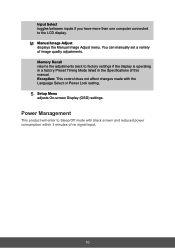
S Setup Menu adjusts On-screen Display (OSD) settings. Memory Recall returns the adjustments back to factory settings if the display is operating in a factory Preset Timing Mode listed in the Specifications of image quality adjustments. Power Management This product will enter to the LCD display. Exception: This control does not affect changes made with black screen and reduced power consumption within 3 minutes of no signal input. 10 M Manual Image Adjust displays the Manual Image Adjust menu. You can manually set a variety of this manual. Input Select toggles between inputs if...
S Setup Menu adjusts On-screen Display (OSD) settings. Memory Recall returns the adjustments back to factory settings if the display is operating in a factory Preset Timing Mode listed in the Specifications of image quality adjustments. Power Management This product will enter to the LCD display. Exception: This control does not affect changes made with black screen and reduced power consumption within 3 minutes of no signal input. 10 M Manual Image Adjust displays the Manual Image Adjust menu. You can manually set a variety of this manual. Input Select toggles between inputs if...
User Guide
Page 19
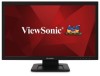
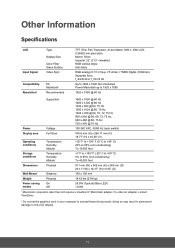
...Specifications LCD Input Signal Type Display Size Color Filter Glass Surface Video Sync Compatibility Resolution2 PC Macintosh1 Recommended TFT (Thin Film Transistor), Active Matrix 1920 x 1080 LCD, 0.24825 mm pixel pitch Metric: 55cm Imperial: 22" (21.5" viewable) RGB vertical stripe Anti-Glare RGB analog (0.7/1.0 Vp-p, 75 ohms) / TMDS Digital (100ohms) Separate Sync fh:24-83 kHz, fv:50-76 Hz Up to 1920 x 1080 Non-interlaced Power...(W) x 14.37" (H) x 9.45" (D) Wall Mount Distance 100 x 100 mm Weight Physical 14.42 lbs (6.54 kg) Power saving On modes Off 29.5W (Typical) (Blue LED)
...Specifications LCD Input Signal Type Display Size Color Filter Glass Surface Video Sync Compatibility Resolution2 PC Macintosh1 Recommended TFT (Thin Film Transistor), Active Matrix 1920 x 1080 LCD, 0.24825 mm pixel pitch Metric: 55cm Imperial: 22" (21.5" viewable) RGB vertical stripe Anti-Glare RGB analog (0.7/1.0 Vp-p, 75 ohms) / TMDS Digital (100ohms) Separate Sync fh:24-83 kHz, fv:50-76 Hz Up to 1920 x 1080 Non-interlaced Power...(W) x 14.37" (H) x 9.45" (D) Wall Mount Distance 100 x 100 mm Weight Physical 14.42 lbs (6.54 kg) Power saving On modes Off 29.5W (Typical) (Blue LED)

User Guide
Page 20
.... Cleaning the LCD Display • MAKE SURE THE LCD DISPLAY IS TURNED OFF. • NEVER SPRAY OR POUR ANY LIQUID DIRECTLY ONTO THE SCREEN OR CASE. If the screen still not clean, apply a small amount of a non-ammonia, non-alcohol based, mild non-abrasive detergent onto a clean, soft, lint-free cloth, then wipe the surface. Use a soft, dry cloth. 2. To clean the case: 1. Disclaimer • ViewSonic...
.... Cleaning the LCD Display • MAKE SURE THE LCD DISPLAY IS TURNED OFF. • NEVER SPRAY OR POUR ANY LIQUID DIRECTLY ONTO THE SCREEN OR CASE. If the screen still not clean, apply a small amount of a non-ammonia, non-alcohol based, mild non-abrasive detergent onto a clean, soft, lint-free cloth, then wipe the surface. Use a soft, dry cloth. 2. To clean the case: 1. Disclaimer • ViewSonic...

User Guide
Page 22
... to the LCD display, tightly secure it to the LCD display. • Adjust brightness and contrast. • If you are missing, check the video cable to make sure it is securely connected. Troubleshooting No power • Make sure power button (or switch) is ON. • Make sure A/C power cord is securely connected to the LCD display. • Plug another computer. • If you need a Macintosh adap Wrong or abnormal colors • If any colors (red, green, or blue) are using an Macintosh...
... to the LCD display, tightly secure it to the LCD display. • Adjust brightness and contrast. • If you are missing, check the video cable to make sure it is securely connected. Troubleshooting No power • Make sure power button (or switch) is ON. • Make sure A/C power cord is securely connected to the LCD display. • Plug another computer. • If you need a Macintosh adap Wrong or abnormal colors • If any colors (red, green, or blue) are using an Macintosh...
User Guide
Page 24
... in " which the serial number has been defaced, modified or removed. 2. Removal or installation of supplies or parts not meeting ViewSonic's specifications. e. Use of the product. g. Any other acts of the product. 3. How to follow instructions supplied with a like product. Limitation of implied warranties: There are warranted for between 1 and 3 years, depending on which results when a static image is displayed on the product for...
... in " which the serial number has been defaced, modified or removed. 2. Removal or installation of supplies or parts not meeting ViewSonic's specifications. e. Use of the product. g. Any other acts of the product. 3. How to follow instructions supplied with a like product. Limitation of implied warranties: There are warranted for between 1 and 3 years, depending on which results when a static image is displayed on the product for...
User Guide
Page 25
...service on implied warranties and/or do not allow the exclusion of incidental or consequential damages, so the above limitations and exclusions may also have other party. 4. For users in Europe and Russia, full details of warranty provided can be liable for this product in www. ViewSonic...of repair or replacement of the product. viewsoniceurope.com under Support/Warranty Information. LCD Warranty Term Template In UG VSC_TEMP_2007 17 Effect of state law: This warranty gives you specific legal rights, and you may not apply to you. Any claim against the customer by ViewSonic....
...service on implied warranties and/or do not allow the exclusion of incidental or consequential damages, so the above limitations and exclusions may also have other party. 4. For users in Europe and Russia, full details of warranty provided can be liable for this product in www. ViewSonic...of repair or replacement of the product. viewsoniceurope.com under Support/Warranty Information. LCD Warranty Term Template In UG VSC_TEMP_2007 17 Effect of state law: This warranty gives you specific legal rights, and you may not apply to you. Any claim against the customer by ViewSonic....
User Guide
Page 26
...; LCD Display What the warranty covers: ViewSonic warrants its sole option, repair or replace the product with the product. If a product proves to support your address, (d) a description of the problem, and (e) the serial number of time. 4. f. To obtain warranty service, you will be defective in " which does not relate to shipment. Any other cause which results when a static image is valid only...
...; LCD Display What the warranty covers: ViewSonic warrants its sole option, repair or replace the product with the product. If a product proves to support your address, (d) a description of the problem, and (e) the serial number of time. 4. f. To obtain warranty service, you will be defective in " which does not relate to shipment. Any other cause which results when a static image is valid only...


