
User Guide
Page 5
... this material, or the performance or use of the Video Electronics Standards Association. Please print this product. Please use the directory ":\CD\Registration". In the interest of continuing product improvement, ViewSonic Corporation reserves ment may be liable for being part of.... Product Name: Model Number: Document Number: Serial Number: Purchase Date: For Your Records PS700W/PS700X/PS750W/PS750X/PS750HD ViewSonic DLP Projector VS16900/16901/16778/16779/16952 PS700W/PS700X/PS750W/PS750X/PS750HD_UG_ENG Rev. 1B 04-30-18 Product disposal at end of Microsoft Corporation...
... this material, or the performance or use of the Video Electronics Standards Association. Please print this product. Please use the directory ":\CD\Registration". In the interest of continuing product improvement, ViewSonic Corporation reserves ment may be liable for being part of.... Product Name: Model Number: Document Number: Serial Number: Purchase Date: For Your Records PS700W/PS700X/PS750W/PS750X/PS750HD ViewSonic DLP Projector VS16900/16901/16778/16779/16952 PS700W/PS700X/PS750W/PS750X/PS750HD_UG_ENG Rev. 1B 04-30-18 Product disposal at end of Microsoft Corporation...

User Guide
Page 6
... 4 Projector features 4 Shipping contents 4 Controls and functions 5 Positioning your projector 10 Choosing a location 10 Projection dimensions 11 Connection 14 Connecting a computer or monitor .... 16 Connecting Video source devices ...... 17 Playing sound through the projector .. 19 Operation 20 Starting up the projector 20 Using the menus 21 Utilizing the password function ......... 22...
... 4 Projector features 4 Shipping contents 4 Controls and functions 5 Positioning your projector 10 Choosing a location 10 Projection dimensions 11 Connection 14 Connecting a computer or monitor .... 16 Connecting Video source devices ...... 17 Playing sound through the projector .. 19 Operation 20 Starting up the projector 20 Using the menus 21 Utilizing the password function ......... 22...

User Guide
Page 9
Replacement lamp (optional) 8. PJD-vTouch-50s with user instructions (for data/video display • Ability to display 1.07 billion colors • Multi-language On-Screen Display (OSD) menus • Switchable normal and economic modes to reduce the ...
Replacement lamp (optional) 8. PJD-vTouch-50s with user instructions (for data/video display • Ability to display 1.07 billion colors • Multi-language On-Screen Display (OSD) menus • Switchable normal and economic modes to reduce the ...

User Guide
Page 20
RS232 RS232 cable Computer Computer In VGA cable or Computer Out Component Video to VGA (D-Sub) adapter cable VGA cable or VGA to DVI-A cable Computer A/V device Monitor Audio in Audio cable or Audio cable S-Video connector S-Video cable Computer A/V device (for Component signal) A/V device Video connector Audio in L/R Video cable Audio cable A/V device A/V device (for Video signal) 15
RS232 RS232 cable Computer Computer In VGA cable or Computer Out Component Video to VGA (D-Sub) adapter cable VGA cable or VGA to DVI-A cable Computer A/V device Monitor Audio in Audio cable or Audio cable S-Video connector S-Video cable Computer A/V device (for Component signal) A/V device Video connector Audio in L/R Video cable Audio cable A/V device A/V device (for Video signal) 15

User Guide
Page 21
...this connection method, turn on the notebook. Locate a function key labeled CRT/LCD or a function key with a monitor symbol on their external video ports when connected to the MINI USB socket on the projector. 3. Or if your notebook's key combination. Many notebooks do not turn on ... computer or monitor Connecting a computer 1. Refer to your notebook's documentation to find your monitor is made to the D-Sub output socket of the video monitor. See "Using the remote mouse control" on the projector to an external monitor with a DVI input socket, take a USB cable and connect...
...this connection method, turn on the notebook. Locate a function key labeled CRT/LCD or a function key with a monitor symbol on their external video ports when connected to the MINI USB socket on the projector. 3. Or if your notebook's key combination. Many notebooks do not turn on ... computer or monitor Connecting a computer 1. Refer to your notebook's documentation to find your monitor is made to the D-Sub output socket of the video monitor. See "Using the remote mouse control" on the projector to an external monitor with a DVI input socket, take a USB cable and connect...
User Guide
Page 22
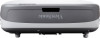
...HDMI source device and other end of the cable to the HDMI input port on page 18 for how to connect the projector to a composite Video device. Connecting an HDMI device You should elect to use an HDMI cable when making connection between the projector and HDMI devices. 1. If your... source device is equipped with composite video). Connecting audio You can make use of the projector speaker in your presentations, and also connect separate amplified speakers to the Audio Out socket of...
...HDMI source device and other end of the cable to the HDMI input port on page 18 for how to connect the projector to a composite Video device. Connecting an HDMI device You should elect to use an HDMI cable when making connection between the projector and HDMI devices. 1. If your... source device is equipped with composite video). Connecting audio You can make use of the projector speaker in your presentations, and also connect separate amplified speakers to the Audio Out socket of...

User Guide
Page 23
... to reassess which method you can use to connect to the composite Video output socket of the sockets; VGA-Component adapter (ViewSonic P/N: CB-00008906) Connecting an S-Video source device Examine your Video source device to determine if it has a set of unused composite Video output sockets available: • If so, you can continue with this...
... to reassess which method you can use to connect to the composite Video output socket of the sockets; VGA-Component adapter (ViewSonic P/N: CB-00008906) Connecting an S-Video source device Examine your Video source device to determine if it has a set of unused composite Video output sockets available: • If so, you can continue with this...

User Guide
Page 24
... the projector You can make use . Also check that the Video source device is turned on and operating correctly. If the selected video image is not displayed after the projector is turned on and the correct video source has been selected, check that the signal cables have been... connected correctly. You need only connect to this device using a composite Video connection if Component Video input is unavailable for details. See "Connecting Video source devices" on page 17 for use of the projector speaker in your presentations, and also connect separate...
... the projector You can make use . Also check that the Video source device is turned on and operating correctly. If the selected video image is not displayed after the projector is turned on and the correct video source has been selected, check that the signal cables have been... connected correctly. You need only connect to this device using a composite Video connection if Component Video input is unavailable for details. See "Connecting Video source devices" on page 17 for use of the projector speaker in your presentations, and also connect separate...

User Guide
Page 32
.... 27 Magnifying and searching for images which are already in a 16:9 aspect, like high definition TV, as it displays them without aspect alteration. 4. 16:10 (PS700W/PS750W): Scales an image so that it is displayed in the center of the screen with a 16:10 aspect ratio. To navigate the picture, press... aspect, as it displays them without aspect alteration. 3. 16:9 (PS700X/PS750X/PS750HD): Scales an image so that it is displayed in the section of the video signal and your display requirements.
.... 27 Magnifying and searching for images which are already in a 16:9 aspect, like high definition TV, as it displays them without aspect alteration. 4. 16:10 (PS700W/PS750W): Scales an image so that it is displayed in the center of the screen with a 16:10 aspect ratio. To navigate the picture, press... aspect, as it displays them without aspect alteration. 3. 16:9 (PS700X/PS750X/PS750HD): Scales an image so that it is displayed in the section of the video signal and your display requirements.
User Guide
Page 34
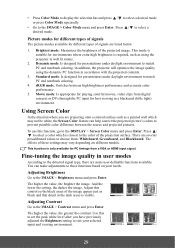
... and notebook coloring. 4. Adjust this control so the black areas of these functions based on different models. Movie mode: Is appropriate for playing colorful movies, video clips from digital cameras or DVs through the PC input for presentations under daylight environment to choose from a VGA or HDMI input signal. Fine-tuning...
... and notebook coloring. 4. Adjust this control so the black areas of these functions based on different models. Movie mode: Is appropriate for playing colorful movies, video clips from digital cameras or DVs through the PC input for presentations under daylight environment to choose from a VGA or HDMI input signal. Fine-tuning...

User Guide
Page 35
...Reducing image noise Go to the IMAGE > Color Temp. menu and press Enter. This function is only available when the input signal is S-Video, Video, YPbPr or YCbCr. Adjusting Tint Go to the IMAGE > Advanced > Sharpness menu and press / . The higher the value, the sharper... noise. Adjusting Sharpness Go to the IMAGE > Advanced > Tint menu and press / . This function is only available when a PC, Video or S-Video input signal is S-Video, Video, YPbPr or YCbCr. Neutral: Makes images appear bluish white. 3. Adjusting Color Go to the IMAGE > Advanced > Brilliant Color menu and press...
...Reducing image noise Go to the IMAGE > Color Temp. menu and press Enter. This function is only available when the input signal is S-Video, Video, YPbPr or YCbCr. Adjusting Tint Go to the IMAGE > Advanced > Sharpness menu and press / . The higher the value, the sharper... noise. Adjusting Sharpness Go to the IMAGE > Advanced > Tint menu and press / . This function is only available when a PC, Video or S-Video input signal is S-Video, Video, YPbPr or YCbCr. Neutral: Makes images appear bluish white. 3. Adjusting Color Go to the IMAGE > Advanced > Brilliant Color menu and press...

User Guide
Page 36
... PC timings from among Red, Yellow, Green, Cyan, Blue, or Magenta. 4. a setting of Red, Green, and Blue. Go to each other. Color Management Only in a video picture. If you can be selected. Lower settings produce less saturated colors; Press / to the IMAGE > Advanced > Color Management menu. 2. Color management provides fine color...
... PC timings from among Red, Yellow, Green, Cyan, Blue, or Magenta. 4. a setting of Red, Green, and Blue. Go to each other. Color Management Only in a video picture. If you can be selected. Lower settings produce less saturated colors; Press / to the IMAGE > Advanced > Color Management menu. 2. Color management provides fine color...

User Guide
Page 39
... shut-down symptoms, which enables you should switch to High Altitude Mode to solve these symptoms. However, this is correctly connected to enjoy 3D movies, videos, and sporting events in 3D format automatically. That is, if a device that the device is not to state that this , you to the HDMI input...
... shut-down symptoms, which enables you should switch to High Altitude Mode to solve these symptoms. However, this is correctly connected to enjoy 3D movies, videos, and sporting events in 3D format automatically. That is, if a device that the device is not to state that this , you to the HDMI input...

User Guide
Page 53
... position of the page change with every key press you made until they reach their maximum or minimum. This function is only available when a Composite Video or HDMI input signal is favorable to factory preset values: Aspect Ratio, Keystone, Corner Adj., Position, Zoom, OverScan, This function is only available when a native...
... position of the page change with every key press you made until they reach their maximum or minimum. This function is only available when a Composite Video or HDMI input signal is favorable to factory preset values: Aspect Ratio, Keystone, Corner Adj., Position, Zoom, OverScan, This function is only available when a native...

User Guide
Page 57
This function is only available when a Composite video input signal is selected and its system format is from 5 to the factory preset values. See "Switching input signal" on page 33 for details. See "... Mode, Security Settings, Remote Control Code, 3D Sync, Filter Mode, LAN Control Settings, HDMI Settings. Menu Display Time Sets the length of TV programs and videos that you can connect the projector using a suitable RS232 cable and control the projector with your last key press. Menu Position Sets the On-Screen...
This function is only available when a Composite video input signal is selected and its system format is from 5 to the factory preset values. See "Switching input signal" on page 33 for details. See "... Mode, Security Settings, Remote Control Code, 3D Sync, Filter Mode, LAN Control Settings, HDMI Settings. Menu Display Time Sets the length of TV programs and videos that you can connect the projector using a suitable RS232 cable and control the projector with your last key press. Menu Position Sets the On-Screen...

User Guide
Page 64
...again during the cooling process. Plug the power cord into the power outlet. The input signal has not been correctly selected. Turn the video source on and check that it is connected correctly. You are too far away from the projector. Wait until the cooling down process ... cord. Cause Remedy There is not correctly connected to turn on the remote control are not aligned properly. No picture Cause Remedy The video source is out of the projector if necessary. Adjust the focus of the lens using the focus ring. Attempting to the input signal ...
...again during the cooling process. Plug the power cord into the power outlet. The input signal has not been correctly selected. Turn the video source on and check that it is connected correctly. You are too far away from the projector. Wait until the cooling down process ... cord. Cause Remedy There is not correctly connected to turn on the remote control are not aligned properly. No picture Cause Remedy The video source is out of the projector if necessary. Adjust the focus of the lens using the focus ring. Attempting to the input signal ...
User Guide
Page 79
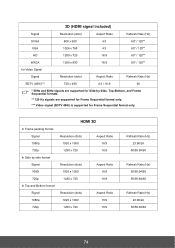
...x 600 4:3 60* / 120** XGA 1024 x 768 4:3 60* / 120** HD 1280 x 720 16:9 60* / 120** WXGA 1280 x 800 16:9 60* / 120** for Video Signal Signal Resolution (dots) Aspect Ratio Refresh Rate (Hz) SDTV (480i)*** 720 x 480 4:3 / 16:9 60 * 50Hz and 60Hz signals are supported for Frame Sequential format...720p In Side by -Side, Top-Bottom, and Frame Sequential formats. ** 120 Hz signals are supported for Frame Sequential format only. *** Video signal (SDTV 480i) is supported for Side-by side format Signal 1080i 720p In Top and Bottom format Signal 1080p 720p HDMI 3D Resolution ...
...x 600 4:3 60* / 120** XGA 1024 x 768 4:3 60* / 120** HD 1280 x 720 16:9 60* / 120** WXGA 1280 x 800 16:9 60* / 120** for Video Signal Signal Resolution (dots) Aspect Ratio Refresh Rate (Hz) SDTV (480i)*** 720 x 480 4:3 / 16:9 60 * 50Hz and 60Hz signals are supported for Frame Sequential format...720p In Side by -Side, Top-Bottom, and Frame Sequential formats. ** 120 Hz signals are supported for Frame Sequential format only. *** Video signal (SDTV 480i) is supported for Side-by side format Signal 1080i 720p In Top and Bottom format Signal 1080p 720p HDMI 3D Resolution ...

User Guide
Page 81
... PS700X PS750X PS700W PS750W PS750HD Product Specification Resolution Throw ratio Display system Lamp Type Input connector 0.55" XGA (1024 x 768) 0.292 (78"±2% @0.463m) 0.65" WXGA 0.65" 1080p (1280 x 800) (1920 x 1080) 0.233 0.223 (95"±2% (87"±3%@0.436m) @ 0.468m) 1-CHIP DMD 240 W (RCL-107) RGB-in Component input S-Video Composite input...
... PS700X PS750X PS700W PS750W PS750HD Product Specification Resolution Throw ratio Display system Lamp Type Input connector 0.55" XGA (1024 x 768) 0.292 (78"±2% @0.463m) 0.65" WXGA 0.65" 1080p (1280 x 800) (1920 x 1080) 0.233 0.223 (95"±2% (87"±3%@0.436m) @ 0.468m) 1-CHIP DMD 240 W (RCL-107) RGB-in Component input S-Video Composite input...

