

PJD7822HDL Datasheet Hi Res (English)
Page 2
... 250 6.4 300 7.6 Focus Ring Zoom Ring Control Panel Vent IR Remote Sensor Projection Lens Elevation Foot HDMI (x2) VGA S-Video / Video In Audio In / Out Monitor Out Kensington® Lock Slot USB Type A / mini Type B AC Power In RS-232 Specifications DISPLAY INPUT SIGNAL COMPATIBILITY CONNECTOR AUDIO POWER Type Resolution Lens Keystone Size Throw Distance Throw Ratio Lamp Light Life Brightness Contrast Ratio Aspect Ratio Color Depth Computer and Video Frequency PC Mac® RGB Input RGB Output Digital Input Composite Input S-Video Audio Input Audio Output USB Control Speaker Voltage...
... 250 6.4 300 7.6 Focus Ring Zoom Ring Control Panel Vent IR Remote Sensor Projection Lens Elevation Foot HDMI (x2) VGA S-Video / Video In Audio In / Out Monitor Out Kensington® Lock Slot USB Type A / mini Type B AC Power In RS-232 Specifications DISPLAY INPUT SIGNAL COMPATIBILITY CONNECTOR AUDIO POWER Type Resolution Lens Keystone Size Throw Distance Throw Ratio Lamp Light Life Brightness Contrast Ratio Aspect Ratio Color Depth Computer and Video Frequency PC Mac® RGB Input RGB Output Digital Input Composite Input S-Video Audio Input Audio Output USB Control Speaker Voltage...

User Guide
Page 1
... este manual" Model No. PJD7822HDL DLP Projector User Guide IMPORTANT: Please read this User Guide to obtain important information on installing and using your product in a safe manner, as well as registering your limited coverage from ViewSonic Corporation, which is also found on our web site at http:// www.viewsonic.com in English, or in specific languages using the Regional selection box in this User Guide will...
... este manual" Model No. PJD7822HDL DLP Projector User Guide IMPORTANT: Please read this User Guide to obtain important information on installing and using your product in a safe manner, as well as registering your limited coverage from ViewSonic Corporation, which is also found on our web site at http:// www.viewsonic.com in English, or in specific languages using the Regional selection box in this User Guide will...

User Guide
Page 7
...\Registration". To find your product online. Product Name: Model Number: Document Number: Serial Number: Purchase Date: For Your Records PJD7822HDL ViewSonic DLP Projector VS16000 PJD7822HDL_UG_ENG Rev. 1A 08-25-14 Product disposal at end of Smarter, Greener Computing. The ViewSonic CD also provides an opportunity for you for being part of product life The lamp in accordance with local, state or federal laws...
...\Registration". To find your product online. Product Name: Model Number: Document Number: Serial Number: Purchase Date: For Your Records PJD7822HDL ViewSonic DLP Projector VS16000 PJD7822HDL_UG_ENG Rev. 1A 08-25-14 Product disposal at end of Smarter, Greener Computing. The ViewSonic CD also provides an opportunity for you for being part of product life The lamp in accordance with local, state or federal laws...

User Guide
Page 9
... ambient temperature above 40°C / 104°F - Locations with live parts. Locations where excessive humidity, dust, or cigarette smoke may damage your projector through a power stabilizer, surge protector or uninterruptible power supply (UPS). 6. Do not operate lamps beyond the rated life could cause them to become excessively high, such as this product on rare occasions. 9. Important safety instructions Your projector is on the projector or remote control. 7.
... ambient temperature above 40°C / 104°F - Locations with live parts. Locations where excessive humidity, dust, or cigarette smoke may damage your projector through a power stabilizer, surge protector or uninterruptible power supply (UPS). 6. Do not operate lamps beyond the rated life could cause them to become excessively high, such as this product on rare occasions. 9. Important safety instructions Your projector is on the projector or remote control. 7.

User Guide
Page 10
... angle of displaying inverted pictures for ceiling mount installation. Safety instructions for ceiling mounting of the projector We want you ensure it is capable of more than 15 degrees front to person and property. Do not cover this safety matter to your projector on the projector and the base of the wrong gauge or length screws. Do not use the Security bar for mounting the projector and...
... angle of displaying inverted pictures for ceiling mount installation. Safety instructions for ceiling mounting of the projector We want you ensure it is capable of more than 15 degrees front to person and property. Do not cover this safety matter to your projector on the projector and the base of the wrong gauge or length screws. Do not use the Security bar for mounting the projector and...

User Guide
Page 11
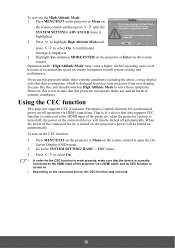
...-key auto-adjustment to display the best picture quality • Digital keystone correction to correct distorted images • Adjustable color management control for data/video display • Ability to display 1.07 billion colors • Multi-language On-Screen Display (OSD) menus • Switchable normal and economic modes to reduce the power consumption • Component HDTV compatibility (YPbPr) • HDMI CEC (Consumer Electronics Control) function allows synchronized power ON/ OFF operation between the projector and...
...-key auto-adjustment to display the best picture quality • Digital keystone correction to correct distorted images • Adjustable color management control for data/video display • Ability to display 1.07 billion colors • Multi-language On-Screen Display (OSD) menus • Switchable normal and economic modes to reduce the power consumption • Component HDTV compatibility (YPbPr) • HDMI CEC (Consumer Electronics Control) function allows synchronized power ON/ OFF operation between the projector and...
User Guide
Page 14
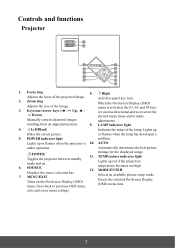
... best picture 6. 7. II POWER Toggles the projector between standby mode and on the On-Screen Display (OSD) menu. Controls and functions Projector 1 2 3 7 4 8 5 MENU EXIT 9 3 10 6 11 12 1. Zoom ring When the On-Screen Display (OSD) Adjusts the size of the image. Activates panel key lock. 2. Lights up red if the projector's temperature becomes too high. SOURCE Displays the source selection bar. exits and saves menu settings. 7 menu is 10. TEMPerature indicator light Lights up Hides the screen picture. timings for the displayed image.
... best picture 6. 7. II POWER Toggles the projector between standby mode and on the On-Screen Display (OSD) menu. Controls and functions Projector 1 2 3 7 4 8 5 MENU EXIT 9 3 10 6 11 12 1. Zoom ring When the On-Screen Display (OSD) Adjusts the size of the image. Activates panel key lock. 2. Lights up red if the projector's temperature becomes too high. SOURCE Displays the source selection bar. exits and saves menu settings. 7 menu is 10. TEMPerature indicator light Lights up Hides the screen picture. timings for the displayed image.
User Guide
Page 15
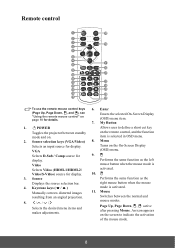
... "Using the remote mouse control" on the On-Screen Display VGA (OSD) menu. Keystone keys ( / ) mode is activated. display. mouse modes. Menu Selects an input source for 9. Manually corrects distorted images 11. An icon appears on . Selects D-Sub / Comp source for display. Source Performs the same function as the left Video Selects Video (HDMI-1/HDMI-2/ mouse button when the mouse mode is selected in OSD menu. 2. Video/S-Video) source for details. 6. Enter Enacts the selected On-Screen Display (OSD) menu item. 7. II POWER...
... "Using the remote mouse control" on the On-Screen Display VGA (OSD) menu. Keystone keys ( / ) mode is activated. display. mouse modes. Menu Selects an input source for 9. Manually corrects distorted images 11. An icon appears on . Selects D-Sub / Comp source for display. Source Performs the same function as the left Video Selects Video (HDMI-1/HDMI-2/ mouse button when the mouse mode is selected in OSD menu. 2. Video/S-Video) source for details. 6. Enter Enacts the selected On-Screen Display (OSD) menu item. 7. II POWER...
User Guide
Page 16
... code for the remote control, press PgUp and PgDn buttons on and off. using the 24. Toggles the projector audio between on the remote control together for more . timings for the projector, select A or B in operation at the same time, switching the remote control codes can be executed immediately. 25. To switch the code for the displayed image. Timer 18. Magnify Displays the zoom bar that happens, switch the code for the remote control. Color Mode Selects an available picture setup mode. 20. Lock...
... code for the remote control, press PgUp and PgDn buttons on and off. using the 24. Toggles the projector audio between on the remote control together for more . timings for the projector, select A or B in operation at the same time, switching the remote control codes can be executed immediately. 25. To switch the code for the displayed image. Timer 18. Magnify Displays the zoom bar that happens, switch the code for the remote control. Color Mode Selects an available picture setup mode. 20. Lock...
User Guide
Page 22
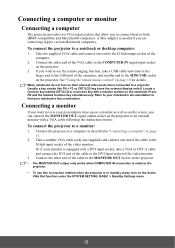
... + F3 or CRT/LCD key turns the external display on the notebook. Locate a function key labeled CRT/LCD or a function key with a monitor symbol on /off. A Mac adapter is in "Connecting a computer" on their external video ports when connected to the MINI USB socket on the projector. 3. Many notebooks do not turn on the Active VGA Out function under the SYSTEM SETTING: BASIC > Standby Settings menu. 15 Refer to...
... + F3 or CRT/LCD key turns the external display on the notebook. Locate a function key labeled CRT/LCD or a function key with a monitor symbol on /off. A Mac adapter is in "Connecting a computer" on their external video ports when connected to the MINI USB socket on the projector. 3. Many notebooks do not turn on the Active VGA Out function under the SYSTEM SETTING: BASIC > Standby Settings menu. 15 Refer to...
User Guide
Page 24
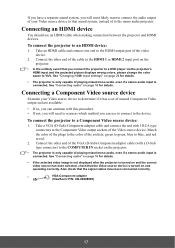
... the projected picture displays wrong colors, please change the color space to the HDMI 1 or HDMI 2 input port on page 16 for details. • The projector is only capable of playing mixed mono audio, even if a stereo audio input is connected. To connect the projector to the HDMI output port of the sockets; See "Changing HDMI input settings" on and operating correctly. See "Connecting audio" on the projector. • In the unlikely event that the signal cables have a separate sound...
... the projected picture displays wrong colors, please change the color space to the HDMI 1 or HDMI 2 input port on page 16 for details. • The projector is only capable of playing mixed mono audio, even if a stereo audio input is connected. To connect the projector to the HDMI output port of the sockets; See "Changing HDMI input settings" on and operating correctly. See "Connecting audio" on the projector. • In the unlikely event that the signal cables have a separate sound...
User Guide
Page 25
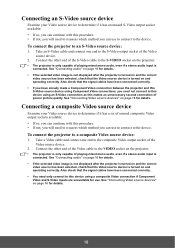
... selected video image is not displayed after the projector is turned on page 16 for use. See "Connecting audio" on and operating correctly. Also check that the signal cables have already made a Component Video connection between the projector and this S-Video source device using Component Video connections, you need not connect to this device using a composite Video connection if Component Video and S-Video inputs are unavailable for details. • If the selected video image is not displayed after the projector is turned...
... selected video image is not displayed after the projector is turned on page 16 for use. See "Connecting audio" on and operating correctly. Also check that the signal cables have already made a Component Video connection between the projector and this S-Video source device using Component Video connections, you need not connect to this device using a composite Video connection if Component Video and S-Video inputs are unavailable for details. • If the selected video image is not displayed after the projector is turned...
User Guide
Page 26
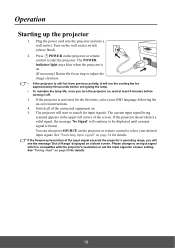
Switch all of the screen. If the projector doesn't detect a valid signal, the message 'No Signal' will start the projector. Please change to adjust the image clearness. • If the projector is activated for details. 19 The POWER indicator light stays blue when the projector is on . 5. The projector will continue to be displayed until an input signal is compatible with the projector's resolution or set the input signal to a lower setting. The current input signal being scanned appears in...
Switch all of the screen. If the projector doesn't detect a valid signal, the message 'No Signal' will start the projector. Please change to adjust the image clearness. • If the projector is activated for details. 19 The POWER indicator light stays blue when the projector is on . 5. The projector will continue to be displayed until an input signal is compatible with the projector's resolution or set the input signal to a lower setting. The current input signal being scanned appears in...
User Guide
Page 28
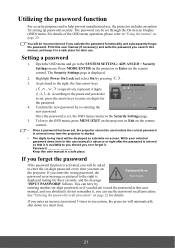
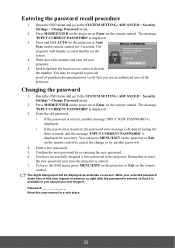
... wrong password, the Password Error password error message as asterisks on page 22 for details. For details of the OSD menu operation, please refer to "Using the menus" on the remote control. Open the OSD menu and go to the right, the four arrow keys ( , , , ) respectively represent 4 digits INPUT PASSWORD (1, 2, 3, 4). MENU Back Once the password is displayed. 2. Utilizing the password function For security purposes and to help prevent unauthorized use, the projector includes...
... wrong password, the Password Error password error message as asterisks on page 22 for details. For details of the OSD menu operation, please refer to "Using the menus" on the remote control. Open the OSD menu and go to the right, the four arrow keys ( , , , ) respectively represent 4 digits INPUT PASSWORD (1, 2, 3, 4). MENU Back Once the password is displayed. 2. Utilizing the password function For security purposes and to help prevent unauthorized use, the projector includes...
User Guide
Page 29
... started. 7. Confirm the new password by re-entering the new password. 6. You can press MENU/EXIT on the projector or Exit on the screen. The digits being input will display a coded number on the remote control to enter the new password next time the projector is correct, another password. 4. Press MODE/ENTER on the projector or Enter on the remote control. To leave the OSD menu, press MENU/EXIT on the projector or Exit on the remote control. Password Keep this user manual...
... started. 7. Confirm the new password by re-entering the new password. 6. You can press MENU/EXIT on the projector or Exit on the screen. The digits being input will display a coded number on the remote control to enter the new password next time the projector is correct, another password. 4. Press MODE/ENTER on the projector or Enter on the remote control. To leave the OSD menu, press MENU/EXIT on the projector or Exit on the remote control. Password Keep this user manual...
User Guide
Page 30
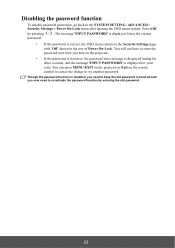
... password function is disabled, you turn on the projector. • If the password is incorrect, the password error message is displayed lasting for three seconds, and the message 'INPUT PASSWORD' is displayed for your retry. Select Off by entering the old password. 23 Enter the current password. • If the password is displayed. You can press MENU/EXIT on the projector or Exit on the remote control to the Security Settings...
... password function is disabled, you turn on the projector. • If the password is incorrect, the password error message is displayed lasting for three seconds, and the message 'INPUT PASSWORD' is displayed for your retry. Select Off by entering the old password. 23 Enter the current password. • If the password is displayed. You can press MENU/EXIT on the projector or Exit on the remote control to the Security Settings...
User Guide
Page 42
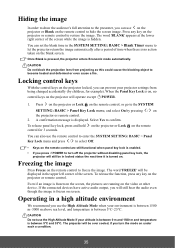
... remote control, or go to become heated and deformed or even cause a fire. The word 'FREEZE' will operate except II POWER. 1. If the connected devices have active audio output, you will still hear the audio even though the image is frozen on the projector will be in locked status the next time it is turned on. Operating in a high altitude environment We recommend you use the High...
... remote control, or go to become heated and deformed or even cause a fire. The word 'FREEZE' will operate except II POWER. 1. If the connected devices have active audio output, you will still hear the audio even though the image is frozen on the projector will be in locked status the next time it is turned on. Operating in a high altitude environment We recommend you use the High...
User Guide
Page 43
... the device is turned off operation via a HDMI cable, and its CEC function is higher than 1500 m. To turn High Altitude Mode ON? 2. Press MENU/EXIT on the projector or Menu on the remote control and then press / until the SYSTEM SETTING: ADVANCED menu is designed to open the OnScreen Display (OSD) menu. 2. Highlight Yes and press MODE/ENTER on the projector or Enter on the remote control to protect your...
... the device is turned off operation via a HDMI cable, and its CEC function is higher than 1500 m. To turn High Altitude Mode ON? 2. Press MENU/EXIT on the projector or Menu on the remote control and then press / until the SYSTEM SETTING: ADVANCED menu is designed to open the OnScreen Display (OSD) menu. 2. Highlight Yes and press MODE/ENTER on the projector or Enter on the remote control to protect your...
User Guide
Page 56
... the following settings via the OSD menu. Setting Auto Power Off This function allows the projector to turn off automatically if no input source is selected, the light output will not automatically shut down in Economic mode also extends the lamp operation life. To set period of time to highlight Lamp Settings and press MODE/ENTER on the projector or ENTER on the remote control and then press / until the SYSTEM SETTING: ADVANCED menu is...
... the following settings via the OSD menu. Setting Auto Power Off This function allows the projector to turn off automatically if no input source is selected, the light output will not automatically shut down in Economic mode also extends the lamp operation life. To set period of time to highlight Lamp Settings and press MODE/ENTER on the projector or ENTER on the remote control and then press / until the SYSTEM SETTING: ADVANCED menu is...

User Guide
Page 62
... video source on and check that it is out of the lens using the focus ring. Check the connection. The projector and the screen are too far away from the power cord. Remote control does not work Cause The battery is switched on . If the power outlet has a switch, make sure that the signal cable is no power from the projector. Select the correct input signal with a new one. You are not aligned properly. Remedy Adjust...
... video source on and check that it is out of the lens using the focus ring. Check the connection. The projector and the screen are too far away from the power cord. Remote control does not work Cause The battery is switched on . If the power outlet has a switch, make sure that the signal cable is no power from the projector. Select the correct input signal with a new one. You are not aligned properly. Remedy Adjust...


