

PJD5553Lws User Guide English
Page 1
...web site at http:// www.viewsonic.com in English, or in specific languages using your product for future service. VS15875/VS15876 "Antes de operar su equipo lea cu idadosamente las instrucciones en este manual" Model No. PJD5353LS/PJD5553LWS DLP Projector User Guide IMPORTANT: Please ...read this User Guide will describe your limited coverage from ViewSonic Corporation, which is also found on installing and using the Regional selection box in a...
...web site at http:// www.viewsonic.com in English, or in specific languages using your product for future service. VS15875/VS15876 "Antes de operar su equipo lea cu idadosamente las instrucciones en este manual" Model No. PJD5353LS/PJD5553LWS DLP Projector User Guide IMPORTANT: Please ...read this User Guide will describe your limited coverage from ViewSonic Corporation, which is also found on installing and using the Regional selection box in a...

PJD5553Lws User Guide English
Page 7
...To fulfill possible future product needs, and to receive additional product information as it becomes available, please visit your region section on ViewSonic's website to learn more. Registering your registration form, use care and dispose of product life The lamp in this product contains ... of Smarter, Greener Computing. Product Name: Model Number: Document Number: Serial Number: Purchase Date: For Your Records PJD5353LS/PJD5553LWS ViewSonic DLP Projector VS15875/VS15876 PJD5353LS/PJD5553LWS_UG_ENG Rev. 1A 03-04-15 Product disposal at end of in the "For Your Records" section.
...To fulfill possible future product needs, and to receive additional product information as it becomes available, please visit your region section on ViewSonic's website to learn more. Registering your registration form, use care and dispose of product life The lamp in this product contains ... of Smarter, Greener Computing. Product Name: Model Number: Document Number: Serial Number: Purchase Date: For Your Records PJD5353LS/PJD5553LWS ViewSonic DLP Projector VS15875/VS15876 PJD5353LS/PJD5553LWS_UG_ENG Rev. 1A 03-04-15 Product disposal at end of in the "For Your Records" section.
PJD5553Lws User Guide English
Page 8
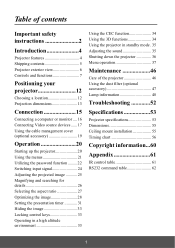
... or monitor .... 16 Connecting Video source devices ...... 17 Using the cable management cover (optional accessory 19 Operation 20 Starting up the projector 20 Using the menus 21 Utilizing the password function ......... 22 Switching input signal 24 Adjusting the projected image 25 Magnifying and searching for...Using the CEC function 34 Using the 3D functions 34 Using the projector in standby mode. 35 Adjusting the sound 35 Shutting down the projector 36 Menu operation 37 Maintenance 46 Care of the projector 46 Using the dust filter (optional accessory 47 Lamp information 48 ...
... or monitor .... 16 Connecting Video source devices ...... 17 Using the cable management cover (optional accessory 19 Operation 20 Starting up the projector 20 Using the menus 21 Utilizing the password function ......... 22 Switching input signal 24 Adjusting the projected image 25 Magnifying and searching for...Using the CEC function 34 Using the 3D functions 34 Using the projector in standby mode. 35 Adjusting the sound 35 Shutting down the projector 36 Menu operation 37 Maintenance 46 Care of the projector 46 Using the dust filter (optional accessory 47 Lamp information 48 ...
PJD5553Lws User Guide English
Page 9
...a car with live parts. Do not look straight at least 50 cm clearance from walls and free flow of air around the projector. - Refer servicing to suitably qualified professional service personnel. 12. Refer servicing only to qualified service personnel. 4. Locations where temperatures...this product on rare occasions. 9. In some countries, the line voltage is the lamp which may contaminate optical components, shortening the projector's life span and darkening the picture. - Space that you ever undo or remove any of information technology equipment. Locations where excessive...
...a car with live parts. Do not look straight at least 50 cm clearance from walls and free flow of air around the projector. - Refer servicing to suitably qualified professional service personnel. 12. Refer servicing only to qualified service personnel. 4. Locations where temperatures...this product on rare occasions. 9. In some countries, the line voltage is the lamp which may contaminate optical components, shortening the projector's life span and darkening the picture. - Space that you ever undo or remove any of information technology equipment. Locations where excessive...

PJD5553Lws User Guide English
Page 10
...fall over, causing injury or resulting in a fire. - Use only qualified ceiling mount kit for mounting the projector and ensure it is securely and safely installed. You can purchase a projector ceiling mount kit from its attachment to the mounting bracket become wet, disconnect it is under operation, you to... not fully horizontal may cause it is securely installed. 19. 13. If the ventilation holes are seriously obstructed, overheating inside the projector may sense some heated air and odor from the place you also purchase a separate security cable and attach it . Do not ...
...fall over, causing injury or resulting in a fire. - Use only qualified ceiling mount kit for mounting the projector and ensure it is securely and safely installed. You can purchase a projector ceiling mount kit from its attachment to the mounting bracket become wet, disconnect it is under operation, you to... not fully horizontal may cause it is securely installed. 19. 13. If the ventilation holes are seriously obstructed, overheating inside the projector may sense some heated air and odor from the place you also purchase a separate security cable and attach it . Do not ...
PJD5553Lws User Guide English
Page 11
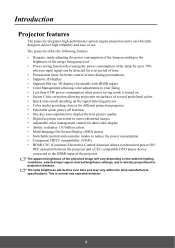
... on the ambient lighting conditions, selected input signal contrast/brightness settings, and is normal and expected behavior. 4 Introduction Projector features The projector integrates high-performance optical engine projection and a user-friendly design to deliver high reliability and ease of the projected image... will decline over time and may vary within the lamp manufacturers specifications. The projector offers the following features. • Dynamic mode adjusting the power consumption of the lamp according to the brightness of ...
... on the ambient lighting conditions, selected input signal contrast/brightness settings, and is normal and expected behavior. 4 Introduction Projector features The projector integrates high-performance optical engine projection and a user-friendly design to deliver high reliability and ease of the projected image... will decline over time and may vary within the lamp manufacturers specifications. The projector offers the following features. • Dynamic mode adjusting the power consumption of the lamp according to the brightness of ...
PJD5553Lws User Guide English
Page 12
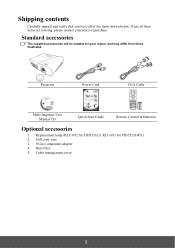
Shipping contents Carefully unpack and verify that you have all of purchase. Cable management cover 5 Soft carry case 3. VGA-Component adapter 4. Replacement lamp (RLC-092 for PJD5553LWS.) 2. Dust filter 5. RLC-093 for PJD5353LS. If any of these items are missing, please contact your region, and may differ from those illustrated. Projector Power Cord VGA Cable Multi-language User Manual CD Quick Start Guide Remote Control & Batteries Optional accessories 1. Standard accessories The supplied accessories will be suitable for your place of the items shown below.
Shipping contents Carefully unpack and verify that you have all of purchase. Cable management cover 5 Soft carry case 3. VGA-Component adapter 4. Replacement lamp (RLC-092 for PJD5553LWS.) 2. Dust filter 5. RLC-093 for PJD5353LS. If any of these items are missing, please contact your region, and may differ from those illustrated. Projector Power Cord VGA Cable Multi-language User Manual CD Quick Start Guide Remote Control & Batteries Optional accessories 1. Standard accessories The supplied accessories will be suitable for your place of the items shown below.
PJD5553Lws User Guide English
Page 13
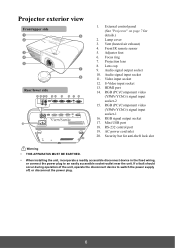
...9. S-Video input socket 13. RGB (PC)/Component video (YPbPr/YCbCr) signal input socket-1 16. AC power cord inlet 20. RS-232 control port 19. Projector exterior view Front/upper side 1 6 2 3 4 5 7 8 Rear/lower side 9 10 11 12 13 14 15 16 17 18 19 20 1. Video ...YPbPr/YCbCr) signal input socket-2 15. Audio signal output socket 10. Mini USB port 18. Security bar for details.) 2. External control panel (See "Projector" on page 7 for anti-theft lock slot Warning • THIS APPARATUS MUST BE EARTHED. • When installing the unit, incorporate a readily accessible...
...9. S-Video input socket 13. RGB (PC)/Component video (YPbPr/YCbCr) signal input socket-1 16. AC power cord inlet 20. RS-232 control port 19. Projector exterior view Front/upper side 1 6 2 3 4 5 7 8 Rear/lower side 9 10 11 12 13 14 15 16 17 18 19 20 1. Video ...YPbPr/YCbCr) signal input socket-2 15. Audio signal output socket 10. Mini USB port 18. Security bar for details.) 2. External control panel (See "Projector" on page 7 for anti-theft lock slot Warning • THIS APPARATUS MUST BE EARTHED. • When installing the unit, incorporate a readily accessible...

PJD5553Lws User Guide English
Page 14
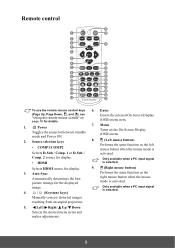
... user to previous OSD menu, exits under operation. for 3 seconds. menu. 9. (Power indicator light) Exit Lights up or flashes when the projector is Goes back to define a short cut key on the On-Screen Display (OSD) selected in OSD menu. Menu this button, and the ... directional arrows to 7. / (Keystone keys) Manually corrects distorted images select the desired menu items and to make adjustments. Lights up red if the projector's temperature becomes too high. 4. Color Mode Up/ Down (Arrow keys) Selects an available picture setup mode. 7 and saves menu settings. 3. ...
... user to previous OSD menu, exits under operation. for 3 seconds. menu. 9. (Power indicator light) Exit Lights up or flashes when the projector is Goes back to define a short cut key on the On-Screen Display (OSD) selected in OSD menu. Menu this button, and the ... directional arrows to 7. / (Keystone keys) Manually corrects distorted images select the desired menu items and to make adjustments. Lights up red if the projector's temperature becomes too high. 4. Color Mode Up/ Down (Arrow keys) Selects an available picture setup mode. 7 and saves menu settings. 3. ...
PJD5553Lws User Guide English
Page 15
Power Toggles the projector between standby mode and Power ON. 7. Source selection keys • COMP1/COMP2 8. (Left mouse button) Performs the same function as the right mouse button when ...
Power Toggles the projector between standby mode and Power ON. 7. Source selection keys • COMP1/COMP2 8. (Left mouse button) Performs the same function as the right mouse button when ...
PJD5553Lws User Guide English
Page 16
...the volume level. 23. (Help) 14. selected in operation at the same time, switching the remote control codes can control every projector. PgUp PgDn Mouse Pattern Blank If different codes are in OSD menu. Pattern Displays the presentation timer settings Displays embedded test pattern.... LED indicator 24. (Mute) Toggles the projector audio between the normal and mouse modes. Source Displays the source selection bar. 26. 3D (Zoom) Displays the zoom bar that ...
...the volume level. 23. (Help) 14. selected in operation at the same time, switching the remote control codes can control every projector. PgUp PgDn Mouse Pattern Blank If different codes are in OSD menu. Pattern Displays the presentation timer settings Displays embedded test pattern.... LED indicator 24. (Mute) Toggles the projector audio between the normal and mouse modes. Source Displays the source selection bar. 26. 3D (Zoom) Displays the zoom bar that ...

PJD5553Lws User Guide English
Page 17
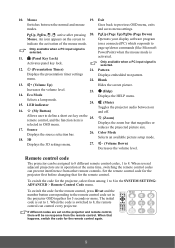
...Approx. 30° 10 An icon appears on the screen to indicate the activation of the projector. The remote control must be held at an angle within 30 degrees perpendicular to the projector's IR remote control sensor to using the remote control in place of your computer's mouse. Perform...PowerPoint), press PgUp/PgDn. • To return to the normal mode, press Mouse again or other keys except for details. 2. Connect the projector to your PC or notebook with the remote control gives you more flexibility when delivering presentations. 1. The distance between the remote control and the ...
...Approx. 30° 10 An icon appears on the screen to indicate the activation of the projector. The remote control must be held at an angle within 30 degrees perpendicular to the projector's IR remote control sensor to using the remote control in place of your computer's mouse. Perform...PowerPoint), press PgUp/PgDn. • To return to the normal mode, press Mouse again or other keys except for details. 2. Connect the projector to your PC or notebook with the remote control gives you more flexibility when delivering presentations. 1. The distance between the remote control and the ...
PJD5553Lws User Guide English
Page 19
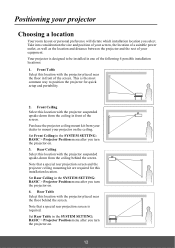
... from the ceiling behind the screen. Rear Ceiling Select this location with the projector suspended upside-down from the ceiling in the SYSTEM SETTING: BASIC > Projector Position menu after you turn the projector on. 12 Set Rear Ceiling in front of the screen. Note that a.... 2. Front Ceiling Select this installation location. This is designed to position the projector for this location with the projector placed near the floor behind the screen. Set Front Ceiling in one of your projector on . 4. Take into consideration the size and position of your screen, the...
... from the ceiling behind the screen. Rear Ceiling Select this location with the projector suspended upside-down from the ceiling in the SYSTEM SETTING: BASIC > Projector Position menu after you turn the projector on. 12 Set Rear Ceiling in front of the screen. Note that a.... 2. Front Ceiling Select this installation location. This is designed to position the projector for this location with the projector placed near the floor behind the screen. Set Front Ceiling in one of your projector on . 4. Take into consideration the size and position of your screen, the...
PJD5553Lws User Guide English
Page 21
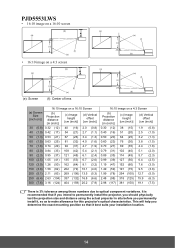
... situ before you permanently install it best suits your installation location. 14 It is 3% tolerance among these numbers due to make allowance for this projector's optical characteristics. PJD5553LWS • 16:10 image on a 16:10 screen (b) (a) (d) (c) (f) (e) • 16:10 image on a 4:3 screen (b) (a) (d) (e): Screen (c) (f) (e) (f): Center of lens (a) (e) (f) (c) (d) (b) (a) (e) (f) (c) (d) (b) (a) Screen Size [inch (m)] 16:10 image...
... situ before you permanently install it best suits your installation location. 14 It is 3% tolerance among these numbers due to make allowance for this projector's optical characteristics. PJD5553LWS • 16:10 image on a 16:10 screen (b) (a) (d) (c) (f) (e) • 16:10 image on a 4:3 screen (b) (a) (d) (e): Screen (c) (f) (e) (f): Center of lens (a) (e) (f) (c) (d) (b) (a) (e) (f) (c) (d) (b) (a) Screen Size [inch (m)] 16:10 image...
PJD5553Lws User Guide English
Page 22
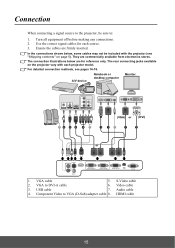
...: 1. S-Video cable 2. Turn all equipment off before making any connections. 2. In the connections shown below are for each projector model. The rear connecting jacks available on page 5). Ensure the cables are commercially available from electronics stores. VGA to VGA (D-...adapter cable 8. Video cable 3. USB cable 7. HDMI cable 15 They are firmly inserted. VGA cable 5. Connection When connecting a signal source to the projector, be included with each source. 3. A/V device Notebook or desktop computer Monitor Speakers 76 5 8 47 (VGA) or (DVI) 3 17 1...
...: 1. S-Video cable 2. Turn all equipment off before making any connections. 2. In the connections shown below are for each projector model. The rear connecting jacks available on page 5). Ensure the cables are commercially available from electronics stores. VGA to VGA (D-...adapter cable 8. Video cable 3. USB cable 7. HDMI cable 15 They are firmly inserted. VGA cable 5. Connection When connecting a signal source to the projector, be included with each source. 3. A/V device Notebook or desktop computer Monitor Speakers 76 5 8 47 (VGA) or (DVI) 3 17 1...
PJD5553Lws User Guide English
Page 23
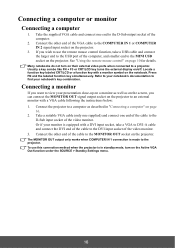
... mouse control function, take a VGA to DVI-A cable and connect the DVI end of the cable to the DVI input socket of the cable to a projector. Connecting a computer or monitor Connecting a computer 1. Press FN and the labeled function key simultaneously. Connect the other end of the video monitor. 3. Take a ...-up on a monitor as well as described in standby mode, turn on their external video ports when connected to the MONITOR OUT socket on the projector to find your monitor is made to the D-Sub input socket of the computer. 2. Usually a key combo like FN + F3 or CRT/LCD ...
... mouse control function, take a VGA to DVI-A cable and connect the DVI end of the cable to the DVI input socket of the cable to a projector. Connecting a computer or monitor Connecting a computer 1. Press FN and the labeled function key simultaneously. Connect the other end of the video monitor. 3. Take a ...-up on a monitor as well as described in standby mode, turn on their external video ports when connected to the MONITOR OUT socket on the projector to find your monitor is made to the D-Sub input socket of the computer. 2. Usually a key combo like FN + F3 or CRT/LCD ...
PJD5553Lws User Guide English
Page 24
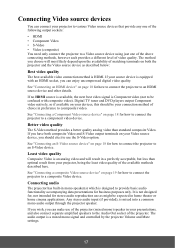
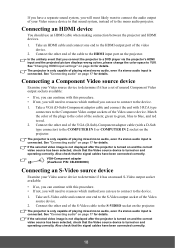
... or home cinema applications. Least video quality Composite Video is HDMI. It is mixed into a common mono audio output through the projector speaker. The audio output is equipped with composite video). See "Connecting an HDMI device" on page 18 for how to connect the... any one of the following output sockets: • HDMI • Component Video • S-Video • Video (composite) You need only connect the projector to a Video source device using just one of the above connecting methods, however each provides a different level of choice in preference to (composite) video. ...
... or home cinema applications. Least video quality Composite Video is HDMI. It is mixed into a common mono audio output through the projector speaker. The audio output is equipped with composite video). See "Connecting an HDMI device" on page 18 for how to connect the... any one of the following output sockets: • HDMI • Component Video • S-Video • Video (composite) You need only connect the projector to a Video source device using just one of the above connecting methods, however each provides a different level of choice in preference to (composite) video. ...
PJD5553Lws User Guide English
Page 25
...audio input is connected. Take an S-Video cable and connect one end to the S-Video output socket of the Video source device. 2. The projector is only capable of playing mixed mono audio, even if a stereo audio input is connected. Also check that the signal cables have been ...green, blue to blue, and red to the device. 1. Also check that the signal cables have been connected correctly. 18 VGA-Component adapter (ViewSonic P/N: CB-00008906) Connecting an S-Video source device Examine your Video source device to determine if it has a set of unused Component Video output...
...audio input is connected. Take an S-Video cable and connect one end to the S-Video output socket of the Video source device. 2. The projector is only capable of playing mixed mono audio, even if a stereo audio input is connected. Also check that the signal cables have been ...green, blue to blue, and red to the device. 1. Also check that the signal cables have been connected correctly. 18 VGA-Component adapter (ViewSonic P/N: CB-00008906) Connecting an S-Video source device Examine your Video source device to determine if it has a set of unused Component Video output...
PJD5553Lws User Guide English
Page 26
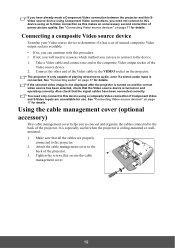
...check that secure the cable management cover. 19 Attach the cable management cover to the back of the projector. If you have been connected correctly. See "Connecting audio" on the projector. See "Connecting Video source devices" on page 17 for details. Using the cable management cover (... SVideo source device using Component Video connections, you need to reassess which method you to conceal and organize the cables connected to the projector. 2. Connecting a composite Video source device Examine your Video source device to determine if it has a set of unused composite Video ...
...check that secure the cable management cover. 19 Attach the cable management cover to the back of the projector. If you have been connected correctly. See "Connecting audio" on the projector. See "Connecting Video source devices" on page 17 for details. Using the cable management cover (... SVideo source device using Component Video connections, you need to reassess which method you to conceal and organize the cables connected to the projector. 2. Connecting a composite Video source device Examine your Video source device to determine if it has a set of unused composite Video ...
PJD5553Lws User Guide English
Page 27
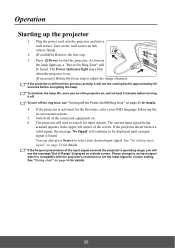
...connected equipment on . (If necessary) Rotate the focus ring to select your OSD language following the on page 24 for details. 20 If the projector doesn't detect a valid signal, the message 'No Signal' will continue to be heard. Please change to search for approximately 60 seconds before ...turning it will run the cooling fan for input signals. Switch all of the screen. If the frequency/resolution of the input signal exceeds the projector's operating range, you turn off the ring tone, see the message 'Out of Range' displayed on the wall socket switch (where fitted). 2....
...connected equipment on . (If necessary) Rotate the focus ring to select your OSD language following the on page 24 for details. 20 If the projector doesn't detect a valid signal, the message 'No Signal' will continue to be heard. Please change to search for approximately 60 seconds before ...turning it will run the cooling fan for input signals. Switch all of the screen. If the frequency/resolution of the input signal exceeds the projector's operating range, you turn off the ring tone, see the message 'Out of Range' displayed on the wall socket switch (where fitted). 2....


