

PJD5553Lws User Guide English
Page 1
... idadosamente las instrucciones en este manual" Model No. VS15875/VS15876 PJD5353LS/PJD5553LWS DLP Projector User Guide IMPORTANT: Please read this User Guide will describe your limited coverage from ViewSonic Corporation, which is also found on installing and using the Regional selection box in a safe manner, as well as registering your product for future service. Warranty information contained in this User Guide to obtain important information...
... idadosamente las instrucciones en este manual" Model No. VS15875/VS15876 PJD5353LS/PJD5553LWS DLP Projector User Guide IMPORTANT: Please read this User Guide will describe your limited coverage from ViewSonic Corporation, which is also found on installing and using the Regional selection box in a safe manner, as well as registering your product for future service. Warranty information contained in this User Guide to obtain important information...

PJD5553Lws User Guide English
Page 7
... additional product information as it becomes available, please visit your region section on ViewSonic's website to you and the environment. Product Name: Model Number: Document Number: Serial Number: Purchase Date: For Your Records PJD5353LS/PJD5553LWS ViewSonic DLP Projector VS15875/VS15876 PJD5353LS/PJD5553LWS_UG_ENG Rev. 1A 03-04-15 Product disposal at end of product life The lamp in the "For Your Records" section.
... additional product information as it becomes available, please visit your region section on ViewSonic's website to you and the environment. Product Name: Model Number: Document Number: Serial Number: Purchase Date: For Your Records PJD5353LS/PJD5553LWS ViewSonic DLP Projector VS15875/VS15876 PJD5353LS/PJD5553LWS_UG_ENG Rev. 1A 03-04-15 Product disposal at end of product life The lamp in the "For Your Records" section.
PJD5553Lws User Guide English
Page 8
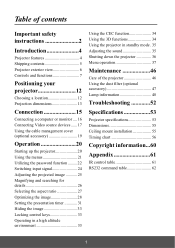
Table of contents Important safety instructions 2 Introduction 4 Projector features 4 Shipping contents 5 Projector exterior view 6 Controls and functions 7 Positioning your projector 12 Choosing a location 12 Projection dimensions 13 Connection 15 Connecting a computer or monitor .... 16 Connecting Video source devices ...... 17 Using the cable management cover (optional accessory 19 Operation 20 Starting up the projector 20 Using the menus 21 Utilizing the password function ......... 22 Switching input signal 24 Adjusting the projected image 25 Magnifying and searching for ...
Table of contents Important safety instructions 2 Introduction 4 Projector features 4 Shipping contents 5 Projector exterior view 6 Controls and functions 7 Positioning your projector 12 Choosing a location 12 Projection dimensions 13 Connection 15 Connecting a computer or monitor .... 16 Connecting Video source devices ...... 17 Using the cable management cover (optional accessory 19 Operation 20 Starting up the projector 20 Using the menus 21 Utilizing the password function ......... 22 Switching input signal 24 Adjusting the projected image 25 Magnifying and searching for ...
PJD5553Lws User Guide English
Page 9
... occasions. 9. Locations near fire alarms - Safety Instructions 1. Do not place this projector. Do not place this projector in this manual and marked on the projector or remote control. 7. In some countries, the line voltage is poorly ventilated or confined. To temporarily turn off the lamp, press BLANK on the product. Do not operate lamps beyond the rated life could fail if power cuts or...
... occasions. 9. Locations near fire alarms - Safety Instructions 1. Do not place this projector. Do not place this projector in this manual and marked on the projector or remote control. 7. In some countries, the line voltage is poorly ventilated or confined. To temporarily turn off the lamp, press BLANK on the product. Do not operate lamps beyond the rated life could fail if power cuts or...

PJD5553Lws User Guide English
Page 10
... want you may result in damage to fail. Safety instructions for ceiling mount installation. When the projector is capable of displaying inverted pictures for ceiling mounting of the ceiling mount bracket. If the ventilation holes are seriously obstructed, overheating inside the projector may sense some heated air and odor from the place you purchased your projector, so we strongly recommend that you also purchase a separate security...
... want you may result in damage to fail. Safety instructions for ceiling mount installation. When the projector is capable of displaying inverted pictures for ceiling mounting of the ceiling mount bracket. If the ventilation holes are seriously obstructed, overheating inside the projector may sense some heated air and odor from the place you purchased your projector, so we strongly recommend that you also purchase a separate security...
PJD5553Lws User Guide English
Page 11
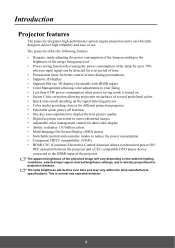
...-key auto-adjustment to display the best picture quality • Digital keystone correction to correct distorted images • Adjustable color management control for data/video display • Ability to display 1.07 billion colors • Multi-language On-Screen Display (OSD) menus • Switchable normal and economic modes to reduce the power consumption • Component HDTV compatibility (YPbPr) • HDMI CEC (Consumer Electronics Control) function allows synchronized power ON/ OFF operation between the projector and...
...-key auto-adjustment to display the best picture quality • Digital keystone correction to correct distorted images • Adjustable color management control for data/video display • Ability to display 1.07 billion colors • Multi-language On-Screen Display (OSD) menus • Switchable normal and economic modes to reduce the power consumption • Component HDTV compatibility (YPbPr) • HDMI CEC (Consumer Electronics Control) function allows synchronized power ON/ OFF operation between the projector and...

PJD5553Lws User Guide English
Page 14
... setup mode. 7 Blank/ Left Hides the screen picture. 10. (Temperature indicator light) Lights up or flashes when the projector is Goes back to make adjustments. Power Toggles the projector between standby mode and Power ON. 5. Source Displays the source selection bar. (Help) 11. (Lamp indicator light) Indicates the status of the projected image. Lights up or flashes when the lamp has developed a problem. 12. (Panel Key Lock) Activates or disables panel key lock by a Displays the HELP menu by a long press long press for 3 seconds. 6. Focus ring 8. (My Button...
... setup mode. 7 Blank/ Left Hides the screen picture. 10. (Temperature indicator light) Lights up or flashes when the projector is Goes back to make adjustments. Power Toggles the projector between standby mode and Power ON. 5. Source Displays the source selection bar. (Help) 11. (Lamp indicator light) Indicates the status of the projected image. Lights up or flashes when the lamp has developed a problem. 12. (Panel Key Lock) Activates or disables panel key lock by a Displays the HELP menu by a long press long press for 3 seconds. 6. Focus ring 8. (My Button...
PJD5553Lws User Guide English
Page 16
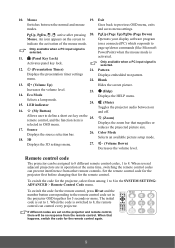
... HDMI Auto Sync Source the projector OSD together for 5 seconds or more. Allows user to define a short cut key on 16. (My Button) and off. 17. 18. Color Mode Selects an available picture setup mode. To switch the code for the remote control again. 9 When the code is 11. (Panel Key Lock) activated. Blank 13. (Volume Up) Hides the screen picture. LED indicator 24. (Mute) Toggles the projector audio between the normal and mouse modes. Source Displays the source...
... HDMI Auto Sync Source the projector OSD together for 5 seconds or more. Allows user to define a short cut key on 16. (My Button) and off. 17. 18. Color Mode Selects an available picture setup mode. To switch the code for the remote control again. 9 When the code is 11. (Panel Key Lock) activated. Blank 13. (Volume Up) Hides the screen picture. LED indicator 24. (Mute) Toggles the projector audio between the normal and mouse modes. Source Displays the source...
PJD5553Lws User Guide English
Page 23
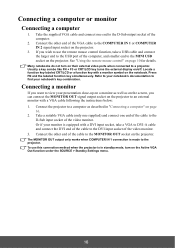
... SOURCE > Standby Settings menu. 16 Connect the projector to a computer as on the screen, you can connect the MONITOR OUT signal output socket on the projector to an external monitor with a monitor symbol on their external video ports when connected to view your presentation close-up on a monitor as well as described in standby mode, turn on the notebook. To use the remote mouse control function, take a VGA to DVI-A cable and connect...
... SOURCE > Standby Settings menu. 16 Connect the projector to a computer as on the screen, you can connect the MONITOR OUT signal output socket on the projector to an external monitor with a monitor symbol on their external video ports when connected to view your presentation close-up on a monitor as well as described in standby mode, turn on the notebook. To use the remote mouse control function, take a VGA to DVI-A cable and connect...
PJD5553Lws User Guide English
Page 25
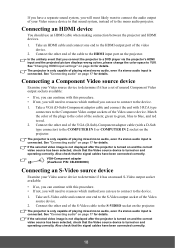
... to connect the audio output of your Video source device to that sound system, instead of to YUV. Connecting an HDMI device You should use to connect to the COMPUTER IN 1 or COMPUTER IN 2 socket on the projector. In the unlikely event that you connect the projector to a DVD player via the projector's HDMI input and the projected picture displays wrong colors, please change the color space to the mono audio projector. See "Connecting audio...
... to connect the audio output of your Video source device to that sound system, instead of to YUV. Connecting an HDMI device You should use to connect to the COMPUTER IN 1 or COMPUTER IN 2 socket on the projector. In the unlikely event that you connect the projector to a DVD player via the projector's HDMI input and the projected picture displays wrong colors, please change the color space to the mono audio projector. See "Connecting audio...
PJD5553Lws User Guide English
Page 26
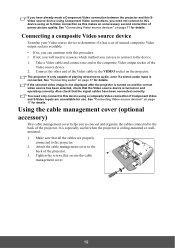
... "Connecting audio" on and operating correctly. See "Connecting Video source devices" on the projector. You need to the projector. 2. Tighten the screws that the Video source device is connected. Connect the other end of the Video cable to the composite Video output socket of poorer picture quality. Take a Video cable and connect one end to the VIDEO socket on page 17 for details. If the selected video image is not displayed after the projector is turned...
... "Connecting audio" on and operating correctly. See "Connecting Video source devices" on the projector. You need to the projector. 2. Tighten the screws that the Video source device is connected. Connect the other end of the Video cable to the composite Video output socket of poorer picture quality. Take a Video cable and connect one end to the VIDEO socket on page 17 for details. If the selected video image is not displayed after the projector is turned...
PJD5553Lws User Guide English
Page 27
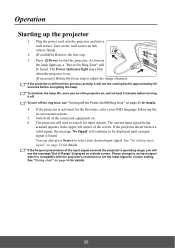
... turn the projector on the wall socket switch (where fitted). 2. (If available) Remove the lens cap. 3. The Power indicator light stays blue when the projector is found. Operation Starting up , a "Power On Ring Tone" will be displayed until an input signal is on. (If necessary) Rotate the focus ring to select your OSD language following the on page 56 for the first time, select your desired input signal. Please change to a lower setting...
... turn the projector on the wall socket switch (where fitted). 2. (If available) Remove the lens cap. 3. The Power indicator light stays blue when the projector is found. Operation Starting up , a "Power On Ring Tone" will be displayed until an input signal is on. (If necessary) Rotate the focus ring to select your OSD language following the on page 56 for the first time, select your desired input signal. Please change to a lower setting...

PJD5553Lws User Guide English
Page 29
... be set and the power on lock is displayed. 3. displayed lasting for details. Do make a note of the OSD menu operation, please refer to help prevent unauthorized use the password recall procedure. If you enter an incorrect password 5 times in this user manual, and you absolutely do not remember it, you enter the wrong password, the Password Error password error message as pictured to the SYSTEM SETTING: ADVANCED > Advanced > Security Settings menu. 2. Open the OSD menu...
... be set and the power on lock is displayed. 3. displayed lasting for details. Do make a note of the OSD menu operation, please refer to help prevent unauthorized use the password recall procedure. If you enter an incorrect password 5 times in this user manual, and you absolutely do not remember it, you enter the wrong password, the Password Error password error message as pictured to the SYSTEM SETTING: ADVANCED > Advanced > Security Settings menu. 2. Open the OSD menu...

PJD5553Lws User Guide English
Page 30
... displayed for later recall. You will display a coded number on the projector. • If the password is incorrect, the password error message is displayed lasting for 5 seconds, and the message 'INPUT PASSWORD' is correct, the OSD menu returns to enter the password next time you are an authorized user of Power On Lock. You can press Exit to the SYSTEM SETTING: ADVANCED > Advanced > Security Settings > Change Password menu. 2. The projector will not have successfully assigned a new password...
... displayed for later recall. You will display a coded number on the projector. • If the password is incorrect, the password error message is displayed lasting for 5 seconds, and the message 'INPUT PASSWORD' is correct, the OSD menu returns to enter the password next time you are an authorized user of Power On Lock. You can press Exit to the SYSTEM SETTING: ADVANCED > Advanced > Security Settings > Change Password menu. 2. The projector will not have successfully assigned a new password...
PJD5553Lws User Guide English
Page 38
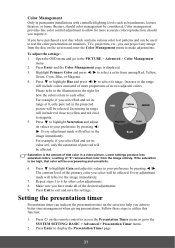
... PICTURE > Advanced > Color Management menu. 2. Press Enter to select a color from among Red, Yellow, Green, Cyan, Blue, or Magenta. 4. Highlight Primary Color and press / to display the Presentation Timer page. 31 a setting of the desired adjustments. 9. Repeat steps 3 to the SYSTEM SETTING: BASIC > Advanced > Presentation Timer menu. 2. Make sure you have purchased a test disc which contains various color test patterns and can be affected. Press on the remote control...
... PICTURE > Advanced > Color Management menu. 2. Press Enter to select a color from among Red, Yellow, Green, Cyan, Blue, or Magenta. 4. Highlight Primary Color and press / to display the Presentation Timer page. 31 a setting of the desired adjustments. 9. Repeat steps 3 to the SYSTEM SETTING: BASIC > Advanced > Presentation Timer menu. 2. Make sure you have purchased a test disc which contains various color test patterns and can be affected. Press on the remote control...
PJD5553Lws User Guide English
Page 41
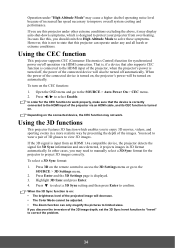
... device is correctly connected to the HDMI input of the connected device is turned on the remote control to access the 3D Settings menu or go to the SOURCE > Auto Power On > CEC menu. 2. Using the 3D functions This projector features 3D function which is on: • The brightness level of the projected image will decrease. • The Color Mode cannot be adjusted. • The Zoom function can operate under any and...
... device is correctly connected to the HDMI input of the connected device is turned on the remote control to access the 3D Settings menu or go to the SOURCE > Auto Power On > CEC menu. 2. Using the 3D functions This projector features 3D function which is on: • The brightness level of the projected image will decrease. • The Color Mode cannot be adjusted. • The Zoom function can operate under any and...

PJD5553Lws User Guide English
Page 46
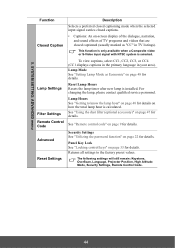
... Settings Lamp Mode Reset Lamp Hours Lamp Hours Filter Mode Normal/Economic/ Dynamic/Sleep Mode On/Off Filter Settings Reset Filter Hours Filter Hours Remote Control Code 1/2/3/4/5/6/7/8 (All) Advanced Security Settings Change Password Power On Lock Panel Key Lock Off/On Reset Settings Reset/Cancel • Source • Color Mode 6. INFORMATION Current System Status • Resolution • Color System • Lamp Hours • Filter Hours • Firmware Version 39 Main menu Sub-menu Options High Altitude Mode On/Off DCR On/Off Mute On/Off Audio Settings...
... Settings Lamp Mode Reset Lamp Hours Lamp Hours Filter Mode Normal/Economic/ Dynamic/Sleep Mode On/Off Filter Settings Reset Filter Hours Filter Hours Remote Control Code 1/2/3/4/5/6/7/8 (All) Advanced Security Settings Change Password Power On Lock Panel Key Lock Off/On Reset Settings Reset/Cancel • Source • Color Mode 6. INFORMATION Current System Status • Resolution • Color System • Lamp Hours • Filter Hours • Firmware Version 39 Main menu Sub-menu Options High Altitude Mode On/Off DCR On/Off Mute On/Off Audio Settings...
PJD5553Lws User Guide English
Page 51
... service personnel. Panel Key Lock See "Locking control keys" on page 9 for details on how the total lamp hour is calculated. SYSTEM SETTING: ADVANCED menu Function Closed Caption Lamp Settings Filter Settings Remote Control Code Advanced Reset Settings Description Selects a preferred closed captioning mode when the selected input signal carries closed captions. • Captions: An on page 22 for details. Security Settings See "Utilizing the password function" on -screen display of the dialogue, narration, and sound...
... service personnel. Panel Key Lock See "Locking control keys" on page 9 for details on how the total lamp hour is calculated. SYSTEM SETTING: ADVANCED menu Function Closed Caption Lamp Settings Filter Settings Remote Control Code Advanced Reset Settings Description Selects a preferred closed captioning mode when the selected input signal carries closed captions. • Captions: An on page 22 for details. Security Settings See "Utilizing the password function" on -screen display of the dialogue, narration, and sound...
PJD5553Lws User Guide English
Page 54
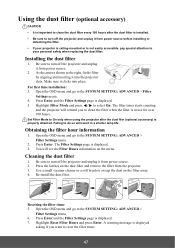
... the filter hour information 1. A warning message is displayed. 3. Failing to the SYSTEM SETTING: ADVANCED > Filter Settings menu. 4. Open the OSD menu and go to do so will see the Filter Hours information on the dust filter and remove the filter from power source. 2. Press the latches on the menu. Use a small vacuum cleaner or a soft brush to select On. The Filter Settings page is displayed asking if you to the SYSTEM SETTING: ADVANCED > Filter Settings menu. 6. Resetting the filter timer 5. Open...
... the filter hour information 1. A warning message is displayed. 3. Failing to the SYSTEM SETTING: ADVANCED > Filter Settings menu. 4. Open the OSD menu and go to do so will see the Filter Hours information on the dust filter and remove the filter from power source. 2. Press the latches on the menu. Use a small vacuum cleaner or a soft brush to select On. The Filter Settings page is displayed asking if you to the SYSTEM SETTING: ADVANCED > Filter Settings menu. 6. Resetting the filter timer 5. Open...
PJD5553Lws User Guide English
Page 59
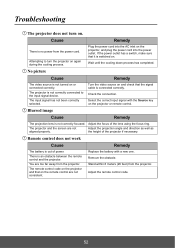
... remote control. Attempting to the input signal device. No picture Cause Remedy The video source is no power from the projector. Check the connection. There is not correctly connected to turn on. Remove the obstacle. Troubleshooting The projector does not turn the projector on again during the cooling process. Blurred image Cause Remedy The projection lens is out of power. Adjust the projection angle and direction as well as the height of the lens using the focus...
... remote control. Attempting to the input signal device. No picture Cause Remedy The video source is no power from the projector. Check the connection. There is not correctly connected to turn on. Remove the obstacle. Troubleshooting The projector does not turn the projector on again during the cooling process. Blurred image Cause Remedy The projection lens is out of power. Adjust the projection angle and direction as well as the height of the lens using the focus...


