
User Manual
Page 1
...ário - Käyttöopas Model No. : VS11949 VS11986 VS11990 User Guide - Guida dell'utente - ViewSonic® PJ557DC/PJ559DC/PJ560DC DLP Projector IMPORTANT: Please read this User Guide will describe your limited coverage from ViewSonic Corporation, which is also found on installing and using the Regional selection box in a safe manner, as...
...ário - Käyttöopas Model No. : VS11949 VS11986 VS11990 User Guide - Guida dell'utente - ViewSonic® PJ557DC/PJ559DC/PJ560DC DLP Projector IMPORTANT: Please read this User Guide will describe your limited coverage from ViewSonic Corporation, which is also found on installing and using the Regional selection box in a safe manner, as...

User Manual
Page 5
.... Product Name: Model Number: Document Number: Serial Number: Purchase Date: For Your Records PJ557DC/PJ559DC/PJ560DC ViewSonic DLP Projector VS11949/VS11986/VS11990 PJ557DC_PJ559DC_PJ560DC_UG_ENG Rev. 1B 12-24-07 The lamp in the United States and other countries.... ViewSonic, the three birds logo, OnView, ViewMatch, and ViewMeter are registered trademarks of continuing product improvement, ViewSonic Corporation reserves the right to change without ...
.... Product Name: Model Number: Document Number: Serial Number: Purchase Date: For Your Records PJ557DC/PJ559DC/PJ560DC ViewSonic DLP Projector VS11949/VS11986/VS11990 PJ557DC_PJ559DC_PJ560DC_UG_ENG Rev. 1B 12-24-07 The lamp in the United States and other countries.... ViewSonic, the three birds logo, OnView, ViewMatch, and ViewMeter are registered trademarks of continuing product improvement, ViewSonic Corporation reserves the right to change without ...

User Manual
Page 6
... Control Operation 9 Installation 10 Connecting the Projector 10 Powering On/Off the Projector 11 Adjusting the Projector 12 Menu Operation 14 Maintenance 18 Cleaning the Lens ...18 Cleaning the Projector Housing 18 Cleaning the Air Filter 18 ...Replacing the Lamp 19 Specifications 21 Appendix 22 LED Indicator Messages 22 Compatibility Modes 23 Troubleshooting ...24 Customer Support ...25 Limited Warranty ...26 Mexico Limited Warranty 28 ViewSonic...
... Control Operation 9 Installation 10 Connecting the Projector 10 Powering On/Off the Projector 11 Adjusting the Projector 12 Menu Operation 14 Maintenance 18 Cleaning the Lens ...18 Cleaning the Projector Housing 18 Cleaning the Air Filter 18 ...Replacing the Lamp 19 Specifications 21 Appendix 22 LED Indicator Messages 22 Compatibility Modes 23 Troubleshooting ...24 Customer Support ...25 Limited Warranty ...26 Mexico Limited Warranty 28 ViewSonic...

User Manual
Page 7
... the proper AC Power Cord is equipped with a grounding type AC line plug to prevent signal interference due to voltage fluctuations. The projector offers the following features: „ Single chip 0.55" Texas Instruments DLP® technology „ XGA (1024 x 768 pixels)...132; Auto image re-sizing (Auto-Sync.) to deliver high reliability and ease of this projector. Introduction Projector Features The projector integrates high-performance optical engine projection and a user - ViewSonic Ground 1 PJ557DC/PJ559DC/PJ560DC If the supplied AC Power Cord does not match your AC outlet...
... the proper AC Power Cord is equipped with a grounding type AC line plug to prevent signal interference due to voltage fluctuations. The projector offers the following features: „ Single chip 0.55" Texas Instruments DLP® technology „ XGA (1024 x 768 pixels)...132; Auto image re-sizing (Auto-Sync.) to deliver high reliability and ease of this projector. Introduction Projector Features The projector integrates high-performance optical engine projection and a user - ViewSonic Ground 1 PJ557DC/PJ559DC/PJ560DC If the supplied AC Power Cord does not match your AC outlet...

User Manual
Page 8
... unit as it was originally packed at the factory. „ Accessories and components may vary by retailer and region. Package Contents When you unpack the projector, make sure you ever to D-SUB) Composite Video Cable S-Video Cable Remote Control (IR) AAA size batteries for remote control User's Manual Quick Start Guide...
... unit as it was originally packed at the factory. „ Accessories and components may vary by retailer and region. Package Contents When you unpack the projector, make sure you ever to D-SUB) Composite Video Cable S-Video Cable Remote Control (IR) AAA size batteries for remote control User's Manual Quick Start Guide...

User Manual
Page 9
Projector Overview Front View 9 12 11 10 9 8 1 2 3 45 6 7 1 Lens cap 2 Elevator button 3 Lens cap strap 4 Projection lens 5 Front IR remote control sensor 6 Ventilation holes 7 Air filter cover 8 AC power socket 9 Speaker 10 Control panel 11 Zoom ring 12 Focus ring 13 Lamp cover ViewSonic 3 PJ557DC/PJ559DC/PJ560DC
Projector Overview Front View 9 12 11 10 9 8 1 2 3 45 6 7 1 Lens cap 2 Elevator button 3 Lens cap strap 4 Projection lens 5 Front IR remote control sensor 6 Ventilation holes 7 Air filter cover 8 AC power socket 9 Speaker 10 Control panel 11 Zoom ring 12 Focus ring 13 Lamp cover ViewSonic 3 PJ557DC/PJ559DC/PJ560DC

User Manual
Page 10
The ceiling mount is not included in the package. Rear View 1 2 3 4 1 Connection ports 2 Kensington lock 3 Rear IR remote control sensor 4 Ventilation holes Bottom View 1 2 3 1 Elevator foot 2 Ceiling mount 3 Tilt-adjustment foot „ This projector can be used with a ceiling mount for support. ViewSonic 4 PJ557DC/PJ559DC/PJ560DC
The ceiling mount is not included in the package. Rear View 1 2 3 4 1 Connection ports 2 Kensington lock 3 Rear IR remote control sensor 4 Ventilation holes Bottom View 1 2 3 1 Elevator foot 2 Ceiling mount 3 Tilt-adjustment foot „ This projector can be used with a ceiling mount for support. ViewSonic 4 PJ557DC/PJ559DC/PJ560DC

User Manual
Page 11
...to select items or make adjustments to your selection. 4 Enter Enter to the input signal from a computer. 6 Power Turn the projector on or off. 7 Menu Display or exit the on-screen display menus. 8 Source Manually select an input source. Activate in ...Color Setting, Lamp Counter Reset and Factory Default menu operations. 5 Resync Resynchronize the projector to sub-menu and confirm the menu selection. ViewSonic 5 PJ557DC/PJ559DC/PJ560DC Using the Product Control Panel LED 1 2 3 4 876 5 1 Lamp (Lamp LED indicator) Refer ...
...to select items or make adjustments to your selection. 4 Enter Enter to the input signal from a computer. 6 Power Turn the projector on or off. 7 Menu Display or exit the on-screen display menus. 8 Source Manually select an input source. Activate in ...Color Setting, Lamp Counter Reset and Factory Default menu operations. 5 Resync Resynchronize the projector to sub-menu and confirm the menu selection. ViewSonic 5 PJ557DC/PJ559DC/PJ560DC Using the Product Control Panel LED 1 2 3 4 876 5 1 Lamp (Lamp LED indicator) Refer ...

User Manual
Page 12
... (analog RGB or component) to this jack. 5 Computer In Connect image input signal (analog RGB or component) to this jack. 6 RS-232 When operating the projector via a computer, connect this to the controlling computer's RS-232C port. 7 S-Video Connect S-Video output from video equipment to this jack. 8 Video Connect composite video...
... (analog RGB or component) to this jack. 5 Computer In Connect image input signal (analog RGB or component) to this jack. 6 RS-232 When operating the projector via a computer, connect this to the controlling computer's RS-232C port. 7 S-Video Connect S-Video output from video equipment to this jack. 8 Video Connect composite video...

User Manual
Page 13
... buttons (Computer mode only) 6 Act as Blank Screen function. Press again to your selection. 1 Blank- This function is only available when the projector 7 is connected to a computer via a USB cable. 10 Enter Confirm the selection. 11 Freeze Press "Freeze" to a computer via a USB... 9 Right (Computer mode only) Act as mouse left button. ViewSonic 7 11 10 9 8 PJ557DC/PJ559DC/PJ560DC The right button acts as computer keyboard (four directional buttons). This function is only available when the projector is connected to pause the screen image. Cut off . 2 ...
... buttons (Computer mode only) 6 Act as Blank Screen function. Press again to your selection. 1 Blank- This function is only available when the projector 7 is connected to a computer via a USB cable. 10 Enter Confirm the selection. 11 Freeze Press "Freeze" to a computer via a USB... 9 Right (Computer mode only) Act as mouse left button. ViewSonic 7 11 10 9 8 PJ557DC/PJ559DC/PJ560DC The right button acts as computer keyboard (four directional buttons). This function is only available when the projector is connected to pause the screen image. Cut off . 2 ...

User Manual
Page 15
ViewSonic 9 PJ557DC/PJ559DC/PJ560DC Remote Control Operation Point the remote control at the infrared remote sensor and press a button. „ Operating the projector from the front „ Operating the projector from a position where the remote sensor is sunlight or other strong light such as a fluorescent lamp shining on the remote sensor. „ Operate the...
ViewSonic 9 PJ557DC/PJ559DC/PJ560DC Remote Control Operation Point the remote control at the infrared remote sensor and press a button. „ Operating the projector from the front „ Operating the projector from a position where the remote sensor is sunlight or other strong light such as a fluorescent lamp shining on the remote sensor. „ Operate the...

User Manual
Page 16
The included cables are based on actual shipment delivery. ViewSonic 10 PJ557DC/PJ559DC/PJ560DC Installation Connecting the Projector 1 VGA Cable (D-Sub to D-Sub) 2 Audio Cable 3 RS-232 Cable 4 USB Cable 5 VGA (D-Sub) to HDTV (RCA) Cable 6 S-Video Cable 7 Composite Video Cable Laptop type ... cable, power cords of these devices can or must be disconnected from the above is a sample connection. This does not mean that all of both a projector and external equipment should be connected simultaneously. „ The cables that come with the...
The included cables are based on actual shipment delivery. ViewSonic 10 PJ557DC/PJ559DC/PJ560DC Installation Connecting the Projector 1 VGA Cable (D-Sub to D-Sub) 2 Audio Cable 3 RS-232 Cable 4 USB Cable 5 VGA (D-Sub) to HDTV (RCA) Cable 6 S-Video Cable 7 Composite Video Cable Laptop type ... cable, power cords of these devices can or must be disconnected from the above is a sample connection. This does not mean that all of both a projector and external equipment should be connected simultaneously. „ The cables that come with the...

User Manual
Page 17
... on , you are not allowed to turn the projector back on the projector immediately following a power off procedure. Do not turn off ? Press button to turn on . Press Power again" appear on your source (computer, notebook, DVD, etc.). The projector automatically detects your eyes. ViewSonic 11 PJ557DC/PJ559DC/PJ560DC Once in stand- Turn on...
... on , you are not allowed to turn the projector back on the projector immediately following a power off procedure. Do not turn off ? Press button to turn on . Press Power again" appear on your source (computer, notebook, DVD, etc.). The projector automatically detects your eyes. ViewSonic 11 PJ557DC/PJ559DC/PJ560DC Once in stand- Turn on...

User Manual
Page 18
...height. „ To avoid damaging the projector, make sure that the elevator foot and tilt- Adjust the image by rotating the focus ring. To level the image on the screen, turn the tilt-adjustment foot to lock the adjustment. 2. ViewSonic 12 PJ557DC/PJ559DC/PJ560DC To raise or lower... the image: 1. Adjusting the Projector Adjusting the Projector Height Tilt-adjustment foot Elevator foot Elevator button The...
...height. „ To avoid damaging the projector, make sure that the elevator foot and tilt- Adjust the image by rotating the focus ring. To level the image on the screen, turn the tilt-adjustment foot to lock the adjustment. 2. ViewSonic 12 PJ557DC/PJ559DC/PJ560DC To raise or lower... the image: 1. Adjusting the Projector Adjusting the Projector Height Tilt-adjustment foot Elevator foot Elevator button The...

User Manual
Page 19
DMD, lens assembly, etc.) ViewSonic 13 PJ557DC/PJ559DC/PJ560DC Smoke residue may cause build-up and damage to determine the screen size and projection distance. 249.80 227.83 124....) Tele (inches) 30.08 27.34 49.96 45.57 74.94 68.35 124.90 113.92 249.80 227.83 „ Position the projector in a smoky environment. other positions can cause heat build-up on critical parts (i.e. Adjusting Projection Image Size Refer to the graphic and table below to...
DMD, lens assembly, etc.) ViewSonic 13 PJ557DC/PJ559DC/PJ560DC Smoke residue may cause build-up and damage to determine the screen size and projection distance. 249.80 227.83 124....) Tele (inches) 30.08 27.34 49.96 45.57 74.94 68.35 124.90 113.92 249.80 227.83 „ Position the projector in a smoky environment. other positions can cause heat build-up on critical parts (i.e. Adjusting Projection Image Size Refer to the graphic and table below to...

User Manual
Page 20
High ViewSonic 14 PJ557DC/PJ559DC/PJ560DC Menu Operation The projector has multilingual on-screen display menus that allow you to make image adjustments and change a variety of settings.
High ViewSonic 14 PJ557DC/PJ559DC/PJ560DC Menu Operation The projector has multilingual on-screen display menus that allow you to make image adjustments and change a variety of settings.

User Manual
Page 21
... the difference between light and dark areas. Keystone Correct the keystone distortion. Adjust the settings with W / X. 5. The OSD menu will close and the projector will return to select any feature in the main menu. 3. At higher temperature the screen looks colder; If you select "User", "Red", "Green"... areas. After selecting the desired main menu feature, press X to open the OSD menu. 2. How to fit the width of the screen. ViewSonic 15 PJ557DC/PJ559DC/PJ560DC Aspect Ratio Select how the picture fits on the remote control again. When OSD is displayed, use S / T to ...
... the difference between light and dark areas. Keystone Correct the keystone distortion. Adjust the settings with W / X. 5. The OSD menu will close and the projector will return to select any feature in the main menu. 3. At higher temperature the screen looks colder; If you select "User", "Red", "Green"... areas. After selecting the desired main menu feature, press X to open the OSD menu. 2. How to fit the width of the screen. ViewSonic 15 PJ557DC/PJ559DC/PJ560DC Aspect Ratio Select how the picture fits on the remote control again. When OSD is displayed, use S / T to ...

User Manual
Page 22
... of or behind the screen. Tracking Adjust the phase of colors. Video Image (Video Mode) Color Adjust the intensity of the projector relative to the computer. Setting (Computer / Video Mode) Menu Position Choose the menu location on the display screen. Signal Type ...132; YCbCr : For component 480i,576i signals Lamp Counter Display the lamp's elapsed operating time (in front of the projector: upright or upside-down within the projection area. ViewSonic 16 PJ557DC/PJ559DC/PJ560DC V Position (Vertical Position) Adjust the image up or down , in hours). Sound (Computer ...
... of or behind the screen. Tracking Adjust the phase of colors. Video Image (Video Mode) Color Adjust the intensity of the projector relative to the computer. Setting (Computer / Video Mode) Menu Position Choose the menu location on the display screen. Signal Type ...132; YCbCr : For component 480i,576i signals Lamp Counter Display the lamp's elapsed operating time (in front of the projector: upright or upside-down within the projection area. ViewSonic 16 PJ557DC/PJ559DC/PJ560DC V Position (Vertical Position) Adjust the image up or down , in hours). Sound (Computer ...
User Manual
Page 23
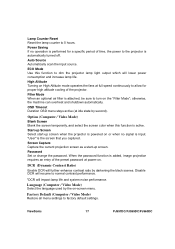
... on or when no operation is performed for proper high altitude cooling of time, the power to dim the projector lamp light output which will impact lamp life and system noise performance. ViewSonic 17 PJ557DC/PJ559DC/PJ560DC High Altitude Turning on the "Filter Mode"; Password Set or change the password. Filter Mode...
... on or when no operation is performed for proper high altitude cooling of time, the power to dim the projector lamp light output which will impact lamp life and system noise performance. ViewSonic 17 PJ557DC/PJ559DC/PJ560DC High Altitude Turning on the "Filter Mode"; Password Set or change the password. Filter Mode...

User Manual
Page 24
...the dirt is difficult to remove or if the filter is located at the bottom of the projector, should keep the lens clean as the illustration shown. 3. Replace the filter. 5. ViewSonic 18 PJ557DC/PJ559DC/PJ560DC Cleaning the Lens Gently wipe the lens with a soft, dry cloth.... Maintenance The projector needs proper maintenance. Remove the air filter cover as dust, dirt or spots will project on the projector. Clean the air filter. „...
...the dirt is difficult to remove or if the filter is located at the bottom of the projector, should keep the lens clean as the illustration shown. 3. Replace the filter. 5. ViewSonic 18 PJ557DC/PJ559DC/PJ560DC Cleaning the Lens Gently wipe the lens with a soft, dry cloth.... Maintenance The projector needs proper maintenance. Remove the air filter cover as dust, dirt or spots will project on the projector. Clean the air filter. „...


