
User Guide
Page 2
... An Audio Input 21 Multifunctional Settings 22 Using The Menu Functions 22 MAIN Menu 23 PICTURE-1 Menu 24 PICTURE-2 Menu 26 INPUT Menu 27 AUTO Menu 29 SCREEN Menu 31 OPTION Menu 33 NETWORK Menu 35 Network Setting Up 36 Lamp 37 Replacing The Lamp 38 Air Filter 39 Caring For The Air Filter 39 Other Care 40 Caring For The Inside Of The Projector .. 40 Caring For The Lens 40 Caring For The Cabinet And Remote Control 40 Troubleshooting 41 Related Messages 41...
... An Audio Input 21 Multifunctional Settings 22 Using The Menu Functions 22 MAIN Menu 23 PICTURE-1 Menu 24 PICTURE-2 Menu 26 INPUT Menu 27 AUTO Menu 29 SCREEN Menu 31 OPTION Menu 33 NETWORK Menu 35 Network Setting Up 36 Lamp 37 Replacing The Lamp 38 Air Filter 39 Caring For The Air Filter 39 Other Care 40 Caring For The Inside Of The Projector .. 40 Caring For The Lens 40 Caring For The Cabinet And Remote Control 40 Troubleshooting 41 Related Messages 41...
User Guide
Page 3
... in this product. PS/2, VGA and XGA are registered trademarks of this document may be liable for any additional product information as it becomes available, please register your projector's warranty on the Internet at: http://www.viewsonic.com For Your Records Product Name: Model Number: Document Number: Serial Number: Purchase Date: ViewSonic PJ1165 VS10152-1W A-CD-PJ1165 ViewSonic PJ1165 2 Apple, Mac and ADB registered trademarks...
... in this product. PS/2, VGA and XGA are registered trademarks of this document may be liable for any additional product information as it becomes available, please register your projector's warranty on the Internet at: http://www.viewsonic.com For Your Records Product Name: Model Number: Document Number: Serial Number: Purchase Date: ViewSonic PJ1165 VS10152-1W A-CD-PJ1165 ViewSonic PJ1165 2 Apple, Mac and ADB registered trademarks...
User Guide
Page 4
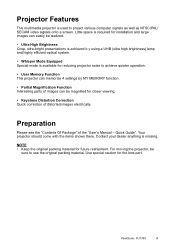
.... Projector Features This multimedia projector is used to use the original packing material. For moving the projector, be magnified for reducing projector noise to achieve quieter operation. • User Memory Function This projector can memorize 4 settings by MY MEMORY function. • Partial Magnification Function Interesting parts of images can be sure to project various computer signals as well as NTSC/PAL/ SECAM video signals onto a screen. ViewSonic PJ1165 3 NOTE • Keep...
.... Projector Features This multimedia projector is used to use the original packing material. For moving the projector, be magnified for reducing projector noise to achieve quieter operation. • User Memory Function This projector can memorize 4 settings by MY MEMORY function. • Partial Magnification Function Interesting parts of images can be sure to project various computer signals as well as NTSC/PAL/ SECAM video signals onto a screen. ViewSonic PJ1165 3 NOTE • Keep...

User Guide
Page 6
...Control Panel on the Projector Remote Control STANDBY/ON button This button may not exist by the model SEARCH button ZOOM buttons FOCUS buttons KEYSTONE button MENU button RESET button ENTER button ( Mouse left button) (Rear) Cursor buttons S/T/W/X ( Keyboard Arrow keys ) Remote Control STANDBY/ON button and STANDBY/ON indicator TEMP indicator LAMP indicator VOLUME button INPUT dial SEARCH button M1-D indicator RGB indicator BNC indicator COMPONENT indicator S-VIDEO indicator VIDEO indicator ZOOM buttons FOCUS buttons KEYSTONE button MENU button RESET button ENTER button Cursor buttons...
...Control Panel on the Projector Remote Control STANDBY/ON button This button may not exist by the model SEARCH button ZOOM buttons FOCUS buttons KEYSTONE button MENU button RESET button ENTER button ( Mouse left button) (Rear) Cursor buttons S/T/W/X ( Keyboard Arrow keys ) Remote Control STANDBY/ON button and STANDBY/ON indicator TEMP indicator LAMP indicator VOLUME button INPUT dial SEARCH button M1-D indicator RGB indicator BNC indicator COMPONENT indicator S-VIDEO indicator VIDEO indicator ZOOM buttons FOCUS buttons KEYSTONE button MENU button RESET button ENTER button Cursor buttons...

User Guide
Page 7
... ratio Screen Lens center Side View Screen Lens center Side View Screen Size Inches (m) 40 (1.0) 60 (1.5) 70 (1.8) 80 (2.0) 100 (2.5) 120 (3.0) 150 (3.8) 200 (5.1) 250 (6.4) 300 (7.6) 350 (8.9) 400 (10.2) 500 (12.7) [Inches (m)] Min. Setting Up Arrangement WARNING • Before installation, make sure that the projector is turned off and the power code is disconnected. • Do not set up and move the projector, while it is hot. • Install the projector...
... ratio Screen Lens center Side View Screen Lens center Side View Screen Size Inches (m) 40 (1.0) 60 (1.5) 70 (1.8) 80 (2.0) 100 (2.5) 120 (3.0) 150 (3.8) 200 (5.1) 250 (6.4) 300 (7.6) 350 (8.9) 400 (10.2) 500 (12.7) [Inches (m)] Min. Setting Up Arrangement WARNING • Before installation, make sure that the projector is turned off and the power code is disconnected. • Do not set up and move the projector, while it is hot. • Install the projector...
User Guide
Page 9
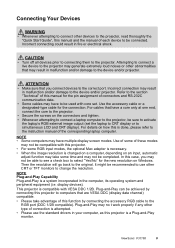
... your computer, as this projector is done, please refer to the instruction manual of the corresponding laptop computer. Attempting to connect a live device to the projector may generate extremely loud noises or other abnormalities that are VESA DDC (display data channel) compatible. • Please take some RGB input modes, the optional Mac adapter is necessary. • When the image resolution is changed on a computer, depending...
... your computer, as this projector is done, please refer to the instruction manual of the corresponding laptop computer. Attempting to connect a live device to the projector may generate extremely loud noises or other abnormalities that are VESA DDC (display data channel) compatible. • Please take some RGB input modes, the optional Mac adapter is necessary. • When the image resolution is changed on a computer, depending...
User Guide
Page 14
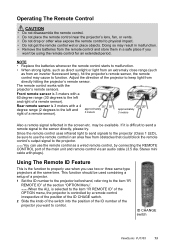
.... Front remote sensor is controlled by connecting the REMOTE CONTROL port of the section "OPTION Menu". Stereo mini cable with the projector's remote sensors. ID CHANGE switch ViewSonic PJ1165 13 The remote control works with plugs). may result in the screen etc. This function should be available. Adjust the direction of the projector to keep light from the remote control and store them in an area free from an inverter fluorescent lamp), hit the projector's remote sensor, the remote control may...
.... Front remote sensor is controlled by connecting the REMOTE CONTROL port of the section "OPTION Menu". Stereo mini cable with the projector's remote sensors. ID CHANGE switch ViewSonic PJ1165 13 The remote control works with plugs). may result in the screen etc. This function should be available. Adjust the direction of the projector to keep light from the remote control and store them in an area free from an inverter fluorescent lamp), hit the projector's remote sensor, the remote control may...
User Guide
Page 15
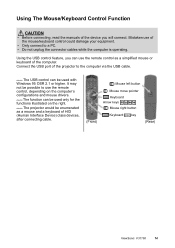
... illustrated on the computer's configurations and mouse drivers. Using the USB control feature, you will connect. Mistaken use of the projector to use the remote control as a mouse and a keyboard of HID (Human Interface Device) class devices, after connecting cable. (Front) Mouse left button Mouse move pointer Keyboard Arrow keys Mouse right button Keyboard key (Rear) ViewSonic PJ1165 14 It may not be enumerated as a simplified...
... illustrated on the computer's configurations and mouse drivers. Using the USB control feature, you will connect. Mistaken use of the projector to use the remote control as a mouse and a keyboard of HID (Human Interface Device) class devices, after connecting cable. (Front) Mouse left button Mouse move pointer Keyboard Arrow keys Mouse right button Keyboard key (Rear) ViewSonic PJ1165 14 It may not be enumerated as a simplified...

User Guide
Page 16
... projector after the connected devices. The projector lamp will light up and the STANDBY/ON indicator will light to solid orange. 3 Press the STANDBY/ON button. The message "Power off , and the STANDBY/ ON indicator will begin blinking green. The STANBY/ON indicator will stop blinking and light green. 4 Select an input signal according to the section "Selecting An Input Sign al" of the projector. STANDBY/ON button / indicator STANDBY/ON button Power switch (Off position) ViewSonic PJ1165 15 Turning On The Power 1 Remove the lens cap. 2 Set the power switch...
... projector after the connected devices. The projector lamp will light up and the STANDBY/ON indicator will light to solid orange. 3 Press the STANDBY/ON button. The message "Power off , and the STANDBY/ ON indicator will begin blinking green. The STANBY/ON indicator will stop blinking and light green. 4 Select an input signal according to the section "Selecting An Input Sign al" of the projector. STANDBY/ON button / indicator STANDBY/ON button Power switch (Off position) ViewSonic PJ1165 15 Turning On The Power 1 Remove the lens cap. 2 Set the power switch...
User Guide
Page 21
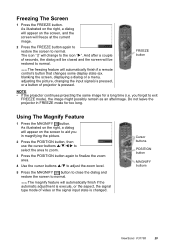
.... Cursor buttons POSITION button MAGNIFY buttons ViewSonic PJ1165 20 As illustrated on the right, a dialog will change to exit FREEZE mode), the image might possibly remain as an afterimage. blanking the screen, displaying a dialog or a menu, adjusting the picture, changing the input signal) is pressed, or a button of video or the signal input state is pressed. Freezing The Screen 1 Press the FREEZE button. FREEZE button NOTE • If the projector continues projecting the same image for...
.... Cursor buttons POSITION button MAGNIFY buttons ViewSonic PJ1165 20 As illustrated on the right, a dialog will change to exit FREEZE mode), the image might possibly remain as an afterimage. blanking the screen, displaying a dialog or a menu, adjusting the picture, changing the input signal) is pressed, or a button of video or the signal input state is pressed. Freezing The Screen 1 Press the FREEZE button. FREEZE button NOTE • If the projector continues projecting the same image for...
User Guide
Page 23
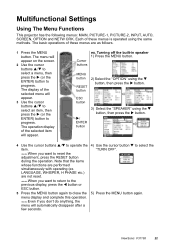
...'t do anything, the menu will appear on the screen. 2 Use the cursor buttons S/T to select a menu, then press the X (or the ENTER) button to progress. Cursor buttons ex. The basic operations of these menus are as follows. 1 Press the MENU button. The operation display of the selected menu will appear. Multifunctional Settings Using The Menu Functions This projector has the following menus: MAIN, PICTURE-1, PICTURE-2, INPUT, AUTO, SCREEN, OPTION and NETW ORK...
...'t do anything, the menu will appear on the screen. 2 Use the cursor buttons S/T to select a menu, then press the X (or the ENTER) button to progress. Cursor buttons ex. The basic operations of these menus are as follows. 1 Press the MENU button. The operation display of the selected menu will appear. Multifunctional Settings Using The Menu Functions This projector has the following menus: MAIN, PICTURE-1, PICTURE-2, INPUT, AUTO, SCREEN, OPTION and NETW ORK...
User Guide
Page 29
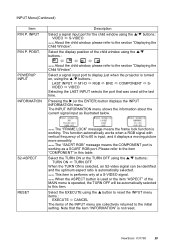
... operated, the TURN OFF will be identified and the optimum aspect ratio is not reset. Please refer to reset the INPUT menu items.: EXECUTE CANCEL The items of the MAIN menu is input, and it displays a moving picture more smoothly. memo When the ASPECT button is used at a S-VIDEO signal. INPUT P.IN P. memo The "SACRT RGB" message means the COMPONENT port is performs only at the last time. ViewSonic PJ1165...
... operated, the TURN OFF will be identified and the optimum aspect ratio is not reset. Please refer to reset the INPUT menu items.: EXECUTE CANCEL The items of the MAIN menu is input, and it displays a moving picture more smoothly. memo When the ASPECT button is used at a S-VIDEO signal. INPUT P.IN P. memo The "SACRT RGB" message means the COMPONENT port is performs only at the last time. ViewSonic PJ1165...
User Guide
Page 30
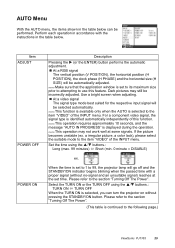
... message "AUTO IN PROGRESS" is set time. a irregular picture, a color lack), please select the suitable mode to 99, the projector lamp will go off and the STANDBY/ON indicator begins blinking when the passed time with the instructions in the table below . Please refer to the section "Turning Off The Power". (This table is selected, you can be performed. Use a bright screen when adjusting. When the time is displayed during the operation. AUTO Menu...
... message "AUTO IN PROGRESS" is set time. a irregular picture, a color lack), please select the suitable mode to 99, the projector lamp will go off and the STANDBY/ON indicator begins blinking when the passed time with the instructions in the table below . Please refer to the section "Turning Off The Power". (This table is selected, you can be performed. Use a bright screen when adjusting. When the time is displayed during the operation. AUTO Menu...

User Guide
Page 40
... to open the menu. (2) Choose the "OPTION" on the projector power, and reset the filter timer. memo Incorrectly resetting of the filter timer (resetting without the air filter could cause malfunction. ViewSonic PJ1165 39 Air Filter WARNING • Please carefully read the "Quick Start Guide". • Before caring the air filter, make sure the power switch is off and the power cable is automatically turned off in incorrect message functions. The use the projector with the air filter and filter cover removed. If the indicators or a message...
... to open the menu. (2) Choose the "OPTION" on the projector power, and reset the filter timer. memo Incorrectly resetting of the filter timer (resetting without the air filter could cause malfunction. ViewSonic PJ1165 39 Air Filter WARNING • Please carefully read the "Quick Start Guide". • Before caring the air filter, make sure the power switch is off and the power cable is automatically turned off in incorrect message functions. The use the projector with the air filter and filter cover removed. If the indicators or a message...
User Guide
Page 42
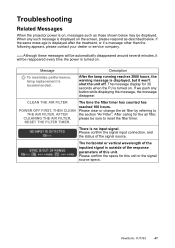
..., THEN CLEAN THE AIR FILTER. Description After the lamp running reaches 2000 hours, the warning message is displayed on the screen, please respond as those shown below . There is outside of the response parameters of this unit or the signal source specs. AFTER CLEANING THE AIR FILTER, RESET THE FILTER TIMER. The horizontal or vertical wavelength of the signal source. After caring for this unit. Troubleshooting Related Messages When the projector power is turned on...
..., THEN CLEAN THE AIR FILTER. Description After the lamp running reaches 2000 hours, the warning message is displayed on the screen, please respond as those shown below . There is outside of the response parameters of this unit or the signal source specs. AFTER CLEANING THE AIR FILTER, RESET THE FILTER TIMER. The horizontal or vertical wavelength of the signal source. After caring for this unit. Troubleshooting Related Messages When the projector power is turned on...
User Guide
Page 43
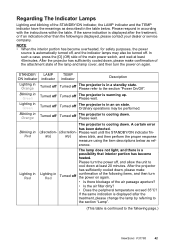
... become heated. Please refer to the section "Lamp". (This table is in according with the instructions within the table. Blinking in Red Lighting in Green Turned off Turned off , and allow the unit to the following page.) ViewSonic PJ1165 42 erence. Blinking in Red The projector is displayed, please contact your dealer or service company. Lighting in Green Turned off Turned off confirmation of the following is cooling down...
... become heated. Please refer to the section "Lamp". (This table is in according with the instructions within the table. Blinking in Red Lighting in Green Turned off Turned off , and allow the unit to the following page.) ViewSonic PJ1165 42 erence. Blinking in Red The projector is displayed, please contact your dealer or service company. Lighting in Green Turned off Turned off confirmation of the following is cooling down...
User Guide
Page 45
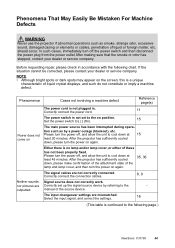
... connect the connection cables. 8, 9 Neither sounds nor pictures are outputted. Select the input signal, and correct the settings. 16 (This table is not set up the signal source device by a power outage (blackout), etc. Please turn the power on again. Phenomena That May Easily Be Mistaken For Machine Defects WARNING Never use the projector if abnormal operations such as by referring to the manual of the lamp and lamp cover, and then turn...
... connect the connection cables. 8, 9 Neither sounds nor pictures are outputted. Select the input signal, and correct the settings. 16 (This table is not set up the signal source device by a power outage (blackout), etc. Please turn the power on again. Phenomena That May Easily Be Mistaken For Machine Defects WARNING Never use the projector if abnormal operations such as by referring to the manual of the lamp and lamp cover, and then turn...
User Guide
Page 46
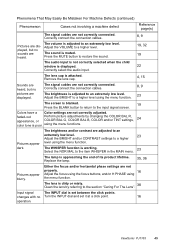
... the sound. Adjust the BRIGHT to the input signal screen. faded-out appearance, or Perform picture adjustments by referring to the section "Caring For The Lens". 38 Input signal The INPUT dial is blanked. 19 Press the BLANK button to return to a higher level using the menu functions. Colors have a Color settings are heard. Replace the lamp. 35, 36 Pictures appear blurry. Correctly connect the connection cables. 8, 9 Pictures are displayed, but no Turn the INPUT dial and set...
... the sound. Adjust the BRIGHT to the input signal screen. faded-out appearance, or Perform picture adjustments by referring to the section "Caring For The Lens". 38 Input signal The INPUT dial is blanked. 19 Press the BLANK button to return to a higher level using the menu functions. Colors have a Color settings are heard. Replace the lamp. 35, 36 Pictures appear blurry. Correctly connect the connection cables. 8, 9 Pictures are displayed, but no Turn the INPUT dial and set...
User Guide
Page 49
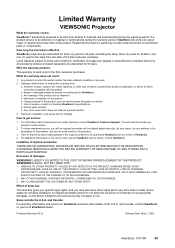
... to manufacturer's installed lamp only. Use of the nearest ViewSonic service center, contact ViewSonic. h. Any other acts of the first consumer purchase. Removal, installation, and set-up service charges. For information about receiving service under warranty, contact ViewSonic Customer Support. You will be required to a product defect. 3. To obtain warranted service, you . For additional information or the name of supplies or parts not meeting ViewSonic's specifications. VIEWSONIC's SHALL NOT...
... to manufacturer's installed lamp only. Use of the nearest ViewSonic service center, contact ViewSonic. h. Any other acts of the first consumer purchase. Removal, installation, and set-up service charges. For information about receiving service under warranty, contact ViewSonic Customer Support. You will be required to a product defect. 3. To obtain warranted service, you . For additional information or the name of supplies or parts not meeting ViewSonic's specifications. VIEWSONIC's SHALL NOT...

User Guide
Page 51
... unauthorized changes or modifications not expressly approved by 93/68/EEC Art.13 with the projector or specified. This equipment has been tested and found to which can radiate radio frequency energy, and if not installed and used , use grounded power supply cord and the provided shielded video interface cable with the limits for a Class B digital device, pursuant to part 15 of...
... unauthorized changes or modifications not expressly approved by 93/68/EEC Art.13 with the projector or specified. This equipment has been tested and found to which can radiate radio frequency energy, and if not installed and used , use grounded power supply cord and the provided shielded video interface cable with the limits for a Class B digital device, pursuant to part 15 of...


