User Guide
Page 2
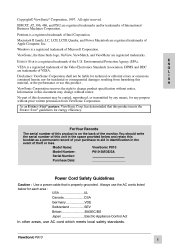
... Association. VESA is properly grounded. nor for energy efficiency. As an ENERGY STAR® partner, ViewSonic Corp. Model Name: ViewSonic P810 Model Number: P810-3M/3E/3A _____ Serial Number: Purchase Date: _____ Power Cord Safety Guidelines Caution : Use a power cable that this document may be liable for each area : USA ...UL Canada ...CSA Germany ...VDE Switzerland ...SEV Britain ...BASEC/BS Japan ...Electric Appliance Control Act...
... Association. VESA is properly grounded. nor for energy efficiency. As an ENERGY STAR® partner, ViewSonic Corp. Model Name: ViewSonic P810 Model Number: P810-3M/3E/3A _____ Serial Number: Purchase Date: _____ Power Cord Safety Guidelines Caution : Use a power cable that this document may be liable for each area : USA ...UL Canada ...CSA Germany ...VDE Switzerland ...SEV Britain ...BASEC/BS Japan ...Electric Appliance Control Act...
User Guide
Page 3
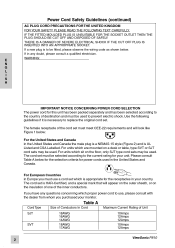
... wiring code as shown below for the selection criteria for the receptacles in your monitor. For units which are mounted on the insulation of one of Unit 10Amps 12Amps 12Amps 10Amps 12Amps SVT 2 W ViewSonic P810 IF THE FITTED MOULDED PLUG IS UNSUITABLE.... Please consult Table A below . The cord set . For European Countries in any questions concerning which is appropriate for power cords used to replace the original cord set is necessary to prevent electric shock. Power Cord Safety Guidelines (continued) AC PLUG CORD PRECAUTIIONS FOR THE UNITED KINGDOM FOR YOUR SAFETY...
... wiring code as shown below for the selection criteria for the receptacles in your monitor. For units which are mounted on the insulation of one of Unit 10Amps 12Amps 12Amps 10Amps 12Amps SVT 2 W ViewSonic P810 IF THE FITTED MOULDED PLUG IS UNSUITABLE.... Please consult Table A below . The cord set . For European Countries in any questions concerning which is appropriate for power cords used to replace the original cord set is necessary to prevent electric shock. Power Cord Safety Guidelines (continued) AC PLUG CORD PRECAUTIIONS FOR THE UNITED KINGDOM FOR YOUR SAFETY...
User Guide
Page 4
... rated 125Vac 7 A min. Also, any unauthorized changes or modifications not expreddly approved by the party responsible for compliance could void the user's authority to operate this equipment appropriately according to the instruction manual. Use this device. There is encouraged to try to "safety". E N G L I S H Power Supply Cord USA For units with 100 - 120V input voltage in the USA, use only shielded BNC(5) cable...
... rated 125Vac 7 A min. Also, any unauthorized changes or modifications not expreddly approved by the party responsible for compliance could void the user's authority to operate this equipment appropriately according to the instruction manual. Use this device. There is encouraged to try to "safety". E N G L I S H Power Supply Cord USA For units with 100 - 120V input voltage in the USA, use only shielded BNC(5) cable...
User Guide
Page 5
CONTENTS Getting Started Package Contents ...5 E N G L I S H Precautions ...5 Quick Installation ...6 Operation Front Control Panel ...7 OnView® Main Menu ...7 Other Information Specifications ...13 Troubleshooting ...14 Cleaning the Monitor ...15 Limited Warranty ...16 Customer Support ...back cover 4 Getting Started ViewSonic P810
CONTENTS Getting Started Package Contents ...5 E N G L I S H Precautions ...5 Quick Installation ...6 Operation Front Control Panel ...7 OnView® Main Menu ...7 Other Information Specifications ...13 Troubleshooting ...14 Cleaning the Monitor ...15 Limited Warranty ...16 Customer Support ...back cover 4 Getting Started ViewSonic P810
User Guide
Page 6
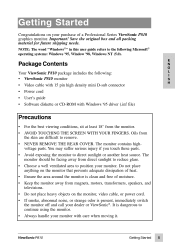
... monitor with Windows '95 driver (.inf file) E N G L I S H Precautions For the best viewing conditions, sit at least 18" from direct sunlight to remove. Do not place anything on the monitor that prevents adequate dissipation of moisture. Do not place heavy objects on the monitor, video cable, or power cord. It is present, immediately switch the monitor off and call your purchase of a Professional Series ViewSonic P810 graphics monitor. Getting Started...
... monitor with Windows '95 driver (.inf file) E N G L I S H Precautions For the best viewing conditions, sit at least 18" from direct sunlight to remove. Do not place anything on the monitor that prevents adequate dissipation of moisture. Do not place heavy objects on the monitor, video cable, or power cord. It is present, immediately switch the monitor off and call your purchase of a Professional Series ViewSonic P810 graphics monitor. Getting Started...
User Guide
Page 7
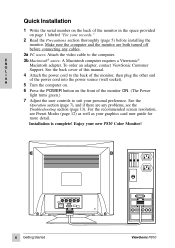
... connecting any problems, see Preset Modes (page 12) as well as your new P810 Color Monitor! For the recommended screen resolution, see the Troubleshooting section (page 13). E N G L I S H 6 Getting Started ViewSonic P810 See the back cover of this manual. 4 Attach the power cord to the back of the monitor, then plug the other end of the monitor ON. (The Power light turns green.) 7 Adjust the user controls to suit your personal preference. Installation is complete! Enjoy your graphics card user guide...
... connecting any problems, see Preset Modes (page 12) as well as your new P810 Color Monitor! For the recommended screen resolution, see the Troubleshooting section (page 13). E N G L I S H 6 Getting Started ViewSonic P810 See the back cover of this manual. 4 Attach the power cord to the back of the monitor, then plug the other end of the monitor ON. (The Power light turns green.) 7 Adjust the user controls to suit your personal preference. Installation is complete! Enjoy your graphics card user guide...
User Guide
Page 8
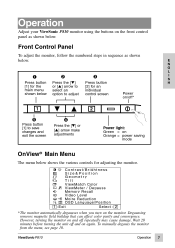
... to save changes and exit the screen 2 Press the [M] or [L] arrow make adjustments š ™ Power light: Green = on again. ViewSonic P810 Operation 7 However, turning the monitor on the front control panel as shown below . Operation Adjust your ViewSonic P810 monitor using the buttons on and off * 1 Press button [1] to adjust ˜ Press button [2] for an individual control screen Power on/off repeatedly may cause damage. Contrast/Brightness Size&Position Geometry Tilt ViewMatch Color ViewMeter / De g auss Memor y Recall Video Level Moire Reduction OSD...
... to save changes and exit the screen 2 Press the [M] or [L] arrow make adjustments š ™ Power light: Green = on again. ViewSonic P810 Operation 7 However, turning the monitor on the front control panel as shown below . Operation Adjust your ViewSonic P810 monitor using the buttons on and off * 1 Press button [1] to adjust ˜ Press button [2] for an individual control screen Power on/off repeatedly may cause damage. Contrast/Brightness Size&Position Geometry Tilt ViewMatch Color ViewMeter / De g auss Memor y Recall Video Level Moire Reduction OSD...

User Guide
Page 9
...® menu & save changes, press button [1]. Contrast/Brightness: Press button [2] to its factory preset level. Brightness adjusts background black level of screen image. Horizontal Position moves the screen image left or right. [M] moves screen left, [L] moves screen right. Note: With the Contrast adjustment screen displayed, pressing the [M] and [L] buttons simultaneously increases Contrast to select one of the screen. [M] decreases screen height, [L] increases screen height. 8 Operation ViewSonic P810 Then press [M] or [L] again to adjust. Size & Position: Press button...
...® menu & save changes, press button [1]. Contrast/Brightness: Press button [2] to its factory preset level. Brightness adjusts background black level of screen image. Horizontal Position moves the screen image left or right. [M] moves screen left, [L] moves screen right. Note: With the Contrast adjustment screen displayed, pressing the [M] and [L] buttons simultaneously increases Contrast to select one of the screen. [M] decreases screen height, [L] increases screen height. 8 Operation ViewSonic P810 Then press [M] or [L] again to adjust. Size & Position: Press button...

User Guide
Page 10
... screen image. [M] rotates screen counterclockwise, [L] rotates screen clockwise. Parallelogram slants vertical edges of the screen. [M] curves vertical edges inward, [L] curves vertical edges outward. ViewSonic P810 Operation 9 Vertical Pincushion straightens vertical sides of the screen to the left or right. [M] slants vertical edges to the left , [L] curves vertical edges to the right. With the Tilt adjustment screen displayed, pressing the [M] and [L] buttons simultaneously adjusts rotation to adjust. To exit the OnView® menu & save changes, press button...
... screen image. [M] rotates screen counterclockwise, [L] rotates screen clockwise. Parallelogram slants vertical edges of the screen. [M] curves vertical edges inward, [L] curves vertical edges outward. ViewSonic P810 Operation 9 Vertical Pincushion straightens vertical sides of the screen to the left or right. [M] slants vertical edges to the left , [L] curves vertical edges to the right. With the Tilt adjustment screen displayed, pressing the [M] and [L] buttons simultaneously adjusts rotation to adjust. To exit the OnView® menu & save changes, press button...
User Guide
Page 11
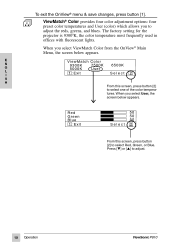
... reds, greens, and blues. The factory setting for the projector is 93000K, the color temperature most frequently used in offices with fluorescent lights. ViewMatch® Color provides four color adjustment options: four preset color temperatures and User (color) which allows you select ViewMatch Color from the OnView® Main Menu, the screen below appears. E N G L I S H V i e w M a tc h C o l o r 7500K 9300K User 5000K 1 :Exit 6500K Select : 2 From this screen, press button [2] to adjust. 10 Operation ViewSonic P810...
... reds, greens, and blues. The factory setting for the projector is 93000K, the color temperature most frequently used in offices with fluorescent lights. ViewMatch® Color provides four color adjustment options: four preset color temperatures and User (color) which allows you select ViewMatch Color from the OnView® Main Menu, the screen below appears. E N G L I S H V i e w M a tc h C o l o r 7500K 9300K User 5000K 1 :Exit 6500K Select : 2 From this screen, press button [2] to adjust. 10 Operation ViewSonic P810...
User Guide
Page 12
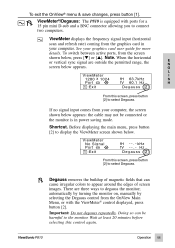
...; control displayed, press button [2]. automatically by turning the monitor on, manually by selecting the Degauss control from the screen shown below appears: the cable may not be harmful to select Degauss. Doing so can cause irregular colors to degauss the monitor; ViewMeter®/Degauss: The P810 is in your computer. If no signal input comes from the graphics card in power saving mode. kHz fV - - . - ViewMeter displays the frequency signal input (horizontal scan...
...; control displayed, press button [2]. automatically by turning the monitor on, manually by selecting the Degauss control from the screen shown below appears: the cable may not be harmful to select Degauss. Doing so can cause irregular colors to degauss the monitor; ViewMeter®/Degauss: The P810 is in your computer. If no signal input comes from the graphics card in power saving mode. kHz fV - - . - ViewMeter displays the frequency signal input (horizontal scan...
User Guide
Page 13
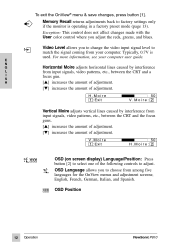
... adjustments back to match the signal coming from among five languages for the OnView menus and adjustment screens; Video Level allows you to change the video input signal level to factory settings only if the monitor is used. OSD Language allows you adjust the reds, greens, and blues. V.Moire 1 :Exit 50 H.Moire: 2 OSD OSD (on screen display) Language/Position: Press button [2] to choose from your computer user guide. English, French, German, Italian, and Spanish. To exit the OnView® menu & save changes, press button...
... adjustments back to match the signal coming from among five languages for the OnView menus and adjustment screens; Video Level allows you to change the video input signal level to factory settings only if the monitor is used. OSD Language allows you adjust the reds, greens, and blues. V.Moire 1 :Exit 50 H.Moire: 2 OSD OSD (on screen display) Language/Position: Press button [2] to choose from your computer user guide. English, French, German, Italian, and Spanish. To exit the OnView® menu & save changes, press button...
User Guide
Page 14
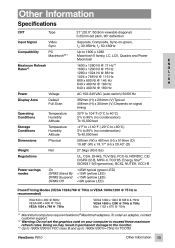
... Information Specifications CRT Input Signal Compatibility Type Video Sync PC Macintosh®*1 21" (20.0" /50.8cm viewable diagonal) 0.25mm dot pitch, 90° deflection Separate, Composite, Sync-on-green, fH: 30-95kHz, fV: 50-180Hz Up to 1600 x 1280 Macintosh II family, LC, LCII, Quadra and Power Macintosh..., TCO'95, Energy Star®, ISO9241-3(Ergonomics), BCIQ, NUTEK, VCCI-B Maximum Refresh Rates*2 E N G L I S H Power Display Area Operating Conditions Storage Conditions Dimensions Weight Regulations Power savings modes On DPMS Stand By DPMS Suspend DPMS Off 145W typical (green LED)
... Information Specifications CRT Input Signal Compatibility Type Video Sync PC Macintosh®*1 21" (20.0" /50.8cm viewable diagonal) 0.25mm dot pitch, 90° deflection Separate, Composite, Sync-on-green, fH: 30-95kHz, fV: 50-180Hz Up to 1600 x 1280 Macintosh II family, LC, LCII, Quadra and Power Macintosh..., TCO'95, Energy Star®, ISO9241-3(Ergonomics), BCIQ, NUTEK, VCCI-B Maximum Refresh Rates*2 E N G L I S H Power Display Area Operating Conditions Storage Conditions Dimensions Weight Regulations Power savings modes On DPMS Stand By DPMS Suspend DPMS Off 145W typical (green LED)
User Guide
Page 15
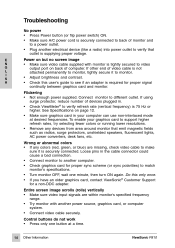
...; Adjust brightness and contrast. • Check this only once. • If you have an older graphics card, contact ViewSonic® Customer Support for proper signal continuity between graphics card and monitor. Entire screen image scrolls (rolls) vertically • Make sure video input signals are missing, check video cable to match monitor's specifications. • Turn monitor OFF, wait one button at desired frequencies. Connect monitor to verify that emit magnetic fields such as radios, surge protectors, unshielded speakers, fluorescent lights, AC power...
...; Adjust brightness and contrast. • Check this only once. • If you have an older graphics card, contact ViewSonic® Customer Support for proper signal continuity between graphics card and monitor. Entire screen image scrolls (rolls) vertically • Make sure video input signals are missing, check video cable to match monitor's specifications. • Turn monitor OFF, wait one button at desired frequencies. Connect monitor to verify that emit magnetic fields such as radios, surge protectors, unshielded speakers, fluorescent lights, AC power...

User Guide
Page 16
... ONTO THE SCREEN OR CASE. To clean the screen 1 Wipe the screen with a clean, soft, lint-free cloth. To clean the case 1 Use a soft, dry cloth. 2 If still not clean, apply a small amount of any ammonia or alcohol-based cleaners on the monitor screen or case. ViewSonic will not be liable for damage resulting from use of the monitor. E N G L I S H ViewSonic P810 Other Information 15 This removes dust and...
... ONTO THE SCREEN OR CASE. To clean the screen 1 Wipe the screen with a clean, soft, lint-free cloth. To clean the case 1 Use a soft, dry cloth. 2 If still not clean, apply a small amount of any ammonia or alcohol-based cleaners on the monitor screen or case. ViewSonic will not be liable for damage resulting from use of the monitor. E N G L I S H ViewSonic P810 Other Information 15 This removes dust and...
User Guide
Page 17
... protects: This warranty is effective: ViewSonic P810 color monitors, including the display tubes, are : U.S. Accident, misuse, neglect, fire, water, lightning, or other cause which the serial number has been defaced, modified or removed. 2. Any damage of nature, unauthorized product modification, or failure to follow instructions supplied with a like product. Causes external to get service: 1. Removal, installation, and set-up service charges. and Canada 1-800-688...
... protects: This warranty is effective: ViewSonic P810 color monitors, including the display tubes, are : U.S. Accident, misuse, neglect, fire, water, lightning, or other cause which the serial number has been defaced, modified or removed. 2. Any damage of nature, unauthorized product modification, or failure to follow instructions supplied with a like product. Causes external to get service: 1. Removal, installation, and set-up service charges. and Canada 1-800-688...


