N4290p User Guide, English. G Region
Page 2
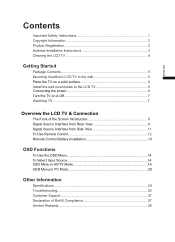
... the LCD TV 6 Connecting the power 6 Turn the TV on & Off 7 Watching TV...7 Overview the LCD TV & Connection The Front of the Screen Introduction 8 Signal Source Interface from Rear View 9 Signal Source Interface from Side View 11 To Use Remote Control 12 Remote Control Battery Installation 13 OSD Functions To Use the OSD Menu 14 To Select Input Source 14 OSD Menu in AV/TV Mode 14 OSD Menu in PC Mode 20 Other Information Specifications 24 Troubleshooting 25 Customer Support...
... the LCD TV 6 Connecting the power 6 Turn the TV on & Off 7 Watching TV...7 Overview the LCD TV & Connection The Front of the Screen Introduction 8 Signal Source Interface from Rear View 9 Signal Source Interface from Side View 11 To Use Remote Control 12 Remote Control Battery Installation 13 OSD Functions To Use the OSD Menu 14 To Select Input Source 14 OSD Menu in AV/TV Mode 14 OSD Menu in PC Mode 20 Other Information Specifications 24 Troubleshooting 25 Customer Support...

N4290p User Guide, English. G Region
Page 3
... attempt to perform the useful function of operation must be described, and the ease of time. 14. Refer all -pole switch is used as vase can only be unused for long periods of switch operation must be guaranteed. 20. Service is the most convenient for further instructions. 7. If a plug or a coupler is used as : if the power-supply cord or plug is damaged, if liquid...
... attempt to perform the useful function of operation must be described, and the ease of time. 14. Refer all -pole switch is used as vase can only be unused for long periods of switch operation must be guaranteed. 20. Service is the most convenient for further instructions. 7. If a plug or a coupler is used as : if the power-supply cord or plug is damaged, if liquid...
N4290p User Guide, English. G Region
Page 7
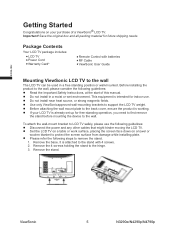
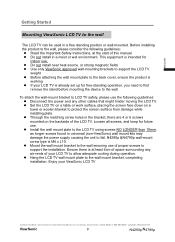
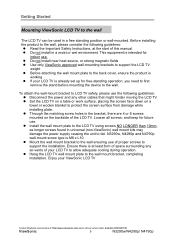
... is already set up for free-standing operation, you need to first remove the stand before mounting the device to the wall. To attach the wall-mount bracket to the hinge. 3. Remove the 4 screws holding the stand to LCD TV safely, please use . z Do not install in a free standing position or wall-mounted. z Before attaching the wall mount plate to the stand with batteries • RF Cable • ViewSonic User Guide Mounting ViewSonic LCD TV to remove the stand. 1. ViewSonic 5 N3290w/N4290p/N4790p Remove the base. ENGLISH Getting...
... is already set up for free-standing operation, you need to first remove the stand before mounting the device to the wall. To attach the wall-mount bracket to the hinge. 3. Remove the 4 screws holding the stand to LCD TV safely, please use . z Do not install in a free standing position or wall-mounted. z Before attaching the wall mount plate to the stand with batteries • RF Cable • ViewSonic User Guide Mounting ViewSonic LCD TV to remove the stand. 1. ViewSonic 5 N3290w/N4290p/N4790p Remove the base. ENGLISH Getting...
N4290p User Guide, English. G Region
Page 8
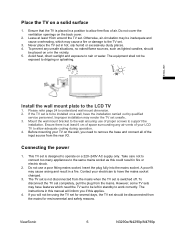
.... 2. ViewSonic 6 N3290w/N4290p/N4790p The equipment shall not be disconnected from the mains. A poor fit may cause a fire or damage to remove the base and connect all of the input source from the rear I/O. To disconnect the TV set . Ensure that the TV is designed to work correctly. Improper installation may have the mains socket changed. 3. Place the TV on the wall, you...
.... 2. ViewSonic 6 N3290w/N4290p/N4790p The equipment shall not be disconnected from the mains. A poor fit may cause a fire or damage to remove the base and connect all of the input source from the rear I/O. To disconnect the TV set . Ensure that the TV is designed to work correctly. Improper installation may have the mains socket changed. 3. Place the TV on the wall, you...
N4290p User Guide, English. G Region
Page 16
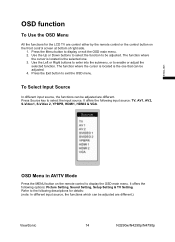
... where the cursor is located is the selected one that can be adjusted are different.) ViewSonic 14 N3290w/N4290p/N4790p It offers the following input source: TV, AV1, AV2, S-Video1, S-Video 2, YPBPR, HDMI1, HDMI2 & VGA. Press the Menu button to enable or adjust the selected function. ENGLISH OSD Menu in AV/TV Mode Press the MENU button on the front control screen at bottom of right...
... where the cursor is located is the selected one that can be adjusted are different.) ViewSonic 14 N3290w/N4290p/N4790p It offers the following input source: TV, AV1, AV2, S-Video1, S-Video 2, YPBPR, HDMI1, HDMI2 & VGA. Press the Menu button to enable or adjust the selected function. ENGLISH OSD Menu in AV/TV Mode Press the MENU button on the front control screen at bottom of right...
N4290p User Guide, English. G Region
Page 22
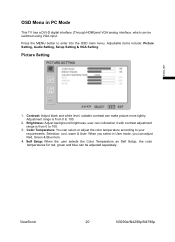
.... 3. ViewSonic 20 N3290w/N4290p/N4790p Picture Setting 1. Color Temperature: You can collocation it with contrast adjustment range is from 0 to your requirements. Contrast: Adjust black and white level, suitable contrast can adjust Red, Green & Blue item. 4. When you select in PC Mode This TV has a DVI-D digital interface (Through HDMI)and VGA analog interface, which can be adjusted separately. Press the MENU button to 100. 2. Self Setup: When the user selects...
.... 3. ViewSonic 20 N3290w/N4290p/N4790p Picture Setting 1. Color Temperature: You can collocation it with contrast adjustment range is from 0 to your requirements. Contrast: Adjust black and white level, suitable contrast can adjust Red, Green & Blue item. 4. When you select in PC Mode This TV has a DVI-D digital interface (Through HDMI)and VGA analog interface, which can be adjusted separately. Press the MENU button to 100. 2. Self Setup: When the user selects...
N4290p User Guide, English. G Region
Page 30
... on the wall, holes and fixed screws will need to get service: 1. Damage, deterioration or malfunction resulting from state to state. Removal or installation of the nearest ViewSonic service center, contact ViewSonic. 5. e. Normal wear and tear. Any product exhibiting a condition commonly known as electric power fluctuations or failure. The accessories attached with the product. b. c. For information about receiving service under Support/Warranty Information. 4.3: ViewSonic LCD TV Warranty LTV_LW01...
... on the wall, holes and fixed screws will need to get service: 1. Damage, deterioration or malfunction resulting from state to state. Removal or installation of the nearest ViewSonic service center, contact ViewSonic. 5. e. Normal wear and tear. Any product exhibiting a condition commonly known as electric power fluctuations or failure. The accessories attached with the product. b. c. For information about receiving service under Support/Warranty Information. 4.3: ViewSonic LCD TV Warranty LTV_LW01...
N4290P User Guide (English)
Page 1
ViewSonic® N4290p N4790p LCD TV - Warranty information contained in this User Guide to obtain important information on installing and using your product in a safe manner, a s well as registering your limited c overage f rom ViewSonic Corporation, which is also f ound on our web site at http://www.viewsonic.com in English, or in specif c languages using the Regional selection box in the upper right corner...
ViewSonic® N4290p N4790p LCD TV - Warranty information contained in this User Guide to obtain important information on installing and using your product in a safe manner, a s well as registering your limited c overage f rom ViewSonic Corporation, which is also f ound on our web site at http://www.viewsonic.com in English, or in specif c languages using the Regional selection box in the upper right corner...
N4290P User Guide (English)
Page 11
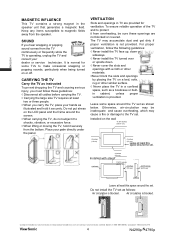
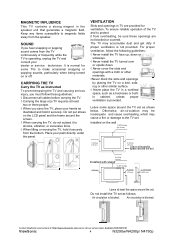
... or service technician. Leave some TVs to make occasional snapping or popping sounds, particularly when being turned on the LCD panel and the frame around the set. Contact ViewSonic service team at least this space around the TV set . Keep...sound comes from the speaker. For proper ventilation, follow these openings are provided for some space around the set as shown below. Do not install the TV set . 4 inches (10 cm) Installed with stand (10 cm) 11.875 inches (30.16 cm) 4 inches (10 cm) 2.375 inches (6.03 cm) Leave at : http://www.ViewSonic.com or call our service...
... or service technician. Leave some TVs to make occasional snapping or popping sounds, particularly when being turned on the LCD panel and the frame around the set. Contact ViewSonic service team at least this space around the TV set . Keep...sound comes from the speaker. For proper ventilation, follow these openings are provided for some space around the set as shown below. Do not install the TV set . 4 inches (10 cm) Installed with stand (10 cm) 11.875 inches (30.16 cm) 4 inches (10 cm) 2.375 inches (6.03 cm) Leave at : http://www.ViewSonic.com or call our service...
N4290P User Guide (English)
Page 16
... free-standing operation, you need to first remove the stand before mounting the device to LCD TV safely, please use . z Set the LCD TV on a table or work surface, placing the screen face down on the backside of space surrounding any other cables that might hinder moving the LCD TV. z Mount the wall mount bracket to the wall ensuring use . z Do not install near heat source, or strong magnetic fields z Use only ViewSonic approved wall-mounting brackets...
... free-standing operation, you need to first remove the stand before mounting the device to LCD TV safely, please use . z Set the LCD TV on a table or work surface, placing the screen face down on the backside of space surrounding any other cables that might hinder moving the LCD TV. z Mount the wall mount bracket to the wall ensuring use . z Do not install near heat source, or strong magnetic fields z Use only ViewSonic approved wall-mounting brackets...
N4290P User Guide (English)
Page 27
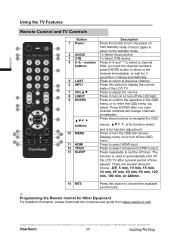
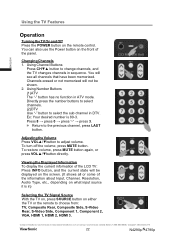
... turn off timer. ENGLISH Using the TV Features Remote Control and TV Controls Button Description 1 Power Press this button to turn the power on or turn off the OSD menu. 11 HDMI Press to select HDMI input 12 YPbPr Press to select component (YPbPr) input 13 SLEEP Press repeatedly to set the off the LED light. 9 ENTER Press to confirm the selection in the OSD menu, or to enter the OSD menu you input the channel numbers...
... turn off timer. ENGLISH Using the TV Features Remote Control and TV Controls Button Description 1 Power Press this button to turn the power on or turn off the OSD menu. 11 HDMI Press to select HDMI input 12 YPbPr Press to select component (YPbPr) input 13 SLEEP Press repeatedly to set the off the LED light. 9 ENTER Press to confirm the selection in the OSD menu, or to enter the OSD menu you input the channel numbers...
N4290P User Guide (English)
Page 29
... remote to choose from: TV, Composite Rear, Composite Side, S-Video Rear, S-Video Side, Component 1, Component 2, VGA, HDMI 1, HDMI 2, HDMI 3. Using Channel Buttons Press CHźŸ button to the previous channel, press LAST button. You will be shown. 2. Viewing the Displayed Information To display the current information of the LCD TV: Press INFO button, and the current state will see all or some of the panel. To turn off the volume, press MUTE button. Changing Channels 1. Contact ViewSonic service...
... remote to choose from: TV, Composite Rear, Composite Side, S-Video Rear, S-Video Side, Component 1, Component 2, VGA, HDMI 1, HDMI 2, HDMI 3. Using Channel Buttons Press CHźŸ button to the previous channel, press LAST button. You will be shown. 2. Viewing the Displayed Information To display the current information of the LCD TV: Press INFO button, and the current state will see all or some of the panel. To turn off the volume, press MUTE button. Changing Channels 1. Contact ViewSonic service...
N4290P User Guide (English)
Page 32
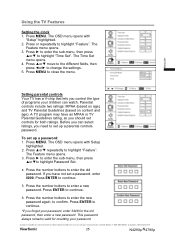
... ViewSonic 25 N4290p/14790p Using the TV Features Setting the clock 1. The Time Set menu opens. 4. To set up a password: 1. If you need to set up a parental controls password. This password always remains valid for resetting your password, enter 3448 for both ratings. Press MENU. Before you can watch. The Feature menu opens. 3. Press Ź to enter the sub-menu, then press Ÿorźto enter a new password. Press the number buttons...
... ViewSonic 25 N4290p/14790p Using the TV Features Setting the clock 1. The Time Set menu opens. 4. To set up a password: 1. If you need to set up a parental controls password. This password always remains valid for resetting your password, enter 3448 for both ratings. Press MENU. Before you can watch. The Feature menu opens. 3. Press Ź to enter the sub-menu, then press Ÿorźto enter a new password. Press the number buttons...

N4290P User Guide (English)
Page 36
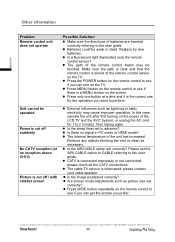
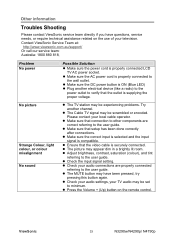
... (color), and tint referring to the user guide. Please contact your television. z The Cable TV signal may appear dim in a brightly lit room. z Press the Volume + (Up) button on the use of your local cable operator. ENGLISH Other information Troubles Shooting Please contact ViewSonic service team directly if you have been pressed, try pressing this button again. z Make sure the AC power cord is properly connected LCD TV AC power...
... (color), and tint referring to the user guide. Please contact your television. z The Cable TV signal may appear dim in a brightly lit room. z Press the Volume + (Up) button on the use of your local cable operator. ENGLISH Other information Troubles Shooting Please contact ViewSonic service team directly if you have been pressed, try pressing this button again. z Make sure the AC power cord is properly connected LCD TV AC power...
N4290P User Guide (English)
Page 37
... sleep timer set correctly? please check all the CATV connections. please contact your cable operator. z Is the image positioned correctly? z Press WIDE button repeatedly on the remote control to 2 minutes, then replug again. z Press MENU button on the remote control to perform. Remove any objects blocking the vent or clean as picture size set in PC mode or HDMI mode? Make sure the path is clear and that the remote control is connected...
... sleep timer set correctly? please check all the CATV connections. please contact your cable operator. z Is the image positioned correctly? z Press WIDE button repeatedly on the remote control to 2 minutes, then replug again. z Press MENU button on the remote control to perform. Remove any objects blocking the vent or clean as picture size set in PC mode or HDMI mode? Make sure the path is clear and that the remote control is connected...
N4290P User Guide (English)
Page 39
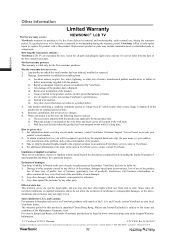
... warranty is mounted on the wall, holes and fixed screws will at : http://www.ViewSonic.com or call our service team: United States 1-800-688-6688, Canada 1-866-463-4775 ViewSonic 32 N4290p/14790p What the warranty does not cover: 1. c. d. e. f. Use of merchantability and fitness for a particular purpose. Any other acts of the first customer purchase. Removal, installation, and set...
... warranty is mounted on the wall, holes and fixed screws will at : http://www.ViewSonic.com or call our service team: United States 1-800-688-6688, Canada 1-866-463-4775 ViewSonic 32 N4290p/14790p What the warranty does not cover: 1. c. d. e. f. Use of merchantability and fitness for a particular purpose. Any other acts of the first customer purchase. Removal, installation, and set...
N3290w, N4290p, N4790p User Guide, English. AU Region
Page 9
...install the TV turned over or upside down. ◊ Never cover the slots and openings with stand (10 cm) 11.875 inches (30.16 cm) 4 inches (10 cm) 2.375 inches (6.03 cm) Leave at : http://www.viewsonic.com.au/ or call our service team: Australia 1800 880 818 ViewSonic 4 N3290w/N4290p/ N4790p Contact ViewSonic service...from the speaker. Installed on the LCD panel and the frame around the set . Do not install the TV set as follows: Air circulation is operating, unplug the TV and consult your palm directly under the panel. VENTILATION Slots and openings in the speaker unit that...
...install the TV turned over or upside down. ◊ Never cover the slots and openings with stand (10 cm) 11.875 inches (30.16 cm) 4 inches (10 cm) 2.375 inches (6.03 cm) Leave at : http://www.viewsonic.com.au/ or call our service team: Australia 1800 880 818 ViewSonic 4 N3290w/N4290p/ N4790p Contact ViewSonic service...from the speaker. Installed on the LCD panel and the frame around the set . Do not install the TV set as follows: Air circulation is operating, unplug the TV and consult your palm directly under the panel. VENTILATION Slots and openings in the speaker unit that...
N3290w, N4290p, N4790p User Guide, English. AU Region
Page 14
... x L10. z Set the LCD TV on a table or work surface, placing the screen face down on the backside of this manual. N3290w, N4290p and N4790p wall-mount screw type is already set up for indoor use the following guidelines: z Read the Important Safety Instructions, at : http://www.viewsonic.com.au/ or call our service team: Australia 1800 880 818 ViewSonic 9 N3290w/N4290p/ N4790p z Do not install in universal (non-ViewSonic) wall mount kits...
... x L10. z Set the LCD TV on a table or work surface, placing the screen face down on the backside of this manual. N3290w, N4290p and N4790p wall-mount screw type is already set up for indoor use the following guidelines: z Read the Important Safety Instructions, at : http://www.viewsonic.com.au/ or call our service team: Australia 1800 880 818 ViewSonic 9 N3290w/N4290p/ N4790p z Do not install in universal (non-ViewSonic) wall mount kits...
N3290w, N4290p, N4790p User Guide, English. AU Region
Page 38
... your audio settings, your local cable operator. z Make sure that the outlet is ON (Blue LED) z Plug another channel. z Make sure the correct input is selected and the input signal is properly connected LCD TV AC power socket. z The picture may have questions, service needs, or require technical assistance related on the remote control. z The MUTE button may appear dim in a brightly lit room. Other information Troubles Shooting Please contact ViewSonic service...
... your audio settings, your local cable operator. z Make sure that the outlet is ON (Blue LED) z Plug another channel. z Make sure the correct input is selected and the input signal is properly connected LCD TV AC power socket. z The picture may have questions, service needs, or require technical assistance related on the remote control. z The MUTE button may appear dim in a brightly lit room. Other information Troubles Shooting Please contact ViewSonic service...
N4290p Spec Sheet
Page 2
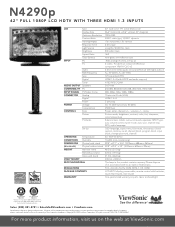
... OUTPUT Speakers 2x10-watt COMPATIBILITY PC 640x480, 800x600,1024x768, 280x1024, 1920x1080 INPUT SIGNAL TV/Video Comp. 480i, 480p, 720p, 1080i, 1080p CONNECTOR Analog 15-pin mini D-sub (VGA) Digital HDMI 1.3 x3 Power 3-pin plug POWER Voltage AC 10-240V (universal), 50-60Hz Consumption 250W (typ) CONTROLS Basic Power, enter, channel +/- , volume +/- , menu Picture Picture mode, brightness, contrast, color, tint, sharpness, color temperature TV/Audio Balance, bass, treble, surround, reverb, equalizer, SPDIF type, auto volume control, tuner mode, auto scan, channel...
... OUTPUT Speakers 2x10-watt COMPATIBILITY PC 640x480, 800x600,1024x768, 280x1024, 1920x1080 INPUT SIGNAL TV/Video Comp. 480i, 480p, 720p, 1080i, 1080p CONNECTOR Analog 15-pin mini D-sub (VGA) Digital HDMI 1.3 x3 Power 3-pin plug POWER Voltage AC 10-240V (universal), 50-60Hz Consumption 250W (typ) CONTROLS Basic Power, enter, channel +/- , volume +/- , menu Picture Picture mode, brightness, contrast, color, tint, sharpness, color temperature TV/Audio Balance, bass, treble, surround, reverb, equalizer, SPDIF type, auto volume control, tuner mode, auto scan, channel...


