
User Manual
Page 2
... or omissions contained herein; VESA is a registered trademark of its useful life. Information in the United States and other countries. FOR YOUR RECORDS Product Name : ViewSonic N4000wP/N4050w LCD Display Model Number : VS10657-1 Document Number : A-CD-N4000wP_N4050w-1 Serial Number: Purchase Date: Product disposal at the end of the U.S. Microsoft, Windows, Windows NT...
... or omissions contained herein; VESA is a registered trademark of its useful life. Information in the United States and other countries. FOR YOUR RECORDS Product Name : ViewSonic N4000wP/N4050w LCD Display Model Number : VS10657-1 Document Number : A-CD-N4000wP_N4050w-1 Serial Number: Purchase Date: Product disposal at the end of the U.S. Microsoft, Windows, Windows NT...
User Manual
Page 3
Contents Product Registration...22 Important Product Safety Instructions 3..3 Cleaning the LCD DISPLAY 4....... Getting Started Package Contents ...5 5 Front View of the Product 66 Rear View of the Product ...7 Remote Control ...88 Notes on the Remote Control 1100 Installation ...1111 OSD Functions Source Input: Display/AV/S-video 1..4.....1 Source input : PC 1919 Source input : DVI-D 2211 Appendix Specifications ...2222 Troubleshooting...2233 Customer Support ...2244 Limited Warranty ...2255 Safety Guidelines ...2266 Compliance Information for USA 2266 ViewSonic N4000wP/N4050w 1
Contents Product Registration...22 Important Product Safety Instructions 3..3 Cleaning the LCD DISPLAY 4....... Getting Started Package Contents ...5 5 Front View of the Product 66 Rear View of the Product ...7 Remote Control ...88 Notes on the Remote Control 1100 Installation ...1111 OSD Functions Source Input: Display/AV/S-video 1..4.....1 Source input : PC 1919 Source input : DVI-D 2211 Appendix Specifications ...2222 Troubleshooting...2233 Customer Support ...2244 Limited Warranty ...2255 Safety Guidelines ...2266 Compliance Information for USA 2266 ViewSonic N4000wP/N4050w 1
User Manual
Page 4
... placing the product on a bed, sofa, rug or other ). Skin oils are unable to continue using the LCD DISPLAY. Never remove the rear cover. ViewSonic N4000wP/N4050w 3 Important Product Safety Instructions Attention: Follow and obey all the safety and operating instructions before you operate this can result fire or electronic shock. 3 Power...
... placing the product on a bed, sofa, rug or other ). Skin oils are unable to continue using the LCD DISPLAY. Never remove the rear cover. ViewSonic N4000wP/N4050w 3 Important Product Safety Instructions Attention: Follow and obey all the safety and operating instructions before you operate this can result fire or electronic shock. 3 Power...

User Manual
Page 5
...SURE THE LCD DISPLAY IS TURNED OFF • NEVER SPRAY OR POUR ANY LIQUID DIRECTLY ONTO THE SCREEN OR CASE To clean the screen: 1. ViewSonic will not be liable for damage resulting from use of any ammonia or alcohol-based cleaners on the LCD DISPLAY screen or case. If still..., apply a small amount of non-ammonia, non-alcohol based, mild non-abrasive detergent onto a clean, soft, lint-free cloth, then wipe the surface. ViewSonic N4000wP/N4050w 4 This removes dust and other particles. 2. Disclaimer ViewSonic does not recommend the use of any ammonia or alcohol-based cleaners.
...SURE THE LCD DISPLAY IS TURNED OFF • NEVER SPRAY OR POUR ANY LIQUID DIRECTLY ONTO THE SCREEN OR CASE To clean the screen: 1. ViewSonic will not be liable for damage resulting from use of any ammonia or alcohol-based cleaners on the LCD DISPLAY screen or case. If still..., apply a small amount of non-ammonia, non-alcohol based, mild non-abrasive detergent onto a clean, soft, lint-free cloth, then wipe the surface. ViewSonic N4000wP/N4050w 4 This removes dust and other particles. 2. Disclaimer ViewSonic does not recommend the use of any ammonia or alcohol-based cleaners.
User Manual
Page 6
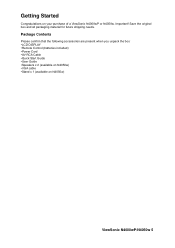
Save the original box and all packaging material for future shipping needs. Package Contents Please confirm that the following accessories are present when you unpack the box: •LCD DISPLAY •Remote Control (batteries included) •Power Cord •AV RCA Cable •Quick Start Guide •User Guide •Speakers x 2 (available on N4050w) •VGA cable •Stand x 1 (available on your purchase of a ViewSonic N4000wP or N4050w. Getting Started Congratulations on N4050w) ViewSonic N4000wP/N4050w 5 Important!
Save the original box and all packaging material for future shipping needs. Package Contents Please confirm that the following accessories are present when you unpack the box: •LCD DISPLAY •Remote Control (batteries included) •Power Cord •AV RCA Cable •Quick Start Guide •User Guide •Speakers x 2 (available on N4050w) •VGA cable •Stand x 1 (available on your purchase of a ViewSonic N4000wP or N4050w. Getting Started Congratulations on N4050w) ViewSonic N4000wP/N4050w 5 Important!

User Manual
Page 7
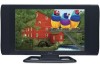
Front View of the Product ViewSonic N4000wP/N4050w 6
Front View of the Product ViewSonic N4000wP/N4050w 6

User Manual
Page 8
Rear View of the Product AV Tuner Box ViewSonic N4000wP/N4050w 7
Rear View of the Product AV Tuner Box ViewSonic N4000wP/N4050w 7

User Manual
Page 11
Note: Availability of OSD controls may vary depending on type and source of applied input. ViewSonic N4000wP/N4050w 10
Note: Availability of OSD controls may vary depending on type and source of applied input. ViewSonic N4000wP/N4050w 10
User Manual
Page 12
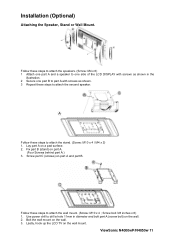
Fix part B (stand) on a pad surface. 2. Follow these steps to attach the stand. (Screw: M10 x 4 / M4 x 2) 1. ViewSonic N4000wP/N4050w 11 Installation (Optional) Attaching the Speaker, Stand or Wall Mount. Screw bolt 3/8 inches x 6) 1. Lay part A on part A. (Four Screws behind part A.) 3. Screw part C (screws) on ...
Fix part B (stand) on a pad surface. 2. Follow these steps to attach the stand. (Screw: M10 x 4 / M4 x 2) 1. ViewSonic N4000wP/N4050w 11 Installation (Optional) Attaching the Speaker, Stand or Wall Mount. Screw bolt 3/8 inches x 6) 1. Lay part A on part A. (Four Screws behind part A.) 3. Screw part C (screws) on ...

User Manual
Page 13
Remote Control Battery Installation Follow the steps below to insert the batteries. 1 Open the remote control's rear battery compartment cover. 2 Insert two AAA batteries. Ensure that the positive and negative ends match as indicated on the bottom of the battery compartment. 3 Replace the battery compartment cover. ViewSonic N4000wP/N4050w 12
Remote Control Battery Installation Follow the steps below to insert the batteries. 1 Open the remote control's rear battery compartment cover. 2 Insert two AAA batteries. Ensure that the positive and negative ends match as indicated on the bottom of the battery compartment. 3 Replace the battery compartment cover. ViewSonic N4000wP/N4050w 12
User Manual
Page 14
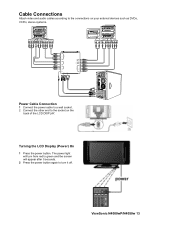
Turning the LCD Display (Power) On 1 Press the power button. SOURCES MUTE POWER DVI AV S-VIDEO SLEEP 123 CH 456 78 100 0 9 VOL ViewSonic N4000wP/N4050w 13 The power light will turn from red to green and the screen will appear after 5 seconds. 2 Press the power button again to the socket ...
Turning the LCD Display (Power) On 1 Press the power button. SOURCES MUTE POWER DVI AV S-VIDEO SLEEP 123 CH 456 78 100 0 9 VOL ViewSonic N4000wP/N4050w 13 The power light will turn from red to green and the screen will appear after 5 seconds. 2 Press the power button again to the socket ...
User Manual
Page 15
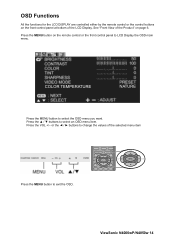
... the values of the LCD Display. Press the VOL +/- COLOR TEMPERATURE NATURE Press the MENU button to select an OSD menu item. MENU VOL ViewSonic N4000wP/N4050w 14 Press the MENU button on page 6. OSD Functions All the functions for the LCD DISPLAY are controlled either by the remote control or the...
... the values of the LCD Display. Press the VOL +/- COLOR TEMPERATURE NATURE Press the MENU button to select an OSD menu item. MENU VOL ViewSonic N4000wP/N4050w 14 Press the MENU button on page 6. OSD Functions All the functions for the LCD DISPLAY are controlled either by the remote control or the...
User Manual
Page 16
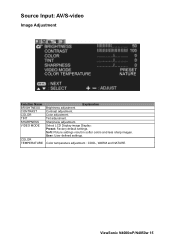
Source Input: AV/S-video Image Adjustment COLOR TEMPERATURE NATURE Function Name BRIGHTNESS CONTRAST COLOR TINT SHARPNESS VIDEO MODE COLOR TEMPERATURE Explanation Brightness adjustment. Color adjustment. Tint adjustment. User: User defined settings. Contrast adjustment. Select LCD Display image Display: Preset: Factory default settings. Sharpness adjustment. Color temperature adjustment : COOL, WARM and NATURE. Soft: Picture settings result in softer colors and less sharp images. ViewSonic N4000wP/N4050w 15
Source Input: AV/S-video Image Adjustment COLOR TEMPERATURE NATURE Function Name BRIGHTNESS CONTRAST COLOR TINT SHARPNESS VIDEO MODE COLOR TEMPERATURE Explanation Brightness adjustment. Color adjustment. Tint adjustment. User: User defined settings. Contrast adjustment. Select LCD Display image Display: Preset: Factory default settings. Sharpness adjustment. Color temperature adjustment : COOL, WARM and NATURE. Soft: Picture settings result in softer colors and less sharp images. ViewSonic N4000wP/N4050w 15

User Manual
Page 17
User: User defined settings. Turns the speaker on and off (same as mute). Adjust bass level. Soft: Picture settings result in softer colors and less sharp images. Audio Adjustment Function Name VOLUME TREBLE BASS BALANCE AUDIO MODE SPEAKER Explanation Volume adjustment. Select audio settings: Preset: Factory default settings. Adjustment treble level. Adjust left and right speaker balance. ViewSonic N4000wP/N4050w 16
User: User defined settings. Turns the speaker on and off (same as mute). Adjust bass level. Soft: Picture settings result in softer colors and less sharp images. Audio Adjustment Function Name VOLUME TREBLE BASS BALANCE AUDIO MODE SPEAKER Explanation Volume adjustment. Select audio settings: Preset: Factory default settings. Adjustment treble level. Adjust left and right speaker balance. ViewSonic N4000wP/N4050w 16
User Manual
Page 18
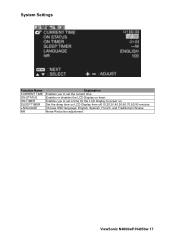
Choose OSD language: English, Spanish, French, and Traditional Chinese. ViewSonic N4000wP/N4050w 17 Noise Reduction adjustment. Enables or disables the LCD Display on LCD Display from off,10,20,30,40,50,60,70,80,90 minutes. Set the sleep time on timer. Enables you to set a time for the LCD Display to set the current time. System Settings Function Name CURRENT TIME ON STATUS ON TIMER SLEEP TIMER LANGUAGE NR Explanation Enables you to power on.
Choose OSD language: English, Spanish, French, and Traditional Chinese. ViewSonic N4000wP/N4050w 17 Noise Reduction adjustment. Enables or disables the LCD Display on LCD Display from off,10,20,30,40,50,60,70,80,90 minutes. Set the sleep time on timer. Enables you to set a time for the LCD Display to set the current time. System Settings Function Name CURRENT TIME ON STATUS ON TIMER SLEEP TIMER LANGUAGE NR Explanation Enables you to power on.
User Manual
Page 19
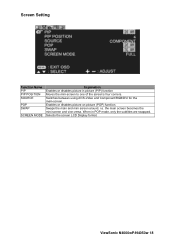
Selects the screen LCD Display format. Swaps the main and mini screen around, i.e. the main screen becomes the mini-screen and vice-versa. ViewSonic N4000wP/N4050w 18 When in picture (PIP) function Moves the mini-screen to one of the screen's four corners. Enables or disables picture on picture (POP) function. Switches between using AV/S-Video and Component/RGB/DVI for the main-screen. Screen Setting Function Name PIP PIP POSITION SOURCE POP SWAP SCREEN MODE Explanation Enables or disables picture in POP mode, only the subtitles are swapped.
Selects the screen LCD Display format. Swaps the main and mini screen around, i.e. the main screen becomes the mini-screen and vice-versa. ViewSonic N4000wP/N4050w 18 When in picture (PIP) function Moves the mini-screen to one of the screen's four corners. Enables or disables picture on picture (POP) function. Switches between using AV/S-Video and Component/RGB/DVI for the main-screen. Screen Setting Function Name PIP PIP POSITION SOURCE POP SWAP SCREEN MODE Explanation Enables or disables picture in POP mode, only the subtitles are swapped.

User Manual
Page 20
Source Input: PC Image Adjustment Function Name BRIGHTNESS CONTRAST SHARPNESS H POSITION V POSITION PHASE CLOCK AUTO Explanation Brightness adjustment. ViewSonic N4000wP/N4050w 19 Contrast adjustment. Adjust vertical position on the image. Automatically adjusts the screen according to obtain the best output. Audio Adjustment See page16. Sharpness adjustment. System Settings See page17. Adjust horizontal position on the image. Screen Settings See Page18. Adjust screen's horizontal size. Adjust the phase of screen to the input sig-nal source.
Source Input: PC Image Adjustment Function Name BRIGHTNESS CONTRAST SHARPNESS H POSITION V POSITION PHASE CLOCK AUTO Explanation Brightness adjustment. ViewSonic N4000wP/N4050w 19 Contrast adjustment. Adjust vertical position on the image. Automatically adjusts the screen according to obtain the best output. Audio Adjustment See page16. Sharpness adjustment. System Settings See page17. Adjust horizontal position on the image. Screen Settings See Page18. Adjust screen's horizontal size. Adjust the phase of screen to the input sig-nal source.

User Manual
Page 21
Adjusts the green color. ViewSonic N4000wP/N4050w 20 Color temperature adjustment: cool, warm and nature NOTES: For PC operation when using DVI-D input, a resolution of 1280 x 768 at 60Hz is recommended. Adjusts the blue color. Color Adjustment Function Name RED GREEN BLUE COLOR TEMPERATURE Explanation Adjusts the red color.
Adjusts the green color. ViewSonic N4000wP/N4050w 20 Color temperature adjustment: cool, warm and nature NOTES: For PC operation when using DVI-D input, a resolution of 1280 x 768 at 60Hz is recommended. Adjusts the blue color. Color Adjustment Function Name RED GREEN BLUE COLOR TEMPERATURE Explanation Adjusts the red color.

User Manual
Page 22
Screen Settings See page18. Color Adjustment See page20. Adjusts the screen's vertical position Auto adjusts the phase, clock, and position of the screen. ViewSonic N4000wP/N4050w 21 Adjusts the screen's horizontal position. Audio Adjustment See page16. Adjusts the sharpness level of the image. Adjusts the light and dark level difference of the screen. System Settings See page17. Source Input: DVI-D Image Adjustment Function Name BRIGHTNESS CONTRAST SHARPNESS H POSITION V POSITION AUTO Explanation Adjusts the light level intensity of the screen.
Screen Settings See page18. Color Adjustment See page20. Adjusts the screen's vertical position Auto adjusts the phase, clock, and position of the screen. ViewSonic N4000wP/N4050w 21 Adjusts the screen's horizontal position. Audio Adjustment See page16. Adjusts the sharpness level of the image. Adjusts the light and dark level difference of the screen. System Settings See page17. Source Input: DVI-D Image Adjustment Function Name BRIGHTNESS CONTRAST SHARPNESS H POSITION V POSITION AUTO Explanation Adjusts the light level intensity of the screen.
User Manual
Page 23
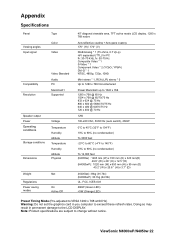
...% to 90% (no condensation) To 3000 feet -20°C to 60°C (-4°F to 140°F) 10% to 90% (no condensation) To 12,000 feet (N4050w) : 1265 mm (W) x 720 mm (H) x 320 mm(D) 49.8" (W) x 28" (H) x 12.5 "(D) (N4000wP) : 1020 mm (W) x 650 mm (H) x 95 mm (D) 40.2" (W) x 25...
...% to 90% (no condensation) To 3000 feet -20°C to 60°C (-4°F to 140°F) 10% to 90% (no condensation) To 12,000 feet (N4050w) : 1265 mm (W) x 720 mm (H) x 320 mm(D) 49.8" (W) x 28" (H) x 12.5 "(D) (N4000wP) : 1020 mm (W) x 650 mm (H) x 95 mm (D) 40.2" (W) x 25...


