User Guide
Page 2
...7 Rear View of the Product 7 Remote Controls 10 Installation 12 OSD Functions PICTURE: Brightness / Contrast / Color / Tint / Sharpness /Color Temp 17 AUDIO: Volume / Bass / Treble / Balance / DVI Audio / Speaker / Line Out / Subwoofer / MTS 18 SOURCE: Main Screen / Sub Screen /Audio From / Display Mode /Wide Mode PIP Aspect /PIP H-POS / PIP V-POS / PIP Size 19 GRAPHIC: Auto Adjust / H.Position / V.Position / Phase / H.Size/ Resolution .... 20 TV: Input / Caption Mode /Auto Scan / Add/Del channels /Parental Controls ....... 21 CLOCK: Date / Time / Timer1 / Timer2 / Sleep Timer 24 SETUP...
...7 Rear View of the Product 7 Remote Controls 10 Installation 12 OSD Functions PICTURE: Brightness / Contrast / Color / Tint / Sharpness /Color Temp 17 AUDIO: Volume / Bass / Treble / Balance / DVI Audio / Speaker / Line Out / Subwoofer / MTS 18 SOURCE: Main Screen / Sub Screen /Audio From / Display Mode /Wide Mode PIP Aspect /PIP H-POS / PIP V-POS / PIP Size 19 GRAPHIC: Auto Adjust / H.Position / V.Position / Phase / H.Size/ Resolution .... 20 TV: Input / Caption Mode /Auto Scan / Add/Del channels /Parental Controls ....... 21 CLOCK: Date / Time / Timer1 / Timer2 / Sleep Timer 24 SETUP...
User Guide
Page 3
..., which you may change product specifications without notice. For Your Records Product Name: Model Number: Document Number: Serial Number: Purchase Date: ViewSonic N3000w VS10003 VS-N3000w-1 Product disposal at the end of VESA. Please dispose of this document may mail or fax to receive any purpose without prior written permission from furnishing this material, or the performance or use of this document, please...
..., which you may change product specifications without notice. For Your Records Product Name: Model Number: Document Number: Serial Number: Purchase Date: ViewSonic N3000w VS10003 VS-N3000w-1 Product disposal at the end of VESA. Please dispose of this document may mail or fax to receive any purpose without prior written permission from furnishing this material, or the performance or use of this document, please...
User Guide
Page 4
... operation of time, unplug and remove the batteries from overheating, these openings must not be walked on or pinched by ViewSonic • If your safety, please read all warnings and instructions marked on the product, video cable, or power cord • If smoke, abnormal noise, or strange odor is provided for ventilation purposes. This is dangerous to remove. Never remove the rear...
... operation of time, unplug and remove the batteries from overheating, these openings must not be walked on or pinched by ViewSonic • If your safety, please read all warnings and instructions marked on the product, video cable, or power cord • If smoke, abnormal noise, or strange odor is provided for ventilation purposes. This is dangerous to remove. Never remove the rear...

User Guide
Page 6
...: • N3000w Display • Remote Control (with Windows operating systems, and the ICM file (Image Color Matching) insures accurate on-screen colors. Getting Started Congratulations on region of a ViewSonic product. ViewSonic N3000w 5 These files are also available at www.viewsonic.com. The INF file insures compatibility with included batteries) • Power Cord(s) • VGA Cable • Audio Cable • AV RCA Cable • RF Cable • Quick Start Guide • User Guide NOTE: Your...
...: • N3000w Display • Remote Control (with Windows operating systems, and the ICM file (Image Color Matching) insures accurate on-screen colors. Getting Started Congratulations on region of a ViewSonic product. ViewSonic N3000w 5 These files are also available at www.viewsonic.com. The INF file insures compatibility with included batteries) • Power Cord(s) • VGA Cable • Audio Cable • AV RCA Cable • RF Cable • Quick Start Guide • User Guide NOTE: Your...

User Guide
Page 7
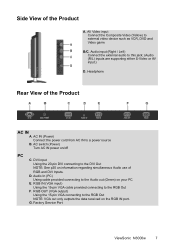
.../OFF Increase/Decrease sound volume or adjust a highlighted control while in OSD Menu. Front View of the Product Use the buttons on page 16. Channel up/down when source is at TV or select a control while in "OSD Functions" on the front panel control (or included remote control) to display and adjust the On Screen Display (OSD). Speaker Front panel controls are defined in OSD Menu. Select Active Video Input Power ON/OFF Remote Control Infrared Sensor (Do not block) ViewSonic N3000w 6
.../OFF Increase/Decrease sound volume or adjust a highlighted control while in OSD Menu. Front View of the Product Use the buttons on page 16. Channel up/down when source is at TV or select a control while in "OSD Functions" on the front panel control (or included remote control) to display and adjust the On Screen Display (OSD). Speaker Front panel controls are defined in OSD Menu. Select Active Video Input Power ON/OFF Remote Control Infrared Sensor (Do not block) ViewSonic N3000w 6
User Guide
Page 8
... only outputs the data received on /off PC C. Headphone Rear View of RGB and DVI Inputs. RGB IN (VGA input) Using the 15-pin VGA cable provided connecting to a power source B. D. Factory Service Port ViewSonic N3000w 7 AC IN (Power) Connect the power cord from AC IN to the RGB Out F. DVI input Using the 20-pin DVI connecting to the Audio out (Green) on information regarding simultaneous Audio use of the Product AC IN A. G. AC switch (Power) Turn AC IN power...
... only outputs the data received on /off PC C. Headphone Rear View of RGB and DVI Inputs. RGB IN (VGA input) Using the 15-pin VGA cable provided connecting to a power source B. D. Factory Service Port ViewSonic N3000w 7 AC IN (Power) Connect the power cord from AC IN to the RGB Out F. DVI input Using the 20-pin DVI connecting to the Audio out (Green) on information regarding simultaneous Audio use of the Product AC IN A. G. AC switch (Power) Turn AC IN power...
User Guide
Page 9
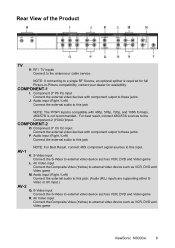
... formats. 480i/576i is not recommended. AV Video input Connect the Composite Video (Yellow) to external video device such as VCR, DVD and Video game M. AV Video input Connect the Composite Video (Yellow) to external video device such as VCR, DVD and Video game L. COMPONENT-2 O. S-Video input Connect the S-Video to external video device such as VCR, DVD and Video game ViewSonic N3000w 8 Rear View of the Product TV H. Audio input (Right / Left) Connect the external audio to this jack; (Audio (R/L) inputs are supporting either SVideo or AV input.) AV-2 Q. Component...
... formats. 480i/576i is not recommended. AV Video input Connect the Composite Video (Yellow) to external video device such as VCR, DVD and Video game M. AV Video input Connect the Composite Video (Yellow) to external video device such as VCR, DVD and Video game L. COMPONENT-2 O. S-Video input Connect the S-Video to external video device such as VCR, DVD and Video game ViewSonic N3000w 8 Rear View of the Product TV H. Audio input (Right / Left) Connect the external audio to this jack; (Audio (R/L) inputs are supporting either SVideo or AV input.) AV-2 Q. Component...

User Guide
Page 10
AUDIO OUTPUT N. Audio output (Right / Left) Provide the external audio output T. Audio input (Right / Left) Connect the external audio to this jack; (Audio (R/L) inputs are supporting either SVideo or AV input.) NOTE: SVHS and COMPOSITE Inputs SHARE their respective Audio Inputs. Subwoofer output Provide the external subwoofer output ViewSonic N3000w 9 In Normal applications, only one source may have an active Audio Input at a time. S.
AUDIO OUTPUT N. Audio output (Right / Left) Provide the external audio output T. Audio input (Right / Left) Connect the external audio to this jack; (Audio (R/L) inputs are supporting either SVideo or AV input.) NOTE: SVHS and COMPOSITE Inputs SHARE their respective Audio Inputs. Subwoofer output Provide the external subwoofer output ViewSonic N3000w 9 In Normal applications, only one source may have an active Audio Input at a time. S.
User Guide
Page 11
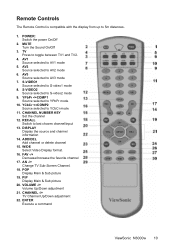
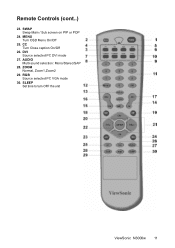
MUTE Turn the Sound On/Off 3. AV2 Source selected to toggle between TV1 and TV2. 4. YPbPr TV Press to AV2 mode 6. S-VIDEO2 Source selected to AV1 mode 5. AV1 Source selected to S-video2 mode 9. S-VIDEO1 Source selected to AV3 mode 7. AV3 Source selected to S-video1 mode 8. Remote Controls The Remote Control is compatible with the display from up to 5m distances. 1. POWER: Switch the power On/Off 2.
MUTE Turn the Sound On/Off 3. AV2 Source selected to toggle between TV1 and TV2. 4. YPbPr TV Press to AV2 mode 6. S-VIDEO2 Source selected to AV1 mode 5. AV1 Source selected to S-video2 mode 9. S-VIDEO1 Source selected to AV3 mode 7. AV3 Source selected to S-video1 mode 8. Remote Controls The Remote Control is compatible with the display from up to 5m distances. 1. POWER: Switch the power On/Off 2.
User Guide
Page 12
CC Turn Close caption On/Off 26. AUDIO Multi-sound selection: Mono/Stereo/SAP 28. MENU Turn OSD Menu On/Off 25. ZOOM Normal, Zoom1,Zoom2 29. Remote Controls (cont..) 23. SWAP Swap Main / Sub screen on PIP or POP 24. SLEEP Set time to turn OFF the unit ViewSonic N3000w 11 RGB Source selected PC VGA mode 30. DVI Source selected PC DVI mode 27.
CC Turn Close caption On/Off 26. AUDIO Multi-sound selection: Mono/Stereo/SAP 28. MENU Turn OSD Menu On/Off 25. ZOOM Normal, Zoom1,Zoom2 29. Remote Controls (cont..) 23. SWAP Swap Main / Sub screen on PIP or POP 24. SLEEP Set time to turn OFF the unit ViewSonic N3000w 11 RGB Source selected PC VGA mode 30. DVI Source selected PC DVI mode 27.
User Guide
Page 14
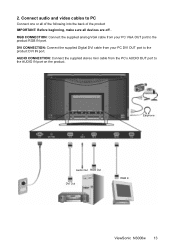
RGB CONNECTION: Connect the supplied analog VGA cable from your PC VGA OUT port to the product DVI IN port. DVI CONNECTION: Connect the supplied Digital DVI cable from your PC DVI OUT port to the product RGB IN port. AUDIO CONNECTION: Connect the supplied stereo mini cable from the PC's AUDIO OUT port to PC Connect one or all of the following into the back of the product IMPORTANT: Before beginning, make sure all devices are off . Connect audio and video cables to the AUDIO IN port on the product. Earphone Audio Out RGB Out DVI Out RGB In ViewSonic N3000w 13 2.
RGB CONNECTION: Connect the supplied analog VGA cable from your PC VGA OUT port to the product DVI IN port. DVI CONNECTION: Connect the supplied Digital DVI cable from your PC DVI OUT port to the product RGB IN port. AUDIO CONNECTION: Connect the supplied stereo mini cable from the PC's AUDIO OUT port to PC Connect one or all of the following into the back of the product IMPORTANT: Before beginning, make sure all devices are off . Connect audio and video cables to the AUDIO IN port on the product. Earphone Audio Out RGB Out DVI Out RGB In ViewSonic N3000w 13 2.

User Guide
Page 16
... best picture quality set this timing mode. Connect power cables Connect the power cord to the product then to -date PC INF/ICM windows driver files are always available at 60Hz, refer to the graphic card's user guide, for questions on how to set your product, via either OSD menu or remote control 7. Power Button 6. 4. ViewSonic N3000w 15 Select input source for your product timing mode to VESA 1280x768 at www.viewsonic.com. Turn Power On Press the AC switch button to receive...
... best picture quality set this timing mode. Connect power cables Connect the power cord to the product then to -date PC INF/ICM windows driver files are always available at 60Hz, refer to the graphic card's user guide, for questions on how to set your product, via either OSD menu or remote control 7. Power Button 6. 4. ViewSonic N3000w 15 Select input source for your product timing mode to VESA 1280x768 at www.viewsonic.com. Turn Power On Press the AC switch button to receive...
User Guide
Page 19
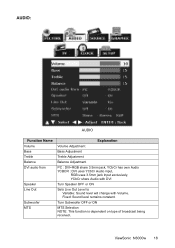
... Volume Adjustment Bass Adjustment Treble Adjustment Balance Adjustment PC : DVI+RGB share 3.5mm jack, YCbCr has own Audio YCBCR : DVI uses YCbCr Audio input, RGB uses 3.5mm jack Input exclusively, YCbCr share Audio with DVI Turn Speaker OFF or ON Sets Live Out Level to Variable: Sound level will change with Volume. Turn Subwoofer OFF or ON MTS Selection NOTE: This function is dependent on type of broadcast being received. ViewSonic N3000w 18 Fixed: Sound...
... Volume Adjustment Bass Adjustment Treble Adjustment Balance Adjustment PC : DVI+RGB share 3.5mm jack, YCbCr has own Audio YCBCR : DVI uses YCbCr Audio input, RGB uses 3.5mm jack Input exclusively, YCbCr share Audio with DVI Turn Speaker OFF or ON Sets Live Out Level to Variable: Sound level will change with Volume. Turn Subwoofer OFF or ON MTS Selection NOTE: This function is dependent on type of broadcast being received. ViewSonic N3000w 18 Fixed: Sound...
User Guide
Page 22
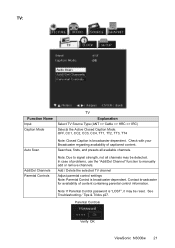
... remove channels. Parental Controls Verify OK ViewSonic N3000w 21 Add / Delete the selected TV channel Adjust parental control settings Note: Parental Control is broadcaster dependent. See Troubleshooting / Tips & Tricks p27. TV: Function Name Input Caption Mode TV Explanation Select TV Source Type (ANT => Cable => HRC => IRC) Selects the Active Closed Caption Mode. OFF, CC1, CC2, CC3, CC4, TT1, TT2, TT3, TT4 Auto Scan Note: Closed Caption is broadcaster dependent. Check with your Broadcaster regarding availability of problems, use the "Add/Del Channel" function to signal...
... remove channels. Parental Controls Verify OK ViewSonic N3000w 21 Add / Delete the selected TV channel Adjust parental control settings Note: Parental Control is broadcaster dependent. See Troubleshooting / Tips & Tricks p27. TV: Function Name Input Caption Mode TV Explanation Select TV Source Type (ANT => Cable => HRC => IRC) Selects the Active Closed Caption Mode. OFF, CC1, CC2, CC3, CC4, TT1, TT2, TT3, TT4 Auto Scan Note: Closed Caption is broadcaster dependent. Check with your Broadcaster regarding availability of problems, use the "Add/Del Channel" function to signal...
User Guide
Page 27
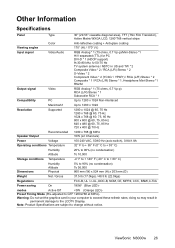
... Other Information Specifications Panel Type 30" (29.53" viewable diagonal area), TFT (Thin Film Transistor), Active Matrix WXGA LCD, 1280*768 vertical stripe Viewing angles Color Anti-reflective coating + Anti-glare coating 170° (H) / 170° (V) Input signal Video/Audio RGB Analog * 1 (75 ohms, 0.7 Vp-p)/Mini-Stereo *1 H/V separated (TTL) for PC DVI-D * 1 (HDCP support) fh:30-80 kHz, fv:50-75 Hz TV system antenna / NSTC...
... Other Information Specifications Panel Type 30" (29.53" viewable diagonal area), TFT (Thin Film Transistor), Active Matrix WXGA LCD, 1280*768 vertical stripe Viewing angles Color Anti-reflective coating + Anti-glare coating 170° (H) / 170° (V) Input signal Video/Audio RGB Analog * 1 (75 ohms, 0.7 Vp-p)/Mini-Stereo *1 H/V separated (TTL) for PC DVI-D * 1 (HDCP support) fh:30-80 kHz, fv:50-75 Hz TV system antenna / NSTC...
User Guide
Page 28
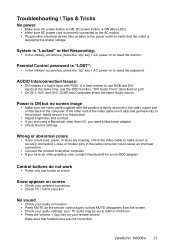
... video output port on p20. • On AV1, AV2, and AV3; Troubleshooting / Tips & Tricks No power • Make sure AC power button is ON, DC power button is ON (Blue LED) • Make sure AC power cord is securely connected to the AC socket • Plug another computer • If you need a Macintosh adapter • Check Source settings Wrong or abnormal colors • If any colors (red, green, or blue) are not connected ViewSonic N3000w...
... video output port on p20. • On AV1, AV2, and AV3; Troubleshooting / Tips & Tricks No power • Make sure AC power button is ON, DC power button is ON (Blue LED) • Make sure AC power cord is securely connected to the AC socket • Plug another computer • If you need a Macintosh adapter • Check Source settings Wrong or abnormal colors • If any colors (red, green, or blue) are not connected ViewSonic N3000w...
User Guide
Page 29
...-Definition Users: • The N3000w is filled at the expense of DVD movies are inserted correctly • Batteries could be weak Image Quality Issues: • TV: For Best Image Quality, "Standard Definition" TV should be viewed as broadcast. However, due to be displayed in broadcast practices, it 's "TRUE" form as 4:3. • COMPONENT 480i: For Best Image Quality the "YCBCR" Input should be used.
...-Definition Users: • The N3000w is filled at the expense of DVD movies are inserted correctly • Batteries could be weak Image Quality Issues: • TV: For Best Image Quality, "Standard Definition" TV should be viewed as broadcast. However, due to be displayed in broadcast practices, it 's "TRUE" form as 4:3. • COMPONENT 480i: For Best Image Quality the "YCBCR" Input should be used.
User Guide
Page 31
...: 1. f. Use of implied warranties: THERE ARE NO WARRANTIES, EXPRESS OR IMPLIED, WHICH EXTEND BEYOND THE DESCRIPTION CONTAINED HEREIN INCLUDING THE IMPLIED WARRANTY OF MERCHANTABILITY AND FITNESS FOR A PARTICULAR PURPOSE. Limitation of supplies or parts not meeting ViewSonic's specifications. ViewSonic LCD Warranty (V3.0) Release Date: 12-17-2002 ViewSonic N3000w 30 Repair or attempted repair by anyone not authorized by ViewSonic. Causes external to get service: 1. Limited Warranty VIEWSONIC N3000w PRODUCT What the warranty...
...: 1. f. Use of implied warranties: THERE ARE NO WARRANTIES, EXPRESS OR IMPLIED, WHICH EXTEND BEYOND THE DESCRIPTION CONTAINED HEREIN INCLUDING THE IMPLIED WARRANTY OF MERCHANTABILITY AND FITNESS FOR A PARTICULAR PURPOSE. Limitation of supplies or parts not meeting ViewSonic's specifications. ViewSonic LCD Warranty (V3.0) Release Date: 12-17-2002 ViewSonic N3000w 30 Repair or attempted repair by anyone not authorized by ViewSonic. Causes external to get service: 1. Limited Warranty VIEWSONIC N3000w PRODUCT What the warranty...
User Guide
Page 32
... EARTHED. Appendix Safety Guidelines CAUTION: The socket-outlet should be installed near the equipment and should be used. Always use , please consult with the coloured markings identifying the terminals in the plug which sit on a desk or table, type SVT or SJT cord sets may be easily accessible. Use the following code: Green-and-Yellow: Earth Blue: Neutral Brown: Live If the...
... EARTHED. Appendix Safety Guidelines CAUTION: The socket-outlet should be installed near the equipment and should be used. Always use , please consult with the coloured markings identifying the terminals in the plug which sit on a desk or table, type SVT or SJT cord sets may be easily accessible. Use the following code: Green-and-Yellow: Earth Blue: Neutral Brown: Live If the...

User Guide
Page 33
... receiving antenna. • Increase the separation between the equipment and receiver. • Connect the equipment into an outlet on , the user is encouraged to try to comply with bonded ferrite cores. ViewSonic N3000w 32 If a BNC cable is no guarantee that to which can radiate radio frequency energy, and if not installed and used , use grounded power supply cord and the provided shielded video interface cable...
... receiving antenna. • Increase the separation between the equipment and receiver. • Connect the equipment into an outlet on , the user is encouraged to try to comply with bonded ferrite cores. ViewSonic N3000w 32 If a BNC cable is no guarantee that to which can radiate radio frequency energy, and if not installed and used , use grounded power supply cord and the provided shielded video interface cable...


