Quick Start Guide
Page 5
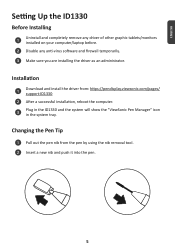
... into the pen. 5 ENGLISH Setting Up the ID1330 Before Installing 1 Uninstall and completely remove any driver of other graphic tablets/monitors installed on your computer/laptop before. 2 Disable any anti-virus software and firewall temporarily. 3 Make sure you are installing the driver as an administrator. Changing the Pen Tip 1 Pull out the pen nib from : https://pendisplay.viewsonic.com/pages/ support-ID1330 2 After a successful installation, reboot the computer. 3 Plug in the ID1330 and...
... into the pen. 5 ENGLISH Setting Up the ID1330 Before Installing 1 Uninstall and completely remove any driver of other graphic tablets/monitors installed on your computer/laptop before. 2 Disable any anti-virus software and firewall temporarily. 3 Make sure you are installing the driver as an administrator. Changing the Pen Tip 1 Pull out the pen nib from : https://pendisplay.viewsonic.com/pages/ support-ID1330 2 After a successful installation, reboot the computer. 3 Plug in the ID1330 and...
Quick Start Guide
Page 6
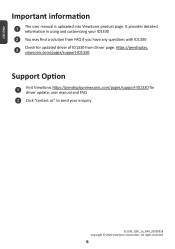
ENGLISH Important information 1 The user manual is uploaded into ViewSonic product page. All rights reserved. 6 It provides detailed information in using and customizing your enquiry ID1330_QSG_1a_ENG_20200528 Copyright © 2020 ViewSonic Corporation. viewsonic.com/pages/support-ID1330 Support Option 1 Visit ViewSonic https://pendisplay.viewsonic.com/pages/support-ID1330 for updated driver of ID1330 from FAQ if you have any questions with ID1330 3 Check for driver update, user manual and FAQ 2 Click "contact us" to send...
ENGLISH Important information 1 The user manual is uploaded into ViewSonic product page. All rights reserved. 6 It provides detailed information in using and customizing your enquiry ID1330_QSG_1a_ENG_20200528 Copyright © 2020 ViewSonic Corporation. viewsonic.com/pages/support-ID1330 Support Option 1 Visit ViewSonic https://pendisplay.viewsonic.com/pages/support-ID1330 for updated driver of ID1330 from FAQ if you have any questions with ID1330 3 Check for driver update, user manual and FAQ 2 Click "contact us" to send...
User Guide
Page 1
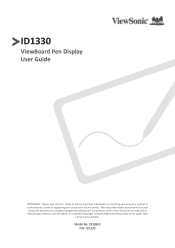
VS18342 P/N: ID1330 Model No. Warranty information contained in the upper right corner of our website. ID1330 ViewBoard Pen Display User Guide IMPORTANT: Please read this User Guide to obtain important information on installing and using your product in a safe manner, as well as registering your limited coverage from ViewSonic® Corporation, which is also found on our web site at http://www.viewsonic.com in English, or in specific languages using the Regional selection box in this User Guide will describe your product for future service.
VS18342 P/N: ID1330 Model No. Warranty information contained in the upper right corner of our website. ID1330 ViewBoard Pen Display User Guide IMPORTANT: Please read this User Guide to obtain important information on installing and using your product in a safe manner, as well as registering your limited coverage from ViewSonic® Corporation, which is also found on our web site at http://www.viewsonic.com in English, or in specific languages using the Regional selection box in this User Guide will describe your product for future service.

User Guide
Page 3
... to the screen. Only use attachments/accessories specified by the manufacturer. • Disconnect the device if it is present, immediately turn the device off and call your dealer or ViewSonic®. Ensure that the power outlet is located near the equipment so that it is easily accessible. • Only use the supplied pen, or fingers for models that support touch input. •...
... to the screen. Only use attachments/accessories specified by the manufacturer. • Disconnect the device if it is present, immediately turn the device off and call your dealer or ViewSonic®. Ensure that the power outlet is located near the equipment so that it is easily accessible. • Only use the supplied pen, or fingers for models that support touch input. •...
User Guide
Page 4
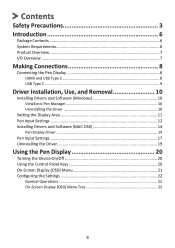
... Making Connections 8 Connecting the Pen Display 8 HDMI and USB Type C 8 USB Type C...9 Driver Installation, Use, and Removal 10 Installing Drivers and Software (Windows 10 ViewSonic Pen Manager 10 Uninstalling the Driver 10 Setting the Display Area 11 Pen Input Settings 12 Installing Drivers and Software (MAC OSX 14 Pen Display Driver 14 Pen Input Settings 17 Uninstalling the Driver 19 Using the Pen Display 20 Turning the Device On/Off 20 Using the Control Panel Keys 20 On-Screen Display (OSD) Menu 21 Configuring the Settings 22 General Operations 22 On-Screen Display (OSD...
... Making Connections 8 Connecting the Pen Display 8 HDMI and USB Type C 8 USB Type C...9 Driver Installation, Use, and Removal 10 Installing Drivers and Software (Windows 10 ViewSonic Pen Manager 10 Uninstalling the Driver 10 Setting the Display Area 11 Pen Input Settings 12 Installing Drivers and Software (MAC OSX 14 Pen Display Driver 14 Pen Input Settings 17 Uninstalling the Driver 19 Using the Pen Display 20 Turning the Device On/Off 20 Using the Control Panel Keys 20 On-Screen Display (OSD) Menu 21 Configuring the Settings 22 General Operations 22 On-Screen Display (OSD...
User Guide
Page 6
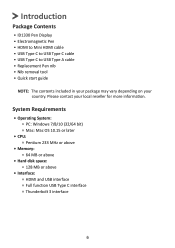
... • ID1330 Pen Display • Electromagnetic Pen • HDMI to Mini HDMI cable • USB Type C to USB Type C cable • USB Type C to USB Type A cable • Replacement Pen nib • Nib removal tool • Quick start guide NOTE: The contents included in your package may vary depending on your local reseller for more information. System Requirements • Operating System: ͫ PC: Windows 7/8/10 (32/64 bit) ͫ Mac: Mac OS...
... • ID1330 Pen Display • Electromagnetic Pen • HDMI to Mini HDMI cable • USB Type C to USB Type C cable • USB Type C to USB Type A cable • Replacement Pen nib • Nib removal tool • Quick start guide NOTE: The contents included in your package may vary depending on your local reseller for more information. System Requirements • Operating System: ͫ PC: Windows 7/8/10 (32/64 bit) ͫ Mac: Mac OS...
User Guide
Page 8
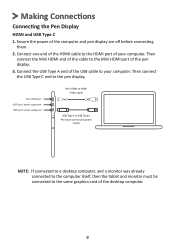
Making Connections Connecting the Pen Display HDMI and USB Type C 1. Ensure the power of your computer. Connect one end of the HDMI cable to your computer. Then connect the Mini HDMI end of the cable to the Mini HDMI port of the USB cable to the HDMI port of the computer and pen display are off before connecting them. 2. Connect the USB Type A end of the pen display. 3. Mini HDMI port USB Type C power supply port USB Type C power supply port Mini HDMI to HDMI Video signal USB Type C to USB Type A Pen touch control and power supply NOTE...
Making Connections Connecting the Pen Display HDMI and USB Type C 1. Ensure the power of your computer. Connect one end of the HDMI cable to your computer. Then connect the Mini HDMI end of the cable to the Mini HDMI port of the USB cable to the HDMI port of the computer and pen display are off before connecting them. 2. Connect the USB Type A end of the pen display. 3. Mini HDMI port USB Type C power supply port USB Type C power supply port Mini HDMI to HDMI Video signal USB Type C to USB Type A Pen touch control and power supply NOTE...
User Guide
Page 9
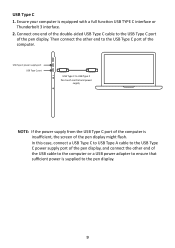
... pen display. 9 USB Type C power supply port USB Type C port USB Type C to ensure that sufficient power is equipped with a full function USB TYPE C interface or Thunderbolt 3 interface. 2. Then connect the other end of the computer. In this case, connect a USB Type C to USB Type A cable to the USB Type C power supply port of the pen display, and connect the other end to the USB Type C port of the USB cable to the computer or a USB power adapter to USB Type C Pen touch control...
... pen display. 9 USB Type C power supply port USB Type C port USB Type C to ensure that sufficient power is equipped with a full function USB TYPE C interface or Thunderbolt 3 interface. 2. Then connect the other end of the computer. In this case, connect a USB Type C to USB Type A cable to the USB Type C power supply port of the pen display, and connect the other end to the USB Type C port of the USB cable to the computer or a USB power adapter to USB Type C Pen touch control...
User Guide
Page 10
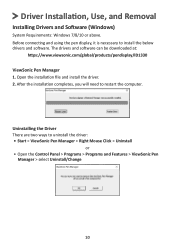
... install the below drivers and software. Before connecting and using the pen display, it is necessary to restart the computer. Driver Installation, Use, and Removal Installing Drivers and Software (Windows) System Requirements: Windows 7/8/10 or above. Uninstalling the Driver There are two ways to uninstall the driver: • Start > ViewSonic Pen Manager > Right Mouse Click > Uninstall or • Open the Control Panel > Programs > Programs and Features > ViewSonic Pen Manager > select Uninstall/Change 10 The drivers and software can be downloaded...
... install the below drivers and software. Before connecting and using the pen display, it is necessary to restart the computer. Driver Installation, Use, and Removal Installing Drivers and Software (Windows) System Requirements: Windows 7/8/10 or above. Uninstalling the Driver There are two ways to uninstall the driver: • Start > ViewSonic Pen Manager > Right Mouse Click > Uninstall or • Open the Control Panel > Programs > Programs and Features > ViewSonic Pen Manager > select Uninstall/Change 10 The drivers and software can be downloaded...
User Guide
Page 11
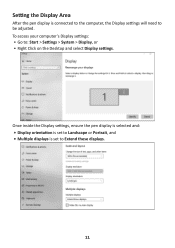
To access your computer's Display settings: • Go to Extend these displays. 11 Once inside the Display settings, ensure the pen display is selected and: • Display orientation is set to Landscape or Portrait, and • Multiple displays is connected to the computer, the Display settings will need to be adjusted. Setting the Display Area After the pen display is set to : Start > Settings > System > Display, or • Right Click on the Desktop and select Display settings.
To access your computer's Display settings: • Go to Extend these displays. 11 Once inside the Display settings, ensure the pen display is selected and: • Display orientation is set to Landscape or Portrait, and • Multiple displays is connected to the computer, the Display settings will need to be adjusted. Setting the Display Area After the pen display is set to : Start > Settings > System > Display, or • Right Click on the Desktop and select Display settings.
User Guide
Page 14
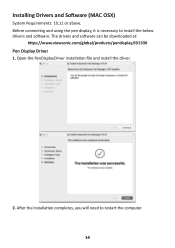
Installing Drivers and Software (MAC OSX) System Requirements: 10.11 or above. Open the PenDisplayDriver installation file and install the driver. 2. The drivers and software can be downloaded at: https://www.viewsonic.com/global/products/pendisplay/ID1330 Pen Display Driver 1. After the installation completes, you will need to install the below drivers and software. Before connecting and using the pen display, it is necessary to restart the computer. 14
Installing Drivers and Software (MAC OSX) System Requirements: 10.11 or above. Open the PenDisplayDriver installation file and install the driver. 2. The drivers and software can be downloaded at: https://www.viewsonic.com/global/products/pendisplay/ID1330 Pen Display Driver 1. After the installation completes, you will need to install the below drivers and software. Before connecting and using the pen display, it is necessary to restart the computer. 14
User Guide
Page 20
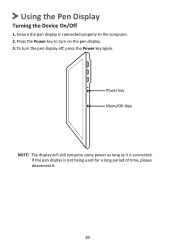
Press the Power key to the computer. 2. Ensure the pen display is not being used for a long period of time, please disconnect it is connected. If the pen display is connected properly to turn the pen display off, press the Power key again. Power key Menu/OK tkey NOTE: The display will still consume some power as long as it . 20 To turn on the pen display. 3. Using the Pen Display Turning the Device On/Off 1.
Press the Power key to the computer. 2. Ensure the pen display is not being used for a long period of time, please disconnect it is connected. If the pen display is connected properly to turn the pen display off, press the Power key again. Power key Menu/OK tkey NOTE: The display will still consume some power as long as it . 20 To turn on the pen display. 3. Using the Pen Display Turning the Device On/Off 1.

User Guide
Page 21
On-Screen Display (OSD) Menu Press the Menu key to factory settings. Select one of image quality adjustments. Select the input source. 21 Brightness Brightness Contrast Eco Mode DCR 80 50 Standard Off Menu Brightness Image Color Temperature OSD Setting Reset Miscellaneous Description Adjust the contrast or brightness level. Adjust On-Screen Display (OSD) settings. Returns the adjustments back to activate the On-Screen Display (OSD) Menu. Adjust the level, or mute the volume. Manually set a variety of the preset color settings.
On-Screen Display (OSD) Menu Press the Menu key to factory settings. Select one of image quality adjustments. Select the input source. 21 Brightness Brightness Contrast Eco Mode DCR 80 50 Standard Off Menu Brightness Image Color Temperature OSD Setting Reset Miscellaneous Description Adjust the contrast or brightness level. Adjust On-Screen Display (OSD) settings. Returns the adjustments back to activate the On-Screen Display (OSD) Menu. Adjust the level, or mute the volume. Manually set a variety of the preset color settings.

User Guide
Page 22
Press the ‚ or key to confirm the selection. 22 NOTE: Certain menu option adjustments do not require the user to press the Menu key to adjust/select the setting. Press the ‚ or key to confirm. Then press the Menu key to select the desired menu option. Press the ‚ or key to enter the sub-menu. 4. Then press the Menu key to select the main menu. Then press the Menu key to display the On-Screen Display (OSD) Menu. 2. Configuring the Settings General Operations 1. Press the Menu key to enter the selected menu. 3.
Press the ‚ or key to confirm the selection. 22 NOTE: Certain menu option adjustments do not require the user to press the Menu key to adjust/select the setting. Press the ‚ or key to confirm. Then press the Menu key to select the desired menu option. Press the ‚ or key to enter the sub-menu. 4. Then press the Menu key to select the main menu. Then press the Menu key to display the On-Screen Display (OSD) Menu. 2. Configuring the Settings General Operations 1. Press the Menu key to enter the selected menu. 3.

User Guide
Page 25
...; F) 10% to 90% (non-condensing) 344 x 210 x 7 mm (13.54" x 8.27" x 0.28") 0.815 kg (1.8 lbs) 5W (Typical) < 1W Pen Item Type Power Supply Resolution Pressure Sensitivity Report Rate Pen Tilt Angle OS Supported Specifications Electromagnetic resonance Battery-less 5080 LPI (lines per inch) 8192 Average 266 PPS (points per second) +/- 60° Win10 (32/64 bit), Win8, Win 7, Win XP;
...; F) 10% to 90% (non-condensing) 344 x 210 x 7 mm (13.54" x 8.27" x 0.28") 0.815 kg (1.8 lbs) 5W (Typical) < 1W Pen Item Type Power Supply Resolution Pressure Sensitivity Report Rate Pen Tilt Angle OS Supported Specifications Electromagnetic resonance Battery-less 5080 LPI (lines per inch) 8192 Average 266 PPS (points per second) +/- 60° Win10 (32/64 bit), Win8, Win 7, Win XP;
User Guide
Page 26
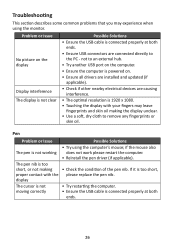
... computer is powered on the display Display interference The display is not clear Possible Solutions • Ensure the USB cable is connected properly at both ends. • Ensure USB connectors are causing interference. • The optimal resolution is not working does not work please restart the computer. • Reinstall the pen driver (if applicable). If it is too short, or not making the display unclear. • Use a soft...
... computer is powered on the display Display interference The display is not clear Possible Solutions • Ensure the USB cable is connected properly at both ends. • Ensure USB connectors are causing interference. • The optimal resolution is not working does not work please restart the computer. • Reinstall the pen driver (if applicable). If it is too short, or not making the display unclear. • Use a soft...

User Guide
Page 30
... if not installed and used in accordance with part 15 of the following measures: • Reorient or relocate the receiving antenna. • Increase the separation between the equipment and receiver. • Connect the equipment into an outlet on , the user is connected. • Consult the dealer or an experienced radio/TV technician for a Class B digital device, pursuant...
... if not installed and used in accordance with part 15 of the following measures: • Reorient or relocate the receiving antenna. • Increase the separation between the equipment and receiver. • Connect the equipment into an outlet on , the user is connected. • Consult the dealer or an experienced radio/TV technician for a Class B digital device, pursuant...

User Guide
Page 35
... instructions supplied with the product or installed by ViewSonic®. ͫ Damage to or loss of any programs, data, or removable storage media. ͫ Normal wear and tear. ͫ Removal or installation of the product. • Software or data loss occurring during repair or replacement. • Any damage of any unauthorized hardware parts or components (e.g. system board, display panel, power board) may include remanufactured or refurbished parts...
... instructions supplied with the product or installed by ViewSonic®. ͫ Damage to or loss of any programs, data, or removable storage media. ͫ Normal wear and tear. ͫ Removal or installation of the product. • Software or data loss occurring during repair or replacement. • Any damage of any unauthorized hardware parts or components (e.g. system board, display panel, power board) may include remanufactured or refurbished parts...

User Guide
Page 36
... described in the product User Guide. • Removal, installation, and set-up service charges, including wall-mounting of the product. Limitation of implied warranties: There are no warranties, express or implied, which does not relate to a product defect. • Damage caused by the customer. • Hardware/Accessories/Parts/Components - Installation of the nearest ViewSonic® service center, contact ViewSonic®. Projector Lamps). •...
... described in the product User Guide. • Removal, installation, and set-up service charges, including wall-mounting of the product. Limitation of implied warranties: There are no warranties, express or implied, which does not relate to a product defect. • Damage caused by the customer. • Hardware/Accessories/Parts/Components - Installation of the nearest ViewSonic® service center, contact ViewSonic®. Projector Lamps). •...

User Guide
Page 38
... attempted repair, or failure to follow instructions supplied with a like product. What the warranty excludes and does not cover: • Any product on which the serial number has been defaced, modified or removed. • Damage, deterioration, or malfunction resulting from: ͫ Accident, misuse, neglect, fire, water, lightning, or other acts of time. • Removal, installation, insurance, and set-up service charges...
... attempted repair, or failure to follow instructions supplied with a like product. What the warranty excludes and does not cover: • Any product on which the serial number has been defaced, modified or removed. • Damage, deterioration, or malfunction resulting from: ͫ Accident, misuse, neglect, fire, water, lightning, or other acts of time. • Removal, installation, insurance, and set-up service charges...


