User Manual
Page 2
Contents TCO Informational i Compliance Information 1 Important Safety Instructions 2 Copyright Information 3 Product Registration 3 Getting Started Package Contents 4 Precautions ...4 Quick Installation 5 Using the Monitor Setting the Timing Mode 6 Adjusting the Screen Image 7 OSD Lock Settings 8 Main Menu Controls 9 Other Information Specifications 11 Troubleshooting 12 Customer Support 13 Cleaning the Monitor 14 Limited Warranty 15 ViewSonic G90f/G90fB
Contents TCO Informational i Compliance Information 1 Important Safety Instructions 2 Copyright Information 3 Product Registration 3 Getting Started Package Contents 4 Precautions ...4 Quick Installation 5 Using the Monitor Setting the Timing Mode 6 Adjusting the Screen Image 7 OSD Lock Settings 8 Main Menu Controls 9 Other Information Specifications 11 Troubleshooting 12 Customer Support 13 Cleaning the Monitor 14 Limited Warranty 15 ViewSonic G90f/G90fB
User Manual
Page 7
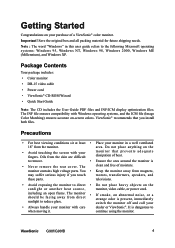
.... Package Contents Your package includes: • Color monitor • DB-15 video cable • Power cord • ViewSonic® CD-ROM Wizard • Quick Start Guide Note: The CD includes the User Guide PDF files and INF/ICM display optimization files. The clean and free of heat. Save the original box and all packing material for future shipping needs. Important! Precautions • For best viewing conditions sit at least • Place...
.... Package Contents Your package includes: • Color monitor • DB-15 video cable • Power cord • ViewSonic® CD-ROM Wizard • Quick Start Guide Note: The CD includes the User Guide PDF files and INF/ICM display optimization files. The clean and free of heat. Save the original box and all packing material for future shipping needs. Important! Precautions • For best viewing conditions sit at least • Place...
User Manual
Page 8
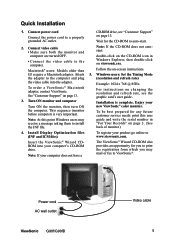
... install the INF file. 4. For instructions on changing the resolution and refresh rate, see "Customer Support" on viewsonic.exe. Attach the adapter to auto-start. Power cord AC wall outlet ViewSonic G90f/G90fB Video cable 5 Quick Installation 1. Connect power cord Connect the power cord to the computer. Enjoy your computer's CD-ROM drive. This sequence (monitor before computer) is complete. To be best prepared for the CD-ROM to the computer and plug the video cable into your new ViewSonic® color monitor...
... install the INF file. 4. For instructions on changing the resolution and refresh rate, see "Customer Support" on viewsonic.exe. Attach the adapter to auto-start. Power cord AC wall outlet ViewSonic G90f/G90fB Video cable 5 Quick Installation 1. Connect power cord Connect the power cord to the computer. Enjoy your computer's CD-ROM drive. This sequence (monitor before computer) is complete. To be best prepared for the CD-ROM to the computer and plug the video cable into your new ViewSonic® color monitor...
User Manual
Page 9
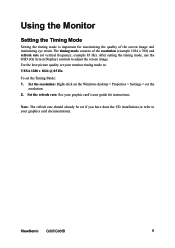
... mode, use the OSD (On Screen Display) controls to : VESA 1280 x 1024 @ 85 Hz. The timing mode consists of the screen image and minimizing eye strain. Note: The refresh rate should already be set the resolution. 2. ViewSonic G90f/G90fB 6 Using the Monitor Setting the Timing Mode Setting the timing mode is important for instructions. For the best picture quality set the Timing Mode: 1. To set your graphic card's user guide for maximizing the quality of the resolution (example 1024 x 768) and refresh rate (or vertical frequency...
... mode, use the OSD (On Screen Display) controls to : VESA 1280 x 1024 @ 85 Hz. The timing mode consists of the screen image and minimizing eye strain. Note: The refresh rate should already be set the resolution. 2. ViewSonic G90f/G90fB 6 Using the Monitor Setting the Timing Mode Setting the timing mode is important for instructions. For the best picture quality set the Timing Mode: 1. To set your graphic card's user guide for maximizing the quality of the resolution (example 1024 x 768) and refresh rate (or vertical frequency...

User Manual
Page 10
... in this user guide. Power LED Green = ON Orange = Power Saving Power On/Off ViewSonic G90f/G90fB 7 Displays the Main Menu or exits the control screen and saves adjustments. • Displays the control screen for the highlighted control. • Also toggles between two controls on page 9. Adjusting the Screen Image Use the buttons on the front control panel to the original factory settings if the display is operating in a factory preset timing mode listed in "Main Menu Controls" on some screens. EXIT CJONTRAST / BRIGHTNESS ZOOM H.POSITION / SIZE V.POSITION / SIZE PINCUSHION...
... in this user guide. Power LED Green = ON Orange = Power Saving Power On/Off ViewSonic G90f/G90fB 7 Displays the Main Menu or exits the control screen and saves adjustments. • Displays the control screen for the highlighted control. • Also toggles between two controls on page 9. Adjusting the Screen Image Use the buttons on the front control panel to the original factory settings if the display is operating in a factory preset timing mode listed in "Main Menu Controls" on some screens. EXIT CJONTRAST / BRIGHTNESS ZOOM H.POSITION / SIZE V.POSITION / SIZE PINCUSHION...
User Manual
Page 11
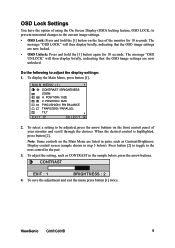
... "OSD UNLOCK" will then display briefly, indicating that the OSD image settings are listed in pairs, such as CONTRAST in the pair. 3. Note: Some controls on the Main Menu are now unlocked. To select a setting to adjust the display settings: 1. The message "OSD LOCK" will then display briefly, indicating that the OSD image settings are now locked. • OSD Unlock: Press and hold the [1] button on the front control panel of the monitor for 10 seconds. ViewSonic G90f...
... "OSD UNLOCK" will then display briefly, indicating that the OSD image settings are listed in pairs, such as CONTRAST in the pair. 3. Note: Some controls on the Main Menu are now unlocked. To select a setting to adjust the display settings: 1. The message "OSD LOCK" will then display briefly, indicating that the OSD image settings are now locked. • OSD Unlock: Press and hold the [1] button on the front control panel of the monitor for 10 seconds. ViewSonic G90f...
User Manual
Page 13
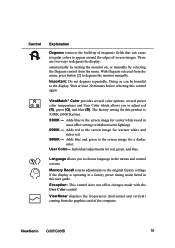
... two ways to the screen image for red, green, and blue. Adds blue and green to degauss the display: automatically by turning the monitor on, or manually by selecting the Degauss control from the graphics card of the computer. Exception: This control does not affect changes made with fluorescent lighting). 6500K - ViewMeter displays the frequencies (horizontal and vertical) coming from the menu. Wait at least 20 minutes before selecting this user guide.
... two ways to the screen image for red, green, and blue. Adds blue and green to degauss the display: automatically by turning the monitor on, or manually by selecting the Degauss control from the graphics card of the computer. Exception: This control does not affect changes made with fluorescent lighting). 6500K - ViewMeter displays the frequencies (horizontal and vertical) coming from the menu. Wait at least 20 minutes before selecting this user guide.
User Manual
Page 14
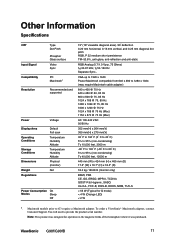
... LED) < 2 W 1. ViewSonic G90f/G90fB 11 Macintosh models prior to provide the product serial number. You will need to G3 require a Macintosh adapter. Other Information Specifications CRT Input Signal Compatibility Resolution Type Dot Pitch Phosphor Glass surface Video Sync PC Macintosh1 Recommended and supported Power Display Area Operating Conditions Storage Conditions Dimensions Weight Regulations Voltage Default Full scan Temperature Humidity Altitude Temperature Humidity Altitude Physical (monitor) Net Power Consumption On Modes Sleep...
... LED) < 2 W 1. ViewSonic G90f/G90fB 11 Macintosh models prior to provide the product serial number. You will need to G3 require a Macintosh adapter. Other Information Specifications CRT Input Signal Compatibility Resolution Type Dot Pitch Phosphor Glass surface Video Sync PC Macintosh1 Recommended and supported Power Display Area Operating Conditions Storage Conditions Dimensions Weight Regulations Voltage Default Full scan Temperature Humidity Altitude Temperature Humidity Altitude Physical (monitor) Net Power Consumption On Modes Sleep...

User Manual
Page 15
... graphics card, contact ViewSonic® Customer Support. To enable your computer can use non-interlaced mode at a time. Connect the monitor to make sure it to verify the refresh rate (vertical frequency) is ON but no screen image • Make sure the video cable supplied with another power source, graphics card, or computer system. • Connect the video cable securely. Entire screen image rolls vertically • Make sure video input signals are missing, check the video cable to a different outlet. Troubleshooting No power • Make sure power button (or switch...
... graphics card, contact ViewSonic® Customer Support. To enable your computer can use non-interlaced mode at a time. Connect the monitor to make sure it to verify the refresh rate (vertical frequency) is ON but no screen image • Make sure the video cable supplied with another power source, graphics card, or computer system. • Connect the video cable securely. Entire screen image rolls vertically • Make sure video input signals are missing, check the video cable to a different outlet. Troubleshooting No power • Make sure power button (or switch...
User Manual
Page 18
... three (3) years for all parts excluding the display tube, and three (3) years for an extended period of the product. If a product proves to an authorized ViewSonic® service center or ViewSonic®. 4. Removal or installation of time. 4. Any product exhibiting a condition commonly known as electric power fluctuations or failure. Warranty_VSMON Rev. 1c 4.3: ViewSonic CRT Monitor Warranty ViewSonic G90f/G90fB 1 of the fi...
... three (3) years for all parts excluding the display tube, and three (3) years for an extended period of the product. If a product proves to an authorized ViewSonic® service center or ViewSonic®. 4. Removal or installation of time. 4. Any product exhibiting a condition commonly known as electric power fluctuations or failure. Warranty_VSMON Rev. 1c 4.3: ViewSonic CRT Monitor Warranty ViewSonic G90f/G90fB 1 of the fi...
Brochure
Page 1
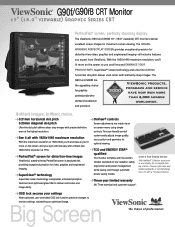
... the screen so you expect from ViewSonic. The AWARDWINNING PERFECTFLAT SCREEN provides exceptional precision for optimal viewing. 1600x1200 resolution at the highest resolution. The G90f and G90fB are made via an Ultra-fine dot pitch delivers clear, crisp images with a flicker-free system easily adjusts image quality, size, position and geometry for distortion-free video, graphics and engineered imaging-all with brilliantly sharp images. Brilliant images, brilliant choice. >0.21mm horizontal dot...
... the screen so you expect from ViewSonic. The AWARDWINNING PERFECTFLAT SCREEN provides exceptional precision for optimal viewing. 1600x1200 resolution at the highest resolution. The G90f and G90fB are made via an Ultra-fine dot pitch delivers clear, crisp images with a flicker-free system easily adjusts image quality, size, position and geometry for distortion-free video, graphics and engineered imaging-all with brilliantly sharp images. Brilliant images, brilliant choice. >0.21mm horizontal dot...
Brochure
Page 2
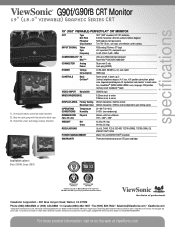
....0" VIEWABLE) PERFECTFLAT® CRT MONITOR CRT Type 19.0" (18.0" viewable) CRT, 90° deflection Dot Pitch 0.21mm horizontal x 0.14mm vertical; 0.25mm diagonal Phosphor RGB medium-short persistence Glass Surface Tint: TM~52.6%, anti-static, anti-reflection screen coating INPUT SIGNAL Video Sync Frequency RGB analog (75 ohms, 0.7 Vp-p) H/V separated (TTL), composite sync Fh:30~97kHz, Fv:50~180Hz COMPATIBILITY PC Mac®** VGA up , 2 Contrast, brightness degauss, H./V. size, H./V. Copyright © 2005 ViewSonic Corporation.
....0" VIEWABLE) PERFECTFLAT® CRT MONITOR CRT Type 19.0" (18.0" viewable) CRT, 90° deflection Dot Pitch 0.21mm horizontal x 0.14mm vertical; 0.25mm diagonal Phosphor RGB medium-short persistence Glass Surface Tint: TM~52.6%, anti-static, anti-reflection screen coating INPUT SIGNAL Video Sync Frequency RGB analog (75 ohms, 0.7 Vp-p) H/V separated (TTL), composite sync Fh:30~97kHz, Fv:50~180Hz COMPATIBILITY PC Mac®** VGA up , 2 Contrast, brightness degauss, H./V. size, H./V. Copyright © 2005 ViewSonic Corporation.
Service Manual
Page 4
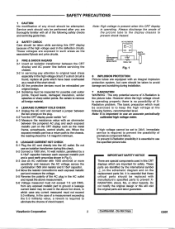
.... Note: High voltage is the picture tube. Note: It is found, replace all foreign material. 4 LEAKAGE CURRENT COLD CHECK 4-1 Unplug the AC cord and connect a jumper between the two prongs on the plug. 4-2 Turn the CRT display power switch "on". 4-3 Measure the resistance value with an ohmmeter between the CRT display and AC power line before servicing the chassis. 3-2 In servicing pay attention to prevent XRADIATION...
.... Note: High voltage is the picture tube. Note: It is found, replace all foreign material. 4 LEAKAGE CURRENT COLD CHECK 4-1 Unplug the AC cord and connect a jumper between the two prongs on the plug. 4-2 Turn the CRT display power switch "on". 4-3 Measure the resistance value with an ohmmeter between the CRT display and AC power line before servicing the chassis. 3-2 In servicing pay attention to prevent XRADIATION...

Service Manual
Page 5
Electrical specification A. Screen characteristics 4.4 Picture display size 4.5 Picture center 4.6 Linearity 4.7 Picture distortion 4.8 Misconvergence 4.9 Focus 4.10 Jitters 4.11 White balance 4.12 Light output 4.13 Brightness uniformity 4.14 Size regulation 5. Input requirements 2.1 AC power supply 2.2 Video interface 2.3 Scanning frequency 3. Adjustment control 3.1 User control 3.2 OSD adjustment function 3.3 LED indication 4. Environmental condition Si Temp and humidity at operation 5.2 Temp and humidity at storage 5.3 Vibration test (packaged) 5.4 Drop test (packaged) 5.5 Altitude...
Electrical specification A. Screen characteristics 4.4 Picture display size 4.5 Picture center 4.6 Linearity 4.7 Picture distortion 4.8 Misconvergence 4.9 Focus 4.10 Jitters 4.11 White balance 4.12 Light output 4.13 Brightness uniformity 4.14 Size regulation 5. Input requirements 2.1 AC power supply 2.2 Video interface 2.3 Scanning frequency 3. Adjustment control 3.1 User control 3.2 OSD adjustment function 3.3 LED indication 4. Environmental condition Si Temp and humidity at operation 5.2 Temp and humidity at storage 5.3 Vibration test (packaged) 5.4 Drop test (packaged) 5.5 Altitude...

Service Manual
Page 8
...J model : T-mark 2.2.1 RGB video 2.2.2 Max PC video signal 2.2.3 Max MAC video signal 2.2.4 Sync signal : Analog, 0.7Vp-p, positive, input impedance 75ohm. : 950mV with no damage to monitor. : 1250mV with no damage to 180Hz -> G90fi ViewSonic Corporation 6 Confidential - Signal 1 Red 2 Green 3 Blue 4 Ground 5 Ground 6 R Return 7 G Return 8 B Return 9 5V (G90f) 10 Ground 11 Ground 12 SDA 13 H. Do Not Copy Pin No. Signal Pin No. Sync 14 V. Sync 15 SCL 2.2.6 Signal memory modes : 13 preset modes(G90f/ ,) 2.2.7 Plug & play 18 user modes, see...
...J model : T-mark 2.2.1 RGB video 2.2.2 Max PC video signal 2.2.3 Max MAC video signal 2.2.4 Sync signal : Analog, 0.7Vp-p, positive, input impedance 75ohm. : 950mV with no damage to monitor. : 1250mV with no damage to 180Hz -> G90fi ViewSonic Corporation 6 Confidential - Signal 1 Red 2 Green 3 Blue 4 Ground 5 Ground 6 R Return 7 G Return 8 B Return 9 5V (G90f) 10 Ground 11 Ground 12 SDA 13 H. Do Not Copy Pin No. Signal Pin No. Sync 14 V. Sync 15 SCL 2.2.6 Signal memory modes : 13 preset modes(G90f/ ,) 2.2.7 Plug & play 18 user modes, see...
Service Manual
Page 16
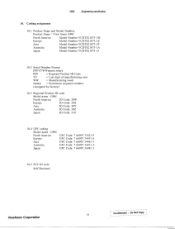
... number (Assigned by factory) 10.3 Regional Product ID code Model name : G90f North America ID Code: 30W Europe ID Code: 30X Asia ID Code: 30Y Australia ID Code: 30Z Japan ID Code: 310 10.4 UPC coding Model name : G90f North America Europe Asia Australia Japan UPC Code: 7 66907 33421 0 UPC Code: 7 66907 34451 6 UPC Code: 7 66907 34461 5 UPC Code: 7 66907 34471 4 UPC Code: 7 66907 34481 3 10.5 FCC ID code Self-Declared ViewSonic Corporation Confidential - 0_92 Engineering specification...
... number (Assigned by factory) 10.3 Regional Product ID code Model name : G90f North America ID Code: 30W Europe ID Code: 30X Asia ID Code: 30Y Australia ID Code: 30Z Japan ID Code: 310 10.4 UPC coding Model name : G90f North America Europe Asia Australia Japan UPC Code: 7 66907 33421 0 UPC Code: 7 66907 34451 6 UPC Code: 7 66907 34461 5 UPC Code: 7 66907 34471 4 UPC Code: 7 66907 34481 3 10.5 FCC ID code Self-Declared ViewSonic Corporation Confidential - 0_92 Engineering specification...

Service Manual
Page 20
... = VSC Product ID Code = 0105 Last 5 Digits of Serial Number = Not Used Week of Manufacture = 01 Year of Manufacture = 2000 Complete Serial Number = See Descriptor Block EDID Version Number = 1 EDID Revision Number = 3 VIDEO INPUT DEFINITION: Analog Signal 0.700, 0.300 (1.000 Vp-p) Serration of the Vsync, Composite Sync, Separate Synes, Blank-to-Black Setup Maximum Horizontal Image Size = 370mm Maximum Vertical Image Size = 270mm Display Gamma = 2.76 DPMS and Supported Feature(s): ViewSonic Corporation 18 Confidential - Do...
... = VSC Product ID Code = 0105 Last 5 Digits of Serial Number = Not Used Week of Manufacture = 01 Year of Manufacture = 2000 Complete Serial Number = See Descriptor Block EDID Version Number = 1 EDID Revision Number = 3 VIDEO INPUT DEFINITION: Analog Signal 0.700, 0.300 (1.000 Vp-p) Serration of the Vsync, Composite Sync, Separate Synes, Blank-to-Black Setup Maximum Horizontal Image Size = 370mm Maximum Vertical Image Size = 270mm Display Gamma = 2.76 DPMS and Supported Feature(s): ViewSonic Corporation 18 Confidential - Do...

Service Manual
Page 55
... its characteristic impedance. 5. screen VR set at any possible settings of 400 to MIN. 2. Power supply alignment 2.1 Input VESA 1024x768 / 75Hz mode & cross-hatch pattern. 2.2 Adjust VR201 until voltage at the monitor's input jacks or in an unstable state within 30 section after turn-on and off, unplugging of power or signal, erratic, Wrong frequency of the power supply board are hot ground The remaining boards are measured assuming...
... its characteristic impedance. 5. screen VR set at any possible settings of 400 to MIN. 2. Power supply alignment 2.1 Input VESA 1024x768 / 75Hz mode & cross-hatch pattern. 2.2 Adjust VR201 until voltage at the monitor's input jacks or in an unstable state within 30 section after turn-on and off, unplugging of power or signal, erratic, Wrong frequency of the power supply board are hot ground The remaining boards are measured assuming...

Service Manual
Page 59
... ViewSonic Corporation Confidential - Video preset condition 8.1 Apply VESA 1024x768 / 75Hz. 8.2 Display size width: 357 ± 4mm, height: 268 ± 4mm. 8.3 C ONTRAST 100 8.4 BRIGHTNESS "100" 8.5 RCUT, GCUT , BCUT "30" 8.6 RGAIN, GGAIN, BGAIN "200" 8.7 G1 "100" (Range 50 - 205) 9. F1 control for HORIZONTAL LINE; Do Not Copy 57 individual; F2 control for VERTICAL LINE; G'90f. 9.1.2 Adjust "RCUT", "GCUT", "BCUT" to get color coordination. L 7. c2911)/ Adjusting procedure 6.2.11 Adjust vertical...
... ViewSonic Corporation Confidential - Video preset condition 8.1 Apply VESA 1024x768 / 75Hz. 8.2 Display size width: 357 ± 4mm, height: 268 ± 4mm. 8.3 C ONTRAST 100 8.4 BRIGHTNESS "100" 8.5 RCUT, GCUT , BCUT "30" 8.6 RGAIN, GGAIN, BGAIN "200" 8.7 G1 "100" (Range 50 - 205) 9. F1 control for HORIZONTAL LINE; Do Not Copy 57 individual; F2 control for VERTICAL LINE; G'90f. 9.1.2 Adjust "RCUT", "GCUT", "BCUT" to get color coordination. L 7. c2911)/ Adjusting procedure 6.2.11 Adjust vertical...

Service Manual
Page 62
...E2PROM data (one mode adjustment value). 2.4 Get 9300 : get color 9300K to adjust . 2.5 Get 6500 : get color 6500K to adjust .. 2.6 Get 5000 : get color 5000K to adjust . 2.7 Save color : save current color temperature data . 2.6 Save geometry : Save geometry adjustment data. 2.7 Save parameter : Save adjustment data to monitor Signal cable Read E2 PROM data form monitor RS232 PC Monitor ViewSonic Corporation 60 Confidential - Fixture Connect. Do Not Copy Pattern Generator Output : H/V SYNC Video Signal cable C Input : H/V SYNC Video Initial data Adjustment II A Initial...
...E2PROM data (one mode adjustment value). 2.4 Get 9300 : get color 9300K to adjust . 2.5 Get 6500 : get color 6500K to adjust .. 2.6 Get 5000 : get color 5000K to adjust . 2.7 Save color : save current color temperature data . 2.6 Save geometry : Save geometry adjustment data. 2.7 Save parameter : Save adjustment data to monitor Signal cable Read E2 PROM data form monitor RS232 PC Monitor ViewSonic Corporation 60 Confidential - Fixture Connect. Do Not Copy Pattern Generator Output : H/V SYNC Video Signal cable C Input : H/V SYNC Video Initial data Adjustment II A Initial...


