User Guide
Page 5
CONTENTS Getting Started Package Contents E Precautions N G Quick Installation* L Operation H Front Control Panel Main Menu Other Information Specifications Troubleshooting Cleaning the Monitor Limited Warranty Customer Support 5 5 6 7 7 10 11 12 13 back cover •To meet your future needs, and to receive any additional product information as it becomes available, please register your monitor's warranty on the Internet at: http://www.viewsonic.com. 4 Getting Started ViewSonic E771
CONTENTS Getting Started Package Contents E Precautions N G Quick Installation* L Operation H Front Control Panel Main Menu Other Information Specifications Troubleshooting Cleaning the Monitor Limited Warranty Customer Support 5 5 6 7 7 10 11 12 13 back cover •To meet your future needs, and to receive any additional product information as it becomes available, please register your monitor's warranty on the Internet at: http://www.viewsonic.com. 4 Getting Started ViewSonic E771

User Guide
Page 6
I II •. Important! iti Congratulations on your purchase of a ViewSonic E771 color monitor. Save the original box and all packing material for future shipping needs.
I II •. Important! iti Congratulations on your purchase of a ViewSonic E771 color monitor. Save the original box and all packing material for future shipping needs.
User Guide
Page 7
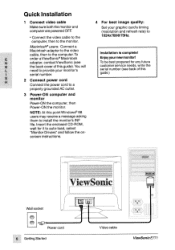
...® users: Connect a Macintosh adapter to the video cable, then to auto-load, select "Monitor Drivers" and follow the onscreen instructions. ®d Vi&wSonic I I Wall socket Power cord 6 Getting Started Video cable ViewSonic E771 To Installation is complete! Enjoy your monitor's serial number. NOTE: At this guide.) S H 2 Connect power cord Connect the power cord...
...® users: Connect a Macintosh adapter to the video cable, then to auto-load, select "Monitor Drivers" and follow the onscreen instructions. ®d Vi&wSonic I I Wall socket Power cord 6 Getting Started Video cable ViewSonic E771 To Installation is complete! Enjoy your monitor's serial number. NOTE: At this guide.) S H 2 Connect power cord Connect the power cord...
User Guide
Page 8
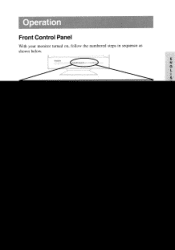
p. s. Front Control Panel With your monitor turned on, follow the numbered steps in sequence as shown below. CIE ii
p. s. Front Control Panel With your monitor turned on, follow the numbered steps in sequence as shown below. CIE ii

User Guide
Page 10
DEGAUSS corrects irregular colors appearing around edges of magnetic fields that can be harmful to manually degauss monitor. N Degaussing removes build-up of screen imates. Doing so can affect color purity and convergence. important: After using Degauss wait al least 20 minutes before using this feature again. Press button [2] to the monitor VIEWMETER® (Display Frequency) displays signal input coming E from your computer. Do not degauss repeatedly. To exit a screen and save changes, press button [1].
DEGAUSS corrects irregular colors appearing around edges of magnetic fields that can be harmful to manually degauss monitor. N Degaussing removes build-up of screen imates. Doing so can affect color purity and convergence. important: After using Degauss wait al least 20 minutes before using this feature again. Press button [2] to the monitor VIEWMETER® (Display Frequency) displays signal input coming E from your computer. Do not degauss repeatedly. To exit a screen and save changes, press button [1].

User Guide
Page 12
Troubleshooting No power • Make sure power button (or switch) is ON. • Make sure A/C power cord is supplying proper voltage. Power on but no screen image • Make sure the video cable supplied with the monitor is tightly secured to verify that the outlet is securely connected to the back of the monitor and to a power outlet. • Plug another electrical device (like a radio) into the power outlet to
Troubleshooting No power • Make sure power button (or switch) is ON. • Make sure A/C power cord is supplying proper voltage. Power on but no screen image • Make sure the video cable supplied with the monitor is tightly secured to verify that the outlet is securely connected to the back of the monitor and to a power outlet. • Plug another electrical device (like a radio) into the power outlet to

User Guide
Page 13
Cleaning the Monitor
Cleaning the Monitor
User Guide
Page 14
...water, lightning, or other acts of the first consumer purchase. Who the warranty protects: This warranty is effective: ViewSonic E771 color monitors, including the display tubes, are warranted for three (3) years for all parts and three (3) years for the first consumer purchaser. ...may include remanufactured or refurbished parts or components. LIMITED WARRANTY VIEWSONIC E771 MONITORS What the warranty covers: ViewSonic® warrants its products to be defective in material and workmanship during the warranty period, ViewSonic will at its sole option repair or replace the product ...
...water, lightning, or other acts of the first consumer purchase. Who the warranty protects: This warranty is effective: ViewSonic E771 color monitors, including the display tubes, are warranted for three (3) years for all parts and three (3) years for the first consumer purchaser. ...may include remanufactured or refurbished parts or components. LIMITED WARRANTY VIEWSONIC E771 MONITORS What the warranty covers: ViewSonic® warrants its products to be defective in material and workmanship during the warranty period, ViewSonic will at its sole option repair or replace the product ...


